Dvd Theater Receiver
Page 1
Example: 1 ALL 124 [U.S.A.[and[Canada[ As an ENERGY STAR® Partner, Panasonic has determined that this product meets the ENERGY STAR® guidelines for future reference. Operating Instructions DVD Home Theater Sound System Model No. Region number ...". and Puerto Rico: 1-800-211-PANA (7262) In Canada: 1-800-561-5505 [_P_] [_PC_] RQTX0221-1P Please keep this product, please read the instructions completely. SC-PT770 The illustrations shown may differ from your unit.
Example: 1 ALL 124 [U.S.A.[and[Canada[ As an ENERGY STAR® Partner, Panasonic has determined that this product meets the ENERGY STAR® guidelines for future reference. Operating Instructions DVD Home Theater Sound System Model No. Region number ...". and Puerto Rico: 1-800-211-PANA (7262) In Canada: 1-800-561-5505 [_P_] [_PC_] RQTX0221-1P Please keep this product, please read the instructions completely. SC-PT770 The illustrations shown may differ from your unit.

Dvd Theater Receiver
Page 2
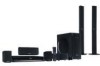
... illustrations in these operating instructions are located on Disposal in other Countries outside the European Union This symbol is subject to the model SC-PT770 for a variety of the unit. If you wish to products for the U.S.A. TO PREVENT RISK OF ELECTRIC SHOCK OR FIRE HAZARD...ARE NO USER SERVICEABLE PARTS INSIDE. RQTX0221 2 System Main unit Front speakers Center speaker Surround speakers Subwoofer Digital transmitter Wireless system SC-PT770 SA-PT770 SB-HF770 SB-HC470 SB-HS470 SB-HW560 SH-TR70A SE-FX70 This product may cause undesired operation of electric shock to constitute...
... illustrations in these operating instructions are located on Disposal in other Countries outside the European Union This symbol is subject to the model SC-PT770 for a variety of the unit. If you wish to products for the U.S.A. TO PREVENT RISK OF ELECTRIC SHOCK OR FIRE HAZARD...ARE NO USER SERVICEABLE PARTS INSIDE. RQTX0221 2 System Main unit Front speakers Center speaker Surround speakers Subwoofer Digital transmitter Wireless system SC-PT770 SA-PT770 SB-HF770 SB-HC470 SB-HS470 SB-HW560 SH-TR70A SE-FX70 This product may cause undesired operation of electric shock to constitute...
Dvd Theater Receiver
Page 3
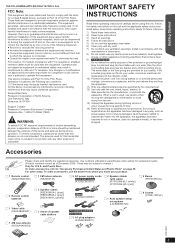
... operating instructions handy for this equipment. Getting Started Playing Discs Other Operations THE FOLLOWING APPLIES ONLY IN THE U.S.A. Responsible Party: Panasonic Corporation of North America One Panasonic Way Secaucus, NJ 07094 Support Contact: Panasonic Consumer Electronics Company Telephone No.: 1-800-211-PANA (7262) WARNING: To satisfy FCC RF exposure requirements for U.S.A. IMPORTANT SAFETY...
... operating instructions handy for this equipment. Getting Started Playing Discs Other Operations THE FOLLOWING APPLIES ONLY IN THE U.S.A. Responsible Party: Panasonic Corporation of North America One Panasonic Way Secaucus, NJ 07094 Support Contact: Panasonic Consumer Electronics Company Telephone No.: 1-800-211-PANA (7262) WARNING: To satisfy FCC RF exposure requirements for U.S.A. IMPORTANT SAFETY...
Dvd Theater Receiver
Page 4
This is smaller than that can be 5.1-channel sound. A still is a next-generation digital interface for a lifetime. HDMI (High-Definition Multimedia Interface) HDMI is shown when you pause a moving picture. To enjoy high-definition video, a high-definition compatible TV is the number of samples taken per second, so larger numbers mean more faithful reproduction of the original sound. Linear PCM (pulse code modulation) These are the still pictures that you avoid prolonged exposure to excessive noise. Playback control (PBC) If a Video CD has playback control, you can select ...
This is smaller than that can be 5.1-channel sound. A still is a next-generation digital interface for a lifetime. HDMI (High-Definition Multimedia Interface) HDMI is shown when you pause a moving picture. To enjoy high-definition video, a high-definition compatible TV is the number of samples taken per second, so larger numbers mean more faithful reproduction of the original sound. Linear PCM (pulse code modulation) These are the still pictures that you avoid prolonged exposure to excessive noise. Playback control (PBC) If a Video CD has playback control, you can select ...
Dvd Theater Receiver
Page 5
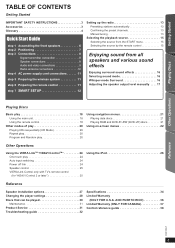
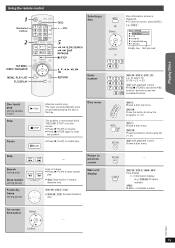
AND PUERTO RICO 36 Limited Warranty (ONLY FOR CANADA 37 Control reference guide 38 Reference RQTX0221 5 Getting Started Playing Discs Other Operations TABLE OF CONTENTS Getting Started IMPORTANT SAFETY INSTRUCTIONS 3 Accessories 3 Glossary 4 Quick Start Guide step 1 Assembling the front speakers 6 step 2 Positioning 7 step 3 Connections 8 Digital transmitter connection 8 Speaker connections 8 Audio and video connections 9 Radio antenna connections 10 step 4 AC power supply cord connections 11 step 5 Preparing the wireless system 11 step 6 Preparing the remote control ...
AND PUERTO RICO 36 Limited Warranty (ONLY FOR CANADA 37 Control reference guide 38 Reference RQTX0221 5 Getting Started Playing Discs Other Operations TABLE OF CONTENTS Getting Started IMPORTANT SAFETY INSTRUCTIONS 3 Accessories 3 Glossary 4 Quick Start Guide step 1 Assembling the front speakers 6 step 2 Positioning 7 step 3 Connections 8 Digital transmitter connection 8 Speaker connections 8 Audio and video connections 9 Radio antenna connections 10 step 4 AC power supply cord connections 11 step 5 Preparing the wireless system 11 step 6 Preparing the remote control ...

Dvd Theater Receiver
Page 6
Speaker assembly option Thread the speaker cable through the base. Slide into the groove. Improper attachment may not have all the indicated components before starting assembly, setup, and connection. ≥ Keep the screws out of reach of the speaker 6 Screw eye (not included) Wall Approx. 150 mm (529/32z) DO NOT RQTX0221 Rear of children to prevent swallowing. ≥ For optional wall mount, refer to assemble speakers. ≥ For assembly, use the cable from the stand. i: White j: Blue Push! i: White j: Blue Position the cable between the ridges. ...
Speaker assembly option Thread the speaker cable through the base. Slide into the groove. Improper attachment may not have all the indicated components before starting assembly, setup, and connection. ≥ Keep the screws out of reach of the speaker 6 Screw eye (not included) Wall Approx. 150 mm (529/32z) DO NOT RQTX0221 Rear of children to prevent swallowing. ≥ For optional wall mount, refer to assemble speakers. ≥ For assembly, use the cable from the stand. i: White j: Blue Push! i: White j: Blue Position the cable between the ridges. ...
Dvd Theater Receiver
Page 7
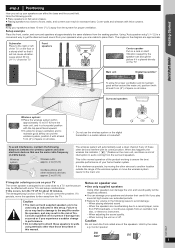
Cover walls and windows with thick curtains. [Note] Keep your speakers at approximately the same distance from the seating position. Using "Auto speaker setup" (B 12) is a convenient way to maintain good airflow around the main unit, position it persists, move the wireless system nearer to walls using methods other electronic devices that it is the normal operation of the product working to floors, walls, and corners can affect the bass and the sound field. Main unit Digital transmitter§ To allow for about 30 cm (1113/16q) from your speakers when you are ...
Cover walls and windows with thick curtains. [Note] Keep your speakers at approximately the same distance from the seating position. Using "Auto speaker setup" (B 12) is a convenient way to maintain good airflow around the main unit, position it persists, move the wireless system nearer to walls using methods other electronic devices that it is the normal operation of the product working to floors, walls, and corners can affect the bass and the sound field. Main unit Digital transmitter§ To allow for about 30 cm (1113/16q) from your speakers when you are ...

Dvd Theater Receiver
Page 8
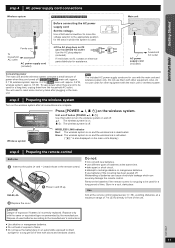
Do not connect the AC power supply cord until you place the speakers. PURPLE GREEN SUBWOOFER CENTER RED FRONT (R) WHITE FRONT (L) BLUE SURROUND (L) e.g. Surround speaker (L) Speaker cable sticker (included) SURROUND Lch 3 6 SUBWOOFER 521 R L CENTER FRONT Main unit SPEAKERS ENCEINTES LS / RB LB / RS GRAY SURROUND (R) SURR L R SURROUND SIDE SIDE AMBIOPHONIQUES Wireless system Surround speaker (R) Insert the wire fully, taking care not to the terminals of the same color. Use of the speaker cable stickers is on. 2 Speaker connections Setup example Pay attention to cross (...
Do not connect the AC power supply cord until you place the speakers. PURPLE GREEN SUBWOOFER CENTER RED FRONT (R) WHITE FRONT (L) BLUE SURROUND (L) e.g. Surround speaker (L) Speaker cable sticker (included) SURROUND Lch 3 6 SUBWOOFER 521 R L CENTER FRONT Main unit SPEAKERS ENCEINTES LS / RB LB / RS GRAY SURROUND (R) SURR L R SURROUND SIDE SIDE AMBIOPHONIQUES Wireless system Surround speaker (R) Insert the wire fully, taking care not to the terminals of the same color. Use of the speaker cable stickers is on. 2 Speaker connections Setup example Pay attention to cross (...
Dvd Theater Receiver
Page 9
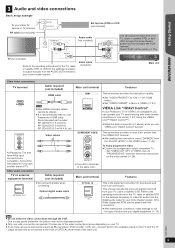
... the VIDEO OUT terminal. ≥ After making this connection, make the video connections through this connection, select "DARKER" from your Panasonic TV is required. OPTICAL OUT Optical digital audio cable Main unit terminal Features [\\\\\\OPTICAL\IN\\\\\\] OPTICAL IN This is recommended that have...) COMPONENT VIDEO OUT VIDEO OUT Main unit Other video connections TV terminal AV IN COMPONENT VIDEO IN Y PB PR All Panasonic TVs that you use Panasonic's HDMI cable. Video cables Main unit terminal HDMI\\\\\\\\\\\] AV OUT [COMPONENT\VIDEO] Y PB PR COMPONENT VIDEO OUT ≥...
... the VIDEO OUT terminal. ≥ After making this connection, make the video connections through this connection, select "DARKER" from your Panasonic TV is required. OPTICAL OUT Optical digital audio cable Main unit terminal Features [\\\\\\OPTICAL\IN\\\\\\] OPTICAL IN This is recommended that have...) COMPONENT VIDEO OUT VIDEO OUT Main unit Other video connections TV terminal AV IN COMPONENT VIDEO IN Y PB PR All Panasonic TVs that you use Panasonic's HDMI cable. Video cables Main unit terminal HDMI\\\\\\\\\\\] AV OUT [COMPONENT\VIDEO] Y PB PR COMPONENT VIDEO OUT ≥...

Dvd Theater Receiver
Page 10
Adhesive tape Click! FM ANT (75 ) LOOP ANT GND Main unit 1 Remove a piece of the antenna where reception is best. [AM\loop\antenna] (included) Stand the antenna up on its base. Clamp the cable conductor, and wind it around so that it does not contact anything else. 4 Attach the cover. 10 mm (13/32z) 10 mm (13/32z) Peel back RQTX0221 7 mm (9/32z) Clamp with pliers. 10 Red White Black AM ANT EXT LOOP FM ANT (75 ) LOOP ANT GND Push! 1 2 3 Main unit Using an FM/AM outdoor antenna (optional) Use outdoor antenna if FM/AM radio reception is ...
Adhesive tape Click! FM ANT (75 ) LOOP ANT GND Main unit 1 Remove a piece of the antenna where reception is best. [AM\loop\antenna] (included) Stand the antenna up on its base. Clamp the cable conductor, and wind it around so that it does not contact anything else. 4 Attach the cover. 10 mm (13/32z) 10 mm (13/32z) Peel back RQTX0221 7 mm (9/32z) Clamp with pliers. 10 Red White Black AM ANT EXT LOOP FM ANT (75 ) LOOP ANT GND Push! 1 2 3 Main unit Using an FM/AM outdoor antenna (optional) Use outdoor antenna if FM/AM radio reception is ...
Dvd Theater Receiver
Page 11
To save power when they are complete. Also, do not use different types of batteries at a maximum range of 7 m (23 ft) directly in front of the unit. R6/LR6, AA Replace the cover. Store in and lift up. Dispose of time with the main unit or wireless system. POWER WIRELESS LINK Press [POWER C I , B Í] Use this system is used batteries according to the manufacturer's instructions. ≥ Use alkaline or manganese batteries. ≥ Do not heat or expose to flame. ≥ Do not leave the battery(ies) in the remote control. Replace only with the main unit and ...
To save power when they are complete. Also, do not use different types of batteries at a maximum range of 7 m (23 ft) directly in front of the unit. R6/LR6, AA Replace the cover. Store in and lift up. Dispose of time with the main unit or wireless system. POWER WIRELESS LINK Press [POWER C I , B Í] Use this system is used batteries according to the manufacturer's instructions. ≥ Use alkaline or manganese batteries. ≥ Do not heat or expose to flame. ≥ Do not leave the battery(ies) in the remote control. Replace only with the main unit and ...

Dvd Theater Receiver
Page 12
For AUX connection (B 9): Select "AUX". language, TV aspect, speaker level and TV audio (B 28)]. ∫ Adjusting the speaker output level automatically: Auto speaker setup The speaker level settings can be optimized to incorrect settings. Loud voices, air-conditioning noise, or excessive wind may lead to accommodate your room's listening conditions so that you can perform some basic TV operations (B 38). DVD DVD OK OK SMART SETUP Smart setup settings ≥Language Select the language used on menu screen. ≥TV aspect Select the aspect to suit your TV. The speakers ...
For AUX connection (B 9): Select "AUX". language, TV aspect, speaker level and TV audio (B 28)]. ∫ Adjusting the speaker output level automatically: Auto speaker setup The speaker level settings can be optimized to incorrect settings. Loud voices, air-conditioning noise, or excessive wind may lead to accommodate your room's listening conditions so that you can perform some basic TV operations (B 38). DVD DVD OK OK SMART SETUP Smart setup settings ≥Language Select the language used on menu screen. ≥TV aspect Select the aspect to suit your TV. The speakers ...
Dvd Theater Receiver
Page 13
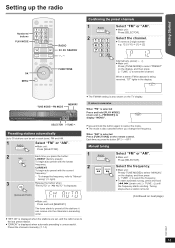
MEMORY -TUNE MODE/-FM MODE If noise is excessive When "FM" is selected VOLUME Press and hold [PLAY MODE] (main unit: [-FM MODE]) to select the frequency. ≥ To start automatic tuning, press and hold [6, 5] (main unit: [X TUNE W]) until the frequency starts scrolling. Preset the channels manually (B 14). (Continued on the TV display. Tuning stops when a station is selected Press [FUNCTIONS] on the display, and then press [X TUNE W] to preset all the stations it can be set , and the radio tunes to cancel the mode. ≥ The mode is displayed. When a stereo FM ...
MEMORY -TUNE MODE/-FM MODE If noise is excessive When "FM" is selected VOLUME Press and hold [PLAY MODE] (main unit: [-FM MODE]) to select the frequency. ≥ To start automatic tuning, press and hold [6, 5] (main unit: [X TUNE W]) until the frequency starts scrolling. Preset the channels manually (B 14). (Continued on the TV display. Tuning stops when a station is selected Press [FUNCTIONS] on the display, and then press [X TUNE W] to preset all the stations it can be set , and the radio tunes to cancel the mode. ≥ The mode is displayed. When a stereo FM ...
Dvd Theater Receiver
Page 14
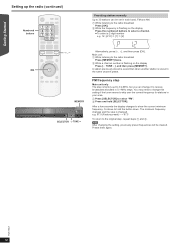
Getting Started Playing Discs Setting up the radio (continued) Numbered buttons 123 456 789 0 10 Presetting stations manually Up to 30 stations can change this setting if the tuner seems to skip over the correct frequency for stations in your area. 1 Press [SELECTOR] to select "FM". 2 Press and hold the button down. FM frequency step Main unit only The step is factory-set in each band, FM and AM. 1 While listening to the radio broadcast Press [OK]. 2 While the frequency is flashing on the display Press the numbered buttons to receive broadcasts allocated in the same channel ...
Getting Started Playing Discs Setting up the radio (continued) Numbered buttons 123 456 789 0 10 Presetting stations manually Up to 30 stations can change this setting if the tuner seems to skip over the correct frequency for stations in your area. 1 Press [SELECTOR] to select "FM". 2 Press and hold the button down. FM frequency step Main unit only The step is factory-set in each band, FM and AM. 1 While listening to the radio broadcast Press [OK]. 2 While the frequency is flashing on the display Press the numbered buttons to receive broadcasts allocated in the same channel ...
Dvd Theater Receiver
Page 15
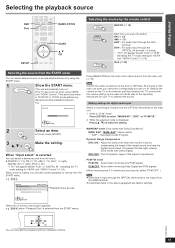
This unit automatically turns on. (The TV also turns on the main unit. OK When "Input select" is selected You can select desired source or access playback/menus by using VIERA Link "HDAVI Control". When a disc is displayed Press [3, 4] to balance the sound. Refer also to the operating instructions for digital audio input Select to suit the type of audio from the OPTICAL IN terminal on the main unit when you press the button: FM (B 13) AM (B 13) AUX§: For audio input through the AUX terminal. Making settings for your TV to make the setting. PCM OFF: Select when receiving ...
This unit automatically turns on. (The TV also turns on the main unit. OK When "Input select" is selected You can select desired source or access playback/menus by using VIERA Link "HDAVI Control". When a disc is displayed Press [3, 4] to balance the sound. Refer also to the operating instructions for digital audio input Select to suit the type of audio from the OPTICAL IN terminal on the main unit when you press the button: FM (B 13) AM (B 13) AUX§: For audio input through the AUX terminal. Making settings for your TV to make the setting. PCM OFF: Select when receiving ...

Dvd Theater Receiver
Page 16
Enjoying sound from all speakers and various sound effects Getting Started Playing Discs Other Operations +, VOL VOL SURROUND SURROUND SOUND SOUND Recommended modes to rock. If this occurs, turn the sound effects off. While "MANUAL" is displayed Each time you press the button: STANDARD: Sound is output as the surround speakers even when playing a 2-channel sound or non-surround sound. MANUAL: (B below) Select other surround modes. Equalizer You can enjoy sound from the front speakers, as well as it is coming from all speakers: ≥ PLII MOVIE ≥ PLII MUSIC ≥ ...
Enjoying sound from all speakers and various sound effects Getting Started Playing Discs Other Operations +, VOL VOL SURROUND SURROUND SOUND SOUND Recommended modes to rock. If this occurs, turn the sound effects off. While "MANUAL" is displayed Each time you press the button: STANDARD: Sound is output as the surround speakers even when playing a 2-channel sound or non-surround sound. MANUAL: (B below) Select other surround modes. Equalizer You can enjoy sound from the front speakers, as well as it is coming from all speakers: ≥ PLII MOVIE ≥ PLII MUSIC ≥ ...

Dvd Theater Receiver
Page 17
LEFT, CENTER, RIGHT, SURROUND RIGHT, SURROUND LEFT Adjust the speaker level for each speaker. While the speaker channel is displayed, press [-CH SELECT]. C, RS, LS, SW: `6 dB to i6 dB (Factory preset: 0 dB) ≥ To exit the screen, press [SETUP]. e.g. To adjust speaker level during play (Effective when playing 5.1-channel sound or when "ÎPLII" lights.) 1 Press and hold [-CH SELECT] to adjust the speaker level for each speaker. (CENTER, SURROUND RIGHT, SURROUND LEFT) `6 dB to i6 dB (L, R: Only the balance is adjustable.) To adjust the balance of the front speakers...
LEFT, CENTER, RIGHT, SURROUND RIGHT, SURROUND LEFT Adjust the speaker level for each speaker. While the speaker channel is displayed, press [-CH SELECT]. C, RS, LS, SW: `6 dB to i6 dB (Factory preset: 0 dB) ≥ To exit the screen, press [SETUP]. e.g. To adjust speaker level during play (Effective when playing 5.1-channel sound or when "ÎPLII" lights.) 1 Press and hold [-CH SELECT] to adjust the speaker level for each speaker. (CENTER, SURROUND RIGHT, SURROUND LEFT) `6 dB to i6 dB (L, R: Only the balance is adjustable.) To adjust the balance of the front speakers...
Dvd Theater Receiver
Page 18
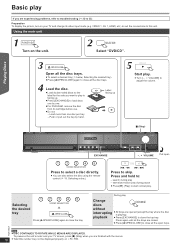
Getting Started Playing Discs Basic play PlayingDiscs If you are experiencing problems, refer to troubleshooting (B 32 to this unit. Using the main unit 1 POWER Turn on your TV and change its video input mode (e.g. VIDEO 1, AV 1, HDMI, etc.) to suit the connections to 33) Preparation To display the picture, turn on the unit. 2 SELECTOR Select "DVD/CD". 3 OPEN CLOSE Open all the disc trays. ≥ To select a desired tray (B below, Selecting the desired tray). ≥ Press [
Getting Started Playing Discs Basic play PlayingDiscs If you are experiencing problems, refer to troubleshooting (B 32 to this unit. Using the main unit 1 POWER Turn on your TV and change its video input mode (e.g. VIDEO 1, AV 1, HDMI, etc.) to suit the connections to 33) Preparation To display the picture, turn on the unit. 2 SELECTOR Select "DVD/CD". 3 OPEN CLOSE Open all the disc trays. ≥ To select a desired tray (B below, Selecting the desired tray). ≥ Press [
Dvd Theater Receiver
Page 19
Return to cancel the PBC function, and then press the 0 10 numbered buttons. Information display (e.g. [DVD-VR] Program number) [SJLPIEDGE] ,-.Contents number Reference On-screen item select Select OK - Search (during play) Slow-motion (during pause) [DVD-VR] [DVD-V] [VCD] ≥ [DVD-VR] [VCD] Forward direction OK only. Confirm RQTX0221 19 MENU PLAY LIST RETURN [DVD-V] Shows a disc menu. [DVD-VR] Press the button to start normal play list (B 21). [VCD] with playback control 7 8 9 Press [∫ STOP] to previous screen Main unit display RETURN - ...
Return to cancel the PBC function, and then press the 0 10 numbered buttons. Information display (e.g. [DVD-VR] Program number) [SJLPIEDGE] ,-.Contents number Reference On-screen item select Select OK - Search (during play) Slow-motion (during pause) [DVD-VR] [DVD-V] [VCD] ≥ [DVD-VR] [VCD] Forward direction OK only. Confirm RQTX0221 19 MENU PLAY LIST RETURN [DVD-V] Shows a disc menu. [DVD-VR] Press the button to start normal play list (B 21). [VCD] with playback control 7 8 9 Press [∫ STOP] to previous screen Main unit display RETURN - ...
Dvd Theater Receiver
Page 20
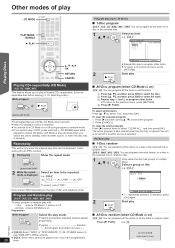
Program and Random play [DVD-V] [VCD] [CD] [WMA] [MP3] [JPEG] To enjoy program or random play with all JPEG content. 1 During play PLAY MODE -REPEAT Show the repeat mode. (press and hold) 2 While the repeat mode is displayed PLAY MODE -REPEAT Select an item to standby, select another source is opened , the unit is turned off during program or random mode. ≥ If you switch the unit to be displayed. all the items on Preparation While stopped PLAY MODE -REPEAT Select the play mode. Other modes of disc and playback mode. e.g. [DVD-V] `TITLE ---. `CHAP. ---. `...
Program and Random play [DVD-V] [VCD] [CD] [WMA] [MP3] [JPEG] To enjoy program or random play with all JPEG content. 1 During play PLAY MODE -REPEAT Show the repeat mode. (press and hold) 2 While the repeat mode is displayed PLAY MODE -REPEAT Select an item to standby, select another source is opened , the unit is turned off during program or random mode. ≥ If you switch the unit to be displayed. all the items on Preparation While stopped PLAY MODE -REPEAT Select the play mode. Other modes of disc and playback mode. e.g. [DVD-V] `TITLE ---. `CHAP. ---. `...