
Owners Manual
Page 2
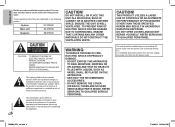
... ACCESSORIES. • DO NOT REMOVE THE COVER (OR BACK); You can also use the buttons on the main unit if they are applicable to it. REFER SERVICING TO QUALIFIED SERVICE PERSONNEL. DO NOT OPEN COVERS AND DO NOT REPAIR YOURSELF. ENGLISH Do the procedures with the power cord connected directly to the following system. THIS PRODUCT UTILIZES A LASER. These operating instructions are the same.
... ACCESSORIES. • DO NOT REMOVE THE COVER (OR BACK); You can also use the buttons on the main unit if they are applicable to it. REFER SERVICING TO QUALIFIED SERVICE PERSONNEL. DO NOT OPEN COVERS AND DO NOT REPAIR YOURSELF. ENGLISH Do the procedures with the power cord connected directly to the following system. THIS PRODUCT UTILIZES A LASER. These operating instructions are the same.

Owners Manual
Page 3
... service, ask the servicer to perform safety checks to service the unit beyond that the unit is only valid in the European Union. or (c) The unit has been exposed to you. Servicing - Please note them in these operating instructions. Safety check - RQT9539 PM500_PC1_1us.indd 3 3 3 7/14/2011 12:13:01 PM MODEL NUMBER SC-PM500 SERIAL NUMBER User memo: DATE OF PURCHASE DEALER NAME DEALER ADDRESS TELEPHONE NUMBER Product service 1. Damage requiring service...
... service, ask the servicer to perform safety checks to service the unit beyond that the unit is only valid in the European Union. or (c) The unit has been exposed to you. Servicing - Please note them in these operating instructions. Safety check - RQT9539 PM500_PC1_1us.indd 3 3 3 7/14/2011 12:13:01 PM MODEL NUMBER SC-PM500 SERIAL NUMBER User memo: DATE OF PURCHASE DEALER NAME DEALER ADDRESS TELEPHONE NUMBER Product service 1. Damage requiring service...
Owners Manual
Page 4
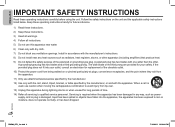
... obsolete outlet. 10) Protect the power cord from being walked on the unit and the applicable safety instructions listed below. If the provided plug does not fit into the apparatus, the apparatus has been exposed to qualified service personnel. A grounding-type plug has two blades and a third grounding prong. ENGLISH IMPORTANT SAFETY INSTRUCTIONS Read these instructions. 3) Heed all warnings. 4) Follow all...
... obsolete outlet. 10) Protect the power cord from being walked on the unit and the applicable safety instructions listed below. If the provided plug does not fit into the apparatus, the apparatus has been exposed to qualified service personnel. A grounding-type plug has two blades and a third grounding prong. ENGLISH IMPORTANT SAFETY INSTRUCTIONS Read these instructions. 3) Heed all warnings. 4) Follow all...
Owners Manual
Page 5
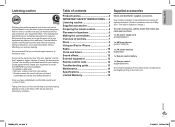
... for replacement parts. (Product numbers correct as the unit you've just purchased is only the start of controls 7 Discs 8 Using an iPod or iPhone 9 Radio 10 Clock and timers 11 Sound effects 12 External equipment 12 Remote control code 12 Troubleshooting guide 13 Maintenance 14 Specifications 14 Limited Warranty 15 Supplied accessories Check and identify the supplied accessories. RQT9539 PM500_PC1_1us.indd 5 5 5 7/14/2011 12:13:01 PM Over time your musical enjoyment...
... for replacement parts. (Product numbers correct as the unit you've just purchased is only the start of controls 7 Discs 8 Using an iPod or iPhone 9 Radio 10 Clock and timers 11 Sound effects 12 External equipment 12 Remote control code 12 Troubleshooting guide 13 Maintenance 14 Specifications 14 Limited Warranty 15 Supplied accessories Check and identify the supplied accessories. RQT9539 PM500_PC1_1us.indd 5 5 5 7/14/2011 12:13:01 PM Over time your musical enjoyment...
Owners Manual
Page 6
You have magnetic shielding. Keep in standby mode. Replace only with those in the remote control. When you play at high levels for a long period of time with doors and windows closed. • Mishandling of battery can cause electrolyte leakage, which can cause damage to the system and decrease the sound quality if you do not have to cross (short-circuit) or...
You have magnetic shielding. Keep in standby mode. Replace only with those in the remote control. When you play at high levels for a long period of time with doors and windows closed. • Mishandling of battery can cause electrolyte leakage, which can cause damage to the system and decrease the sound quality if you do not have to cross (short-circuit) or...
Owners Manual
Page 7
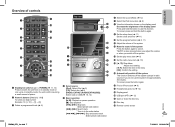
... 2-digit number Example: 16: [≧10] → [1] → [6] C Delete a programmed track (Z 8) D Select source [iPod]: Select iPod (Z 9) [CD]: Select disc (Z 8) [RADIO, EXT-IN] / [RADIO/EXT-IN(USB)]: Select radio or USB (Z 10, 12) E Basic operation [4/9]: Playback or pause operation [8]: Stop playback [2], [6]: Skip track Select preset radio station [3], [5]: Search track Tune in radio source) if you switch off the system. ENGLISH Overview of controls A SLEEP PLAY I Set the sleep timer (Z 11) Set the clock and timer (Z 11) J Set the program function (Z 8, 11) K Adjust the volume of...
... 2-digit number Example: 16: [≧10] → [1] → [6] C Delete a programmed track (Z 8) D Select source [iPod]: Select iPod (Z 9) [CD]: Select disc (Z 8) [RADIO, EXT-IN] / [RADIO/EXT-IN(USB)]: Select radio or USB (Z 10, 12) E Basic operation [4/9]: Playback or pause operation [8]: Stop playback [2], [6]: Skip track Select preset radio station [3], [5]: Search track Tune in radio source) if you switch off the system. ENGLISH Overview of controls A SLEEP PLAY I Set the sleep timer (Z 11) Set the clock and timer (Z 11) J Set the program function (Z 8, 11) K Adjust the volume of...
Owners Manual
Page 8
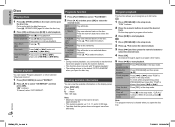
... does not support can view the available information on the display panel. Program playback This function allows you open the disc tray. Do this step again to program other tracks. 3 Press [4/9] to start playback. 1 Press [PROGRAM] in the stop mode. 2 Press [R, T] to select the desired album. 3 Press [6] and then press the numeric buttons to select the desired track. To check while programming, press [PROGRAM] two times after "PGM...
... does not support can view the available information on the display panel. Program playback This function allows you open the disc tray. Do this step again to program other tracks. 3 Press [4/9] to start playback. 1 Press [PROGRAM] in the stop mode. 2 Press [R, T] to select the desired album. 3 Press [6] and then press the numeric buttons to select the desired track. To check while programming, press [PROGRAM] two times after "PGM...

Owners Manual
Page 9
... of time after charging is complete. • Charging stops when the battery is in standby mode). • See the iPod or iPhone display for its case. 3 Press [iPod] and then press [4/9] to previous menu Press [iPod MENU] in the order you want them . Note on MP3s • Files are treated as tracks and folders are treated as CD-DA, only the format recorded in the first session can be played...
... of time after charging is complete. • Charging stops when the battery is in standby mode). • See the iPod or iPhone display for its case. 3 Press [iPod] and then press [4/9] to previous menu Press [iPod MENU] in the order you want them . Note on MP3s • Files are treated as tracks and folders are treated as CD-DA, only the format recorded in the first session can be played...

Owners Manual
Page 10
... latest software before using this accessory with new software. Automatic presetting 1 Press [OK] to select "LOWEST" or "CURRENT" frequency. 2 Press [RADIO MENU] to start presetting. "START?" is selected 1 Press [RADIO MENU] to select "B.PROOF". 2 Press [Y, U] to meet Apple performance standards. iPhone, iPod, iPod classic, iPod nano, and iPod touch are trademarks of the required station. iPhone responses can be different on newer models or with iPod, or iPhone may affect wireless performance...
... latest software before using this accessory with new software. Automatic presetting 1 Press [OK] to select "LOWEST" or "CURRENT" frequency. 2 Press [RADIO MENU] to start presetting. "START?" is selected 1 Press [RADIO MENU] to select "B.PROOF". 2 Press [Y, U] to meet Apple performance standards. iPhone, iPod, iPod classic, iPod nano, and iPod touch are trademarks of the required station. iPhone responses can be different on newer models or with iPod, or iPhone may affect wireless performance...

Owners Manual
Page 11
...]. Prepare the music source you change the setting, preset frequencies are erased. Press [CLOCK/TIMER] to select the preset station. Selecting a preset station Press the numeric buttons, [2] or [6] (main unit: [2/3] or [5/6]) to select "#PLAY 1", "#PLAY 2" or "#PLAY 3". Play timer You can set the end time. Press [#, PLAY] two times to switch off the system after the set an overlap of timers. Note: • The timer starts at a low volume and increases gradually to the preset level. •...
...]. Prepare the music source you change the setting, preset frequencies are erased. Press [CLOCK/TIMER] to select the preset station. Selecting a preset station Press the numeric buttons, [2] or [6] (main unit: [2/3] or [5/6]) to select "#PLAY 1", "#PLAY 2" or "#PLAY 3". Play timer You can set the end time. Press [#, PLAY] two times to switch off the system after the set an overlap of timers. Note: • The timer starts at a low volume and increases gradually to the preset level. •...
Owners Manual
Page 12
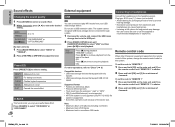
... a cable. 1 Decrease the volume and connect the USB mass storage device to the USB port. 2 Press [RADIO, EXT-IN] (main unit: [RADIO/EXT-IN(USB)]) to select "USB" and then press [4/9] to select a setting. Press [4/9] to use a USB extension cable. Plug type: Ø 3.5 mm (1/8″) stereo (not included) • Avoid listening for this system, change the remote control code for prolonged periods of the sector size. Supported format • Folders are defined as album. • Files...
... a cable. 1 Decrease the volume and connect the USB mass storage device to the USB port. 2 Press [RADIO, EXT-IN] (main unit: [RADIO/EXT-IN(USB)]) to select "USB" and then press [4/9] to select a setting. Press [4/9] to use a USB extension cable. Plug type: Ø 3.5 mm (1/8″) stereo (not included) • Avoid listening for this system, change the remote control code for prolonged periods of the sector size. Supported format • Folders are defined as album. • Files...
Owners Manual
Page 13
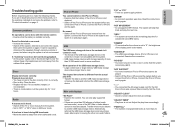
... cables of programmed tracks is different from the actual play time. • Transfer the data to "Product information" on again. Examine the connection. "--:--" • You connected the AC power supply cord for variable bit rate (VBR) tracks. Connect the iPod or iPhone to "BP 1" or "BP 2" when in some conditions. The elapsed time shown is more than 32 GB cannot work in AM tuner mode. "ADJUST CLOCK" • Clock is heard. • Switch...
... cables of programmed tracks is different from the actual play time. • Transfer the data to "Product information" on again. Examine the connection. "--:--" • You connected the AC power supply cord for variable bit rate (VBR) tracks. Connect the iPod or iPhone to "BP 1" or "BP 2" when in some conditions. The elapsed time shown is more than 32 GB cannot work in AM tuner mode. "ADJUST CLOCK" • Clock is heard. • Switch...
Owners Manual
Page 14
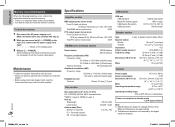
... (9 kHz step) Headphones jack Terminal Stereo, 3.5 mm (1/8″) jack Disc section Disc played [8 cm (3″) or 12 cm (5″)] CD, CD-R/RW (CD-DA, MP3 formatted disc) MPEG-1 Layer 3, MPEG-2 Layer 3 Pick up Wavelength 790 nm (CD) Laser power CLASS 1 (CD) Audio output (Disc) Number of channels 2 ch (FL, FR) FL = Front left channel FR = Front right channel USB section USB port USB standard Media file format support USB device file system USB port power USB 2.0 full speed MP3 ( .mp3...
... (9 kHz step) Headphones jack Terminal Stereo, 3.5 mm (1/8″) jack Disc section Disc played [8 cm (3″) or 12 cm (5″)] CD, CD-R/RW (CD-DA, MP3 formatted disc) MPEG-1 Layer 3, MPEG-2 Layer 3 Pick up Wavelength 790 nm (CD) Laser power CLASS 1 (CD) Audio output (Disc) Number of channels 2 ch (FL, FR) FL = Front left channel FR = Front right channel USB section USB port USB standard Media file format support USB device file system USB port power USB 2.0 full speed MP3 ( .mp3...
Owners Manual
Page 15
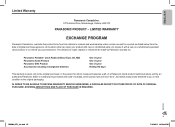
Panasonic Portable / Clock Radio (without Tape, CD, MD) Panasonic Audio Product Panasonic DVD Product Accessories including rechargeable batteries One (1) year One (1) year One (1) year Ninety (90) days This warranty is ", and which product was purchased as stated below from defects in the original packaging. warrants this product to be made by an authorized Panasonic dealer in Canada and purchased and used in Canada, which product was not...
Panasonic Portable / Clock Radio (without Tape, CD, MD) Panasonic Audio Product Panasonic DVD Product Accessories including rechargeable batteries One (1) year One (1) year One (1) year Ninety (90) days This warranty is ", and which product was purchased as stated below from defects in the original packaging. warrants this product to be made by an authorized Panasonic dealer in Canada and purchased and used in Canada, which product was not...
Owners Manual
Page 16
..., but for lost time, travel to and from accidents, misuse, abuse, neglect, mishandling, misapplication, alteration, faulty installation, set-up adjustments, misadjustment of consumer controls, improper maintenance, power line surge, lightning damage, modification, introduction of sand, humidity or liquids, commercial use such as hotel, office, restaurant, or other business or rental use of the product, or service by anyone other than...
..., but for lost time, travel to and from accidents, misuse, abuse, neglect, mishandling, misapplication, alteration, faulty installation, set-up adjustments, misadjustment of consumer controls, improper maintenance, power line surge, lightning damage, modification, introduction of sand, humidity or liquids, commercial use such as hotel, office, restaurant, or other business or rental use of the product, or service by anyone other than...


