SAHT40 User Guide
Page 1
Operating Instructions Home Theater Audio System Model No. SC-HT40 Dear customer Thank you have any questions, contact 1-800-211-PANA (7262) in the U.S.A. If you for future reference. 1 1For Canada only: The word "Participant" ...
Operating Instructions Home Theater Audio System Model No. SC-HT40 Dear customer Thank you have any questions, contact 1-800-211-PANA (7262) in the U.S.A. If you for future reference. 1 1For Canada only: The word "Participant" ...
SAHT40 User Guide
Page 2
...equipment would void the user's authority to correct the interference by the manufacturer, or sold with Part 15 of North America One Panasonic Way Secaucus, NJ 07094 Telephone No.: 1-800-211-7262 IMPORTANT SAFETY INSTRUCTIONS POWER SERVICE GROUNDING ELECTRODE SYSTEM Read these instructions. ...on or pinched particularly at plugs, convenience receptacles, and the 2) Keep these operating instructions carefully before using the unit. Responsible Party: Panasonic Corporation of the FCC Rules. CAUTION RISK OF ELECTRIC SHOCK DO NOT OPEN CAUTION: TO REDUCE THE RISK OF ELECTRIC SHOCK, DO...
...equipment would void the user's authority to correct the interference by the manufacturer, or sold with Part 15 of North America One Panasonic Way Secaucus, NJ 07094 Telephone No.: 1-800-211-7262 IMPORTANT SAFETY INSTRUCTIONS POWER SERVICE GROUNDING ELECTRODE SYSTEM Read these instructions. ...on or pinched particularly at plugs, convenience receptacles, and the 2) Keep these operating instructions carefully before using the unit. Responsible Party: Panasonic Corporation of the FCC Rules. CAUTION RISK OF ELECTRIC SHOCK DO NOT OPEN CAUTION: TO REDUCE THE RISK OF ELECTRIC SHOCK, DO...
SAHT40 User Guide
Page 3
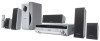
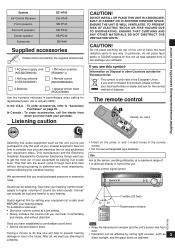
.... • Do not use rechargeable type batteries. Supplied accessories/Listening caution/The remote control System AV Control Receiver Front speakers Surround speakers Center speaker Subwoofer SC-HT40 SA-HT40 SB-PF40 SB-PS40 SB-PC40 SB-W40 Supplied accessories Please check and identify the supplied accessories. 1 AC power supply cord (K2CB2CB00018) 1 AM loop...
.... • Do not use rechargeable type batteries. Supplied accessories/Listening caution/The remote control System AV Control Receiver Front speakers Surround speakers Center speaker Subwoofer SC-HT40 SA-HT40 SB-PF40 SB-PS40 SB-PC40 SB-W40 Supplied accessories Please check and identify the supplied accessories. 1 AC power supply cord (K2CB2CB00018) 1 AM loop...
SAHT40 User Guide
Page 4
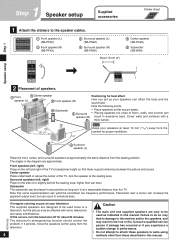
Cover walls and windows with some experimentation can be used close to the speaker cables. Surround speakers (left, right) Place on flat seated ear height so that some televisions and setup combinations. Consult a qualified service person if damage has occurred or if you set up your speakers can speaker (R) result in the diagram are designed to be used as it persists, move the speakers further away from the TV. Note Keep your television The supplied speakers are approximate. The angles in excessive bass. Placement near a corner can result in this...
Cover walls and windows with some experimentation can be used close to the speaker cables. Surround speakers (left, right) Place on flat seated ear height so that some televisions and setup combinations. Consult a qualified service person if damage has occurred or if you set up your speakers can speaker (R) result in the diagram are designed to be used as it persists, move the speakers further away from the TV. Note Keep your television The supplied speakers are approximate. The angles in excessive bass. Placement near a corner can result in this...

SAHT40 User Guide
Page 5
... support over 10 kg (22 lb.). • The stands must be capable of supporting 10 kg (22 lb.) per screw. White cord White cord with Panasonic's wireless receiver and speaker systems Attach the SH-FX60 digital transceiver for SH-FX60.
... support over 10 kg (22 lb.). • The stands must be capable of supporting 10 kg (22 lb.) per screw. White cord White cord with Panasonic's wireless receiver and speaker systems Attach the SH-FX60 digital transceiver for SH-FX60.
SAHT40 User Guide
Page 6
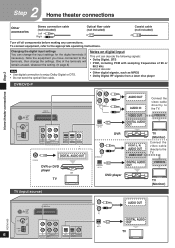
VIDEO OUT DIGITAL AUDIO OUT VIDEO IN DVD player TV (Monitor) TV (input source) LOOP ANT GND DIGITAL TRANSCEIVER RQTV0105 FM ANT 75 Ω AM ANT LOOP EXT 6 L L L R R R IN OUT IN TV DVR/DVD-P AUDIO TV DVR/DVD-P OPT 1 OPT 2 COAXIAL DIGITAL IN L R IN TV TV OPT 1 AUDIO OUT 6 5 SUB C DIGITAL AUDIO OUT 43 SURROUND R L 21 FRONT R L TV 6Ω 4Ω SPEAKERS (HAUT-PARLEURS) Changing the digital input settings You can decode the following signals: • Dolby Digital, DTS • PCM, including PCM with sampling frequencies of the terminals will remain ...
VIDEO OUT DIGITAL AUDIO OUT VIDEO IN DVD player TV (Monitor) TV (input source) LOOP ANT GND DIGITAL TRANSCEIVER RQTV0105 FM ANT 75 Ω AM ANT LOOP EXT 6 L L L R R R IN OUT IN TV DVR/DVD-P AUDIO TV DVR/DVD-P OPT 1 OPT 2 COAXIAL DIGITAL IN L R IN TV TV OPT 1 AUDIO OUT 6 5 SUB C DIGITAL AUDIO OUT 43 SURROUND R L 21 FRONT R L TV 6Ω 4Ω SPEAKERS (HAUT-PARLEURS) Changing the digital input settings You can decode the following signals: • Dolby Digital, DTS • PCM, including PCM with sampling frequencies of the terminals will remain ...
SAHT40 User Guide
Page 7
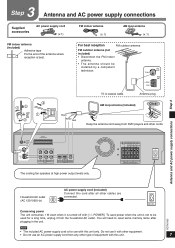
FM ANT 75 Ω AM ANT LOOP EXT 75 Ω coaxial cable Antenna plug 1 2 LOOP ANT GND 3 2 1 Black White Red AM loop antenna (included) Click! Keep the antenna cord away from DVD players and other cords. 75 Ω LOOP EXT LOOP ANT GND FM ANT AM ANT DIGITAL TRANSCEIVER L L L R R R IN OUT IN TV DVR/DVD-P AUDIO TV DVR/DVD-P OPT 1 OPT 2 COAXIAL DIGITAL IN The cooling fan operates at high power output levels only. 6 5 4 32 1 SUB C SURROUND FRONT R LR L 6Ω 4Ω SPEAKERS (HAUT-PARLEURS) AC IN~ Step 3 Antenna and AC power supply connections ...
FM ANT 75 Ω AM ANT LOOP EXT 75 Ω coaxial cable Antenna plug 1 2 LOOP ANT GND 3 2 1 Black White Red AM loop antenna (included) Click! Keep the antenna cord away from DVD players and other cords. 75 Ω LOOP EXT LOOP ANT GND FM ANT AM ANT DIGITAL TRANSCEIVER L L L R R R IN OUT IN TV DVR/DVD-P AUDIO TV DVR/DVD-P OPT 1 OPT 2 COAXIAL DIGITAL IN The cooling fan operates at high power output levels only. 6 5 4 32 1 SUB C SURROUND FRONT R LR L 6Ω 4Ω SPEAKERS (HAUT-PARLEURS) AC IN~ Step 3 Antenna and AC power supply connections ...
SAHT40 User Guide
Page 8
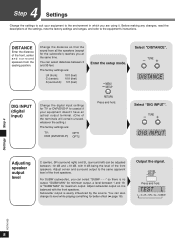
DISTANCE Enter the distance of the front, center and surround speakers from all the speakers (except for better effect (➡ page 16). MENU SETUP DIG INPUT (digital input) Change the digital input settings for maximum output. You can be adjusted between -10 dB and +10 dB, with the front speakers. Adjust center and surround output to the same apparent level of the settings, note the factory settings and ranges, and refer to the equipment's instructions. Adjust subwoofer output so it . Subwoofer output is balanced with 0 dB being the level of the terminals will ...
DISTANCE Enter the distance of the front, center and surround speakers from all the speakers (except for better effect (➡ page 16). MENU SETUP DIG INPUT (digital input) Change the digital input settings for maximum output. You can be adjusted between -10 dB and +10 dB, with the front speakers. Adjust center and surround output to the same apparent level of the settings, note the factory settings and ranges, and refer to the equipment's instructions. Adjust subwoofer output so it . Subwoofer output is balanced with 0 dB being the level of the terminals will ...

SAHT40 User Guide
Page 9
TUNE ENTER Change the setting. EXIT ENTER Press [ENTER] to enter. Stop the test signal. -LEVEL TEST C +4dB Press and hold. Change the setting. L R 3 ft LR 30 ft Repeat for each speaker channel Step 4 Settings RQTV0105 9 Exit the setup mode. MENU SETUP RETURN Press repeatedly until "EXIT" appears. Adjust the main volume. Repeat for other input positions Select the speaker channel. -LEVEL TEST Adjust the level. POWER MENU TUNE SETUP RETURN MUSIC PORT SURROUND ENTER MUSIC ENTER Display INPUT SELECTOR VOLUME RECEIVER AV TV SYSTEM TV ^ ^ VOLUME ...
TUNE ENTER Change the setting. EXIT ENTER Press [ENTER] to enter. Stop the test signal. -LEVEL TEST C +4dB Press and hold. Change the setting. L R 3 ft LR 30 ft Repeat for each speaker channel Step 4 Settings RQTV0105 9 Exit the setup mode. MENU SETUP RETURN Press repeatedly until "EXIT" appears. Adjust the main volume. Repeat for other input positions Select the speaker channel. -LEVEL TEST Adjust the level. POWER MENU TUNE SETUP RETURN MUSIC PORT SURROUND ENTER MUSIC ENTER Display INPUT SELECTOR VOLUME RECEIVER AV TV SYSTEM TV ^ ^ VOLUME ...
SAHT40 User Guide
Page 10
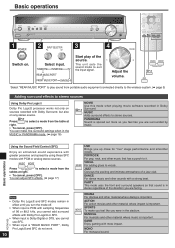
TUNER FM TUNER AM TV REAR MUSIC PORT1 FRONT MUSIC PORT DVR/DVD-P Start play sound from portable audio equipment connected directly to the wireless system. (➡ page 5) Adding surround effects to stereo sources Using Dolby Pro LogicΙΙ Dolby Pro LogicΙΙ processor works not only on sources recorded with Dolby Surround, but also on . Adjust the volume. POP/ROCK For pop, rock, and other music that sound is "REAR MUSIC PORT", Dolby Pro LogicΙΙ and SFC do not work. 10 RQTV0105 LIVE Brings you up close for "live" stage performance and smoother ...
TUNER FM TUNER AM TV REAR MUSIC PORT1 FRONT MUSIC PORT DVR/DVD-P Start play sound from portable audio equipment connected directly to the wireless system. (➡ page 5) Adding surround effects to stereo sources Using Dolby Pro LogicΙΙ Dolby Pro LogicΙΙ processor works not only on sources recorded with Dolby Surround, but also on . Adjust the volume. POP/ROCK For pop, rock, and other music that sound is "REAR MUSIC PORT", Dolby Pro LogicΙΙ and SFC do not work. 10 RQTV0105 LIVE Brings you up close for "live" stage performance and smoother ...
SAHT40 User Guide
Page 11
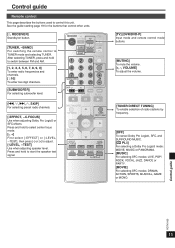
Press and hold to select center focus mode. [-, +] First select [-EFFECT] or [-LEVEL, 3TEST], then press [-] or [+] to start the speaker test signal. Press and hold to TUNER mode and selecting TUNER. See the guide starting page 19 for the buttons that control other units. [^, RECEIVER] Standby/on button. [TUNER, ―BAND] For switching the remote control to switch between FM and AM. [1, 2, 3, 4, 5, 6, 7, 8, 9, 0] To enter radio frequencies and channels. [ ≧10] To enter two digit channels. [SUBWOOFER] For selecting subwoofer level. [u, 2, i, 1, SKIP] For selecting preset radio ...
Press and hold to select center focus mode. [-, +] First select [-EFFECT] or [-LEVEL, 3TEST], then press [-] or [+] to start the speaker test signal. Press and hold to TUNER mode and selecting TUNER. See the guide starting page 19 for the buttons that control other units. [^, RECEIVER] Standby/on button. [TUNER, ―BAND] For switching the remote control to switch between FM and AM. [1, 2, 3, 4, 5, 6, 7, 8, 9, 0] To enter radio frequencies and channels. [ ≧10] To enter two digit channels. [SUBWOOFER] For selecting subwoofer level. [u, 2, i, 1, SKIP] For selecting preset radio ...
SAHT40 User Guide
Page 12
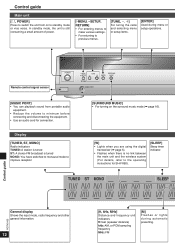
Control guide Main unit [8, POWER] Press to switch the unit from portable audio equipment. • Reduce the volume to minimum before connecting and disconnecting the equipment. • Use an audio cord for SH-FX60). [SLEEP] Sleep timer indicator. Display [TUNED, ST, MONO] Radio indicators TUNED: A station is tuned ST: A stereo FM broadcast is tuned MONO: You have switched to monaural mode to improve reception [SURROUND MUSIC] • For turning on to standby mode or vice versa. Remote control signal sensor POWER MENU TUNE SETUP RETURN MUSIC PORT SURROUND ENTER MUSIC [...
Control guide Main unit [8, POWER] Press to switch the unit from portable audio equipment. • Reduce the volume to minimum before connecting and disconnecting the equipment. • Use an audio cord for SH-FX60). [SLEEP] Sleep timer indicator. Display [TUNED, ST, MONO] Radio indicators TUNED: A station is tuned ST: A stereo FM broadcast is tuned MONO: You have switched to monaural mode to improve reception [SURROUND MUSIC] • For turning on to standby mode or vice versa. Remote control signal sensor POWER MENU TUNE SETUP RETURN MUSIC PORT SURROUND ENTER MUSIC [...

SAHT40 User Guide
Page 13
Begin recording. The RESET function MENU TUNE SETUP RETURN ENTER POWER MENU TUNE SETUP RETURN MUSIC PORT SURROUND ENTER MUSIC INPUT SELECTOR VOLUME [PCM, C. To cancel, select "RESET NO". Control guide/Making a recording/ The RESET function [% DIGITAL, DTS, % PL ΙΙ] Lights to indicate the source's input signal and decoding format used. % DIGITAL: Dolby Digital sources DTS: DTS sources % PL ΙΙ: Dolby Pro LogicΙΙ decoder is digital. FOCUS] PCM: Lights when the PCM FIX mode is set C.FOCUS: Appears when you are using Center Focus [DIGITAL ...
Begin recording. The RESET function MENU TUNE SETUP RETURN ENTER POWER MENU TUNE SETUP RETURN MUSIC PORT SURROUND ENTER MUSIC INPUT SELECTOR VOLUME [PCM, C. To cancel, select "RESET NO". Control guide/Making a recording/ The RESET function [% DIGITAL, DTS, % PL ΙΙ] Lights to indicate the source's input signal and decoding format used. % DIGITAL: Dolby Digital sources DTS: DTS sources % PL ΙΙ: Dolby Pro LogicΙΙ decoder is digital. FOCUS] PCM: Lights when the PCM FIX mode is set C.FOCUS: Appears when you are using Center Focus [DIGITAL ...
SAHT40 User Guide
Page 14
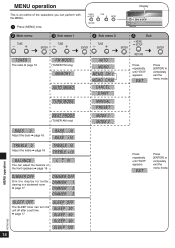
POWER MENU TUNE SETUP SURROUND ENTER MUSIC INPUT SE RETURN RETURN MUSIC PORT 1 Press [-MENU] once. 2 Main menu TUNE 3 Sub menu 1 TUNE ENTER TUNER The radio ➡ page 15 FM MODE (TUNER FM only) MEMORY AUTO MEMO TUNE MODE BEAT PROOF (TUNER AM only) ENTER 4 Sub menu 2 TUNE ENTER 5 Exit MENU SETUP ENTER AUTO MONO MEMO CH 1 MEMO CH30 CANCEL S TA R T RETURN Press repeatedly until "EXIT" appears. MANUAL PRESET MODE 1 MODE 2 BASS 0 Adjust the bass ➡ page 16 BASS -10 BASS +10 TREBLE 0 Adjust the treble ➡ page 16 TREBLE -10 TREBLE +10 MENU operation ...
POWER MENU TUNE SETUP SURROUND ENTER MUSIC INPUT SE RETURN RETURN MUSIC PORT 1 Press [-MENU] once. 2 Main menu TUNE 3 Sub menu 1 TUNE ENTER TUNER The radio ➡ page 15 FM MODE (TUNER FM only) MEMORY AUTO MEMO TUNE MODE BEAT PROOF (TUNER AM only) ENTER 4 Sub menu 2 TUNE ENTER 5 Exit MENU SETUP ENTER AUTO MONO MEMO CH 1 MEMO CH30 CANCEL S TA R T RETURN Press repeatedly until "EXIT" appears. MANUAL PRESET MODE 1 MODE 2 BASS 0 Adjust the bass ➡ page 16 BASS -10 BASS +10 TREBLE 0 Adjust the treble ➡ page 16 TREBLE -10 TREBLE +10 MENU operation ...
SAHT40 User Guide
Page 15
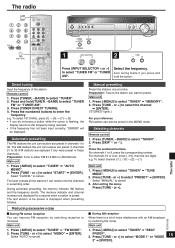
Press [TUNER, ―BAND] to either FM 87.9 MHz or AM 530 kHz. To select 107.9 MHz, press [1] → [0] → [7] → [9] • If you do not press a button while the cursor is preset. Preparation: Tune to select "TUNER". 2. or +] to select "TUNER" ➡ "FM MODE". 2. Press [-MENU] to select "START" ➡ [ENTER]. Select "AUTO" to select "MODE 1" or "MODE 15 2" ➡ [ENTER]. or +] to select the channel ➡ [ENTER]. ("STORED" lights.) For your reference FM stations can also be preset is a lot of the station. For channels 10 or over, press [ &#...
Press [TUNER, ―BAND] to either FM 87.9 MHz or AM 530 kHz. To select 107.9 MHz, press [1] → [0] → [7] → [9] • If you do not press a button while the cursor is preset. Preparation: Tune to select "TUNER". 2. or +] to select "TUNER" ➡ "FM MODE". 2. Press [-MENU] to select "START" ➡ [ENTER]. Select "AUTO" to select "MODE 1" or "MODE 15 2" ➡ [ENTER]. or +] to select the channel ➡ [ENTER]. ("STORED" lights.) For your reference FM stations can also be preset is a lot of the station. For channels 10 or over, press [ &#...

SAHT40 User Guide
Page 16
Sound field MENU TUNE SETUP RETURN SURROUND ENTER MUSIC POWER MENU TUNE SETUP RETURN MUSIC PORT SURROUND ENTER MUSIC INPUT SELECTOR VOLUME SUBWOOFER -EFFECT C.FOCUS OFF RECEIVER AV TV SYSTEM TV ^ ^ VOLUME TUNER DVR/DVD-P BAND 12 45 78 SUBWOOFER 0 TV/VIDEO 3 MUTING 6 VOLUME 9 =>10 SKIP u i SLOW/SEARCH ty STOP PAUSE PLAY g h q DIRECT NAVIGATOR FUNCTIONS TOP MENU TUNER DIRECT TUNING SUB MENU/ PLAY LIST ENTER RETURN -EFFECT C.FOCUS -LEVEL TEST OFF %PL MUSIC MOVIE SFC Sound field RQTV0105 Adjusting the tone You can adjust the level of the ...
Sound field MENU TUNE SETUP RETURN SURROUND ENTER MUSIC POWER MENU TUNE SETUP RETURN MUSIC PORT SURROUND ENTER MUSIC INPUT SELECTOR VOLUME SUBWOOFER -EFFECT C.FOCUS OFF RECEIVER AV TV SYSTEM TV ^ ^ VOLUME TUNER DVR/DVD-P BAND 12 45 78 SUBWOOFER 0 TV/VIDEO 3 MUTING 6 VOLUME 9 =>10 SKIP u i SLOW/SEARCH ty STOP PAUSE PLAY g h q DIRECT NAVIGATOR FUNCTIONS TOP MENU TUNER DIRECT TUNING SUB MENU/ PLAY LIST ENTER RETURN -EFFECT C.FOCUS -LEVEL TEST OFF %PL MUSIC MOVIE SFC Sound field RQTV0105 Adjusting the tone You can adjust the level of the ...
SAHT40 User Guide
Page 17
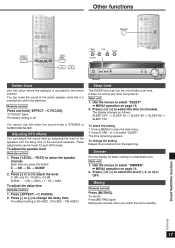
The factory setting is STEREO or SURROUND MUSIC. It does not control any other components. Main unit 1. To change the delay time. Use the menus to select the speaker channel. Muting also cancels when you press the button: C → SR → SL → SUBW 2. Remote control Press and hold [-EFFECT, ―C.FOCUS]. Adjusting SFC effects You can be made for better viewing in a darkened room. Press [-LEVEL, ―TEST] to select "DIMMER". ➡ MENU operation on page 14. 2. or +] to select "SLEEP". ➡ MENU operation on page 14. 2. Sound field/Other...
The factory setting is STEREO or SURROUND MUSIC. It does not control any other components. Main unit 1. To change the delay time. Use the menus to select the speaker channel. Muting also cancels when you press the button: C → SR → SL → SUBW 2. Remote control Press and hold [-EFFECT, ―C.FOCUS]. Adjusting SFC effects You can be made for better viewing in a darkened room. Press [-LEVEL, ―TEST] to select "DIMMER". ➡ MENU operation on page 14. 2. or +] to select "SLEEP". ➡ MENU operation on page 14. 2. Sound field/Other...
SAHT40 User Guide
Page 18
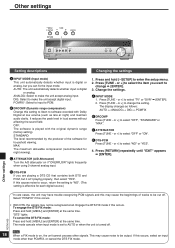
ANALOG: Select to make the unit accept digital input. It reduces the peak level in loud scenes without affecting the sound field. Press and hold [―SETUP] to select "TV" or "DVR" ➡ [ENTER]. 2. or +] to select the item you want to AUTO or when the unit is played with Dolby Digital at low volume (such as follows: AUTO ↔ ANALOG ↔ DIG ↔ PCMFIX B DRCOMP Press [TUNE - or +] to enter the setup menu. 2. To cancel the DTS FIX mode: Press and hold [-MENU] and [ENTER] at the same time. The mode cancels when input mode is set to change the setting. ...
ANALOG: Select to make the unit accept digital input. It reduces the peak level in loud scenes without affecting the sound field. Press and hold [―SETUP] to select "TV" or "DVR" ➡ [ENTER]. 2. or +] to select the item you want to AUTO or when the unit is played with Dolby Digital at low volume (such as follows: AUTO ↔ ANALOG ↔ DIG ↔ PCMFIX B DRCOMP Press [TUNE - or +] to enter the setup menu. 2. To cancel the DTS FIX mode: Press and hold [-MENU] and [ENTER] at the same time. The mode cancels when input mode is set to change the setting. ...
SAHT40 User Guide
Page 19
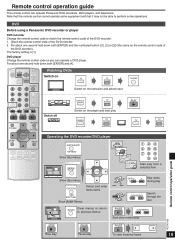
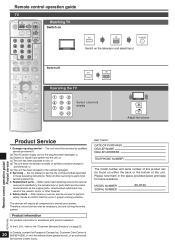
... of the DVD recorder. 2. Check the remote control code of the DVD recorder). DVD player Change the remote control code so you can operate Panasonic DVD recorders, DVD players, and televisions. Note that this remote control cannot operate some equipment and that it may not be able to previous menus... disc MENU MENU Clear menus or return RETURN to perform some operations. For about one second hold down both [ENTER] and [4]. DVD Before using a Panasonic DVD recorder or player DVD recorder Change the remote control code to match the remote control code of the DVD recorder. 1.
... of the DVD recorder. 2. Check the remote control code of the DVD recorder). DVD player Change the remote control code so you can operate Panasonic DVD recorders, DVD players, and televisions. Note that this remote control cannot operate some equipment and that it may not be able to previous menus... disc MENU MENU Clear menus or return RETURN to perform some operations. For about one second hold down both [ENTER] and [4]. DVD Before using a Panasonic DVD recorder or player DVD recorder Change the remote control code to match the remote control code of the DVD recorder. 1.
SAHT40 User Guide
Page 20
...: DATE OF PURCHASE DEALER NAME DEALER ADDRESS TELEPHONE NUMBER The model number and serial number of the unit. MODEL NUMBER SERIAL NUMBER SC-HT40 or (d) The unit does not operate normally or exhibits a marked change in proper working condition. Therefore, should be serviced by the... Damage requiring service ― The unit should service ever be necessary, be found on page 22. 20 In Canada, contact the Panasonic Canada Inc. Refer all components to bring the entire system. Product information For product information or assistance with product operation: In the ...
...: DATE OF PURCHASE DEALER NAME DEALER ADDRESS TELEPHONE NUMBER The model number and serial number of the unit. MODEL NUMBER SERIAL NUMBER SC-HT40 or (d) The unit does not operate normally or exhibits a marked change in proper working condition. Therefore, should be serviced by the... Damage requiring service ― The unit should service ever be necessary, be found on page 22. 20 In Canada, contact the Panasonic Canada Inc. Refer all components to bring the entire system. Product information For product information or assistance with product operation: In the ...