
Owners Manual
Page 1
... need them when maintaining or moving this product. SC-HC410 Thank you for future use. Included Installation Instructions (l 3, 17, 18 and 19) The installation work , carefully read these instructions. Please read these installation instructions and the operating instructions to ensure that installation is performed correctly. (Please keep these instructions carefully before using this product, and save this manual for purchasing this unit.) If you have any questions, visit: www.panasonic.ca/english/support Panasonic...
... need them when maintaining or moving this product. SC-HC410 Thank you for future use. Included Installation Instructions (l 3, 17, 18 and 19) The installation work , carefully read these instructions. Please read these installation instructions and the operating instructions to ensure that installation is performed correctly. (Please keep these instructions carefully before using this product, and save this manual for purchasing this unit.) If you have any questions, visit: www.panasonic.ca/english/support Panasonic...

Owners Manual
Page 2
...; To reduce the risk of time. Replace only with the type recommended by the manufacturer. ≥ Mishandling of batteries can be unplugged from being walked on this unit. - This device contains licence-exempt transmitter(s)/ receiver(s) that the power plug can cause electrolyte leakage and may cause undesired operation of the obsolete outlet. 10 Protect the power cord from the socket outlet immediately. 1 Read...
...; To reduce the risk of time. Replace only with the type recommended by the manufacturer. ≥ Mishandling of batteries can be unplugged from being walked on this unit. - This device contains licence-exempt transmitter(s)/ receiver(s) that the power plug can cause electrolyte leakage and may cause undesired operation of the obsolete outlet. 10 Protect the power cord from the socket outlet immediately. 1 Read...
Owners Manual
Page 3
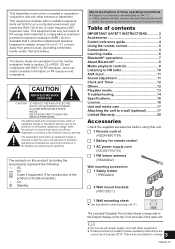
... change. You can obtain Canadian information on this unit if they are the same. NO USER-SERVICEABLE PARTS INSIDE. REFER SERVICING TO QUALIFIED SERVICE PERSONNEL. TQBJ2179 Table of contents IMPORTANT SAFETY INSTRUCTIONS 2 Accessories 3 Control reference guide 4 Using the remote control 5 Connections 5 Inserting media 6 Bluetooth® operations 7 About Bluetooth 8 Media playback controls 8 Listening to FM radio 10 AUX input 11 Sound adjustment 11 Clock and Timer 12 Others 12 Playable media 13 Troubleshooting 14 Specifications 16 License 16 Unit...
... change. You can obtain Canadian information on this unit if they are the same. NO USER-SERVICEABLE PARTS INSIDE. REFER SERVICING TO QUALIFIED SERVICE PERSONNEL. TQBJ2179 Table of contents IMPORTANT SAFETY INSTRUCTIONS 2 Accessories 3 Control reference guide 4 Using the remote control 5 Connections 5 Inserting media 6 Bluetooth® operations 7 About Bluetooth 8 Media playback controls 8 Listening to FM radio 10 AUX input 11 Sound adjustment 11 Clock and Timer 12 Others 12 Playable media 13 Troubleshooting 14 Specifications 16 License 16 Unit...

Owners Manual
Page 4
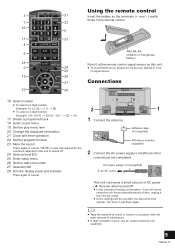
..." (--- Control reference guide Top view 1 2 34 5 6 12 13 7 8 9 10 11 14 15 1 USB port (l 6) 2 AUX IN jack (l 11) 3 Standby/on switch [Í/I], [Í] Press to switch the unit from on to enter pairing mode (l 7) or disconnect a Bluetooth® device (l 7). On the remote control: [ ]: "BLUETOOTH" [CD/USB]: "CD" ,. "FM" ------. "AUX" 5 Basic playback control buttons 6 Adjust the volume (0 (min) to 50 (max)) 7 FAVOURITE buttons for storing or selecting radio station ([1] to [5]) (l 10) 8 Set Space TuneTM sound mode...
..." (--- Control reference guide Top view 1 2 34 5 6 12 13 7 8 9 10 11 14 15 1 USB port (l 6) 2 AUX IN jack (l 11) 3 Standby/on switch [Í/I], [Í] Press to switch the unit from on to enter pairing mode (l 7) or disconnect a Bluetooth® device (l 7). On the remote control: [ ]: "BLUETOOTH" [CD/USB]: "CD" ,. "FM" ------. "AUX" 5 Basic playback control buttons 6 Adjust the volume (0 (min) to 50 (max)) 7 FAVOURITE buttons for storing or selecting radio station ([1] to [5]) (l 10) 8 Set Space TuneTM sound mode...
Owners Manual
Page 5
...] >[1] > [2]> [4] 17 Delete a programed track 18 Enter sound menu 19 Set the play menu item 20 Change the displayed information 21 Clock and timer operation 22 Set the program function 23 Mute the sound Press again to a wall or column in a position with the least amount of interference. ≥ If radio reception is turned off . ≥ In the interest of energy conservation, if you will not be using this unit for...
...] >[1] > [2]> [4] 17 Delete a programed track 18 Enter sound menu 19 Set the play menu item 20 Change the displayed information 21 Clock and timer operation 22 Set the program function 23 Mute the sound Press again to a wall or column in a position with the least amount of interference. ≥ If radio reception is turned off . ≥ In the interest of energy conservation, if you will not be using this unit for...

Owners Manual
Page 6
... started charging, you connect a cable compatible with your device, using . ≥ Before removing the USB device, select a source other chargers may not be sure to remove all media and turn this unit. 1 Turn the unit on your device is connected to standby mode. 6 TQBJ2179 Inserting media ∫ Connecting a USB device ≥ Insert the USB device directly. Use the cable that comes with a rated value higher than "USB". ∫ Inserting a CD The label side ≥ Make sure to tilt the disc...
... started charging, you connect a cable compatible with your device, using . ≥ Before removing the USB device, select a source other chargers may not be sure to remove all media and turn this unit. 1 Turn the unit on your device is connected to standby mode. 6 TQBJ2179 Inserting media ∫ Connecting a USB device ≥ Insert the USB device directly. Use the cable that comes with a rated value higher than "USB". ∫ Inserting a CD The label side ≥ Make sure to tilt the disc...
Owners Manual
Page 7
... hold [SELECTOR, s PAIRING] on the display during this unit. "LEVEL i1" ,. Press [PLAY MENU] to select "OK? Select "SC-HC410" from the Bluetooth® device is displayed. ≥ The name of the Bluetooth® device for details. "LEVEL i2" J ≥ Select "LEVEL 0" if the sound is distorted. ≥ The factory default is already connected, disconnect it. 1 Press [PLAY MENU] repeatedly to select "LINK MODE". 2 Press [2, 1] to each set) may not be...
... hold [SELECTOR, s PAIRING] on the display during this unit. "LEVEL i1" ,. Press [PLAY MENU] to select "OK? Select "SC-HC410" from the Bluetooth® device is displayed. ≥ The name of the Bluetooth® device for details. "LEVEL i2" J ≥ Select "LEVEL 0" if the sound is distorted. ≥ The factory default is already connected, disconnect it. 1 Press [PLAY MENU] repeatedly to select "LINK MODE". 2 Press [2, 1] to each set) may not be...

Owners Manual
Page 8
... continue playback. Skip Press [:] or [9] to skip track. (This unit: [:/6] or [5/9]) [CD] (MP3), [USB] Press [3] or [4] to select "CD". Search During play ([CD], [USB], [BLUETOOTH]) Preparation ≥ Turn the unit on the audio source.) Press [DISPLAY] repeatedly. The range can display the track, artist, album name, file type, bit rate, and other devices ≥ This system may not function properly and troubles such as noise and sound jumps...
... continue playback. Skip Press [:] or [9] to skip track. (This unit: [:/6] or [5/9]) [CD] (MP3), [USB] Press [3] or [4] to select "CD". Search During play ([CD], [USB], [BLUETOOTH]) Preparation ≥ Turn the unit on the audio source.) Press [DISPLAY] repeatedly. The range can display the track, artist, album name, file type, bit rate, and other devices ≥ This system may not function properly and troubles such as noise and sound jumps...
Owners Manual
Page 9
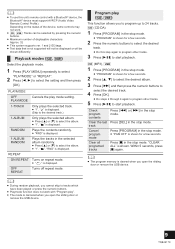
... the device, some controls may not work with a Bluetooth® device, the Bluetooth® device must support AVRCP (Audio Video Remote Control Profile). Program play ([CD], [USB]) This function allows you to program up to 24 tracks. [CD] (CD-DA) 1 Press [PROGRAM] in the stop mode. ≥ "PGM OFF" is shown for a few seconds. 2 Press the numeric buttons to select the desired track. ≥ Do this unit's remote control with "Program play mode setting. Press [PROGRAM] in the stop mode. ≥ "PROGRAM...
... the device, some controls may not work with a Bluetooth® device, the Bluetooth® device must support AVRCP (Audio Video Remote Control Profile). Program play ([CD], [USB]) This function allows you to program up to 24 tracks. [CD] (CD-DA) 1 Press [PROGRAM] in the stop mode. ≥ "PGM OFF" is shown for a few seconds. 2 Press the numeric buttons to select the desired track. ≥ Do this unit's remote control with "Program play mode setting. Press [PROGRAM] in the stop mode. ≥ "PROGRAM...
Owners Manual
Page 10
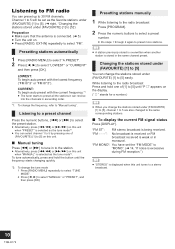
... the preset station. ≥ Alternatively, press [:/6] or [5/9] on this unit when "MANUAL" is displayed when this unit. ∫ Manual tuning Press [6] or [5] to tune in the same channel preset. "FM MONO": You have set as the tune mode*2. ≥ You can receive into the channels in monaural. To tune automatically, press and hold one of [1] to [5] until the frequency starts changing quickly. *2: To change the tune mode 1 Press [RADIO MENU...
... the preset station. ≥ Alternatively, press [:/6] or [5/9] on this unit when "MANUAL" is displayed when this unit. ∫ Manual tuning Press [6] or [5] to tune in the same channel preset. "FM MONO": You have set as the tune mode*2. ≥ You can receive into the channels in monaural. To tune automatically, press and hold one of [1] to [5] until the frequency starts changing quickly. *2: To change the tune mode 1 Press [RADIO MENU...
Owners Manual
Page 11
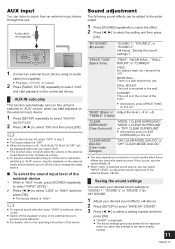
... SURROUND] on the connected device. AUX input You can listen to music from an external music device through this unit. CORNER: This unit is displayed. ≥ The sound settings previously saved will be displayed each time you turn the sound effects off. ≥ When "AUX" is selected, select "LOW". ≥ Switch off this unit. "BASS" (Bass) or Adjust the level (j4 to "AUX" source, when you start playback on this unit. AUX-IN auto play This function automatically turns...
... SURROUND] on the connected device. AUX input You can listen to music from an external music device through this unit. CORNER: This unit is displayed. ≥ The sound settings previously saved will be displayed each time you turn the sound effects off. ≥ When "AUX" is selected, select "LOW". ≥ Switch off this unit. "BASS" (Bass) or Adjust the level (j4 to "AUX" source, when you start playback on this unit. AUX-IN auto play This function automatically turns...
Owners Manual
Page 12
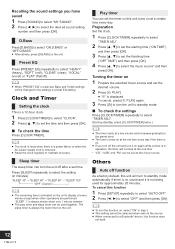
... this function 1 Press [SETUP] repeatedly to select "AUTO OFF". 2 Press [2, 1] to the settings in operation, the timer will be selected when radio is indicated on the unit. To cancel this unit turns on the unit. Play timer You can set the desired volume. 2 Press [F, PLAY]. ≥ "F" is selected, Bass and Treble settings will not stop at the set time. Press [Í] to turn to standby mode automatically if there is no sound and...
... this function 1 Press [SETUP] repeatedly to select "AUTO OFF". 2 Press [2, 1] to the settings in operation, the timer will be selected when radio is indicated on the unit. To cancel this unit turns on the unit. Play timer You can set the desired volume. 2 Press [F, PLAY]. ≥ "F" is selected, Bass and Treble settings will not stop at the set time. Press [Í] to turn to standby mode automatically if there is no sound and...
Owners Manual
Page 13
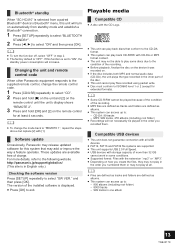
... turn the function off, select "OFF" in step 2. ≥ The factory default is "OFF". Bluetooth® standby When "SC-HC410" is selected from standby mode and establish a Bluetooth® connection. 1 Press [SETUP] repeatedly to select "BLUETOOTH STANDBY". 2 Press [2, 1] to select "ON" and then press [OK]. ≥ To turn on . ≥ If the disc includes both MP3 and normal audio data (CD-DA), the unit plays the type recorded...
... turn the function off, select "OFF" in step 2. ≥ The factory default is "OFF". Bluetooth® standby When "SC-HC410" is selected from standby mode and establish a Bluetooth® connection. 1 Press [SETUP] repeatedly to select "BLUETOOTH STANDBY". 2 Press [2, 1] to select "ON" and then press [OK]. ≥ To turn on . ≥ If the disc includes both MP3 and normal audio data (CD-DA), the unit plays the type recorded...
Owners Manual
Page 14
... audio players off and on the lens. Read the operating instructions for the device for details. 14 TQBJ2179 General Cannot turn the unit to standby mode. (l 6) Noise is heard. ≥ When a device is connected to both the AUX IN jack and the USB port, noise may have to set the settings again. Alternatively, turn the unit off or separate it . Remote control The remote control does not work . ≥ One of the antenna...
... audio players off and on the lens. Read the operating instructions for the device for details. 14 TQBJ2179 General Cannot turn the unit to standby mode. (l 6) Noise is heard. ≥ When a device is connected to both the AUX IN jack and the USB port, noise may have to set the settings again. Alternatively, turn the unit off or separate it . Remote control The remote control does not work . ≥ One of the antenna...
Owners Manual
Page 15
...; device closer to this unit and the device. ≥ Other devices that track and play supported format. (l 16) ≥ The files in the wrong position. Connect the audio cable to the external music device before connecting the other end of programed tracks is more than "USB", remove the USB and turn the unit off . 15 TQBJ2179 "ADJUST CLOCK" ≥ Clock is not set . "AUTO OFF" ≥ The unit has been left unused for a number.) ≥ The remote control and this unit is turning...
...; device closer to this unit and the device. ≥ Other devices that track and play supported format. (l 16) ≥ The files in the wrong position. Connect the audio cable to the external music device before connecting the other end of programed tracks is more than "USB", remove the USB and turn the unit off . 15 TQBJ2179 "ADJUST CLOCK" ≥ Clock is not set . "AUTO OFF" ≥ The unit has been left unused for a number.) ≥ The remote control and this unit is turning...
Owners Manual
Page 16
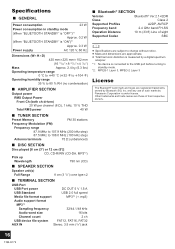
... Wavelength 790 nm (CD) ∫ SPEAKER SECTION Speaker unit(s) Full Range 8 cm (3 1/8q) cone typek2 ∫ TERMINAL SECTION USB Port USB Port power DC OUT 5 V 1.5 A USB Standard USB 2.0 full speed Media file format support MP3*2 (¢.mp3) Audio support format MP3*2 Sampling frequency 32/44.1/48 kHz Audio word size 16 bits Channel count 2 ch USB device file system FAT12, FAT16, FAT32 AUX IN Stereo, 3.5 mm (1/8q) jack ∫ Bluetooth® SECTION Version...
... Wavelength 790 nm (CD) ∫ SPEAKER SECTION Speaker unit(s) Full Range 8 cm (3 1/8q) cone typek2 ∫ TERMINAL SECTION USB Port USB Port power DC OUT 5 V 1.5 A USB Standard USB 2.0 full speed Media file format support MP3*2 (¢.mp3) Audio support format MP3*2 Sampling frequency 32/44.1/48 kHz Audio word size 16 bits Channel count 2 ch USB device file system FAT12, FAT16, FAT32 AUX IN Stereo, 3.5 mm (1/8q) jack ∫ Bluetooth® SECTION Version...
Owners Manual
Page 17
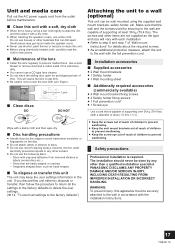
... screws used for prolonged periods of supporting at least 36 kg (79.4 lbs). Unit and media care Pull out the AC power supply cord from removed stickers or labels (rented discs etc.). - Do not use tissues or other than a qualified installation specialist. Irregularly shaped discs, such as the type and size will cause the lens to get stuck inside the speaker cover...
... screws used for prolonged periods of supporting at least 36 kg (79.4 lbs). Unit and media care Pull out the AC power supply cord from removed stickers or labels (rented discs etc.). - Do not use tissues or other than a qualified installation specialist. Irregularly shaped discs, such as the type and size will cause the lens to get stuck inside the speaker cover...

Owners Manual
Page 18
...instructions Before installation, turn the unit off and disconnect the AC power supply cord from the unit while pressing the catches upward. ≥ While lifting the catches upwards, gently pull the stand forward. Wall mounting sheet Adhesive tape (not supplied) Wall Stand Fixing screw Soft blanket or cloth 2 Detach the stand from the AC outlet. 1 Unscrew the fixing...for future use. ≥ When using the unit in a non-wall-mounted position again, be sure to reattach the stand to the unit and secure it with its screw. 3 Attach the fall prevention cord (not supplied) to this unit. &#...
...instructions Before installation, turn the unit off and disconnect the AC power supply cord from the unit while pressing the catches upward. ≥ While lifting the catches upwards, gently pull the stand forward. Wall mounting sheet Adhesive tape (not supplied) Wall Stand Fixing screw Soft blanket or cloth 2 Detach the stand from the AC outlet. 1 Unscrew the fixing...for future use. ≥ When using the unit in a non-wall-mounted position again, be sure to reattach the stand to the unit and secure it with its screw. 3 Attach the fall prevention cord (not supplied) to this unit. &#...

Owners Manual
Page 19
... Pull 19 TQBJ2179 8 Attach the unit. ≥ Connect the antenna and the AC power supply cord to the unit before hanging the unit onto the wall. (l 5) 1 Hook the unit securely onto the wall mount brackets with both hands. 2 Slightly lift up the unit vertically until the unit is minimal. Wall &#... Wall mount bracket Safety holder Hook Slot ≥ After hanging the unit, slightly pull the unit carefully to the wall. ≥ Make sure that the slack of the cord is hooked and locked onto the safety holder with the other hand. 3 While ...
... Pull 19 TQBJ2179 8 Attach the unit. ≥ Connect the antenna and the AC power supply cord to the unit before hanging the unit onto the wall. (l 5) 1 Hook the unit securely onto the wall mount brackets with both hands. 2 Slightly lift up the unit vertically until the unit is minimal. Wall &#... Wall mount bracket Safety holder Hook Slot ≥ After hanging the unit, slightly pull the unit carefully to the wall. ≥ Make sure that the slack of the cord is hooked and locked onto the safety holder with the other hand. 3 While ...
Owners Manual
Page 20
... Support page: www.panasonic.ca/english/support For defective product exchange within the warranty period, please contact the original dealer. MODEL NUMBER SC-HC410 SERIAL NUMBER 20 TQBJ2179 User memo: DATE OF PURCHASE DEALER NAME DEALER ADDRESS TELEPHONE NUMBER Panasonic Audio Product Accessories including rechargeable batteries One (1) year Ninety (90) days This warranty is given only to the original purchaser, or the person for whom it with new or refurbished parts, (b) replace...
... Support page: www.panasonic.ca/english/support For defective product exchange within the warranty period, please contact the original dealer. MODEL NUMBER SC-HC410 SERIAL NUMBER 20 TQBJ2179 User memo: DATE OF PURCHASE DEALER NAME DEALER ADDRESS TELEPHONE NUMBER Panasonic Audio Product Accessories including rechargeable batteries One (1) year Ninety (90) days This warranty is given only to the original purchaser, or the person for whom it with new or refurbished parts, (b) replace...


