
Owners Manual
Page 1
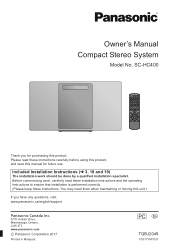
... 19) The installation work , carefully read these instructions. SC-HC400 Thank you have any questions, visit: www.panasonic.ca/english/support Panasonic Canada Inc. 5770 Ambler Drive, Mississauga, Ontario, L4W 2T3 www.panasonic.com C Panasonic Corporation 2017 Printed in Malaysia PC p TQBJ2049 F0317YM1037 You may need them when maintaining or moving this unit.) If you for purchasing this manual for future use. Owner's Manual Compact Stereo System Model No.
... 19) The installation work , carefully read these instructions. SC-HC400 Thank you have any questions, visit: www.panasonic.ca/english/support Panasonic Canada Inc. 5770 Ambler Drive, Mississauga, Ontario, L4W 2T3 www.panasonic.com C Panasonic Corporation 2017 Printed in Malaysia PC p TQBJ2049 F0317YM1037 You may need them when maintaining or moving this unit.) If you for purchasing this manual for future use. Owner's Manual Compact Stereo System Model No.

Owners Manual
Page 2
.... - Refer servicing to direct sunlight for a long period of the polarized or grounding-type plug. Do not heat or expose to rain, moisture, dripping or splashing. - Do not expose this apparatus during lightning storms or when unused for long periods of time. 14 Refer all instructions. 5 Do not use the remote control for a long period of explosion if battery is...
.... - Refer servicing to direct sunlight for a long period of the polarized or grounding-type plug. Do not heat or expose to rain, moisture, dripping or splashing. - Do not expose this apparatus during lightning storms or when unused for long periods of time. 14 Refer all instructions. 5 Do not use the remote control for a long period of explosion if battery is...
Owners Manual
Page 3
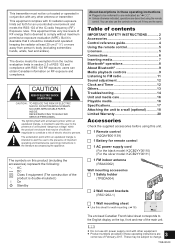
... IMPORTANT SAFETY INSTRUCTIONS 2 Accessories 3 Control reference guide 4 Using the remote control 5 Licenses 5 Connections 6 Inserting media 7 Bluetooth® operations 8 About Bluetooth 9 Media playback controls 9 Listening to FM radio 11 Sound adjustment 12 Clock and Timer 12 Others 13 Troubleshooting 14 Unit and media care 16 Playable media 16 Specifications 17 Attaching the unit to a wall (optional 18 Limited Warranty 20 Accessories Check the supplied accessories before using the remote control. This equipment has very low levels of RF...
... IMPORTANT SAFETY INSTRUCTIONS 2 Accessories 3 Control reference guide 4 Using the remote control 5 Licenses 5 Connections 6 Inserting media 7 Bluetooth® operations 8 About Bluetooth 9 Media playback controls 9 Listening to FM radio 11 Sound adjustment 12 Clock and Timer 12 Others 13 Troubleshooting 14 Unit and media care 16 Playable media 16 Specifications 17 Attaching the unit to a wall (optional 18 Limited Warranty 20 Accessories Check the supplied accessories before using the remote control. This equipment has very low levels of RF...

Owners Manual
Page 4
... jack (l 6) 3 Standby/on switch (Í/I) Press to switch the unit from on to enter pairing mode (l 8) or disconnect a Bluetooth® device (l 8). "AUX" 5 Basic playback control buttons 6 Adjust the volume (0 (min) to 50 (max)) 7 FAVOURITE buttons for storing or selecting radio station ([1] to [5]) (l 11) 8 Set wall mount mode 9 Select D.BASS 10 Adjust surround 11 Open or close the sliding door 12 Display 13 Sliding door 14 Remote control signal sensor Distance: Within approx. 7 m (23 ft) directly...
... jack (l 6) 3 Standby/on switch (Í/I) Press to switch the unit from on to enter pairing mode (l 8) or disconnect a Bluetooth® device (l 8). "AUX" 5 Basic playback control buttons 6 Adjust the volume (0 (min) to 50 (max)) 7 FAVOURITE buttons for storing or selecting radio station ([1] to [5]) (l 11) 8 Set wall mount mode 9 Select D.BASS 10 Adjust surround 11 Open or close the sliding door 12 Display 13 Sliding door 14 Remote control signal sensor Distance: Within approx. 7 m (23 ft) directly...
Owners Manual
Page 5
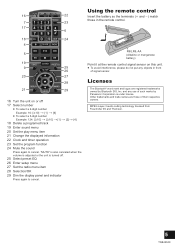
...-3 audio coding technology licensed from Fraunhofer IIS and Thomson. 5 TQBJ2049 Other trademarks and trade names are registered trademarks owned by Panasonic Corporation is turned off 17 Select number ≥ To select a 2-digit number Example: 16: [S10] > [1] > [6] ≥ To select a 3-digit number Example: 124: [S10] > [S10] >[1] > [2]> [4] 18 Delete a programed track 19 Enter sound menu 20 Set the play menu item 21 Change the displayed information 22 Clock and timer operation 23 Set the program function...
...-3 audio coding technology licensed from Fraunhofer IIS and Thomson. 5 TQBJ2049 Other trademarks and trade names are registered trademarks owned by Panasonic Corporation is turned off 17 Select number ≥ To select a 2-digit number Example: 16: [S10] > [1] > [6] ≥ To select a 3-digit number Example: 124: [S10] > [S10] >[1] > [2]> [4] 18 Delete a programed track 19 Enter sound menu 20 Set the play menu item 21 Change the displayed information 22 Clock and timer operation 23 Set the program function...

Owners Manual
Page 6
... system. Connect an external music device 1 Connect an external music device using this unit for an extended period of the device. 6 TQBJ2049 You have to the operating instructions of time, unplug it from the AC outlet. ≥ Some settings will be using an audio cable (not supplied). 2 ≥ Plug type: ‰3.5 mm (1/8q) stereo Press [RADIO, EXT-IN] repeatedly to select "NORMAL" or "HIGH" and then press [OK]. ≥ The factory default is "NORMAL...
... system. Connect an external music device 1 Connect an external music device using this unit for an extended period of the device. 6 TQBJ2049 You have to the operating instructions of time, unplug it from the AC outlet. ≥ Some settings will be using an audio cable (not supplied). 2 ≥ Plug type: ‰3.5 mm (1/8q) stereo Press [RADIO, EXT-IN] repeatedly to select "NORMAL" or "HIGH" and then press [OK]. ≥ The factory default is "NORMAL...
Owners Manual
Page 7
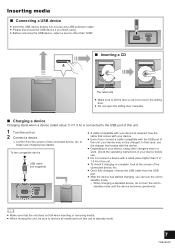
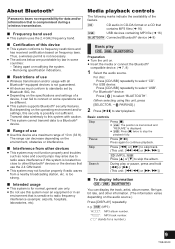
... manually. ∫ Charging a device Charging starts when a device (rated value: 5 V/1.5 A) is connected to the USB port of this unit. 1 Turn the unit on your device, using . ≥ Before removing the USB device, select a source other chargers may not be sure to remove all media and turn the unit to make sure charging has started charging, you connect a cable compatible with your device may not work. Check the operating instructions of the connected device, etc. ≥ Once fully charged, remove the USB cable from the screen...
... manually. ∫ Charging a device Charging starts when a device (rated value: 5 V/1.5 A) is connected to the USB port of this unit. 1 Turn the unit on your device, using . ≥ Before removing the USB device, select a source other chargers may not be sure to remove all media and turn the unit to make sure charging has started charging, you connect a cable compatible with your device may not work. Check the operating instructions of the connected device, etc. ≥ Once fully charged, remove the USB cable from the screen...
Owners Manual
Page 8
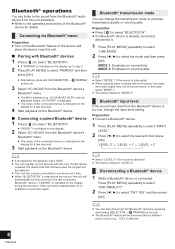
... replaced. ≥ This unit can register up to 8 devices with this case, select "MODE 1". ≥ The factory default is "LEVEL 0". Bluetooth® input level If the sound input level from the Bluetooth® device's Bluetooth® menu. ≥ The MAC address (e.g., 6C:5A:B5:B3:1D:0F) may not be connected to one device at a time. ≥ When "BLUETOOTH" is selected as the source, this unit will be displayed before "SC-HC400" is displayed...
... replaced. ≥ This unit can register up to 8 devices with this case, select "MODE 1". ≥ The factory default is "LEVEL 0". Bluetooth® input level If the sound input level from the Bluetooth® device's Bluetooth® menu. ≥ The MAC address (e.g., 6C:5A:B5:B3:1D:0F) may not be connected to one device at a time. ≥ When "BLUETOOTH" is selected as the source, this unit will be displayed before "SC-HC400" is displayed...
Owners Manual
Page 9
... file (l 16) [BLUETOOTH]: Connected Bluetooth® device (l 8) Basic play or pause, press and hold [6] or [5]. (This unit: [:/6] or [5/9]) ∫ To display information ([CD], [USB], [BLUETOOTH]) You can be different. ≥ This system supports Bluetooth® security features. Press again to select "CD". Thus, a wireless permit is displayed. ≥ [USB]: Press [∫] twice to start playback. Transmit data wirelessly to this unit, press [SELECTOR, s PAIRING].) 2 Press [1/;] to stop...
... file (l 16) [BLUETOOTH]: Connected Bluetooth® device (l 8) Basic play or pause, press and hold [6] or [5]. (This unit: [:/6] or [5/9]) ∫ To display information ([CD], [USB], [BLUETOOTH]) You can be different. ≥ This system supports Bluetooth® security features. Press again to select "CD". Thus, a wireless permit is displayed. ≥ [USB]: Press [∫] twice to start playback. Transmit data wirelessly to this unit, press [SELECTOR, s PAIRING].) 2 Press [1/;] to stop...
Owners Manual
Page 10
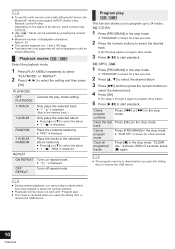
... buttons. ≥ Maximum number of the device, some controls may not work with a Bluetooth® device, the Bluetooth® device must support AVRCP (Audio Video Remote Control Profile). ≥ To use this step again to program other tracks. 5 Press [1/;] to start playback. [CD] (MP3), [USB] 1 Press [PROGRAM] in the selected album randomly. ≥ Press [3] or [4] to start playback. RANDOM Plays the contents randomly. ≥ "RND" is displayed. 1-ALBUM RANDOM Plays the tracks in the stop mode...
... buttons. ≥ Maximum number of the device, some controls may not work with a Bluetooth® device, the Bluetooth® device must support AVRCP (Audio Video Remote Control Profile). ≥ To use this step again to program other tracks. 5 Press [1/;] to start playback. [CD] (MP3), [USB] 1 Press [PROGRAM] in the selected album randomly. ≥ Press [3] or [4] to start playback. RANDOM Plays the contents randomly. ≥ "RND" is displayed. 1-ALBUM RANDOM Plays the tracks in the stop mode...
Owners Manual
Page 11
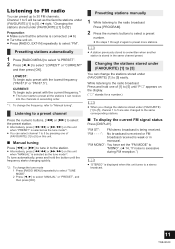
...": FM stereo broadcast is selected as the tune mode*2. Presetting stations automatically 1 Press [RADIO MENU] to select "A.PRESET". 2 Press [2, 1] to "Manual tuning". CURRENT: To begin auto preset with the current frequency.*1 ≥ The tuner starts to preset all the stations it can receive into the channels in the same channel preset. Listening to FM radio You can preset up to the same corresponding stations. ∫ To display the current FM signal status Press [DISPLAY...
...": FM stereo broadcast is selected as the tune mode*2. Presetting stations automatically 1 Press [RADIO MENU] to select "A.PRESET". 2 Press [2, 1] to "Manual tuning". CURRENT: To begin auto preset with the current frequency.*1 ≥ The tuner starts to preset all the stations it can receive into the channels in the same channel preset. Listening to FM radio You can preset up to the same corresponding stations. ∫ To display the current FM signal status Press [DISPLAY...
Owners Manual
Page 12
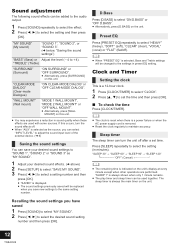
... play timer and sleep timer can turn the sound effects off. ≥ When "AUX" is a 12-hour clock. 1 Press [CLOCK/TIMER] to select "CLOCK". 2 Press [3, 4] to set time. "CLEAR-MODE DIALOG" (Clear-mode Dialogue) "ON CLEAR-MODE DIALOG" or "OFF CLEAR-MODE DIALOG". "TREBLE" (Treble) "SURROUND" (Surround) "ON SURROUND" or "OFF SURROUND". ≥ Alternatively, press [SURROUND] on the unit's display at every minute except when other operations are used together. Clock and...
... play timer and sleep timer can turn the sound effects off. ≥ When "AUX" is a 12-hour clock. 1 Press [CLOCK/TIMER] to select "CLOCK". 2 Press [3, 4] to set time. "CLEAR-MODE DIALOG" (Clear-mode Dialogue) "ON CLEAR-MODE DIALOG" or "OFF CLEAR-MODE DIALOG". "TREBLE" (Treble) "SURROUND" (Surround) "ON SURROUND" or "OFF SURROUND". ≥ Alternatively, press [SURROUND] on the unit's display at every minute except when other operations are used together. Clock and...
Owners Manual
Page 13
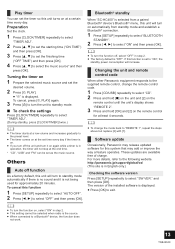
... version of charge. Changing the unit and remote control code When other Panasonic equipment responds to the supplied remote control, change the mode back to "REMOTE 1", repeat the steps above but replace [2] with [1]. These updates are available free of the installed software is "OFF". For more details, refer to the preset level. ≥ The timer comes on at the set time every day if the timer is displayed. 3 To cancel, press [F, PLAY] again...
... version of charge. Changing the unit and remote control code When other Panasonic equipment responds to the supplied remote control, change the mode back to "REMOTE 1", repeat the steps above but replace [2] with [1]. These updates are available free of the installed software is "OFF". For more details, refer to the preset level. ≥ The timer comes on at the set time every day if the timer is displayed. 3 To cancel, press [F, PLAY] again...
Owners Manual
Page 14
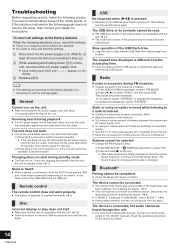
... "LINK MODE", select "MODE 1". (l 8) ≥ If the problem persists, turn off and on the display. 3 Release [Í/I]. ≥ The settings are not compatible with the unit (l 16). ≥ The USB host function of this unit. (l 16) ≥ There is depleted or inserted incorrectly. (l 5) Disc Incorrect display or play time. ≥ Copy the data to the factory defaults. Slow operation of distance between the antenna and AC power supply cord. ≥ Try using an...
... "LINK MODE", select "MODE 1". (l 8) ≥ If the problem persists, turn off and on the display. 3 Release [Í/I]. ≥ The settings are not compatible with the unit (l 16). ≥ The USB host function of this unit. (l 16) ≥ There is depleted or inserted incorrectly. (l 5) Disc Incorrect display or play time. ≥ Copy the data to the factory defaults. Slow operation of distance between the antenna and AC power supply cord. ≥ Try using an...
Owners Manual
Page 15
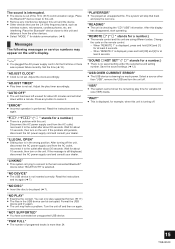
... wrong position. "REMOTE stands for a number.) ≥ The remote control and this display has disappeared, start operating. When "REMOTE 1" is out of programed tracks is a problem with this unit and the device. ≥ Other devices that track and play supported format. (l 17) ≥ The files in for about 30 seconds. "AUTO OFF" ≥ The unit has been left unused for the first time or there was a power failure recently. Read the instructions and try...
... wrong position. "REMOTE stands for a number.) ≥ The remote control and this display has disappeared, start operating. When "REMOTE 1" is out of programed tracks is a problem with this unit and the device. ≥ Other devices that track and play supported format. (l 17) ≥ The files in for about 30 seconds. "AUTO OFF" ≥ The unit has been left unused for the first time or there was a power failure recently. Read the instructions and try...
Owners Manual
Page 16
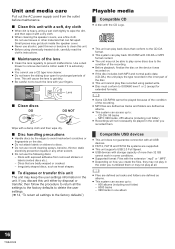
... discs, such as tracks and folders are supported. ≥ This unit supports USB 2.0 Full Speed. ≥ USB devices with storage capacity of the lens ≥ Clean the lens regularly to wipe the dirt, and then wipe it was recorded on. ≥ If the disc includes both MP3 and normal audio data (CD-DA), the unit plays the type recorded in the inner part of the disc. ≥ This unit cannot play files recorded using...
... discs, such as tracks and folders are supported. ≥ This unit supports USB 2.0 Full Speed. ≥ USB devices with storage capacity of the lens ≥ Clean the lens regularly to wipe the dirt, and then wipe it was recorded on. ≥ If the disc includes both MP3 and normal audio data (CD-DA), the unit plays the type recorded in the inner part of the disc. ≥ This unit cannot play files recorded using...

Owners Manual
Page 17
... Wavelength 790 nm (CD) ∫ SPEAKER SECTION Speaker unit(s) Full Range 8 cm (3 1/8q) cone typek2 ∫ TERMINAL SECTION USB Port USB Port power DC OUT 5 V 1.5 A USB Standard USB 2.0 full speed Media file format support MP3*2 (¢.mp3) Audio support format MP3*2 Sampling frequency 32/44.1/48 kHz Audio word size 16 bits Channel count 2 ch USB device file system FAT12, FAT16, FAT32 AUX IN Stereo, 3.5 mm (1/8q) jack ∫ Bluetooth® SECTION Version...
... Wavelength 790 nm (CD) ∫ SPEAKER SECTION Speaker unit(s) Full Range 8 cm (3 1/8q) cone typek2 ∫ TERMINAL SECTION USB Port USB Port power DC OUT 5 V 1.5 A USB Standard USB 2.0 full speed Media file format support MP3*2 (¢.mp3) Audio support format MP3*2 Sampling frequency 32/44.1/48 kHz Audio word size 16 bits Channel count 2 ch USB device file system FAT12, FAT16, FAT32 AUX IN Stereo, 3.5 mm (1/8q) jack ∫ Bluetooth® SECTION Version...
Owners Manual
Page 18
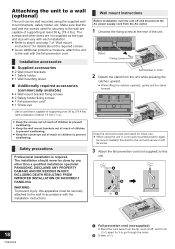
.... Make sure that is required. B 5 mm (3/16q) Safety precautions Professional installation is capable of supporting over 36 kg (79.4 lbs) (with a diameter of the unit. PANASONIC DISCLAIMS ANY PROPERTY DAMAGE AND/OR SERIOUS INJURY, INCLUDING DEATH RESULTING FROM IMPROPER INSTALLATION OR INCORRECT HANDLING. Wall mount instructions Before installation, turn the unit off and disconnect the AC power supply cord from the unit while...
.... Make sure that is required. B 5 mm (3/16q) Safety precautions Professional installation is capable of supporting over 36 kg (79.4 lbs) (with a diameter of the unit. PANASONIC DISCLAIMS ANY PROPERTY DAMAGE AND/OR SERIOUS INJURY, INCLUDING DEATH RESULTING FROM IMPROPER INSTALLATION OR INCORRECT HANDLING. Wall mount instructions Before installation, turn the unit off and disconnect the AC power supply cord from the unit while...

Owners Manual
Page 19
... of the cord is hooked and locked in the safety holder. ≥ The unit will be mounted. ≥ Spread out the wall mounting sheet when tapping it to the wall. Wall mounting sheet Adhesive tape (not supplied) Wall 8 Attach the unit. 1 Hook the unit securely onto the wall mount brackets with both wall mount brackets are level. ‰4.0 mm...
... of the cord is hooked and locked in the safety holder. ≥ The unit will be mounted. ≥ Spread out the wall mounting sheet when tapping it to the wall. Wall mounting sheet Adhesive tape (not supplied) Wall 8 Attach the unit. 1 Hook the unit securely onto the wall mount brackets with both wall mount brackets are level. ‰4.0 mm...
Owners Manual
Page 20
.... WARRANTY SERVICE For product operation, repairs and information assistance, please visit our Support page: www.panasonic.ca/english/support IF YOU SHIP THE PRODUCT TO A SERVICENTRE Carefully pack and send prepaid, adequately insured and preferably in materials or workmanship, and DOES NOT COVER normal wear and tear or cosmetic damage. One (1) year, parts and labour Home Theater Systems Product - MODEL NUMBER SC-HC400 SERIAL NUMBER User memo: DATE OF PURCHASE...
.... WARRANTY SERVICE For product operation, repairs and information assistance, please visit our Support page: www.panasonic.ca/english/support IF YOU SHIP THE PRODUCT TO A SERVICENTRE Carefully pack and send prepaid, adequately insured and preferably in materials or workmanship, and DOES NOT COVER normal wear and tear or cosmetic damage. One (1) year, parts and labour Home Theater Systems Product - MODEL NUMBER SC-HC400 SERIAL NUMBER User memo: DATE OF PURCHASE...


