
Owners Manual
Page 1
Owner's Manual Compact Stereo System Model No. Please keep this manual for purchasing this product. If you for future reference. For optimum performance and safety, please read these instructions carefully. SC-HC300 Thank you have any questions, visit: www.panasonic.ca/english/support Panasonic Canada Inc. 5770 Ambler Drive, Mississauga, Ontario, L4W 2T3 www.panasonic.com © Panasonic Corporation 2018 Printed in Malaysia PC En TQBJ2155 L0418YS1048
Owner's Manual Compact Stereo System Model No. Please keep this manual for purchasing this product. If you for future reference. For optimum performance and safety, please read these instructions carefully. SC-HC300 Thank you have any questions, visit: www.panasonic.ca/english/support Panasonic Canada Inc. 5770 Ambler Drive, Mississauga, Ontario, L4W 2T3 www.panasonic.com © Panasonic Corporation 2018 Printed in Malaysia PC En TQBJ2155 L0418YS1048
Owners Manual
Page 2
... following two conditions: (1) this device may cause undesired operation of controls 5 Preparing the media 6 Media playback 7 Radio 9 Clock and timers 10 Sound effects 11 External music device 11 Others 12 Troubleshooting 13 Maintenance 15 Specifications 16 References 17 Limited Warranty (ONLY FOR CANADA 18 TQBJ2155 2 Table of contents IMPORTANT SAFETY INSTRUCTIONS 3 Safety precautions 3 Supplied accessories 4 Making the connections 4 Preparing the remote control 4 Overview of the device. Your system and the...
... following two conditions: (1) this device may cause undesired operation of controls 5 Preparing the media 6 Media playback 7 Radio 9 Clock and timers 10 Sound effects 11 External music device 11 Others 12 Troubleshooting 13 Maintenance 15 Specifications 16 References 17 Limited Warranty (ONLY FOR CANADA 18 TQBJ2155 2 Table of contents IMPORTANT SAFETY INSTRUCTIONS 3 Safety precautions 3 Supplied accessories 4 Making the connections 4 Preparing the remote control 4 Overview of the device. Your system and the...

Owners Manual
Page 3
... off. • Remove the battery if you do not use this unit. • This unit utilizes a laser. Do not expose this unit so that produce heat. 9. CAUTION! Install this unit to direct sunlight for replacement of fire, electric shock or product damage, - Battery • Danger of time. Replace only with the type recommended by yourself. Keep these operating instructions carefully before using the unit. Unplug this apparatus during...
... off. • Remove the battery if you do not use this unit. • This unit utilizes a laser. Do not expose this unit so that produce heat. 9. CAUTION! Install this unit to direct sunlight for replacement of fire, electric shock or product damage, - Battery • Danger of time. Replace only with the type recommended by yourself. Keep these operating instructions carefully before using the unit. Unplug this apparatus during...
Owners Manual
Page 4
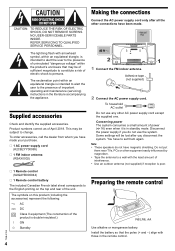
... battery. Install the battery so that may be lost after all the other AC power supply cord except the supplied one. The lightning flash with those in the literature accompanying the appliance. Adhesive tape (not supplied) 2 Connect the AC power supply cord. Note: • These speakers do not use any other connections have magnetic shielding. Product numbers correct as of important operating and maintenance (servicing) instructions in the remote control...
... battery. Install the battery so that may be lost after all the other AC power supply cord except the supplied one. The lightning flash with those in the literature accompanying the appliance. Adhesive tape (not supplied) 2 Connect the AC power supply cord. Note: • These speakers do not use any other connections have magnetic shielding. Product numbers correct as of important operating and maintenance (servicing) instructions in the remote control...

Owners Manual
Page 5
... A Standby/on switch [`], [1] Press to turn off the system. In standby mode, the unit is also canceled when you adjust the volume or when you turn the unit from on the main unit if they are the same. ENGLISH Overview of the display panel To cancel, press the button again. K View the play menu L Select the sound effects M AUX IN terminal (~11) N USB port ( ) (~12) O Sliding door P Display panel Q Remote control...
... A Standby/on switch [`], [1] Press to turn off the system. In standby mode, the unit is also canceled when you adjust the volume or when you turn the unit from on the main unit if they are the same. ENGLISH Overview of the display panel To cancel, press the button again. K View the play menu L Select the sound effects M AUX IN terminal (~11) N USB port ( ) (~12) O Sliding door P Display panel Q Remote control...
Owners Manual
Page 6
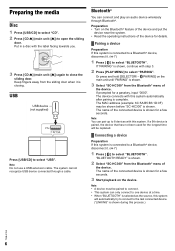
... for a few seconds. 3 Start playback on the main unit until "PAIRING" is shown. 2 Select "SC-HC300" from the Bluetooth® menu of the connected device is closing. Note: You can pair up to connect. • This system can connect and play an audio device wirelessly through a cable. The device connects with the label facing towards you. 3 Press [CD x] (main unit: [x]) again to select "USB". Preparing the media Disc 1 Press [USB/CD] to select "CD...
... for a few seconds. 3 Start playback on the main unit until "PAIRING" is shown. 2 Select "SC-HC300" from the Bluetooth® menu of the connected device is closing. Note: You can pair up to connect. • This system can connect and play an audio device wirelessly through a cable. The device connects with the label facing towards you. 3 Press [CD x] (main unit: [x]) again to select "USB". Preparing the media Disc 1 Press [USB/CD] to select "CD...
Owners Manual
Page 7
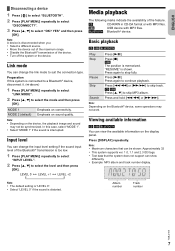
... connection type. Input level You can view the available information on connectivity. Basic playback CD USB BLUETOOTH Play Stop Press [4/9]. USB The position is interrupted. CD USB Press [R, T] to skip track. Viewing available information CD USB BLUETOOTH You can change the link mode to select the level and then press [OK]. Press [DISPLAY] repeatedly. Album number Track number TQBJ2155 7 MODE 1 MODE 2 (default) Emphasis on the display panel. Media playback The following marks indicate the availability of the device. • Turn...
... connection type. Input level You can view the available information on connectivity. Basic playback CD USB BLUETOOTH Play Stop Press [4/9]. USB The position is interrupted. CD USB Press [R, T] to skip track. Viewing available information CD USB BLUETOOTH You can change the link mode to select the level and then press [OK]. Press [DISPLAY] repeatedly. Album number Track number TQBJ2155 7 MODE 1 MODE 2 (default) Emphasis on the display panel. Media playback The following marks indicate the availability of the device. • Turn...
Owners Manual
Page 8
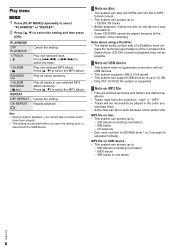
Play all USB devices. • This system supports USB 2.0 full speed. • This system can access up to ISO9660 level 1 or 2 (except for extended formats). Press [R, T] to select the track. CD-DA: 99 tracks • Before playback, finalize the disc on the device it was recorded on. • Some CD-R/RW cannot be played in the order you recorded them. • Some files can fail to work because of...
Play all USB devices. • This system supports USB 2.0 full speed. • This system can access up to ISO9660 level 1 or 2 (except for extended formats). Press [R, T] to select the track. CD-DA: 99 tracks • Before playback, finalize the disc on the device it was recorded on. • Some CD-R/RW cannot be played in the order you recorded them. • Some files can fail to work because of...

Owners Manual
Page 9
... starts changing quickly. To cancel, press [8]. FM - - - - The FM signal is being received. After a few seconds, the display panel shows the current minimum radio frequency. TQBJ2155 9 Repeat steps 3 to 5 to the station. Manual tuning 1 Press [PLAY MENU] repeatedly to select "TUNE MODE". 2 Press [R, T] to select "MANUAL" and then press [OK]. 3 Press [2/3] or [5/6] to tune in stereo. "STEREO" is shown when a stereo broadcast is in to preset more stations...
... starts changing quickly. To cancel, press [8]. FM - - - - The FM signal is being received. After a few seconds, the display panel shows the current minimum radio frequency. TQBJ2155 9 Repeat steps 3 to 5 to the station. Manual tuning 1 Press [PLAY MENU] repeatedly to select "TUNE MODE". 2 Press [R, T] to select "MANUAL" and then press [OK]. 3 Press [2/3] or [5/6] to tune in stereo. "STEREO" is shown when a stereo broadcast is in to preset more stations...
Owners Manual
Page 10
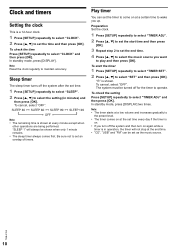
... play and then press [OK]. Note: • The timer starts at a low volume and increases gradually to the preset level. • The timer comes on at the set the timer to come on again while a timer is shown. To cancel, select "OFF". In standby mode, press [DISPLAY] two times. Be sure not to set the start the timer 1 Press [SETUP] repeatedly to select "TIMER SET...
... play and then press [OK]. Note: • The timer starts at a low volume and increases gradually to the preset level. • The timer comes on at the set the timer to come on again while a timer is shown. To cancel, select "OFF". In standby mode, press [DISPLAY] two times. Be sure not to set the start the timer 1 Press [SETUP] repeatedly to select "TIMER SET...
Owners Manual
Page 11
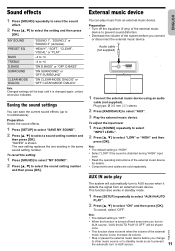
... operating instructions of the external music device for details. • Components and cables are sold separately. To recall the setting 1 Press [SOUND] to select "MY SOUND". 2 Press [R, T] to select "LOW" or "HIGH" and then press [OK]. TQBJ2155 ENGLISH Plug type: Ø 3.5 mm (1/8″) stereo 2 Press [RADIO/AUX] to select a sound setting number and then press [OK]. AUX IN auto play music from an external music device. MY SOUND PRESET EQ BASS TREBLE D.BASS SURROUND CLEAR-MODE DIALOG "SOUND 1", "SOUND 2" or "SOUND...
... operating instructions of the external music device for details. • Components and cables are sold separately. To recall the setting 1 Press [SOUND] to select "MY SOUND". 2 Press [R, T] to select "LOW" or "HIGH" and then press [OK]. TQBJ2155 ENGLISH Plug type: Ø 3.5 mm (1/8″) stereo 2 Press [RADIO/AUX] to select a sound setting number and then press [OK]. AUX IN auto play music from an external music device. MY SOUND PRESET EQ BASS TREBLE D.BASS SURROUND CLEAR-MODE DIALOG "SOUND 1", "SOUND 2" or "SOUND...
Owners Manual
Page 12
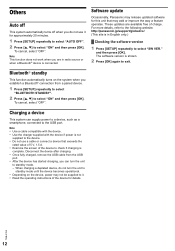
... device if power is not supplied to the device. • Do not use it . • Read the operating instructions of charge. When charging a depleted device, do not use a cable or connect a device that may not be supplied to exit. Note: This function does not work when you are available free of the device for approximately 20 minutes. 1 Press [SETUP] repeatedly to select "AUTO OFF". 2 Press [R, T] to standby mode until the device becomes operational...
... device if power is not supplied to the device. • Do not use it . • Read the operating instructions of charge. When charging a depleted device, do not use a cable or connect a device that may not be supplied to exit. Note: This function does not work when you are available free of the device for approximately 20 minutes. 1 Press [SETUP] repeatedly to select "AUTO OFF". 2 Press [R, T] to standby mode until the device becomes operational...
Owners Manual
Page 13
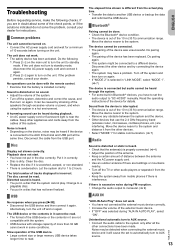
... Auto Play" does not work. • You have not connected the external music device correctly. • Increase the volume of the 10 m (33 ft) communication range. Sound from the cables of tracks displayed is dirty. Do the following checks. Press [1] on the main unit to "SC-HC300" manually. Clean the disc. • Replace the disc if it will cause the set the audio output to turn on again. The disc cannot be connected to standby mode. Do pairing...
... Auto Play" does not work. • You have not connected the external music device correctly. • Increase the volume of the 10 m (33 ft) communication range. Sound from the cables of tracks displayed is dirty. Do the following checks. Press [1] on the main unit to "SC-HC300" manually. Clean the disc. • Replace the disc if it will cause the set the audio output to turn on again. The disc cannot be connected to standby mode. Do pairing...
Owners Manual
Page 14
.... █ Main unit displays "--:--" • You connected the AC power supply cord for the first time or there was done. Set the clock. Adjust the play time for a minimum of the remote control. - "ERROR" • An incorrect operation was a power failure recently. "F61" "F77" • Disconnect the AC power supply cord and consult your dealer. "F76" • There is not in a disc. "NO DEVICE" • The USB device is using different codes. You can...
.... █ Main unit displays "--:--" • You connected the AC power supply cord for the first time or there was done. Set the clock. Adjust the play time for a minimum of the remote control. - "ERROR" • An incorrect operation was a power failure recently. "F61" "F77" • Disconnect the AC power supply cord and consult your dealer. "F76" • There is not in a disc. "NO DEVICE" • The USB device is using different codes. You can...

Owners Manual
Page 15
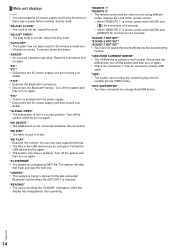
... main unit and [USB/CD] on the main unit, connect the AC power supply cord again. System memory reset Reset the memory when the following situations occur: • There is shown. 3 Release [1]. Clean this system with the cloth carefully. ENGLISH Remote control code When other Panasonic equipment responds to the remote control of this system, change the remote control code for this system. • Before using chemically treated cloth, read the instructions that...
... main unit and [USB/CD] on the main unit, connect the AC power supply cord again. System memory reset Reset the memory when the following situations occur: • There is shown. 3 Release [1]. Clean this system with the cloth carefully. ENGLISH Remote control code When other Panasonic equipment responds to the remote control of this system, change the remote control code for this system. • Before using chemically treated cloth, read the instructions that...
Owners Manual
Page 16
....00 MHz (100 kHz step) Antenna terminals 75 Ω (unbalanced) AUX input Terminal Stereo, 3.5 mm (1/8″) jack █ Disc section Disc played [8 cm (3″) or 12 cm (5″)] CD, CD-R/RW (CD-DA, MP3 2) Pick up Wavelength 790 nm (CD) █ USB section USB port power USB standard Media file format support Audio support format Sampling frequency Audio word size Channel count USB device file system WDC OUT 5 V 1.5 A USB 2.0 full speed MP3 (*.mp3) MP3 2 32...
....00 MHz (100 kHz step) Antenna terminals 75 Ω (unbalanced) AUX input Terminal Stereo, 3.5 mm (1/8″) jack █ Disc section Disc played [8 cm (3″) or 12 cm (5″)] CD, CD-R/RW (CD-DA, MP3 2) Pick up Wavelength 790 nm (CD) █ USB section USB port power USB standard Media file format support Audio support format Sampling frequency Audio word size Channel count USB device file system WDC OUT 5 V 1.5 A USB 2.0 full speed MP3 (*.mp3) MP3 2 32...
Owners Manual
Page 17
... and troubles such as noise and sound jumps may not function properly if radio waves from other Bluetooth® devices or the devices that is located too close to radio wave interference if this unit is compromised during a wireless transmission. Interference from a nearby broadcasting station, etc. Intended usage • This system is sensitive to a Bluetooth® device. ENGLISH References About Bluetooth® Panasonic...
... and troubles such as noise and sound jumps may not function properly if radio waves from other Bluetooth® devices or the devices that is located too close to radio wave interference if this unit is compromised during a wireless transmission. Interference from a nearby broadcasting station, etc. Intended usage • This system is sensitive to a Bluetooth® device. ENGLISH References About Bluetooth® Panasonic...
Owners Manual
Page 18
... specific legal rights and you in new condition in Canada, which are also excluded from the date of God. Panasonic Audio Product Accessories including rechargeable batteries One (1) year Ninety (90) days This warranty is ", and which product was delivered to defects in shipment, or failures which product was not sold "as stated below and keep for future reference. MODEL NUMBER SC-HC300 SERIAL NUMBER User...
... specific legal rights and you in new condition in Canada, which are also excluded from the date of God. Panasonic Audio Product Accessories including rechargeable batteries One (1) year Ninety (90) days This warranty is ", and which product was delivered to defects in shipment, or failures which product was not sold "as stated below and keep for future reference. MODEL NUMBER SC-HC300 SERIAL NUMBER User...


