
SAST1 User Guide
Page 1
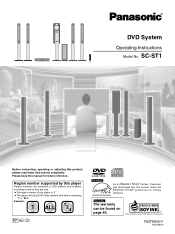
...-ST1 Before connecting, operating or adjusting this player is "1". ¡The player will play DVD-Video marked with labels containing "1" or "ALL". DIGITAL VIDEO As an ENERGY STAR® Partner, Panasonic has determined that this manual for energy efficiency. PHONES r AC IN AV SYSTEM TV VCR.../AUX SLEEP TV/VIDEO TUNER/BAND DVD/CD FL DISPLAY DIMMER 1 PLAY MODE MIX 2CH 4 REPEAT 7 POSITION MEMORY ...
...-ST1 Before connecting, operating or adjusting this player is "1". ¡The player will play DVD-Video marked with labels containing "1" or "ALL". DIGITAL VIDEO As an ENERGY STAR® Partner, Panasonic has determined that this manual for energy efficiency. PHONES r AC IN AV SYSTEM TV VCR.../AUX SLEEP TV/VIDEO TUNER/BAND DVD/CD FL DISPLAY DIMMER 1 PLAY MODE MIX 2CH 4 REPEAT 7 POSITION MEMORY ...
SAST1 User Guide
Page 2
For optimum performance and safety, please read these materials may be determined by turning the equipment off and on, the user is encouraged to try to correct the interference by one or more of the following two conditions: (1) This device may not cause harmful interference, and (2) this equipment does cause harmful interference to radio or television reception, which the receiver is no guarantee that interference will not occur in some components. WARNING: TO REDUCE THE RISK OF FIRE, ELECTRIC SHOCK OR PRODUCT DAMAGE, DO NOT EXPOSE THIS APPARATUS TO RAIN, MOISTURE, DRIPPING OR ...
For optimum performance and safety, please read these materials may be determined by turning the equipment off and on, the user is encouraged to try to correct the interference by one or more of the following two conditions: (1) This device may not cause harmful interference, and (2) this equipment does cause harmful interference to radio or television reception, which the receiver is no guarantee that interference will not occur in some components. WARNING: TO REDUCE THE RISK OF FIRE, ELECTRIC SHOCK OR PRODUCT DAMAGE, DO NOT EXPOSE THIS APPARATUS TO RAIN, MOISTURE, DRIPPING OR ...
SAST1 User Guide
Page 3
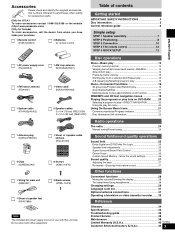
Use numbers indicated in parentheses when asking for replacement parts. (Only for U.S.A.) To order accessories contact 1-800-332-5368 or the website (http:// www.panasonic.com). (Only for Canada) To order accessories, call the dealer from whom you have made your purchase. 1 Remote control (EUR7623X20) 2 Batteries for...Marking places to play again/Variable zoom function 18 WMA/MP3 and CD text navigation menus 19 Playing the programs or play lists on DVD-RAM ...........20 Selecting a program to play-DIRECT NAVIGATOR 20 Using the play list menu 20 Using On-Screen Menu lcons 21 Common ...
Use numbers indicated in parentheses when asking for replacement parts. (Only for U.S.A.) To order accessories contact 1-800-332-5368 or the website (http:// www.panasonic.com). (Only for Canada) To order accessories, call the dealer from whom you have made your purchase. 1 Remote control (EUR7623X20) 2 Batteries for...Marking places to play again/Variable zoom function 18 WMA/MP3 and CD text navigation menus 19 Playing the programs or play lists on DVD-RAM ...........20 Selecting a program to play-DIRECT NAVIGATOR 20 Using the play list menu 20 Using On-Screen Menu lcons 21 Common ...

SAST1 User Guide
Page 4
When a cart is used, use attachments/accessories specified by the manufacturer. 12) Use only with the cart, stand, tripod, bracket, or table specified by the manufacturer, or sold with the apparatus. RQT6945 4 Install in accordance with the manufacturer's instructions. 8) Do not install near any heat sources such as power-supply cord or plug is required when the apparatus has been damaged in any ventilation openings. Servicing is damaged, liquid has been spilled or objects have fallen into your safety. A polarized plug has two blades with dry cloth. 11) Only use caution when moving...
When a cart is used, use attachments/accessories specified by the manufacturer. 12) Use only with the cart, stand, tripod, bracket, or table specified by the manufacturer, or sold with the apparatus. RQT6945 4 Install in accordance with the manufacturer's instructions. 8) Do not install near any heat sources such as power-supply cord or plug is required when the apparatus has been damaged in any ventilation openings. Servicing is damaged, liquid has been spilled or objects have fallen into your safety. A polarized plug has two blades with dry cloth. 11) Only use caution when moving...
SAST1 User Guide
Page 5
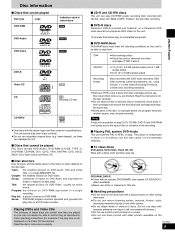
...static electricity prevention liquids or any other discs correctly. ¡Do not use cloths or cleaners for play lists on DVD-RAM. Read the disc's instructions carefully. s DVD-R discs Panasonic DVD-R recorded and finalized∗ on the disc type. Read the instructions for example if the play on the label...time is compressed to show it to NTSC for CDs etc. s Disc structure Disc structure and the labels given to a single recording. s DVD-RAM discs DVD-RAM discs must meet the following conditions for this unit to be able to become dirty or scratched. Store discs in these...
...static electricity prevention liquids or any other discs correctly. ¡Do not use cloths or cleaners for play lists on DVD-RAM. Read the disc's instructions carefully. s DVD-R discs Panasonic DVD-R recorded and finalized∗ on the disc type. Read the instructions for example if the play on the label...time is compressed to show it to NTSC for CDs etc. s Disc structure Disc structure and the labels given to a single recording. s DVD-RAM discs DVD-RAM discs must meet the following conditions for this unit to be able to become dirty or scratched. Store discs in these...
SAST1 User Guide
Page 6
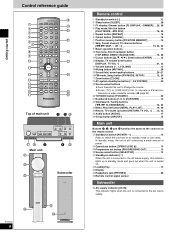
... to the AC mains supply. Getting started Control reference guide 1 2 3 4 5 6 7 8 9 10 AV SYSTEM TV VCR/AUX SLEEP TV/VIDEO TUNER/BAND DVD/CD FL DISPLAY DIMMER 1 PLAY MODE MIX 2CH 4 REPEAT 7 POSITION MEMORY CANCEL SKIP 23 56 89 >=10/ ENTER 0 SLOW/SEARCH CH TOP MENU DIRECT NAVIGATOR... [^] When the unit is connected to the AC mains supply, this unit to change the source. ¡Press [TV] or [VCR/AUX] first to operate a Panasonic television or video cassette recorder (\ page 32). @0 TV/VIDEO button [TV/VIDEO 32 @1 Numbered buttons [1-9, 0, =>10/ENTER 14 @2 Slow/search, Tuning buttons [t,...
... to the AC mains supply. Getting started Control reference guide 1 2 3 4 5 6 7 8 9 10 AV SYSTEM TV VCR/AUX SLEEP TV/VIDEO TUNER/BAND DVD/CD FL DISPLAY DIMMER 1 PLAY MODE MIX 2CH 4 REPEAT 7 POSITION MEMORY CANCEL SKIP 23 56 89 >=10/ ENTER 0 SLOW/SEARCH CH TOP MENU DIRECT NAVIGATOR... [^] When the unit is connected to the AC mains supply, this unit to change the source. ¡Press [TV] or [VCR/AUX] first to operate a Panasonic television or video cassette recorder (\ page 32). @0 TV/VIDEO button [TV/VIDEO 32 @1 Numbered buttons [1-9, 0, =>10/ENTER 14 @2 Slow/search, Tuning buttons [t,...

SAST1 User Guide
Page 7
Only the lengths of speaker (for SURROUND L/R) 8 Screws Simple setup 1 Stand + Base Speaker unit Stand Base Approx. 120 mm (4-3/4") Stand \ Base Fit into groove. Place into groove. Connect the speaker cables. Black Red Copper \ Stand/Base Silver Fit into groove. Position wire in grooves as necessary avoiding knots. Place into groove. ¡You can put front and surround speakers on the shelf by connecting a speaker directly to the base. Preparing the center speaker 1 Short cable 1 Sheet of the cables are the same. Connect the speaker cables. Confirm screw ...
Only the lengths of speaker (for SURROUND L/R) 8 Screws Simple setup 1 Stand + Base Speaker unit Stand Base Approx. 120 mm (4-3/4") Stand \ Base Fit into groove. Place into groove. Connect the speaker cables. Black Red Copper \ Stand/Base Silver Fit into groove. Position wire in grooves as necessary avoiding knots. Place into groove. ¡You can put front and surround speakers on the shelf by connecting a speaker directly to the base. Preparing the center speaker 1 Short cable 1 Sheet of the cables are the same. Connect the speaker cables. Confirm screw ...

SAST1 User Guide
Page 8
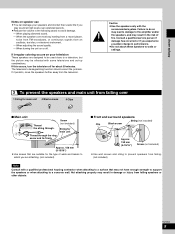
Take proper precautions to prevent the speakers from falling if you set them from the seating position. Note the following points. ¡Place speakers on flat secure bases. ¡Placing speakers too close to floors, walls, and corners can damage the unit and sound quality will be effective. Cover walls and windows with thick curtain. Put the center speaker on a rack or shelf. Leave 10 cm (4") on the right for ventilation. Use those you have connected the short cords to as front speakers and those you have connected the long cords to as surround speakers. ¡Place ...
Take proper precautions to prevent the speakers from falling if you set them from the seating position. Note the following points. ¡Place speakers on flat secure bases. ¡Placing speakers too close to floors, walls, and corners can damage the unit and sound quality will be effective. Cover walls and windows with thick curtain. Put the center speaker on a rack or shelf. Leave 10 cm (4") on the right for ventilation. Use those you have connected the short cords to as front speakers and those you have connected the long cords to as surround speakers. ¡Place ...
SAST1 User Guide
Page 9
Caution ¡Use the speakers only with a qualified professional housing contractor when attaching to a surface that are suitable for the type of fire. Screw (not included) String for main unit Approx. 150 mm (5-15/16") ¡Use screws that may not have enough strength to support the speakers or when attaching to a concrete wall. When turning the unit on or off for main unit 4 Black screws 4 Clips s Main unit Thread the string through the ring screw and tie firmly. If irregular coloring occurs on your speakers and shorten their useful life if you play sound at high levels ...
Caution ¡Use the speakers only with a qualified professional housing contractor when attaching to a surface that are suitable for the type of fire. Screw (not included) String for main unit Approx. 150 mm (5-15/16") ¡Use screws that may not have enough strength to support the speakers or when attaching to a concrete wall. When turning the unit on or off for main unit 4 Black screws 4 Clips s Main unit Thread the string through the ring screw and tie firmly. If irregular coloring occurs on your speakers and shorten their useful life if you play sound at high levels ...

SAST1 User Guide
Page 10
Simple setup STEP 3 Connection 1 System Cable 1 AM loop antenna 1 FM indoor antenna 1 Video cable 1 AC power supply cord Simple setup 1 Speakers L1 R2 L3 R4 5 Black Click! Silver Subwoofer Note ¡Never short-circuit positive (+) and negative (-) speaker wires. Remove the cover Catch TO SUBW Å O O F E R h TO S U BWO Å OF E R h You can damage the speakers. Front (L) Front (R) Surround (L) Surround (R) Center L1 R2 HSAPUET_A-PKAERRLSEURS + L3 R4 5 (6Ω) FRONT (6Ω) SURROUND (6Ω) CENTER 2 System cable Subwoofer Catch facing ...
Simple setup STEP 3 Connection 1 System Cable 1 AM loop antenna 1 FM indoor antenna 1 Video cable 1 AC power supply cord Simple setup 1 Speakers L1 R2 L3 R4 5 Black Click! Silver Subwoofer Note ¡Never short-circuit positive (+) and negative (-) speaker wires. Remove the cover Catch TO SUBW Å O O F E R h TO S U BWO Å OF E R h You can damage the speakers. Front (L) Front (R) Surround (L) Surround (R) Center L1 R2 HSAPUET_A-PKAERRLSEURS + L3 R4 5 (6Ω) FRONT (6Ω) SURROUND (6Ω) CENTER 2 System cable Subwoofer Catch facing ...

SAST1 User Guide
Page 11
... into the unit's memory remains intact for either interlace or progressive output and provide a purer picture COMPONENT VIDEO IN Y than the VIDEO OUT terminal by Panasonic and that have another brand of the component video input terminals depends on the television.) S video cable (not included) RQT6945 11 Do not connect the...
... into the unit's memory remains intact for either interlace or progressive output and provide a purer picture COMPONENT VIDEO IN Y than the VIDEO OUT terminal by Panasonic and that have another brand of the component video input terminals depends on the television.) S video cable (not included) RQT6945 11 Do not connect the...
SAST1 User Guide
Page 12
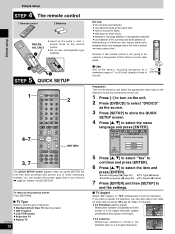
... alkaline or manganese batteries. ¡use rechargeable type batteries. 3 STEP 5 1 2 QUICK SETUP 1 4-7 3, 7 AV SYSTEM TV VCR/AUX SLEEP TV/VIDEO TUNER/BAND DVD/CD FL DISPLAY DIMMER 1 PLAY MODE MIX 2CH 4 REPEAT 7 POSITION MEMORY CANCEL SKIP 23 56 89 >=10/ ENTER 0 SLOW/SEARCH CH TOP MENU DIRECT NAVIGATOR... assists you need to the previous screen Press [RETURN]. Remove if the remote control is shown in the letterbox style on the unit. 2 Press [DVD/CD] to select "DVD/CD" as the source. 3 Press [SETUP] to show the QUICK SETUP screen. 4 Press [e, r] to suit the type of time. s TV...
... alkaline or manganese batteries. ¡use rechargeable type batteries. 3 STEP 5 1 2 QUICK SETUP 1 4-7 3, 7 AV SYSTEM TV VCR/AUX SLEEP TV/VIDEO TUNER/BAND DVD/CD FL DISPLAY DIMMER 1 PLAY MODE MIX 2CH 4 REPEAT 7 POSITION MEMORY CANCEL SKIP 23 56 89 >=10/ ENTER 0 SLOW/SEARCH CH TOP MENU DIRECT NAVIGATOR... assists you need to the previous screen Press [RETURN]. Remove if the remote control is shown in the letterbox style on the unit. 2 Press [DVD/CD] to select "DVD/CD" as the source. 3 Press [SETUP] to show the QUICK SETUP screen. 4 Press [e, r] to suit the type of time. s TV...
SAST1 User Guide
Page 13
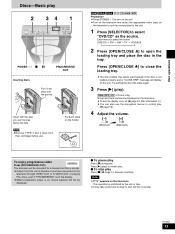
...this unit is interlace if you have connected to turn the display on or off (\ page 22, Disc information 5). ¡You can also use . RAM DVD-A DVD-V VCD CD WMA MP3 Preparation ¡Press [POWER 8] to the television through VIDEO OUT or S VIDEO OUT or playing PAL discs, even if "PROGRESSIVE... 2 34 1 POWER 8 g h PROGRESSIVE OUT Inserting discs Put 12-cm discs into place again. 3 Press [q] (play). Insert with the side you press the button: DVD/CD / FM / AM / TV / VCR/AUX , 2 Press [OPEN/CLOSE ;] to play facing the lens. Each time you want to open the loading tray and ...
...this unit is interlace if you have connected to turn the display on or off (\ page 22, Disc information 5). ¡You can also use . RAM DVD-A DVD-V VCD CD WMA MP3 Preparation ¡Press [POWER 8] to the television through VIDEO OUT or S VIDEO OUT or playing PAL discs, even if "PROGRESSIVE... 2 34 1 POWER 8 g h PROGRESSIVE OUT Inserting discs Put 12-cm discs into place again. 3 Press [q] (play). Insert with the side you press the button: DVD/CD / FM / AM / TV / VCR/AUX , 2 Press [OPEN/CLOSE ;] to play facing the lens. Each time you want to open the loading tray and ...
SAST1 User Guide
Page 14
...memorized, "RESUME" lights on up to Preview Chapters when "RESUME" is displayed. Note ¡The disc continues to clear the position. DVD-A DVD-V VCD CD WMA MP3 RAM Chapter/track twice Program/scene Play position Chapter/track Chapter/track once once twice Play position Marker Program/scene... down or speed up to preserve the unit's motor and your selection. The position is replaced. Position memorized Press again to the menu screen DVD-A DVD-V [TOP MENU]: Shows the first menu screen. RQT6945 (This feature works only within a title.) 14 If you pressed [g] or [POSITION ...
...memorized, "RESUME" lights on up to Preview Chapters when "RESUME" is displayed. Note ¡The disc continues to clear the position. DVD-A DVD-V VCD CD WMA MP3 RAM Chapter/track twice Program/scene Play position Chapter/track Chapter/track once once twice Play position Marker Program/scene... down or speed up to preserve the unit's motor and your selection. The position is replaced. Position memorized Press again to the menu screen DVD-A DVD-V [TOP MENU]: Shows the first menu screen. RQT6945 (This feature works only within a title.) 14 If you pressed [g] or [POSITION ...
SAST1 User Guide
Page 15
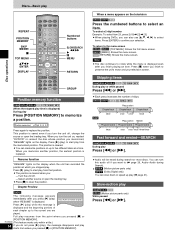
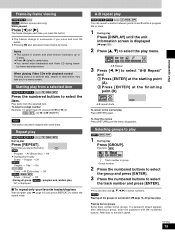
...[REPEAT]. To clear the menus Press [RETURN] until the unit information screen is displayed. RQT6945 15 Disc operations Play starts from a selected item RAM DVD-A DVD-V VCD CD WMA MP3 Press the numbered buttons to select the play "All" is displayed (\ page 22). 2 Press [e, r] to select the ...in succession (\ page 16, All group play Press [DISPLAY] until the menu disappears. Playing bonus groups Some discs contain bonus groups. A-B repeat play RAM DVD-A DVD-V VCD CD WMA MP3 You can also use [e, r, w, q] to the normal play Press [GROUP]. A B AxB A-B repeat starts. Refer also ...
...[REPEAT]. To clear the menus Press [RETURN] until the unit information screen is displayed. RQT6945 15 Disc operations Play starts from a selected item RAM DVD-A DVD-V VCD CD WMA MP3 Press the numbered buttons to select the play "All" is displayed (\ page 22). 2 Press [e, r] to select the ...in succession (\ page 16, All group play Press [DISPLAY] until the menu disappears. Playing bonus groups Some discs contain bonus groups. A-B repeat play RAM DVD-A DVD-V VCD CD WMA MP3 You can also use [e, r, w, q] to the normal play Press [GROUP]. A B AxB A-B repeat starts. Refer also ...
SAST1 User Guide
Page 16
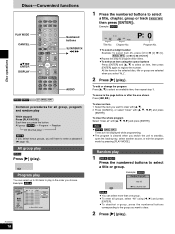
...with [e, r]. 2 Press [CANCEL], or select "Clear" with [e, r, w, q] and press [ENTER]. Random play While stopped Press [PLAY MODE]. Example: DVD-V PROGRAM 09 SELECT NUMBER SELECT Choose a title and chapter, then press ENTER. Program No. ¡To select a 2-digit number Example: To select item 25,... press [>=10] \ [2] \ [5]. Example: DVD-V TTL CHAP PGM P: 0 Title No. To clear an item 1 Select the item you switch the unit to standby, open the loading tray, select ...
...with [e, r]. 2 Press [CANCEL], or select "Clear" with [e, r, w, q] and press [ENTER]. Random play While stopped Press [PLAY MODE]. Example: DVD-V PROGRAM 09 SELECT NUMBER SELECT Choose a title and chapter, then press ENTER. Program No. ¡To select a 2-digit number Example: To select item 25,... press [>=10] \ [2] \ [5]. Example: DVD-V TTL CHAP PGM P: 0 Title No. To clear an item 1 Select the item you switch the unit to standby, open the loading tray, select ...
SAST1 User Guide
Page 17
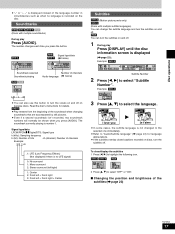
...the subtitle language is not changed to the selected one immediately. ¡Refer to turn the subtitles on karaoke discs. Example: DVD-V ON 1 ENG 3 Press [e, r] to select "Subtitle Number". Example: DVD-V 2 2 1:02:37 % Digital ON 1 ENG 3/2.1 ch 1 ENG 1 Subtitle Number 2 Press [w, q] to ...R ¡You can change the subtitle language and turn the subtitles off. RAM You can turn the vocals on and off on and off . DVD-A DVD-V RAM OFF 1 ENG OFF 2 Press [e, r] to highlight the following icon. Signal type/data LPCM/PPCM/%Digital/DTS: Signal type k (kHz):...
...the subtitle language is not changed to the selected one immediately. ¡Refer to turn the subtitles on karaoke discs. Example: DVD-V ON 1 ENG 3 Press [e, r] to select "Subtitle Number". Example: DVD-V 2 2 1:02:37 % Digital ON 1 ENG 3/2.1 ch 1 ENG 1 Subtitle Number 2 Press [w, q] to ...R ¡You can change the subtitle language and turn the subtitles off. RAM You can turn the vocals on and off on and off . DVD-A DVD-V RAM OFF 1 ENG OFF 2 Press [e, r] to highlight the following icon. Signal type/data LPCM/PPCM/%Digital/DTS: Signal type k (kHz):...
SAST1 User Guide
Page 18
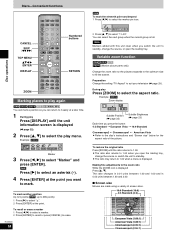
... SFC LEVEL S.SRND FM MODE SETUP PL ZOOM CH SELECT C.FOCUS TEST GROUP AUDIO Numbered buttons RETURN Marking places to play again RAM DVD-A DVD-V VCD CD WMA MP3 You can mark a position so you can select the next group when the current group is full. RQT6945 ...open the loading tray. Preparation Change the setting "TV Aspect" to fill the screen. Making fine adjustments to 1.00 when a menu is displayed Press [e, r]. Example: DVD-V ∗ ∗ OFF Marker 3 Press [w, q] to the disc's instructions and "Screen size" below for the aspect ratio of screen sizes. 16:9 Standard (...
... SFC LEVEL S.SRND FM MODE SETUP PL ZOOM CH SELECT C.FOCUS TEST GROUP AUDIO Numbered buttons RETURN Marking places to play again RAM DVD-A DVD-V VCD CD WMA MP3 You can mark a position so you can select the next group when the current group is full. RQT6945 ...open the loading tray. Preparation Change the setting "TV Aspect" to fill the screen. Making fine adjustments to 1.00 when a menu is displayed Press [e, r]. Example: DVD-V ∗ ∗ OFF Marker 3 Press [w, q] to the disc's instructions and "Screen size" below for the aspect ratio of screen sizes. 16:9 Standard (...

SAST1 User Guide
Page 19
To show other pages Press [e, r, w, q] to select "Find" and press [ENTER]. Repeat this step to enter "O", "V", and "E". ¡Press [u, i] to skip between A, E, I, O and U. ¡Only uppercase appear but the search also includes lower case. ¡Press [w] to erase a character. ∗ ¡You can erase the asterisk ( ) to select "Find" and press [ENTER]. To use the contents screen to find a track CD (CD text only) You can enter numbers with the numbered buttons. 3 Press [q] to search for the next group appears. Disc operations WMA/MP3 and CD text navigation menus WMA MP3 ...
To show other pages Press [e, r, w, q] to select "Find" and press [ENTER]. Repeat this step to enter "O", "V", and "E". ¡Press [u, i] to skip between A, E, I, O and U. ¡Only uppercase appear but the search also includes lower case. ¡Press [w] to erase a character. ∗ ¡You can erase the asterisk ( ) to select "Find" and press [ENTER]. To use the contents screen to find a track CD (CD text only) You can enter numbers with the numbered buttons. 3 Press [q] to search for the next group appears. Disc operations WMA/MP3 and CD text navigation menus WMA MP3 ...

SAST1 User Guide
Page 20
... them. ¡You cannot change program and disc titles. To clear the play list, created on other equipment such as a DVD video recorder. 1 Press [PLAY LIST]. Disc operations Playing the programs or play lists on DVD-RAM DIRECT NAVIGATOR erw q ENTER AV SYSTEM TV VCR/AUX SLEEP TV/VIDEO TUNER/BAND... DVD/CD FL DISPLAY DIMMER 1 PLAY MODE MIX 2CH 4 REPEAT 7 POSITION MEMORY CANCEL SKIP 23 56 89 >=10/ ENTER 0 SLOW/SEARCH CH...
... them. ¡You cannot change program and disc titles. To clear the play list, created on other equipment such as a DVD video recorder. 1 Press [PLAY LIST]. Disc operations Playing the programs or play lists on DVD-RAM DIRECT NAVIGATOR erw q ENTER AV SYSTEM TV VCR/AUX SLEEP TV/VIDEO TUNER/BAND... DVD/CD FL DISPLAY DIMMER 1 PLAY MODE MIX 2CH 4 REPEAT 7 POSITION MEMORY CANCEL SKIP 23 56 89 >=10/ ENTER 0 SLOW/SEARCH CH...