
SAPM53 User Guide
Page 1
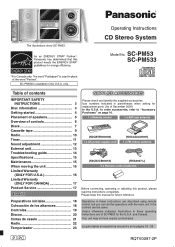
...Purchases" on page 16. 1 x Remote control 1 x AM loop antenna (N2QAYB000008) 1 x AC power supply cord (N1DAAAA00001) 1 x FM indoor antenna (K2CB2CB00018) (RSA0007-L) 2 x Remote control batteries Before connecting, operating or adjusting this manual for the U.S.A. P PC RQTV0097-2P Use numbers indicated in these instructions are described using remote control, but you can do the operations with the main unit if the controls are of controls 6 Discs 7 Cassette tape 9 Radio 10 Timer 11 Sound adjustment 12 External unit 13 Troubleshooting guide 14 Specifications 15...
...Purchases" on page 16. 1 x Remote control 1 x AM loop antenna (N2QAYB000008) 1 x AC power supply cord (N1DAAAA00001) 1 x FM indoor antenna (K2CB2CB00018) (RSA0007-L) 2 x Remote control batteries Before connecting, operating or adjusting this manual for the U.S.A. P PC RQTV0097-2P Use numbers indicated in these instructions are described using remote control, but you can do the operations with the main unit if the controls are of controls 6 Discs 7 Cassette tape 9 Radio 10 Timer 11 Sound adjustment 12 External unit 13 Troubleshooting guide 14 Specifications 15...
SAPM53 User Guide
Page 2
NO USER-SERVICEABLE PARTS INSIDE. REFER SERVICING TO QUALIFIED SERVICE PERSONNEL. The exclamation point within the product s enclosure that may be found on either the back or the bottom of the unit. These operating instructions are applicable to the following system. System SC-PM53 SC-PM533 Main unit SA-PM53 SA-PM533 Speakers SB-PM53 SB-PM53 The model number and serial number of...
NO USER-SERVICEABLE PARTS INSIDE. REFER SERVICING TO QUALIFIED SERVICE PERSONNEL. The exclamation point within the product s enclosure that may be found on either the back or the bottom of the unit. These operating instructions are applicable to the following system. System SC-PM53 SC-PM533 Main unit SA-PM53 SA-PM533 Speakers SB-PM53 SB-PM53 The model number and serial number of...
SAPM53 User Guide
Page 3
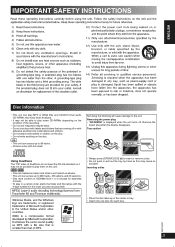
... folders are coming off . RQTV0097 3 Remove the power plug after this display disappears. Inserting a disc • Place the disc label-up to 999 tracks, 255 albums and 20 sessions. • Disc must conform to ISO9660 level 1 or 2 (except for extended formats). • To play in a certain order, prefix the folder and file names with the 3-digit numbers in the...
... folders are coming off . RQTV0097 3 Remove the power plug after this display disappears. Inserting a disc • Place the disc label-up to 999 tracks, 255 albums and 20 sessions. • Disc must conform to ISO9660 level 1 or 2 (except for extended formats). • To play in a certain order, prefix the folder and file names with the 3-digit numbers in the...
SAPM53 User Guide
Page 4
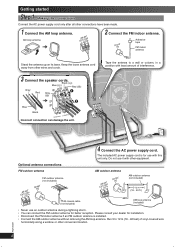
... your dealer for use an outdoor antenna during a lightning storm. • You can damage the unit. Making the connections Connect the AC power supply cord only after all other wires and cords. 3 Connect the speaker cords. FM75AN T Adhesive tape FM indoor antenna Stand the antenna up on its base. RQTV0097 4 Optional antenna connections FM outdoor antenna AM EXT LAONOTP FM outdoor antenna (not included) FM75AN T 75 Ω coaxial cable (not included...
... your dealer for use an outdoor antenna during a lightning storm. • You can damage the unit. Making the connections Connect the AC power supply cord only after all other wires and cords. 3 Connect the speaker cords. FM75AN T Adhesive tape FM indoor antenna Stand the antenna up on its base. RQTV0097 4 Optional antenna connections FM outdoor antenna AM EXT LAONOTP FM outdoor antenna (not included) FM75AN T 75 Ω coaxial cable (not included...

SAPM53 User Guide
Page 5
... sound. The display changes each time the button is off . ■ Use • Aim at the remote control sensor, avoiding obstacles, at the same time. • heat or expose to flame. • take apart or short circuit. • attempt to the speakers, do not have taken the nets off. The combination of batteries in , a demonstration of the unit. If the demo setting...
... sound. The display changes each time the button is off . ■ Use • Aim at the remote control sensor, avoiding obstacles, at the same time. • heat or expose to flame. • take apart or short circuit. • attempt to the speakers, do not have taken the nets off. The combination of batteries in , a demonstration of the unit. If the demo setting...
SAPM53 User Guide
Page 6
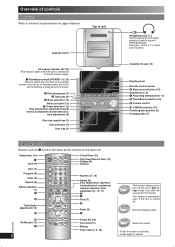
... Tape play (9) 4 Bass selection (12) Music port jack (13) 5 Treble selection (12) Disc skip/search, tape fast-forward/ rewind, tune/preset channel selection, time adjustment (9) Disc tray open (9) Display panel Remote control sensor 6 Music port selection (13) Stop/Demo (5, 9) 7 Recording start/pause (9, 13) 8 Tuner/Band selection (10) 9 Volume control ! Dims the display panel. Sleep timer (11) 1 Auto off . Re-Master (13) 7 6 Preset EQ (12) Surround (13) Muting Play mode (7, 9, 10) This function allows you to cancel. Plug type: 3.5 mm (1/8˝) stereo (not included) Cassette lid open...
... Tape play (9) 4 Bass selection (12) Music port jack (13) 5 Treble selection (12) Disc skip/search, tape fast-forward/ rewind, tune/preset channel selection, time adjustment (9) Disc tray open (9) Display panel Remote control sensor 6 Music port selection (13) Stop/Demo (5, 9) 7 Recording start/pause (9, 13) 8 Tuner/Band selection (10) 9 Volume control ! Dims the display panel. Sleep timer (11) 1 Auto off . Re-Master (13) 7 6 Preset EQ (12) Surround (13) Muting Play mode (7, 9, 10) This function allows you to cancel. Plug type: 3.5 mm (1/8˝) stereo (not included) Cassette lid open...
SAPM53 User Guide
Page 7
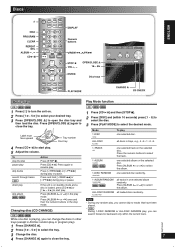
... select the tray. 3 Change the disc. 7 4 Press [CHANGE 0] again to open the disc tray and then load the disc. If the unit is playing, you cannot skip to resume play mode. Press [ALBUM or ] to select the track. Press the numeric buttons to select the album. Press [CD 6]. Press and hold [4/REW/4] or [3/FF/¢] during play Label must face upward Tray number Disc tray 1-DISC 1DISC ALL-DISC ALL DISC one selected...
... select the tray. 3 Change the disc. 7 4 Press [CHANGE 0] again to open the disc tray and then load the disc. If the unit is playing, you cannot skip to resume play mode. Press [ALBUM or ] to select the track. Press the numeric buttons to select the album. Press [CD 6]. Press and hold [4/REW/4] or [3/FF/¢] during play Label must face upward Tray number Disc tray 1-DISC 1DISC ALL-DISC ALL DISC one selected...
SAPM53 User Guide
Page 8
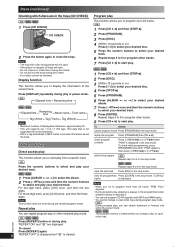
... displayed in the stop mode. CD Press the numeric buttons to select and play your desired track. 6 Repeat steps 3 to 5 to program other tracks. 7 Press [CD 6] to start play your desired disc. 4 Press [STOP 7]. 5 Press [PROGRAM]. 6 Press [ALBUM album. "CLR ALL" tracks is cleared. Note • The tray with MP3 and WMA tracks. • You cannot change a disc or open . • If the player is cleared when you to start play . CD Elapsed time Remaining time...
... displayed in the stop mode. CD Press the numeric buttons to select and play your desired track. 6 Repeat steps 3 to 5 to program other tracks. 7 Press [CD 6] to start play your desired disc. 4 Press [STOP 7]. 5 Press [PROGRAM]. 6 Press [ALBUM album. "CLR ALL" tracks is cleared. Note • The tray with MP3 and WMA tracks. • You cannot change a disc or open . • If the player is cleared when you to start play . CD Elapsed time Remaining time...
SAPM53 User Guide
Page 9
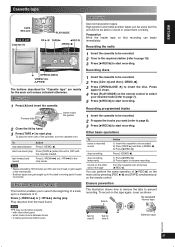
... the remote control to select your desired mode (refer to page 7). 5 Press [¶ REC/8] to start recording. " Forward side Insert inside the guides 2 Close the lid by pressing [REC ¶¥8] and [TAPE] simultaneously on the other side of a track, up in the stop recording Press [-DEMO, 7]. Other basic operations To Action erase a recorded sound 1) Insert the cassette to be recorded. 2 Press [CD 6] and then [-DEMO, 7]. 3 Press [OPEN...
... the remote control to select your desired mode (refer to page 7). 5 Press [¶ REC/8] to start recording. " Forward side Insert inside the guides 2 Close the lid by pressing [REC ¶¥8] and [TAPE] simultaneously on the other side of a track, up in the stop recording Press [-DEMO, 7]. Other basic operations To Action erase a recorded sound 1) Insert the cassette to be recorded. 2 Press [CD 6] and then [-DEMO, 7]. 3 Press [OPEN...
SAPM53 User Guide
Page 10
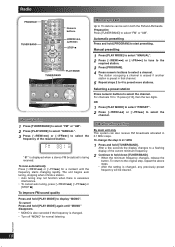
... be set in 0.1 MHz steps. Selecting a preset station Press numeric buttons to 0.1 MHz 1 Press and hold down [TUNER/BAND]. • When the minimum frequency changes, release the button. " ST " is displayed when a stereo FM broadcast is excessive interference. • To cancel auto tuning, press [4/REW/4], [3/FF/¢] or [STOP 7]. To change the step to select the channel. Radio Numeric buttons Manual tuning 1 Press [TUNER/BAND] to select "FM" or "AM". 2 Press [PLAY MODE...
... be set in 0.1 MHz steps. Selecting a preset station Press numeric buttons to 0.1 MHz 1 Press and hold down [TUNER/BAND]. • When the minimum frequency changes, release the button. " ST " is displayed when a stereo FM broadcast is excessive interference. • To cancel auto tuning, press [4/REW/4], [3/FF/¢] or [STOP 7]. To change the step to select the channel. Radio Numeric buttons Manual tuning 1 Press [TUNER/BAND] to select "FM" or "AM". 2 Press [PLAY MODE...
SAPM53 User Guide
Page 11
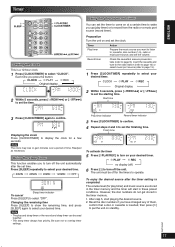
... time. Using the play timer) or to record from the radio or a music port source (record timer). Record timer Check the cassetteʼs erasure prevention tabs (refer to page 9), insert the cassette and tune to the radio station (refer to page 10) or select music port source (refer to page 13). 1 Press [CLOCK/TIMER] repeatedly to select your desired time. Displaying the clock Press [CLOCK/TIMER] to display the clock for the timers to operate. Readjust as necessary. Using the sleep timer This function...
... time. Using the play timer) or to record from the radio or a music port source (record timer). Record timer Check the cassetteʼs erasure prevention tabs (refer to page 9), insert the cassette and tune to the radio station (refer to page 10) or select music port source (refer to page 13). 1 Press [CLOCK/TIMER] repeatedly to select your desired time. Displaying the clock Press [CLOCK/TIMER] to display the clock for the timers to operate. Readjust as necessary. Using the sleep timer This function...

SAPM53 User Guide
Page 12
... increase the level. Note • The play timer and record timer cannot be varied within -3 to decrease the level. Note The tone level can be used together. • The play mode and increase the volume. (See the portable audio equipmentʼs instruction manual.) Selecting sound effects You can change the sound effect by selecting Preset EQ or adjusting the bass or treble effect. Turn [BASS] or [TREBLE] counter-clockwise to...
... increase the level. Note • The play timer and record timer cannot be varied within -3 to decrease the level. Note The tone level can be used together. • The play mode and increase the volume. (See the portable audio equipmentʼs instruction manual.) Selecting sound effects You can change the sound effect by selecting Preset EQ or adjusting the bass or treble effect. Turn [BASS] or [TREBLE] counter-clockwise to...

SAPM53 User Guide
Page 13
... speaker may be distorted. 1 Plug the audio cord into the MUSIC PORT jack and press [MUSIC P.]. 2 Play the portable audio equipment. (See the portable audio equipment's instruction manual.) Recording from portable audio equipment 1 Insert the cassette to be recorded. 2 Press [MUSIC P.]. 3 Play the portable audio equipment. 4 Press [¶ REC¥8] to enjoy music from portable audio equipment Switch off the equalizer function (if there is less discernible when listening through headphones. • If interference in FM stereo reception increases, cancel the surround sound...
... speaker may be distorted. 1 Plug the audio cord into the MUSIC PORT jack and press [MUSIC P.]. 2 Play the portable audio equipment. (See the portable audio equipment's instruction manual.) Recording from portable audio equipment 1 Insert the cassette to be recorded. 2 Press [MUSIC P.]. 3 Play the portable audio equipment. 4 Press [¶ REC¥8] to enjoy music from portable audio equipment Switch off the equalizer function (if there is less discernible when listening through headphones. • If interference in FM stereo reception increases, cancel the surround sound...
SAPM53 User Guide
Page 14
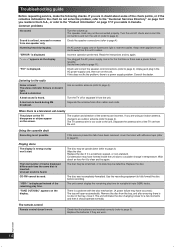
... the connections and turn on the screen. The location and direction of the remaining play won't start. Unusual sound is displayed. Troubleshooting guide Before requesting service, make the disc changing noises for a few moments and then it should operate normally. The speaker cords may be defective. "ERROR" is heard. Unplug and plug in doubt about an hour for it is heard. A beat sound is a power supply problem. "VBR-" is a television set from...
... the connections and turn on the screen. The location and direction of the remaining play won't start. Unusual sound is displayed. Troubleshooting guide Before requesting service, make the disc changing noises for a few moments and then it should operate normally. The speaker cords may be defective. "ERROR" is heard. Unplug and plug in doubt about an hour for it is heard. A beat sound is a power supply problem. "VBR-" is a television set from...

SAPM53 User Guide
Page 15
... Semiconductor laser Laser power CLASS 1 Audio output (Disc) Number of channels 2-Channel Frequency response 20 Hz to 20 kHz (+1dB, -2 dB) Wow and flutter Below measurable limit Digital filter 8 fs D/A converter MASH (1 bit DAC) SPEAKER SECTION Type 2 way, 2 speaker system Speaker(s) Woofer 10cm (4˝) cone type (6 Ω) Tweeter 6 cm (23/8˝) cone type (6 Ω) Impedance 6 Ω Input power (IEC) HIGH 90 W (Max) LOW 90 W (Max) Output sound...
... Semiconductor laser Laser power CLASS 1 Audio output (Disc) Number of channels 2-Channel Frequency response 20 Hz to 20 kHz (+1dB, -2 dB) Wow and flutter Below measurable limit Digital filter 8 fs D/A converter MASH (1 bit DAC) SPEAKER SECTION Type 2 way, 2 speaker system Speaker(s) Woofer 10cm (4˝) cone type (6 Ω) Tweeter 6 cm (23/8˝) cone type (6 Ω) Impedance 6 Ω Input power (IEC) HIGH 90 W (Max) LOW 90 W (Max) Output sound...
SAPM53 User Guide
Page 16
..., neglect, mishandling, misapplication, alteration, faulty installation, set-up adjustments, misadjustment of consumer controls, improper maintenance, power line surge, lightning damage, modification, or commercial use of the product, service by anyone other than a Factory Servicenter or other proof of the original purchase date is not handled to your product with new or refurbished parts, or (b) replace it with the date of the period indicated on...
..., neglect, mishandling, misapplication, alteration, faulty installation, set-up adjustments, misadjustment of consumer controls, improper maintenance, power line surge, lightning damage, modification, or commercial use of the product, service by anyone other than a Factory Servicenter or other proof of the original purchase date is not handled to your product with new or refurbished parts, or (b) replace it with the date of the period indicated on...
SAPM53 User Guide
Page 17
... out only to authorized servicing personnel. 3. Technics Audio Product Panasonic Audio & DVD Product Accessories including rechargeable batteries One (1) year, parts and labour One (1) year, parts and labour Ninety (90) days In-home Service will require all other proof of date of original purchase. A purchase receipt or other servicing to locations accessible by qualified service personnel if: (a) The AC power supply cord or the plug has been damaged...
... out only to authorized servicing personnel. 3. Technics Audio Product Panasonic Audio & DVD Product Accessories including rechargeable batteries One (1) year, parts and labour One (1) year, parts and labour Ninety (90) days In-home Service will require all other proof of date of original purchase. A purchase receipt or other servicing to locations accessible by qualified service personnel if: (a) The AC power supply cord or the plug has been damaged...


