
SAPM28 User Guide
Page 2
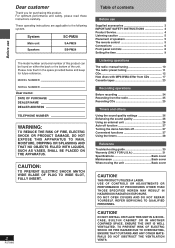
... use Supplied accessories 3 IMPORTANT SAFETY INSTRUCTIONS 4 Product Service 4 Listening caution 5 Placement of speakers 5 The remote control 5 Connections 6 Front panel controls 8 Setting the time 9 Listening operations The radio: manual tuning 10 The radio: preset tuning 11 CDs 12 How discs with MP3/WMA differ from CDs 17 Cassette tapes 23 Recording operations Before recording 24 Recording from the radio 25 Recording CDs 25 Timers and others Using the sound quality settings 26 Enhancing the sound quality 26 Using an external unit 26 Auto-off function 27 Turning the demo...
... use Supplied accessories 3 IMPORTANT SAFETY INSTRUCTIONS 4 Product Service 4 Listening caution 5 Placement of speakers 5 The remote control 5 Connections 6 Front panel controls 8 Setting the time 9 Listening operations The radio: manual tuning 10 The radio: preset tuning 11 CDs 12 How discs with MP3/WMA differ from CDs 17 Cassette tapes 23 Recording operations Before recording 24 Recording from the radio 25 Recording CDs 25 Timers and others Using the sound quality settings 26 Enhancing the sound quality 26 Using an external unit 26 Auto-off function 27 Turning the demo...
SAPM28 User Guide
Page 3
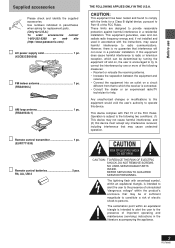
...; Increase the separation between the equipment and receiver. • Connect the equipment into an outlet on , the user is no guarantee that to which can radiate radio frequency energy and, if not installed and used in a residential installation. AC power supply cord 1 pc. (K2CB2CB00006) FM indoor antenna 1 pc. (RSA0006-L) AM loop antenna 1 pc. (RSA0033A-1) Remote control transmitter 1 pc. (EUR7711030) THE FOLLOWING APPLIES ONLY IN...
...; Increase the separation between the equipment and receiver. • Connect the equipment into an outlet on , the user is no guarantee that to which can radiate radio frequency energy and, if not installed and used in a residential installation. AC power supply cord 1 pc. (K2CB2CB00006) FM indoor antenna 1 pc. (RSA0006-L) AM loop antenna 1 pc. (RSA0033A-1) Remote control transmitter 1 pc. (EUR7711030) THE FOLLOWING APPLIES ONLY IN...
SAPM28 User Guide
Page 6
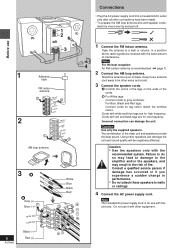
... radio signals are received with red and black tags are for high frequency. Note The included AC power supply cord is recommended. (\ page 7) 2 Connect the AM loop antenna. Note 4 For the best reception: An FM outdoor antenna is for low frequency. Consult a qualified service person if damage has occurred or if you experience a sudden change in performance. • Do not attach these speakers...
... radio signals are received with red and black tags are for high frequency. Note The included AC power supply cord is recommended. (\ page 7) 2 Connect the AM loop antenna. Note 4 For the best reception: An FM outdoor antenna is for low frequency. Consult a qualified service person if damage has occurred or if you experience a sudden change in performance. • Do not attach these speakers...
SAPM28 User Guide
Page 7
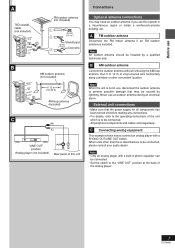
... damage that the power supply for all components has been turned off before making any connections. • For details, refer to the operating instructions of the unit which is to be caused by a qualified technician only. External unit connections • Make sure that may need an outdoor antenna if you use an outdoor antenna during an electrical storm. Before use A FM outdoor antenna (not included) 1 (1 3/16...
... damage that the power supply for all components has been turned off before making any connections. • For details, refer to the operating instructions of the unit which is to be caused by a qualified technician only. External unit connections • Make sure that may need an outdoor antenna if you use an outdoor antenna during an electrical storm. Before use A FM outdoor antenna (not included) 1 (1 3/16...
SAPM28 User Guide
Page 8
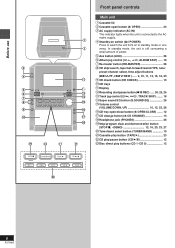
...;CD tray open button (c OPEN 23 3AC supply indicator (AC IN) This indicator lights when the unit is connected to standby mode or vice versa. Before use 1 OPEN 2 3 4 AC IN POWER " 5 6 7 8 9 ! Front panel controls Main unit 1Cassette lid 2Cassette open /close button (c OPEN/CLOSE) ....... 12 áCD change button (c CD CHANGE 13 àHeadphone jack (PHONES 26 âStop/program clear and demonstration button (STOP L, -DEMO 12, 16, 20, 23, 27 äTuner/band select button (TUNER/BAND 10 ãCassette play button (TAPE...
...;CD tray open button (c OPEN 23 3AC supply indicator (AC IN) This indicator lights when the unit is connected to standby mode or vice versa. Before use 1 OPEN 2 3 4 AC IN POWER " 5 6 7 8 9 ! Front panel controls Main unit 1Cassette lid 2Cassette open /close button (c OPEN/CLOSE) ....... 12 áCD change button (c CD CHANGE 13 àHeadphone jack (PHONES 26 âStop/program clear and demonstration button (STOP L, -DEMO 12, 16, 20, 23, 27 äTuner/band select button (TUNER/BAND 10 ãCassette play button (TAPE...
SAPM28 User Guide
Page 9
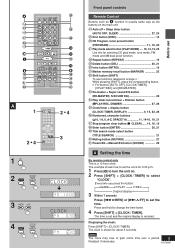
... button (MUTING 27 üPreset EQ + Manual EQ button (SOUND 26 A Setting the time By remote control only This is shown for about 5 seconds. RQT6885 Auto off + Sleep timer button (AUTO OFF, SLEEP 27, 29 èDisc button (DISC 14 êCD Program, tuner preset button ë(PROGRAM 11, 16, 20 Play mode select button (PLAY MODE) .... 10, 14, 19, 25 Use this for 6:30 p.m.. 1 Press [y] to change the time faster. 4 Press [SHIFT] + [CLOCK / TIMER]. The clock is a 12-hour clock. Press and hold to turn...
... button (MUTING 27 üPreset EQ + Manual EQ button (SOUND 26 A Setting the time By remote control only This is shown for about 5 seconds. RQT6885 Auto off + Sleep timer button (AUTO OFF, SLEEP 27, 29 èDisc button (DISC 14 êCD Program, tuner preset button ë(PROGRAM 11, 16, 20 Play mode select button (PLAY MODE) .... 10, 14, 19, 25 Use this for 6:30 p.m.. 1 Press [y] to change the time faster. 4 Press [SHIFT] + [CLOCK / TIMER]. The clock is a 12-hour clock. Press and hold to turn...
SAPM28 User Guide
Page 10
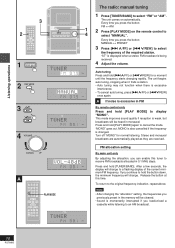
... • After changing the "allocation" setting, the frequencies you load/unload a cassette while listening to hold [f 3 /FF] or [g 4/REW] for normal listening. Release the button at this tuner to cancel the mode. The unit comes on the remote control to the original frequency indication, repeat above. Press and hold [PLAY MODE] to select "FM" or "AM". Listening operations Before use 2 CLOCK AUTO OFF TIMER SLEEP DISPLAY PLAY REC DIMMER DISC 1 PROGRAM GHI 4 PLAY MODE PQRS 7 REPEAT DEL ABC DEF...
... • After changing the "allocation" setting, the frequencies you load/unload a cassette while listening to hold [f 3 /FF] or [g 4/REW] for normal listening. Release the button at this tuner to cancel the mode. The unit comes on the remote control to the original frequency indication, repeat above. Press and hold [PLAY MODE] to select "FM" or "AM". Listening operations Before use 2 CLOCK AUTO OFF TIMER SLEEP DISPLAY PLAY REC DIMMER DISC 1 PROGRAM GHI 4 PLAY MODE PQRS 7 REPEAT DEL ABC DEF...
SAPM28 User Guide
Page 11
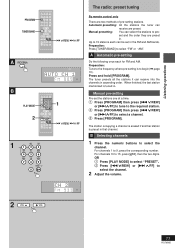
... A PROGRAM B PLAY MODE 2 CLOCK AUTO OFF TIMER SLEEP DISPLAY PLAY REC DIMMER DISC 1 PROGRAM GHI 4 PLAY MODE PQRS 7 REPEAT DEL ABC DEF 23 JKL MNO 56 TUV WXYZ 89 SPACE 0 10 TUNER BAND CD CLEAR AUX TAPE VOL ALBUM VOL REW FF TITLE INTRO MARKER SEARCH ENTER SHIFT RE-MASTER S.SOUND EQ SOUND MUTING 1 /REW, /FF 1 ABC DEF 12 3 GHI JKL MNO 45 6 PQRS TUV WXYZ 78 9 SPACE 0 10 The radio: preset tuning...
... A PROGRAM B PLAY MODE 2 CLOCK AUTO OFF TIMER SLEEP DISPLAY PLAY REC DIMMER DISC 1 PROGRAM GHI 4 PLAY MODE PQRS 7 REPEAT DEL ABC DEF 23 JKL MNO 56 TUV WXYZ 89 SPACE 0 10 TUNER BAND CD CLEAR AUX TAPE VOL ALBUM VOL REW FF TITLE INTRO MARKER SEARCH ENTER SHIFT RE-MASTER S.SOUND EQ SOUND MUTING 1 /REW, /FF 1 ABC DEF 12 3 GHI JKL MNO 45 6 PQRS TUV WXYZ 78 9 SPACE 0 10 The radio: preset tuning...
SAPM28 User Guide
Page 12
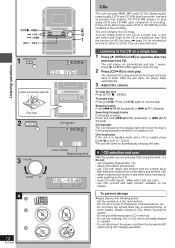
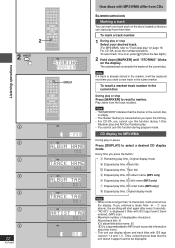
.... • Set the system on automatically and play If the unit is loaded, press [CD 2/J] or [CD 1] ~ [CD 5]. Listening operations STOP , DEMO 2 /FF, 3 / REW 1 (CD 1) ~ (CD 5) 1 OPEN/CLOSE Label must face upward. To stop the disc Press [STOP L, -DEMO]. The unit will start play . Press [c OPEN/CLOSE] again to close the tray. 2 Press [CD 2/J] to resume play . After the last track, the player stops automatically. 3 Adjust the volume. To pause play or pause Press and hold [g 4/REW...
.... • Set the system on automatically and play If the unit is loaded, press [CD 2/J] or [CD 1] ~ [CD 5]. Listening operations STOP , DEMO 2 /FF, 3 / REW 1 (CD 1) ~ (CD 5) 1 OPEN/CLOSE Label must face upward. To stop the disc Press [STOP L, -DEMO]. The unit will start play . Press [c OPEN/CLOSE] again to close the tray. 2 Press [CD 2/J] to resume play . After the last track, the player stops automatically. 3 Adjust the volume. To pause play or pause Press and hold [g 4/REW...
SAPM28 User Guide
Page 13
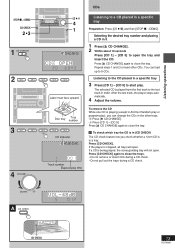
... you check whether a 12cm CD is playing (except in All-Disc Random play or program play time Listening to a CD placed in a specific tray 3 Press [CD 1] - [CD 5] to close the tray. After the last track, the player stops automatically. 4 Adjust the volume. To remove the CD While one CD is in it 1 Press [c CD CHANGE]. 2 Within about 10 seconds Press [CD 1] - [CD 5] to the CD placed in a specific tray Preparation: Press [CD 2/J] and then [STOP L, -DEMO]. Repeat steps 1 and 2 to close...
... you check whether a 12cm CD is playing (except in All-Disc Random play or program play time Listening to a CD placed in a specific tray 3 Press [CD 1] - [CD 5] to close the tray. After the last track, the player stops automatically. 4 Adjust the volume. To remove the CD While one CD is in it 1 Press [c CD CHANGE]. 2 Within about 10 seconds Press [CD 1] - [CD 5] to the CD placed in a specific tray Preparation: Press [CD 2/J] and then [STOP L, -DEMO]. Repeat steps 1 and 2 to close...
SAPM28 User Guide
Page 14
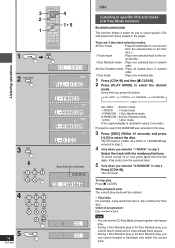
... [ 10] then the two digits. There are 5 disc/track selection modes. The CD starts. 3 2 1 AUTO OFF SLEEP CLOCK TIMER DISPLAY PLAY REC DIMMER DISC 1 PROGRAM GHI 4 PLAY MODE PQRS 7 REPEAT DEL ABC DEF 23 JKL MNO 56 TUV WXYZ 89 SPACE 0 10 TUNER BAND CD CLEAR AUX TAPE VOL ALBUM VOL REW FF TITLE INTRO MARKER SEARCH ENTER SHIFT RE-MASTER S.SOUND EQ SOUND MUTING 4 15 1 CD CLEAR 2 PLAY MODE Listening operations 3 DISC ABC DEF 12 3 GHI...
... [ 10] then the two digits. There are 5 disc/track selection modes. The CD starts. 3 2 1 AUTO OFF SLEEP CLOCK TIMER DISPLAY PLAY REC DIMMER DISC 1 PROGRAM GHI 4 PLAY MODE PQRS 7 REPEAT DEL ABC DEF 23 JKL MNO 56 TUV WXYZ 89 SPACE 0 10 TUNER BAND CD CLEAR AUX TAPE VOL ALBUM VOL REW FF TITLE INTRO MARKER SEARCH ENTER SHIFT RE-MASTER S.SOUND EQ SOUND MUTING 4 15 1 CD CLEAR 2 PLAY MODE Listening operations 3 DISC ABC DEF 12 3 GHI...
SAPM28 User Guide
Page 15
... button: Elapsed play time ↔ Remaining play time Note When track number 25 or greater is cleared. ". 15 RQT6885 Listening operations To repeat your favorite tracks 1. B CD display By remote control only This function allows you to display the remaining play from a specific track to the last track of the current track. 1 REPEAT CLOCK AUTO OFF TIMER SLEEP DISPLAY PLAY REC DIMMER DISC 1 PROGRAM GHI 4 PLAY MODE PQRS 7 REPEAT DEL ABC DEF 23 JKL MNO 56 TUV WXYZ 89 SPACE 0 10 TUNER BAND CD CLEAR AUX TAPE...
... button: Elapsed play time ↔ Remaining play time Note When track number 25 or greater is cleared. ". 15 RQT6885 Listening operations To repeat your favorite tracks 1. B CD display By remote control only This function allows you to display the remaining play from a specific track to the last track of the current track. 1 REPEAT CLOCK AUTO OFF TIMER SLEEP DISPLAY PLAY REC DIMMER DISC 1 PROGRAM GHI 4 PLAY MODE PQRS 7 REPEAT DEL ABC DEF 23 JKL MNO 56 TUV WXYZ 89 SPACE 0 10 TUNER BAND CD CLEAR AUX TAPE...
SAPM28 User Guide
Page 22
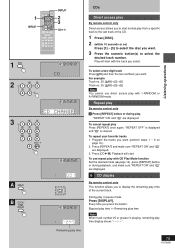
... current disc. Play starts from CDs By remote control only Marking a track You can mark one track each on the display. 2 CLOCK AUTO OFF TIMER SLEEP DISPLAY PLAY REC DIMMER DISC 1 PROGRAM GHI 4 PLAY MODE PQRS 7 REPEAT DEL ABC DEF 23 JKL MNO 56 TUV WXYZ 89 SPACE 0 10 TUNER BAND CD CLEAR AUX TAPE VOL ALBUM VOL REW FF TITLE INTRO MARKER SEARCH ENTER SHIFT RE-MASTER S.SOUND EQ SOUND MUTING 2 MARKER Listening operations Timers and...
... current disc. Play starts from CDs By remote control only Marking a track You can mark one track each on the display. 2 CLOCK AUTO OFF TIMER SLEEP DISPLAY PLAY REC DIMMER DISC 1 PROGRAM GHI 4 PLAY MODE PQRS 7 REPEAT DEL ABC DEF 23 JKL MNO 56 TUV WXYZ 89 SPACE 0 10 TUNER BAND CD CLEAR AUX TAPE VOL ALBUM VOL REW FF TITLE INTRO MARKER SEARCH ENTER SHIFT RE-MASTER S.SOUND EQ SOUND MUTING 2 MARKER Listening operations Timers and...
SAPM28 User Guide
Page 26
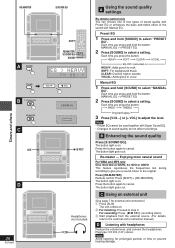
... C AUX D 26 RQT6885 S.SOUND EQ SHIFT RE-MASTER S.SOUND EQ SOUND CLOCK AUTO OFF TIMER SLEEP DISPLAY PLAY REC DIMMER DISC 1 PROGRAM GHI 4 PLAY MODE PQRS 7 REPEAT DEL ABC DEF 23 JKL MNO 56 TUV WXYZ 89 SPACE 0 10 TUNER BAND CD CLEAR AUX TAPE VOL ALBUM VOL REW FF TITLE INTRO MARKER SEARCH ENTER SHIFT RE-MASTER S.SOUND EQ SOUND MUTING VOL VOL / REC Headphones (not included) A Using the sound quality settings By remote control...
... C AUX D 26 RQT6885 S.SOUND EQ SHIFT RE-MASTER S.SOUND EQ SOUND CLOCK AUTO OFF TIMER SLEEP DISPLAY PLAY REC DIMMER DISC 1 PROGRAM GHI 4 PLAY MODE PQRS 7 REPEAT DEL ABC DEF 23 JKL MNO 56 TUV WXYZ 89 SPACE 0 10 TUNER BAND CD CLEAR AUX TAPE VOL ALBUM VOL REW FF TITLE INTRO MARKER SEARCH ENTER SHIFT RE-MASTER S.SOUND EQ SOUND MUTING VOL VOL / REC Headphones (not included) A Using the sound quality settings By remote control...
SAPM28 User Guide
Page 27
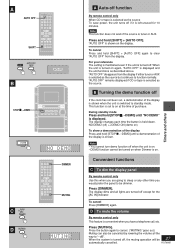
... CLOCK AUTO OFF TIMER SLEEP DISPLAY PLAY REC DIMMER DISC 1 PROGRAM GHI 4 PLAY MODE PQRS 7 REPEAT DEL ABC DEF 23 JKL MNO 56 TUV WXYZ 89 SPACE 0 10 TUNER BAND CD CLEAR AUX TAPE VOL ALBUM VOL REW FF TITLE INTRO MARKER SEARCH ENTER SHIFT RE-MASTER S.SOUND EQ SOUND MUTING DIMMER MUTING A Auto-off function By remote control only When CD or tape is selected as the source To save power, the unit turns...
... CLOCK AUTO OFF TIMER SLEEP DISPLAY PLAY REC DIMMER DISC 1 PROGRAM GHI 4 PLAY MODE PQRS 7 REPEAT DEL ABC DEF 23 JKL MNO 56 TUV WXYZ 89 SPACE 0 10 TUNER BAND CD CLEAR AUX TAPE VOL ALBUM VOL REW FF TITLE INTRO MARKER SEARCH ENTER SHIFT RE-MASTER S.SOUND EQ SOUND MUTING DIMMER MUTING A Auto-off function By remote control only When CD or tape is selected as the source To save power, the unit turns...
SAPM28 User Guide
Page 28
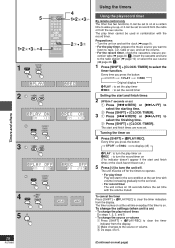
... timer function. Turning the timer on next page) The timer comes on at the set time with volume increasing gradually to the set level. • For record timer The unit comes on and set the clock (\ page 9). • For the play timer, prepare the music source you press the button: CLOCK PLAY REC Original display ˚ PLAY : to set the play timer on ˚REC : to turn the record timer on . 5 1 22 32 4 CLOCK AUTO OFF TIMER SLEEP DISPLAY PLAY REC DIMMER DISC 1 PROGRAM GHI 4 PLAY MODE PQRS 7 REPEAT DEL...
... timer function. Turning the timer on next page) The timer comes on at the set time with volume increasing gradually to the set level. • For record timer The unit comes on and set the clock (\ page 9). • For the play timer, prepare the music source you press the button: CLOCK PLAY REC Original display ˚ PLAY : to set the play timer on ˚REC : to turn the record timer on . 5 1 22 32 4 CLOCK AUTO OFF TIMER SLEEP DISPLAY PLAY REC DIMMER DISC 1 PROGRAM GHI 4 PLAY MODE PQRS 7 REPEAT DEL...

SAPM28 User Guide
Page 29
... RE-MASTER S.SOUND EQ SOUND MUTING PLAY/ REC CLOCK/ TIMER B SLEEP CLOCK AUTO OFF TIMER SLEEP DISPLAY PLAY REC DIMMER DISC 1 PROGRAM GHI 4 PLAY MODE PQRS 7 REPEAT DEL ABC DEF 23 JKL MNO 56 TUV WXYZ 89 SPACE 0 10 TUNER BAND CD CLEAR AUX TAPE VOL ALBUM VOL REW FF TITLE INTRO MARKER SEARCH ENTER SHIFT RE-MASTER S.SOUND EQ SOUND MUTING AUTO OFF SLEEP Using the timers A Using the play/record timer By remote control only To check settings While the...
... RE-MASTER S.SOUND EQ SOUND MUTING PLAY/ REC CLOCK/ TIMER B SLEEP CLOCK AUTO OFF TIMER SLEEP DISPLAY PLAY REC DIMMER DISC 1 PROGRAM GHI 4 PLAY MODE PQRS 7 REPEAT DEL ABC DEF 23 JKL MNO 56 TUV WXYZ 89 SPACE 0 10 TUNER BAND CD CLEAR AUX TAPE VOL ALBUM VOL REW FF TITLE INTRO MARKER SEARCH ENTER SHIFT RE-MASTER S.SOUND EQ SOUND MUTING AUTO OFF SLEEP Using the timers A Using the play/record timer By remote control only To check settings While the...

SAPM28 User Guide
Page 30
... the connections and turn the unit on the screen. "TAKE OUT/DISC" appears on the display. Keep other cables and cords. An AC power supply cord or fluorescent light is a problem with adhesive tape. : Playing discs The display is heard. Condensation may be read. Troubleshooting guide Before requesting service, make the disc changing noises for variable bit rate (VBR) tracks. "- -:- -" appears on the display. Sound is heard. Using the cassette deck Poor quality sound. Turn the volume up...
... the connections and turn the unit on the screen. "TAKE OUT/DISC" appears on the display. Keep other cables and cords. An AC power supply cord or fluorescent light is a problem with adhesive tape. : Playing discs The display is heard. Condensation may be read. Troubleshooting guide Before requesting service, make the disc changing noises for variable bit rate (VBR) tracks. "- -:- -" appears on the display. Sound is heard. Using the cassette deck Poor quality sound. Turn the volume up...
SAPM28 User Guide
Page 31
... caused by products not supplied by the warrantor, or failures which result from accidents, misuse, abuse, neglect, mishandling, misapplication, alteration, faulty installation, set-up adjustments, misadjustment of consumer controls, improper maintenance, power line surge, lightning damage, modification, or commercial use of the original purchase date is attributable to repair or replace will be no charge for parts. Carry-In or Mail-In Service For...
... caused by products not supplied by the warrantor, or failures which result from accidents, misuse, abuse, neglect, mishandling, misapplication, alteration, faulty installation, set-up adjustments, misadjustment of consumer controls, improper maintenance, power line surge, lightning damage, modification, or commercial use of the original purchase date is attributable to repair or replace will be no charge for parts. Carry-In or Mail-In Service For...

SAPM28 User Guide
Page 32
... to turn the unit off. 3 Disconnect the AC power supply cord. Printed in standby mode: 0.45W Notes: 1. Use a cleaning tape (not included). 1 Remove all discs. 2 Press [ /I ) 35 Hz - 14 kHz S/N 50 dB (A weighted) Wow and flutter 0.18% (WRMS) Fast forward and rewind time Approx. 120 seconds with C-60 cassette tape CD SECTION Sampling frequency Decoding Beam source/wavelength Number of channels Frequency response Wow and flutter Digital filter...
... to turn the unit off. 3 Disconnect the AC power supply cord. Printed in standby mode: 0.45W Notes: 1. Use a cleaning tape (not included). 1 Remove all discs. 2 Press [ /I ) 35 Hz - 14 kHz S/N 50 dB (A weighted) Wow and flutter 0.18% (WRMS) Fast forward and rewind time Approx. 120 seconds with C-60 cassette tape CD SECTION Sampling frequency Decoding Beam source/wavelength Number of channels Frequency response Wow and flutter Digital filter...


