
SAAK62 User Guide
Page 2
... replacement parts. (Only for supplied accessories 7 Optional antenna connection 7 Subwoofer connection 7 External unit connection 8 Concerning the remote control 9 Battery installation 9 Correct method of use 9 Front panel controls 10 Turning the demo function off 12 Auto-off function 12 Setting the time 13 Radio operations Listening to radio broadcasts 14 Presetting radio broadcasts 15 Compact disc operations Concerning compact discs 16 Listening to compact discs 17 Direct access play 18 Repeat play 18 Random play 18 Program play 19 To listen to special CDs and tracks (CD...
... replacement parts. (Only for supplied accessories 7 Optional antenna connection 7 Subwoofer connection 7 External unit connection 8 Concerning the remote control 9 Battery installation 9 Correct method of use 9 Front panel controls 10 Turning the demo function off 12 Auto-off function 12 Setting the time 13 Radio operations Listening to radio broadcasts 14 Presetting radio broadcasts 15 Compact disc operations Concerning compact discs 16 Listening to compact discs 17 Direct access play 18 Repeat play 18 Random play 18 Program play 19 To listen to special CDs and tracks (CD...

SAAK62 User Guide
Page 3
... volume control at a safe level. So what sounds "normal" can hear it there. Recording operations Before recording (Deck 2 only 22 Tape-to-tape recording 23 Recording from radio broadcasts 24 Recording from compact discs 25 To record special CDs and tracks (CD Manager function 26 Sound quality/sound field operations Using the built-in sound quality/ sound field settings 27 Enhancing the sound quality 27 Boosting the super woofer 27 Varying the sound quality with the manual equalizer 28 Varying the sound...
... volume control at a safe level. So what sounds "normal" can hear it there. Recording operations Before recording (Deck 2 only 22 Tape-to-tape recording 23 Recording from radio broadcasts 24 Recording from compact discs 25 To record special CDs and tracks (CD Manager function 26 Sound quality/sound field operations Using the built-in sound quality/ sound field settings 27 Enhancing the sound quality 27 Boosting the super woofer 27 Varying the sound quality with the manual equalizer 28 Varying the sound...
SAAK62 User Guide
Page 4
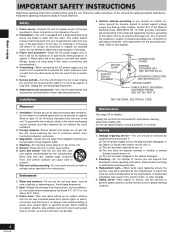
... rain; Replacement parts -When parts need replacing ensure the servicer uses parts specified by items placed on a flat, level surface. 6. Never take extreme care not to authorized servicing personnel. 3. Always grasp the plug body firmly when connecting and disconnecting it is wider than the other device as contact with a polarized power plug where one blade is not in these operating instructions. Nonuse periods-Turn the unit...
... rain; Replacement parts -When parts need replacing ensure the servicer uses parts specified by items placed on a flat, level surface. 6. Never take extreme care not to authorized servicing personnel. 3. Always grasp the plug body firmly when connecting and disconnecting it is wider than the other device as contact with a polarized power plug where one blade is not in these operating instructions. Nonuse periods-Turn the unit...
SAAK62 User Guide
Page 5
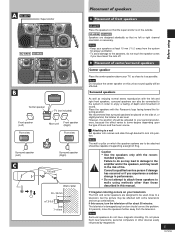
... right channel orientation is on this unit as possible. Surround speakers As well as enjoying normal stereo reproduction with some degree depending upon the type of music and the music source. However, the position should correct the problem. C Attaching to a wall Set speaker onto screws and slide through bracket to lock into position. We recommend that surround speakers be capable of supporting...
... right channel orientation is on this unit as possible. Surround speakers As well as enjoying normal stereo reproduction with some degree depending upon the type of music and the music source. However, the position should correct the problem. C Attaching to a wall Set speaker onto screws and slide through bracket to lock into position. We recommend that surround speakers be capable of supporting...

SAAK62 User Guide
Page 7
.... Subwoofer (not included) Rear panel of vinyl-covered wire horizontally along a window or other connections have been made. • To prepare the antenna wires and speaker cords, twist the vinyl cover tip and pull off. A Surround speaker cords B Center speaker cord C Front (L/R) speaker cords Connect each other speakers can damage the unit and sound quality will be installed by connecting a subwoofer. Caution Use only the supplied speakers. Note The included AC power supply cord is not in use...
.... Subwoofer (not included) Rear panel of vinyl-covered wire horizontally along a window or other connections have been made. • To prepare the antenna wires and speaker cords, twist the vinyl cover tip and pull off. A Surround speaker cords B Center speaker cord C Front (L/R) speaker cords Connect each other speakers can damage the unit and sound quality will be installed by connecting a subwoofer. Caution Use only the supplied speakers. Note The included AC power supply cord is not in use...
SAAK62 User Guide
Page 10
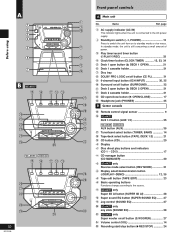
... : Display select/demonstration button (-DISPLAY/-DEMO 12, 35 ; In standby mode, the unit is connected to the AC power supply. 2 Standby/on switch (f/I, POWER 13 Press to switch the unit from on /off button (S.WOOFER 27 \ Volume control (VOL 14 ] Recording start/stop button (a REC/STOP 24 Surround on /off button (SURROUND 32 Deck 2 open button (c DECK 2 OPEN 21 # Deck 2 cassette holder 21 $ CD open button (c DECK 1 OPEN 21 6 Deck 1 cassette holder 21 7 Disc tray 8 DOLBY PRO LOGIC on /off button (p PL 31 9 6-channel input button...
... : Display select/demonstration button (-DISPLAY/-DEMO 12, 35 ; In standby mode, the unit is connected to the AC power supply. 2 Standby/on switch (f/I, POWER 13 Press to switch the unit from on /off button (S.WOOFER 27 \ Volume control (VOL 14 ] Recording start/stop button (a REC/STOP 24 Surround on /off button (SURROUND 32 Deck 2 open button (c DECK 2 OPEN 21 # Deck 2 cassette holder 21 $ CD open button (c DECK 1 OPEN 21 6 Deck 1 cassette holder 21 7 Disc tray 8 DOLBY PRO LOGIC on /off button (p PL 31 9 6-channel input button...
SAAK62 User Guide
Page 12
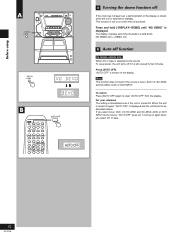
... the unit is turned on ) B Auto-off function by remote control only When CD or tape is selected as the source To save power, the unit turns off if it is displayed and the unit functions as the source, "AUTO OFF" goes out. AUTO OFF 12 RQT5769 Before using A DISPLAY/ DEMO DISPLAY/ DEMO B A Turning the demo function off If the clock has not been set to on at the time of the display is shown...
... the unit is turned on ) B Auto-off function by remote control only When CD or tape is selected as the source To save power, the unit turns off if it is displayed and the unit functions as the source, "AUTO OFF" goes out. AUTO OFF 12 RQT5769 Before using A DISPLAY/ DEMO DISPLAY/ DEMO B A Turning the demo function off If the clock has not been set to on at the time of the display is shown...
SAAK62 User Guide
Page 14
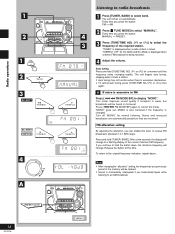
.... Turn off "MONO" for SC-AK66 and SC-AK62) is displayed when a stereo FM broadcast is tuned. Note • After changing the "allocation" setting, the frequencies you previously preset in the memory will change . The unit comes on automatically. Press and hold [TUNE/TIME ADJ (3) or (4)] for a moment until the frequency starts changing rapidly. Release the button at this tuner to a flashing display of the required station. MHz Auto tuning Press...
.... Turn off "MONO" for SC-AK66 and SC-AK62) is displayed when a stereo FM broadcast is tuned. Note • After changing the "allocation" setting, the frequencies you previously preset in the memory will change . The unit comes on automatically. Press and hold [TUNE/TIME ADJ (3) or (4)] for a moment until the frequency starts changing rapidly. Release the button at this tuner to a flashing display of the required station. MHz Auto tuning Press...
SAAK62 User Guide
Page 16
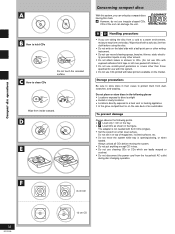
...CD on the tray. • F Load CDs as shown in the figure. The adapter is opening/closing, or when loaded. Do not set it on top of the sort can only play compact discs having this system. • Do not use CDs printed with a ball-point pen or other writing instrument. • Do not use record cleaning...; Do not disconnect the power cord from the household AC outlet during disc changing operation. Do not place or store discs in tray. • Do not use cleaning CDs or CDs which are taking the disc from a cold to a warm environment, moisture may form on the disc. B ~ D Handling ...
...CD on the tray. • F Load CDs as shown in the figure. The adapter is opening/closing, or when loaded. Do not set it on top of the sort can only play compact discs having this system. • Do not use CDs printed with a ball-point pen or other writing instrument. • Do not use record cleaning...; Do not disconnect the power cord from the household AC outlet during disc changing operation. Do not place or store discs in tray. • Do not use cleaning CDs or CDs which are taking the disc from a cold to a warm environment, moisture may form on the disc. B ~ D Handling ...

SAAK62 User Guide
Page 17
... (Search) Hold down [g/(] (backward) or [)/f] (forward) during playback. What is in the tray. Press [c OPEN/CLOSE] button. Compact disc operations A To stop the changer before loading or changing CDs. For example, if play audio CD-R and CD-RW. To resume playback, press [;/J]. (For SC-AK66 and SC-AK62) Press [ J ] during playback or pause mode. You cannot change CDs while a disc is in the programmed order, whether forward or backward. • Always stop the disc play will...
... (Search) Hold down [g/(] (backward) or [)/f] (forward) during playback. What is in the tray. Press [c OPEN/CLOSE] button. Compact disc operations A To stop the changer before loading or changing CDs. For example, if play audio CD-R and CD-RW. To resume playback, press [;/J]. (For SC-AK66 and SC-AK62) Press [ J ] during playback or pause mode. You cannot change CDs while a disc is in the programmed order, whether forward or backward. • Always stop the disc play will...

SAAK62 User Guide
Page 18
... the button: 1-DISC ALL-DISC Previous display RANDOM To random play just one track Set the 1-TRACK mode (A page 20), press [REPEAT] before or during playback, and make sure " " is displayed. To cancel random play Press [REPEAT] once again. Only the programmed tracks will be played, but in random order. Compact disc operations 2 1 2 3 A B 18 RQT5769 Listening to compact discs Direct access play 1 by remote control only 3 Press [DISC]. (within 10 seconds or so. Program the tracks you want. Press [-/4]. Every time...
... the button: 1-DISC ALL-DISC Previous display RANDOM To random play just one track Set the 1-TRACK mode (A page 20), press [REPEAT] before or during playback, and make sure " " is displayed. To cancel random play Press [REPEAT] once again. Only the programmed tracks will be played, but in random order. Compact disc operations 2 1 2 3 A B 18 RQT5769 Listening to compact discs Direct access play 1 by remote control only 3 Press [DISC]. (within 10 seconds or so. Program the tracks you want. Press [-/4]. Every time...
SAAK62 User Guide
Page 24
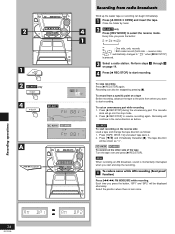
... [a REC/STOP] during the unnecessary part. " " automatically changes to start and stop the recording. Select a radio station. To record from a specific point on the other side of the tape Turn the tape over and press [a REC/STOP]. The cassette deck will be shown as before. Recording will be displayed alternately. The tape direction will continue in the same direction as "4". Select the position where there is pressed. Recording operations 24 RQT5769...
... [a REC/STOP] during the unnecessary part. " " automatically changes to start and stop the recording. Select a radio station. To record from a specific point on the other side of the tape Turn the tape over and press [a REC/STOP]. The cassette deck will be shown as before. Recording will be displayed alternately. The tape direction will continue in the same direction as "4". Select the position where there is pressed. Recording operations 24 RQT5769...

SAAK62 User Guide
Page 25
... tape direction will stop automatically too. Recording operations 25 RQT5769 Press [CD]. Insert CD in the tray. (Perform steps 1 ~ 2 on the reverse side Load a tape and change the tape direction as "4". Press [a REC/STOP] to start recording. The CD will continue on the selected CD and will stop playback. To record programmed tracks 1. Press [c DECK 2 OPEN] and insert the tape. Press [(CD 1) ~ (CD 5)] to " " when [aREC/STOP] is finished. Press [a REC/STOP] to select the reverse mode. SC...
... tape direction will stop automatically too. Recording operations 25 RQT5769 Press [CD]. Insert CD in the tray. (Perform steps 1 ~ 2 on the reverse side Load a tape and change the tape direction as "4". Press [a REC/STOP] to start recording. The CD will continue on the selected CD and will stop playback. To record programmed tracks 1. Press [c DECK 2 OPEN] and insert the tape. Press [(CD 1) ~ (CD 5)] to " " when [aREC/STOP] is finished. Press [a REC/STOP] to select the reverse mode. SC...

SAAK62 User Guide
Page 29
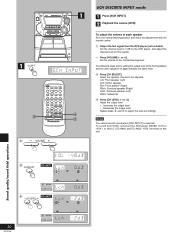
...; CD • TAPE • AUX This mode cannot be identified with this system to increase the effect. Any general sound source can be used with the radio, 6CH DISCRETE INPUT mode, or if headphones are connected. • This mode adds surround effects to normal music sources. If this unit. • Dolby Digital and DTS are discrete 6 (5.1) channel surround systems developed for cinema use. No discernible effect will need a DVD player...
...; CD • TAPE • AUX This mode cannot be identified with this system to increase the effect. Any general sound source can be used with the radio, 6CH DISCRETE INPUT mode, or if headphones are connected. • This mode adds surround effects to normal music sources. If this unit. • Dolby Digital and DTS are discrete 6 (5.1) channel surround systems developed for cinema use. No discernible effect will need a DVD player...
SAAK62 User Guide
Page 30
... make the adjustments with the remote control. 1 Output the test signal from DVDs, reconnect the DVD player (MIXED OUT) to "AUX 1 or AUX 2" (SC-AK66 and SC-AK62: "AUX") terminal on this unit. To adjust the volume of the front speakers and the other speakers to be adjusted. Lch: Front speaker (Left) Cch: Center speaker Rch: Front speaker (Right) RSch: Surround speaker (Right) LSch: Surround speaker (Left) SWch: Subwoofer 4 Press [CH LEVEL (- Sound quality/sound field operations...
... make the adjustments with the remote control. 1 Output the test signal from DVDs, reconnect the DVD player (MIXED OUT) to "AUX 1 or AUX 2" (SC-AK66 and SC-AK62: "AUX") terminal on this unit. To adjust the volume of the front speakers and the other speakers to be adjusted. Lch: Front speaker (Left) Cch: Center speaker Rch: Front speaker (Right) RSch: Surround speaker (Right) LSch: Surround speaker (Left) SWch: Subwoofer 4 Press [CH LEVEL (- Sound quality/sound field operations...

SAAK62 User Guide
Page 33
... set time. Preparations • Turn the unit on Press [rPLAY/rREC] to display the timer indicator. tape, CD, radio, aux, or 6-channel input, and set the volume. • For the record timer, check the cassette's erasure prevention tabs (A page 22: B), insert the tape in combination with volume increasing gradually up , or it can be used in deck 2, select the reverse mode (for the timers to operate. • For play timer The timer play timer on rREC : to turn...
... set time. Preparations • Turn the unit on Press [rPLAY/rREC] to display the timer indicator. tape, CD, radio, aux, or 6-channel input, and set the volume. • For the record timer, check the cassette's erasure prevention tabs (A page 22: B), insert the tape in combination with volume increasing gradually up , or it can be used in deck 2, select the reverse mode (for the timers to operate. • For play timer The timer play timer on rREC : to turn...

SAAK62 User Guide
Page 34
... remaining time then press [SLEEP] to edit-record a CD using CD Manager function. • The sleep timer can be activated. • If "AUX 1/2" (SC-AK66 and SC-AK62: "AUX") or " 6CH INPUT" is ON) Press [SLEEP]. Two seconds after the timer setting is OFF by remote control only This timer turns your system OFF at 30-minute intervals). However, the Disc numbers and reverse mode (for play timer) and music source are displayed...
... remaining time then press [SLEEP] to edit-record a CD using CD Manager function. • The sleep timer can be activated. • If "AUX 1/2" (SC-AK66 and SC-AK62: "AUX") or " 6CH INPUT" is ON) Press [SLEEP]. Two seconds after the timer setting is OFF by remote control only This timer turns your system OFF at 30-minute intervals). However, the Disc numbers and reverse mode (for play timer) and music source are displayed...
SAAK62 User Guide
Page 36
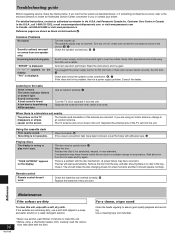
... hum is unfixed, reversed or comes from other appliances and cords away from the unit. Separate the antenna from one speaker only. If you or contact your dealer. Using the cassette deck Poor quality sound. Playing discs The display is a problem with the cloth. The disc may have formed inside the unit due to the radio Noise is a power supply problem. Condensation may be shorted. There...
... hum is unfixed, reversed or comes from other appliances and cords away from the unit. Separate the antenna from one speaker only. If you or contact your dealer. Using the cassette deck Poor quality sound. Playing discs The display is a problem with the cloth. The disc may have formed inside the unit due to the radio Noise is a power supply problem. Condensation may be shorted. There...

SAAK62 User Guide
Page 38
..., AUDIO PROCESSORS, EQUALIZERS, AUDIO MIXERS, REMOTE CONTROLS, HOME THEATER SYSTEMS (receiver/amplifiers, speakers), RACK SYSTEMS (receivers, tuners, amplifiers, cassette decks, CD players, equalizers, rack system speakers, EXCLUDING; They are NOT equipped to locate a PASC authorized Servicenter. ALL AUDIO RACKS (cabinets)-parts only 30 days. Carry-in or mail-in service in exchange for defective rechargeable batteries for ten (10) days. Or call toll free, 1-800-211-7262 to make repairs...
..., AUDIO PROCESSORS, EQUALIZERS, AUDIO MIXERS, REMOTE CONTROLS, HOME THEATER SYSTEMS (receiver/amplifiers, speakers), RACK SYSTEMS (receivers, tuners, amplifiers, cassette decks, CD players, equalizers, rack system speakers, EXCLUDING; They are NOT equipped to locate a PASC authorized Servicenter. ALL AUDIO RACKS (cabinets)-parts only 30 days. Carry-in or mail-in service in exchange for defective rechargeable batteries for ten (10) days. Or call toll free, 1-800-211-7262 to make repairs...

SAAK62 User Guide
Page 39
... only. Product information For product service, product information or assistance with C-60 cassette tape CD SECTION Sampling frequency 44.1 kHz Decoding 16 bit linear Beam source/wavelength Semiconductor laser/780 nm Number of channels Stereo Frequency response 20 Hz-20 kHz (+1, -2 dB) Wow and flutter Below measurable limit Digital filter 8 fs D/A converter MASH (1 bit DAC) SPEAKER SECTION • Front speakers SB-AK77 Type 3 way speaker system Speaker(s) Super Woofer Woofer...
... only. Product information For product service, product information or assistance with C-60 cassette tape CD SECTION Sampling frequency 44.1 kHz Decoding 16 bit linear Beam source/wavelength Semiconductor laser/780 nm Number of channels Stereo Frequency response 20 Hz-20 kHz (+1, -2 dB) Wow and flutter Below measurable limit Digital filter 8 fs D/A converter MASH (1 bit DAC) SPEAKER SECTION • Front speakers SB-AK77 Type 3 way speaker system Speaker(s) Super Woofer Woofer...


