
Operating Instructions
Page 1
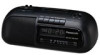
f.1 1-1 • L.Lf, Panaauni Before connecting, operating or adjusting this product, please read these instructions com- p pletely. Panasonic Clock Radio Cassette Player RC-X160 Operating instructions arrant ttr.
f.1 1-1 • L.Lf, Panaauni Before connecting, operating or adjusting this product, please read these instructions com- p pletely. Panasonic Clock Radio Cassette Player RC-X160 Operating instructions arrant ttr.
Operating Instructions
Page 2
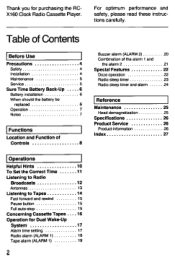
... operation 22 Radio sleep timer 23 Radio sleep timer and alarm 24 Reference Maintenance 25 Head demagnetization 25 Specifications 26 Product Service 26 Product information 26 Index 27 Operations Helpful Hints 10 To Set the Correct Time 11 Listening to Radio Broadcasts 12 Antennas 13 Listening to Tapes 14 Fast forward and rewind 15 Pause button 15 Full auto-stop 15 Concerning Cassette Tapes ....16 Operation for purchasing the RCX160 Clock Radio Cassette Player. Thank you for Dual Wake...
... operation 22 Radio sleep timer 23 Radio sleep timer and alarm 24 Reference Maintenance 25 Head demagnetization 25 Specifications 26 Product Service 26 Product information 26 Index 27 Operations Helpful Hints 10 To Set the Correct Time 11 Listening to Radio Broadcasts 12 Antennas 13 Listening to Tapes 14 Fast forward and rewind 15 Pause button 15 Full auto-stop 15 Concerning Cassette Tapes ....16 Operation for purchasing the RCX160 Clock Radio Cassette Player. Thank you for Dual Wake...

Operating Instructions
Page 3
... A The lightning flash with arrow head symbol, within an equi lateral triangle, is intended to alert the user to the presence of uninsulated "dangerous voltage" within an equilateral triangle is intended to alert the user to the presence of important operating and maintenance (servicing) instructions in the event of theft. MODEL NUMBER SERIAL NUMBER a The model number and serial number of this booklet as...
... A The lightning flash with arrow head symbol, within an equi lateral triangle, is intended to alert the user to the presence of uninsulated "dangerous voltage" within an equilateral triangle is intended to alert the user to the presence of important operating and maintenance (servicing) instructions in the event of theft. MODEL NUMBER SERIAL NUMBER a The model number and serial number of this booklet as...

Operating Instructions
Page 4
... not used, turn the power off. If the plug should still fail to fit, contact your electrician to replace your hand is equipped with a polarized AC power plug (a plug having one way. AC power supply cords should be walked on the unit. 2. Afterwards keep them . When the unit is a safety feature. Do not use this unit please read these operating instructions carefully. Precautions Before using this...
... not used, turn the power off. If the plug should still fail to fit, contact your electrician to replace your hand is equipped with a polarized AC power plug (a plug having one way. AC power supply cords should be walked on the unit. 2. Afterwards keep them . When the unit is a safety feature. Do not use this unit please read these operating instructions carefully. Precautions Before using this...

Operating Instructions
Page 5
..., scouring powder or solvent such as alcohol or benzine. 1. The unit should be used only with care. Damage Requiring Service -- The user should be moved with a cart or stand that objects do not fall into and ...change in performance; Service Do not use any type of the unit. Magnetism -- Quick stops, excessive force, and uneven surfaces may cause the unit and cart combination to a wall or ceiling, unless specified in the operating instructions. Care should not be taken so that is recommended by qualified service personnel when: (a) The AC power supply cord or the plug...
..., scouring powder or solvent such as alcohol or benzine. 1. The unit should be used only with care. Damage Requiring Service -- The user should be moved with a cart or stand that objects do not fall into and ...change in performance; Service Do not use any type of the unit. Magnetism -- Quick stops, excessive force, and uneven surfaces may cause the unit and cart combination to a wall or ceiling, unless specified in the operating instructions. Care should not be taken so that is recommended by qualified service personnel when: (a) The AC power supply cord or the plug...

Operating Instructions
Page 6
Battery installation 1 Connect a 9-Volt battery (not included) to reset the alarm. After several seconds, plug it in the direction of the arrow p, while pushing the battery holder in the compartment by a power interruption-so there is resumed, the display will keep the clock operating during a power interruption. A battery installed with a new one year). If the digits flash continuously, replace the battery with incorrect polarity may leak and damage the unit. 2 Place the...
Battery installation 1 Connect a 9-Volt battery (not included) to reset the alarm. After several seconds, plug it in the direction of the arrow p, while pushing the battery holder in the compartment by a power interruption-so there is resumed, the display will keep the clock operating during a power interruption. A battery installed with a new one year). If the digits flash continuously, replace the battery with incorrect polarity may leak and damage the unit. 2 Place the...
Operating Instructions
Page 7
... the power interruption.) After a power interruption, the time shown in use) for a long time, remove the back-up . Operation The sure time battery back-up is designed to keep the clock operating in the event of a power failure or interruption. (Such as the power source and the present time and the alarm time will be preserved. Notes When the set is not resumed by the wake-up time, the radio alarm...
... the power interruption.) After a power interruption, the time shown in use) for a long time, remove the back-up . Operation The sure time battery back-up is designed to keep the clock operating in the event of a power failure or interruption. (Such as the power source and the present time and the alarm time will be preserved. Notes When the set is not resumed by the wake-up time, the radio alarm...
Operating Instructions
Page 9
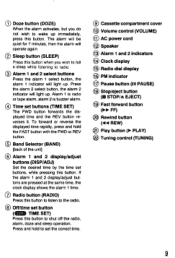
... alarm 2 select button, the alarm 2 indicator will light up . Alarm 1 is radio or tape alarm, alarm 2 is buzzer alarm. ® Time set the correct time. ® Cassette compartment cover 10 Volume control (VOLUME) 11 AC power cord © Speaker O Alarm 1 and 2 indicators ® Clock display @ Radio dial display PM indicator Pause button (II PAUSE) 18 Stop/eject button (• STOP/A EJECT) 19 Fast forward button (►► FF) Rewind button ('4-4 REW) © Play button (► PLAY) ict Tuning control (TUNING) 2 To forward or reverse the displayed time...
... alarm 2 select button, the alarm 2 indicator will light up . Alarm 1 is radio or tape alarm, alarm 2 is buzzer alarm. ® Time set the correct time. ® Cassette compartment cover 10 Volume control (VOLUME) 11 AC power cord © Speaker O Alarm 1 and 2 indicators ® Clock display @ Radio dial display PM indicator Pause button (II PAUSE) 18 Stop/eject button (• STOP/A EJECT) 19 Fast forward button (►► FF) Rewind button ('4-4 REW) © Play button (► PLAY) ict Tuning control (TUNING) 2 To forward or reverse the displayed time...
Operating Instructions
Page 11
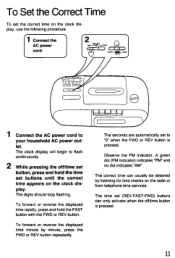
... AC power cord. The time set (REV-FAST-FWD) buttons can usually be obtained by minute, press the FWD or REV button repeatedly. The clock display will begin to flash continuously. 2 While pressing the off /time button is pressed. A green dot (PM indicator) indicates "PM' and no dot indicates "AM". To Set the Correct Time To set buttons until the correct time appears on the clock display. The digits should stop flashing...
... AC power cord. The time set (REV-FAST-FWD) buttons can usually be obtained by minute, press the FWD or REV button repeatedly. The clock display will begin to flash continuously. 2 While pressing the off /time button is pressed. A green dot (PM indicator) indicates "PM' and no dot indicates "AM". To Set the Correct Time To set buttons until the correct time appears on the clock display. The digits should stop flashing...
Operating Instructions
Page 12
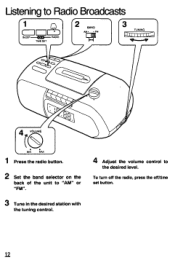
Listening to the desired level. To turn off the radio, press the orktIme set button. 3 Tune in the desired station with the tuning control. 12 VOLUME MIN MA{ f 1 Press the radio button. 2 Set the band selector on the back of the unit to "AM" or 4 Adjust the volume control to Radio Broadcasts r1 gs e2r cal NMIO 2 BAND IIII 3 TUNING Jrr.
Listening to the desired level. To turn off the radio, press the orktIme set button. 3 Tune in the desired station with the tuning control. 12 VOLUME MIN MA{ f 1 Press the radio button. 2 Set the band selector on the back of the unit to "AM" or 4 Adjust the volume control to Radio Broadcasts r1 gs e2r cal NMIO 2 BAND IIII 3 TUNING Jrr.
Operating Instructions
Page 14
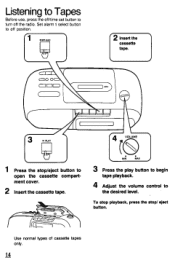
C C IN 3 Press the play button to begin tape playback. 4 Adjust the volume control to the desired level. To stop playback, press the stop /eject button to open the cassette compartment cover. 2 Insert the cassette tape. Use normal types of cassette tapes only. 14 c= 1 VOLUME 1 Press the stop / eject button. Set alarm 1 select button to off the radio. Listening to Tapes Before use, press the off/time set button to turn off position. 1 cOO CO= O 2 Insert the cassette tape.
C C IN 3 Press the play button to begin tape playback. 4 Adjust the volume control to the desired level. To stop playback, press the stop /eject button to open the cassette compartment cover. 2 Insert the cassette tape. Use normal types of cassette tapes only. 14 c= 1 VOLUME 1 Press the stop / eject button. Set alarm 1 select button to off the radio. Listening to Tapes Before use, press the off/time set button to turn off position. 1 cOO CO= O 2 Insert the cassette tape.
Operating Instructions
Page 17
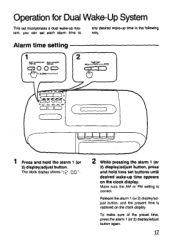
Operation for Dual Wake-Up System This set incorporates a dual wake-up system, you can set buttons until desired wake-up time in the following way. The clock display shows "Ip:00". 2 While pressing the alarm 1 (or 2) display/adjust button, press and hold the alarm 1 (or 2) display/adjust button. Release the alarm 1 (or 2) display/adjust button, and the present time is correct. Make sure the AM or PM setting is restored on the clock display. Alarm time setting 0 0 cp 2 2 REV ThEMEL.-rwo r t,it...
Operation for Dual Wake-Up System This set incorporates a dual wake-up system, you can set buttons until desired wake-up time in the following way. The clock display shows "Ip:00". 2 While pressing the alarm 1 (or 2) display/adjust button, press and hold the alarm 1 (or 2) display/adjust button. Release the alarm 1 (or 2) display/adjust button, and the present time is correct. Make sure the AM or PM setting is restored on the clock display. Alarm time setting 0 0 cp 2 2 REV ThEMEL.-rwo r t,it...
Operating Instructions
Page 18
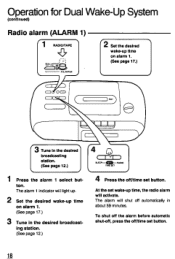
ing station. (See page 12.) 4 4 ( 1 1 ) - iWE SET 4 Press the off /time set button. 11 The alarm 1 indicator will light up. 2 Set the desired wake-up time on alarm 1. (See page 17.) 3 Tune in the desired broadcast- At the set button. To shut off the alarm before automatic shut-off, press the off /time set wake-up time, the radio alarm will shut off automatically in about 59 minutes. Operation for Dual Wake-Up System (continued) Radio alarm (ALARM 1) r RADIO/TAPE .C5 r ALAFIM ( 2 Set the...
ing station. (See page 12.) 4 4 ( 1 1 ) - iWE SET 4 Press the off /time set button. 11 The alarm 1 indicator will light up. 2 Set the desired wake-up time on alarm 1. (See page 17.) 3 Tune in the desired broadcast- At the set button. To shut off the alarm before automatic shut-off, press the off /time set wake-up time, the radio alarm will shut off automatically in about 59 minutes. Operation for Dual Wake-Up System (continued) Radio alarm (ALARM 1) r RADIO/TAPE .C5 r ALAFIM ( 2 Set the...
Operating Instructions
Page 19
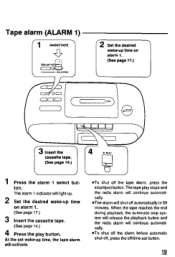
... playback button and the radio alarm will shut off /time set wake-up time, the tape alarm will light up. 2 Set the desired wake-up time on alarm 1. (See page 17.) 3 Insert the cassette tape. (See page 14.) 4 Press the play stops and the radio alarm will continue automatically. *The alarm will continue automatically. *To shut off the alarm before automatic shut-off, press the off automatically in 59 minutes. At the set button. 19 The tape play button. ton. Tape alarm (ALARM 1) ( 1 RADIO...
... playback button and the radio alarm will shut off /time set wake-up time, the tape alarm will light up. 2 Set the desired wake-up time on alarm 1. (See page 17.) 3 Insert the cassette tape. (See page 14.) 4 Press the play stops and the radio alarm will continue automatically. *The alarm will continue automatically. *To shut off the alarm before automatic shut-off, press the off automatically in 59 minutes. At the set button. 19 The tape play button. ton. Tape alarm (ALARM 1) ( 1 RADIO...

Operating Instructions
Page 20
ton. Operation for Dual Wake-up System (continued) Buzzer alarm (ALARM 2) r1 BUZZER a =-r"1"?.:' 2 Set the desired wake-up time on alarm 2. (See page 17.) At the set wake-up time on alarm 2. (See page 17.) c Co = CIO0 C L_LJ) 1 Press the alarm 2 select but- The alarm 2 indicator will light up. 2 Set the desired wake-up time, the buzzer alarm will shut off /time set button. The alarm will activate. To shut off the alarm before automatic shut-off, press the off automatically in about 59 minutes.
ton. Operation for Dual Wake-up System (continued) Buzzer alarm (ALARM 2) r1 BUZZER a =-r"1"?.:' 2 Set the desired wake-up time on alarm 2. (See page 17.) At the set wake-up time on alarm 2. (See page 17.) c Co = CIO0 C L_LJ) 1 Press the alarm 2 select but- The alarm 2 indicator will light up. 2 Set the desired wake-up time, the buzzer alarm will shut off /time set button. The alarm will activate. To shut off the alarm before automatic shut-off, press the off automatically in about 59 minutes.
Operating Instructions
Page 21
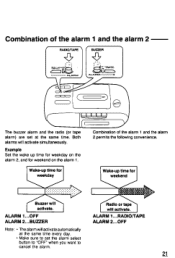
... time for weekday on the alarm 1. Radio or tape will activate automatically at the same time. Wake-up time for weekend on the alarm 2, and for weekend Buzzer will activate simultaneously. Wake-up time for weekday Combination of the alarm 1 and the alarm 2 RADIO/TAPE B.CUZZER C7 ALAR CO= C ) The buzzer alarm and the radio (or tape alarm) are set at the same time every day. • Make sure to set the alarm select button...
... time for weekday on the alarm 1. Radio or tape will activate automatically at the same time. Wake-up time for weekend on the alarm 2, and for weekend Buzzer will activate simultaneously. Wake-up time for weekday Combination of the alarm 1 and the alarm 2 RADIO/TAPE B.CUZZER C7 ALAR CO= C ) The buzzer alarm and the radio (or tape alarm) are set at the same time every day. • Make sure to set the alarm select button...
Operating Instructions
Page 22
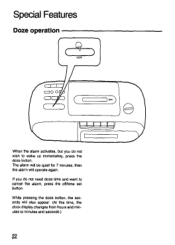
While pressing the doze button, the seconds will operate again. If you do not need doze time and want to minutes and seconds.) 22 Special Features Doze operation C=O 0 Cra When the alarm activates, but you do not wish to wake up immediately, press the doze button. The alarm will be quiet for 7 minutes, then the alarm will also appear. (At this time, the clock display changes from hours and minutes to cancel the alarm, press the off/time set button.
While pressing the doze button, the seconds will operate again. If you do not need doze time and want to minutes and seconds.) 22 Special Features Doze operation C=O 0 Cra When the alarm activates, but you do not wish to wake up immediately, press the doze button. The alarm will be quiet for 7 minutes, then the alarm will also appear. (At this time, the clock display changes from hours and minutes to cancel the alarm, press the off/time set button.
Operating Instructions
Page 23
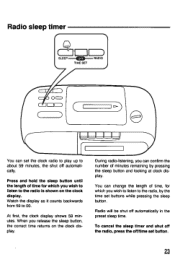
... the number of time for which you wish to listen to the radio is shown on the clock display. a To cancel the sleep timer and shut ott the radio, press the off automatically in the preset sleep time. Radio will be shut off /time set button. Press and hold the sleep button until the length of minutes remaining by the time set buttons while pressing the sleep button. Radio sleep timer SLEEP a OFF TIME SET RADIO OC., C ) O Li You can set the clock radio to play...
... the number of time for which you wish to listen to the radio is shown on the clock display. a To cancel the sleep timer and shut ott the radio, press the off automatically in the preset sleep time. Radio will be shut off /time set button. Press and hold the sleep button until the length of minutes remaining by the time set buttons while pressing the sleep button. Radio sleep timer SLEEP a OFF TIME SET RADIO OC., C ) O Li You can set the clock radio to play...
Operating Instructions
Page 24
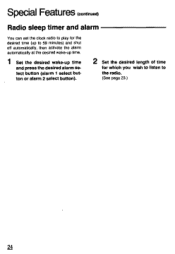
Special Features (continued) Radio sleep timer and alarm You can set the clock radio to play for the desired time (up to 59 minutes) and shut off automatically, then activate the alarm automatically at the desired wake-up time. 1 Set the desired wake-up time and press the desired alarm select button (alarm 1 select button or alarm 2 select button). 2 Set the desired length of time for which you wish to listen to the radio. (See page 23.) 24
Special Features (continued) Radio sleep timer and alarm You can set the clock radio to play for the desired time (up to 59 minutes) and shut off automatically, then activate the alarm automatically at the desired wake-up time. 1 Set the desired wake-up time and press the desired alarm select button (alarm 1 select button or alarm 2 select button). 2 Set the desired length of time for which you wish to listen to the radio. (See page 23.) 24
Operating Instructions
Page 27
Index AC power cord 9 Alarm 1 and 2 display/adjust button . . .17 Alarm 1 and 2 indicator 9 Alarm 1 and 2 select button .18, 19, 20 Antennas 13 Band selector 9 Clock display 9 Doze button 22 Fast forward button Ott/time set button 15 11, 12 PM indicator Pause button Play button Radio button Radio dial display Rewind button Sleep button Speaker Stop/eject button Time set buttons Tuning control Volume control 9 11 9 15 9 14 12 9 15 23 9 9 14 11, 17 12 12, 14 2Z
Index AC power cord 9 Alarm 1 and 2 display/adjust button . . .17 Alarm 1 and 2 indicator 9 Alarm 1 and 2 select button .18, 19, 20 Antennas 13 Band selector 9 Clock display 9 Doze button 22 Fast forward button Ott/time set button 15 11, 12 PM indicator Pause button Play button Radio button Radio dial display Rewind button Sleep button Speaker Stop/eject button Time set buttons Tuning control Volume control 9 11 9 15 9 14 12 9 15 23 9 9 14 11, 17 12 12, 14 2Z

