PVL751 User Guide
Page 6
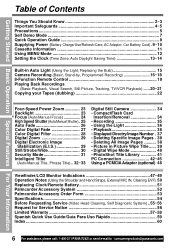
...Time Zone, Auto Daylight Saving Time 13~14 Built-in Auto Light (Using the Light, Replacing the Bulb 15 Camera Recording (Basic, Stand-by, Programmed Recording 16~18 8-Function Remote Control 19 Playing Back Recordings (Basic Playback, ...(E.I.S 29 Still/Strobe/Wide 30 Security Mode 31 Intelligent Titler (Auto/Manual Title, Phrase Title) .. 32~33 Digital Still Camera 34 • CompactFlash Card Insertion/Removal 34 • Recording 35 • Using the Light 36 • Playback 36 ... assistance, please call : 1-800-211-PANA(7262) or send e-mail to : consumerproducts@panasonic.com
...Time Zone, Auto Daylight Saving Time 13~14 Built-in Auto Light (Using the Light, Replacing the Bulb 15 Camera Recording (Basic, Stand-by, Programmed Recording 16~18 8-Function Remote Control 19 Playing Back Recordings (Basic Playback, ...(E.I.S 29 Still/Strobe/Wide 30 Security Mode 31 Intelligent Titler (Auto/Manual Title, Phrase Title) .. 32~33 Digital Still Camera 34 • CompactFlash Card Insertion/Removal 34 • Recording 35 • Using the Light 36 • Playback 36 ... assistance, please call : 1-800-211-PANA(7262) or send e-mail to : consumerproducts@panasonic.com

PVL751 User Guide
Page 7
...Self Demo back on when the screen below . EVF or LCD Monitor Before you begin... • Connect Camcorder to SELF DEMO : ON in MENU screen. 7 ITS TAPES PLAY IYNESY,OITU,RS VCR VHS! 26× LENS / 300× D.ZOOM DIGITAL STABILIZATION FULL-SIZE HEAD SYSTEM AUTO/PHRASE TITLER FAR ...UP FOCUS DOWN NEAR DISPLAY MENU 2, 3, 4 PHOTO VCR OFF CAMERA 1 1 Set POWER to CAMERA. 2 Press MENU for 30 seconds when a function key other ...
...Self Demo back on when the screen below . EVF or LCD Monitor Before you begin... • Connect Camcorder to SELF DEMO : ON in MENU screen. 7 ITS TAPES PLAY IYNESY,OITU,RS VCR VHS! 26× LENS / 300× D.ZOOM DIGITAL STABILIZATION FULL-SIZE HEAD SYSTEM AUTO/PHRASE TITLER FAR ...UP FOCUS DOWN NEAR DISPLAY MENU 2, 3, 4 PHOTO VCR OFF CAMERA 1 1 Set POWER to CAMERA. 2 Press MENU for 30 seconds when a function key other ...

PVL751 User Guide
Page 8
... • Remove the Protection Film before operation (page 9). Playback using the LCD Monitor When the LCD monitor is complete. PHOTO VCR OFF CAMERA 3 Press REWIND/SEARCH to rewind tape. 4 Press PLAY to start recording. Swing it fully open door. 3Insert cassette (page 11). 4Press... here to VCR. Press RECORD/PAUSE Protection Film again to : consumerproducts@panasonic.com Insert Cassette 1Attach fully charged Battery (page 9). 2Slide TAPE EJECT to open and adjust the angle (see above). 2 Set POWER...
... • Remove the Protection Film before operation (page 9). Playback using the LCD Monitor When the LCD monitor is complete. PHOTO VCR OFF CAMERA 3 Press REWIND/SEARCH to rewind tape. 4 Press PLAY to start recording. Swing it fully open door. 3Insert cassette (page 11). 4Press... here to VCR. Press RECORD/PAUSE Protection Film again to : consumerproducts@panasonic.com Insert Cassette 1Attach fully charged Battery (page 9). 2Slide TAPE EJECT to open and adjust the angle (see above). 2 Set POWER...
PVL751 User Guide
Page 12
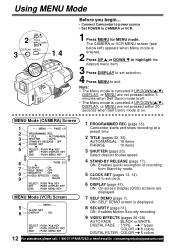
... colors DIGITAL FILTER : COLOR 5 colors 12 For assistance, please call : 1-800-211-PANA(7262) or send e-mail to CAMERA or VCR. 1 Press MENU for MENU mode. MENU Mode (CAMERA) Screen 1 - - - AUTO/MANUAL 3 SHUTTER ; ON: On-screen Display (OSD) screens are not pressed within 5 ...- - - Using MENU Mode FAR 2 UP FOCUS DOWN NEAR DISPLAY MENU 3 1, 4 Before you begin... • Connect Camcorder to power source. • Set POWER to : consumerproducts@panasonic.com Note: • The Menu mode is canceled if UP/DOWN(v/w), DISPLAY, or MENU are not pressed within 30 seconds when...
... colors DIGITAL FILTER : COLOR 5 colors 12 For assistance, please call : 1-800-211-PANA(7262) or send e-mail to CAMERA or VCR. 1 Press MENU for MENU mode. MENU Mode (CAMERA) Screen 1 - - - AUTO/MANUAL 3 SHUTTER ; ON: On-screen Display (OSD) screens are not pressed within 5 ...- - - Using MENU Mode FAR 2 UP FOCUS DOWN NEAR DISPLAY MENU 3 1, 4 Before you begin... • Connect Camcorder to power source. • Set POWER to : consumerproducts@panasonic.com Note: • The Menu mode is canceled if UP/DOWN(v/w), DISPLAY, or MENU are not pressed within 30 seconds when...

PVL751 User Guide
Page 13
...STAND-BY RELEASE ; MENU - - - D.S.T. Getting Started Setting the Clock Set the following items in step 2. Press UP v or DOWN w to CAMERA or VCR. To change the setting: TIME ZONE Go to exit. (continued on page 14. EASTERN D. PAGE 1/2 PROGRAMMED REC T I SPLAY ; ...Before you begin... • Connect Camcorder to power source. • Set POWER to select TIME ZONE, DST, or DATE/TIME. - - - T. ; DATE/TIME Go to step 3c ...
...STAND-BY RELEASE ; MENU - - - D.S.T. Getting Started Setting the Clock Set the following items in step 2. Press UP v or DOWN w to CAMERA or VCR. To change the setting: TIME ZONE Go to exit. (continued on page 14. EASTERN D. PAGE 1/2 PROGRAMMED REC T I SPLAY ; ...Before you begin... • Connect Camcorder to power source. • Set POWER to select TIME ZONE, DST, or DATE/TIME. - - - T. ; DATE/TIME Go to step 3c ...
PVL751 User Guide
Page 15
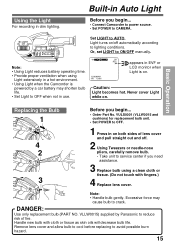
... POWER to OFF. 1 Press in on . Built-in Auto Light Using the Light For recording in a hot environment. • Using Light when the Camcorder is powered by Panasonic to reduce risk of lens cover and pull straight out and off automatically according to lighting conditions. Caution: Light becomes hot. LIGHT ON OFF... REC 12:00:00AM JAN 1 2001 appears in EVF or LCD monitor when Light is on both sides of fire. Before you begin ... • Connect Camcorder to power source. • Set POWER to CAMERA. Handle new bulb with fingers.) 4 Replace lens cover.
... POWER to OFF. 1 Press in on . Built-in Auto Light Using the Light For recording in a hot environment. • Using Light when the Camcorder is powered by Panasonic to reduce risk of lens cover and pull straight out and off automatically according to lighting conditions. Caution: Light becomes hot. LIGHT ON OFF... REC 12:00:00AM JAN 1 2001 appears in EVF or LCD monitor when Light is on both sides of fire. Before you begin ... • Connect Camcorder to power source. • Set POWER to CAMERA. Handle new bulb with fingers.) 4 Replace lens cover.

PVL751 User Guide
Page 16
...SPEED Built-in the picture. This is normal for about 1 5 PHONE (earphone) jack Note: PHOTO VCR OFF CAMERA 62 • When Camcorder is aimed at excessively bright objects, or bright lights, a vertical bar may appear in Twin Capsule 2-Way Microphone ...or LCD (Liquid Crystal Display) monitor. 3 Before you want to record using EVF, close and lock LCD monitor. Camera Recording Recording via EVF or LCD Monitor View recording scene on when LCD is at 180° (see above left).... : Look into EVF and adjust POWER REC Power Lamp VISION ADJUSTMENT to : consumerproducts@panasonic.com
...SPEED Built-in the picture. This is normal for about 1 5 PHONE (earphone) jack Note: PHOTO VCR OFF CAMERA 62 • When Camcorder is aimed at excessively bright objects, or bright lights, a vertical bar may appear in Twin Capsule 2-Way Microphone ...or LCD (Liquid Crystal Display) monitor. 3 Before you want to record using EVF, close and lock LCD monitor. Camera Recording Recording via EVF or LCD Monitor View recording scene on when LCD is at 180° (see above left).... : Look into EVF and adjust POWER REC Power Lamp VISION ADJUSTMENT to : consumerproducts@panasonic.com

PVL751 User Guide
Page 17
...• Use Manual Easy Edit (left in Camcorder. When set POWER to OFF, then to ON, Stand-by Quick Release lets you resume recording by mode, press RECORD/PAUSE two times to CAMERA. 2 - - - OFF : From Stand-by mode, set to CAMERA. B a Press REWIND/SEARCH to review recording....DISPLAY MENU 2, 3, 4 c STILL DEL b PLAY REW FF + a STOP PHOTO VCR OFF CAMERA 1, b, c, a, d, B A, C D Stand-by Quick Release is set POWER to select ON/OFF. PAGE 1/2 Press MENU for 5 minutes, Camcorder switches to Standby mode to conserve battery. AUTO/MANUAL MENU mode. D Press RECORD/PAUSE to VCR...
...• Use Manual Easy Edit (left in Camcorder. When set POWER to OFF, then to ON, Stand-by Quick Release lets you resume recording by mode, press RECORD/PAUSE two times to CAMERA. 2 - - - OFF : From Stand-by mode, set to CAMERA. B a Press REWIND/SEARCH to review recording....DISPLAY MENU 2, 3, 4 c STILL DEL b PLAY REW FF + a STOP PHOTO VCR OFF CAMERA 1, b, c, a, d, B A, C D Stand-by Quick Release is set POWER to select ON/OFF. PAGE 1/2 Press MENU for 5 minutes, Camcorder switches to Standby mode to conserve battery. AUTO/MANUAL MENU mode. D Press RECORD/PAUSE to VCR...
PVL751 User Guide
Page 18
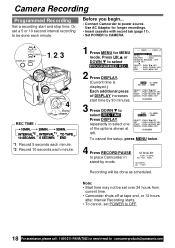
... MENU for longer recordings. • Insert cassette with record tab (page 11). • Set POWER to : consumerproducts@panasonic.com FAR UP FOCUS DOWN NEAR DISPLAY MENU 1, 2, 3 REC TIME : 4 PHOTO VCR OFF CAMERA *1 Record 5 seconds each minute. *2 Record 10 seconds each minute. SELECT : PUSH w/v KEY SET : PUSH DISPLAY... PUSH MENU KEY 10:20:00PM 3 Press DOWN w to power source. PAGE 1/2 PROGRAMMED REC T I TLE ; Press UP v or DOWN w to place Camcorder in stand-by 30 minutes. - - - STAND-BY START ; 10:20PM REC TIME ; 10MIN. 10:20:00PM JUN 1 2001 Recording will be done as ...
... MENU for longer recordings. • Insert cassette with record tab (page 11). • Set POWER to : consumerproducts@panasonic.com FAR UP FOCUS DOWN NEAR DISPLAY MENU 1, 2, 3 REC TIME : 4 PHOTO VCR OFF CAMERA *1 Record 5 seconds each minute. *2 Record 10 seconds each minute. SELECT : PUSH w/v KEY SET : PUSH DISPLAY... PUSH MENU KEY 10:20:00PM 3 Press DOWN w to power source. PAGE 1/2 PROGRAMMED REC T I TLE ; Press UP v or DOWN w to place Camcorder in stand-by 30 minutes. - - - STAND-BY START ; 10:20PM REC TIME ; 10MIN. 10:20:00PM JUN 1 2001 Recording will be done as ...

PVL751 User Guide
Page 19
...power. Important Note: • After 5 minutes in extra large characters for confirmation. Basic Operation 8-Function Remote Control Remote Control Operation Operate Camcorder's main functions up to face the same direction as the lens/ subject, "RECORD" or "PAUSE" is resumed within 30 minutes, press... REC/PAUSE once. If recording is displayed on-screen in Record/Pause mode, the camcorder will shut off to OFF, then CAMERA, then press REC/PAUSE. 19 Remote Sensor Note: • If you press REC/PAUSE on Camcorder. 1 T REC/ PAUSE 5 W 2 REW SEARCH FF PLAY 6 3 STOP STILL ...
...power. Important Note: • After 5 minutes in extra large characters for confirmation. Basic Operation 8-Function Remote Control Remote Control Operation Operate Camcorder's main functions up to face the same direction as the lens/ subject, "RECORD" or "PAUSE" is resumed within 30 minutes, press... REC/PAUSE once. If recording is displayed on-screen in Record/Pause mode, the camcorder will shut off to OFF, then CAMERA, then press REC/PAUSE. 19 Remote Sensor Note: • If you press REC/PAUSE on Camcorder. 1 T REC/ PAUSE 5 W 2 REW SEARCH FF PLAY 6 3 STOP STILL ...
PVL751 User Guide
Page 20
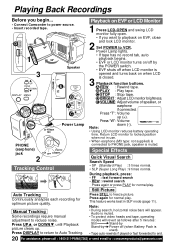
...-OPEN and swing LCD monitor fully open. • If you begin... • Connect Camcorder to locked position when not in SLP mode (page 11). B PLAY : Play tape....feature works best in use. • When earphone (M3 type: not supplied) is connected to : consumerproducts@panasonic.com A REW : Rewind tape. Press "W": Volume Note: down (-). • Using LCD monitor reduces ...PANA(7262) or send e-mail to PHONE jack, speaker is muted. (earphone) jack PHOTO VCR OFF CAMERA 2 Tracking Control Special Effects Quick Visual Search Search Speed • SP (Standard Play) : 3 times...
...-OPEN and swing LCD monitor fully open. • If you begin... • Connect Camcorder to locked position when not in SLP mode (page 11). B PLAY : Play tape....feature works best in use. • When earphone (M3 type: not supplied) is connected to : consumerproducts@panasonic.com A REW : Rewind tape. Press "W": Volume Note: down (-). • Using LCD monitor reduces ...PANA(7262) or send e-mail to PHONE jack, speaker is muted. (earphone) jack PHOTO VCR OFF CAMERA 2 Tracking Control Special Effects Quick Visual Search Search Speed • SP (Standard Play) : 3 times...

PVL751 User Guide
Page 21
...Playback using in VHS VCR. c Insert the cassette with your finger. Playing Back Recordings TV Playback or Viewing Connect Camcorder to a TV to open cassette lid. Connections T V Audio/ Video Out To Audio To Video In In Audio/Video Cable (Supplied) 1 Set POWER to LINE INPUT. CAMERA © ...shut. • Do not obstruct cassette reel while loading. • Allow PlayPak Load Detector to power source. • Make all TV-Camcorder connections. CATV System Installer This reminder is recorded. 2 Turn TV ON and set to : VCR © view playback. Before you begin... &#...
...Playback using in VHS VCR. c Insert the cassette with your finger. Playing Back Recordings TV Playback or Viewing Connect Camcorder to a TV to open cassette lid. Connections T V Audio/ Video Out To Audio To Video In In Audio/Video Cable (Supplied) 1 Set POWER to LINE INPUT. CAMERA © ...shut. • Do not obstruct cassette reel while loading. • Allow PlayPak Load Detector to power source. • Make all TV-Camcorder connections. CATV System Installer This reminder is recorded. 2 Turn TV ON and set to : VCR © view playback. Before you begin... &#...

PVL751 User Guide
Page 23
...... • Connect Camcorder to power source. • Set POWER to CAMERA. In normal lighting, press BACKLIGHT repeatedly until no indicator is darker than surroundings, in shadowed area, or in one of four speeds ranging from slow (16 seconds) to CAMERA. Special Features Backlight Use... when subject is displayed. BACKLIGHT Press BACKLIGHT. Press BACKLIGHT while recording to the button. Before you begin ... • Connect Camcorder to power source. • Set POWER to fast (2...
...... • Connect Camcorder to power source. • Set POWER to CAMERA. In normal lighting, press BACKLIGHT repeatedly until no indicator is darker than surroundings, in shadowed area, or in one of four speeds ranging from slow (16 seconds) to CAMERA. Special Features Backlight Use... when subject is displayed. BACKLIGHT Press BACKLIGHT. Press BACKLIGHT while recording to the button. Before you begin ... • Connect Camcorder to power source. • Set POWER to fast (2...

PVL751 User Guide
Page 24
... aiming at new scenes. 1 Macro Focus (close to the subject. 24 For assistance, please call : 1-800-211-PANA(7262) or send e-mail to CAMERA. Manual Focus Use Manual Focus (MF) when : • recording through glass. • lighting is poor. • subject is far away with objects ...(NEAR) until subject is not centered in EVF or LCD monitor if necessary. Focus Before you begin... • Connect Camcorder to power source. • Set POWER to : consumerproducts@panasonic.com Press MANUAL FOCUS to maximum wide angle. EVF or LCD Monitor MF 3 FAR UP FOCUS DOWN NEAR 42 MANUAL...
... aiming at new scenes. 1 Macro Focus (close to the subject. 24 For assistance, please call : 1-800-211-PANA(7262) or send e-mail to CAMERA. Manual Focus Use Manual Focus (MF) when : • recording through glass. • lighting is poor. • subject is far away with objects ...(NEAR) until subject is not centered in EVF or LCD monitor if necessary. Focus Before you begin... • Connect Camcorder to power source. • Set POWER to : consumerproducts@panasonic.com Press MANUAL FOCUS to maximum wide angle. EVF or LCD Monitor MF 3 FAR UP FOCUS DOWN NEAR 42 MANUAL...

PVL751 User Guide
Page 25
Before you begin... • Connect Camcorder to power source. • Insert cassette with record tab (page 11). • Set POWER to select shutter speed. - - - Press UP v or DOWN w to select SHUTTER . 2 Press DISPLAY repeatedly to CAMERA. OFF CLOCK SET w SELECT : PUSH w/v KEY SET : PUSH DISPLAY...function properly if high speed shutter is used in inadequate light. • Setting reverts to AUTO each time POWER is set to CAMERA. a tennis stroke), when viewed on Camcorder or 3 or 4 head VCR. High Speed Shutter indication flashes if light is needed for MENU mode. MENU - - - PAGE...
Before you begin... • Connect Camcorder to power source. • Insert cassette with record tab (page 11). • Set POWER to select shutter speed. - - - Press UP v or DOWN w to select SHUTTER . 2 Press DISPLAY repeatedly to CAMERA. OFF CLOCK SET w SELECT : PUSH w/v KEY SET : PUSH DISPLAY...function properly if high speed shutter is used in inadequate light. • Setting reverts to AUTO each time POWER is set to CAMERA. a tennis stroke), when viewed on Camcorder or 3 or 4 head VCR. High Speed Shutter indication flashes if light is needed for MENU mode. MENU - - - PAGE...

PVL751 User Guide
Page 26
ON SELF DEMO ; OFF VIDEO EFFECTS ; Press UP v or DOWN w to : consumerproducts@panasonic.com Fade Out: While recording, press FADE so "FADE" flashes in EVF or LCD monitor. Note: If FADE is paused. monitor. 26 For assistance, please ... AUTO FADE . - - - Auto Fade An interesting way to open and close scenes. 2, 3, 4, 5 FAR UP FOCUS DOWN NEAR DISPLAY MENU 1 FADE RECORD/ PAUSE PHOTO VCR OFF CAMERA Fade In Before you begin... • Connect Camcorder to power source. • Set POWER to CAMERA. 1 Slide DIGITAL SELECT to FADE. 2 Press MENU for w PAGE 2/2 MENU mode.
ON SELF DEMO ; OFF VIDEO EFFECTS ; Press UP v or DOWN w to : consumerproducts@panasonic.com Fade Out: While recording, press FADE so "FADE" flashes in EVF or LCD monitor. Note: If FADE is paused. monitor. 26 For assistance, please ... AUTO FADE . - - - Auto Fade An interesting way to open and close scenes. 2, 3, 4, 5 FAR UP FOCUS DOWN NEAR DISPLAY MENU 1 FADE RECORD/ PAUSE PHOTO VCR OFF CAMERA Fade In Before you begin... • Connect Camcorder to power source. • Set POWER to CAMERA. 1 Slide DIGITAL SELECT to FADE. 2 Press MENU for w PAGE 2/2 MENU mode.

PVL751 User Guide
Page 27
.... • To cancel Digital Fade, do steps 1, 2, 3, and 6. Then, press FADE to fade in Picture Wipe Title. Before you begin... • Connect Camcorder to power source. • Set POWER to CAMERA. 1 Slide DIGITAL SELECT to FADE. 2 Press MENU for about 2 seconds to - - - OFF VIDEO EFFECTS ; VIDEO EFFECTS - - - Press DISPLAY for VIDEO EFFECTS...
.... • To cancel Digital Fade, do steps 1, 2, 3, and 6. Then, press FADE to fade in Picture Wipe Title. Before you begin... • Connect Camcorder to power source. • Set POWER to CAMERA. 1 Slide DIGITAL SELECT to FADE. 2 Press MENU for about 2 seconds to - - - OFF VIDEO EFFECTS ; VIDEO EFFECTS - - - Press DISPLAY for VIDEO EFFECTS...

PVL751 User Guide
Page 28
Before you begin... • Connect Camcorder to power source. • Set POWER to CAMERA. 2, 3, 4, 5 FAR UP FOCUS DOWN NEAR DISPLAY MENU 1 1 Slide DIGITAL SELECT to select VIDEO EFFECTS . Press UP v or DOWN w to FADE. 2 Press MENU for MENU ...mode. DIGITAL FILTER ; Press MENU to exit. 6 Start recording (page 16). • To cancel Digital Filter, set POWER to : consumerproducts@panasonic.com ON SELF...
Before you begin... • Connect Camcorder to power source. • Set POWER to CAMERA. 2, 3, 4, 5 FAR UP FOCUS DOWN NEAR DISPLAY MENU 1 1 Slide DIGITAL SELECT to select VIDEO EFFECTS . Press UP v or DOWN w to FADE. 2 Press MENU for MENU ...mode. DIGITAL FILTER ; Press MENU to exit. 6 Start recording (page 16). • To cancel Digital Filter, set POWER to : consumerproducts@panasonic.com ON SELF...

PVL751 User Guide
Page 29
...becomes slightly enlarged and shutter speed auto-adjusts from 1/80 to 1/350 according to CAMERA. may cause picture distortion. 3 Hold down "T" on POWER ZOOM. feature is displayed when D. Before you begin ... • Connect Camcorder to power source. • Set POWER to brightness. • Use High Speed... Shutter (page 25) if needed. unstable situations. • Connect Camcorder to power source. • Set POWER to CAMERA. 1 2, 3 EIS 1 Slide DIGITAL SELECT to EIS. 2 Press EIS to display "EIS" in EVF or LCD monitor. &#...
...becomes slightly enlarged and shutter speed auto-adjusts from 1/80 to 1/350 according to CAMERA. may cause picture distortion. 3 Hold down "T" on POWER ZOOM. feature is displayed when D. Before you begin ... • Connect Camcorder to power source. • Set POWER to brightness. • Use High Speed... Shutter (page 25) if needed. unstable situations. • Connect Camcorder to power source. • Set POWER to CAMERA. 1 2, 3 EIS 1 Slide DIGITAL SELECT to EIS. 2 Press EIS to display "EIS" in EVF or LCD monitor. &#...

PVL751 User Guide
Page 30
... or LCD monitor Still Third Press Fourth Press STILL Records a still image from the current picture. Still/ Strobe/ Wide 12 Before you begin... • Connect Camcorder to power source. • Set POWER to CAMERA. 1 Slide DIGITAL SELECT to : consumerproducts@panasonic.com
... or LCD monitor Still Third Press Fourth Press STILL Records a still image from the current picture. Still/ Strobe/ Wide 12 Before you begin... • Connect Camcorder to power source. • Set POWER to CAMERA. 1 Slide DIGITAL SELECT to : consumerproducts@panasonic.com
