PVL751 User Guide
Page 2
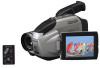
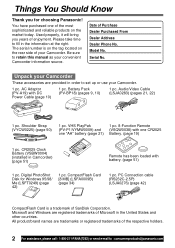
... the market today. Date of the most sophisticated and reliable products on the rear side of enjoyment. Digital PhotoShot Disk for choosing Panasonic! Unpack your Camcorder These accessories are trademarks or registered trademarks of Microsoft in order to : consumerproducts@panasonic.com Be sure to fill in Camcorder) (page 51) Remote has been loaded with battery. (page 51) 1 pc. Audio/Video Cable (LSJA0283) (pages...
... the market today. Date of the most sophisticated and reliable products on the rear side of enjoyment. Digital PhotoShot Disk for choosing Panasonic! Unpack your Camcorder These accessories are trademarks or registered trademarks of Microsoft in order to : consumerproducts@panasonic.com Be sure to fill in Camcorder) (page 51) Remote has been loaded with battery. (page 51) 1 pc. Audio/Video Cable (LSJA0283) (pages...

PVL751 User Guide
Page 3
... harmful interference, and (2) this unit. Your Compact VHS Camcorder is equipped with the HQ System to comply with standard VHS equipment. This Camcorder is designed to record and play a Compact VHS Camcorder recording on , use only provided shielded interfacing cable with Part 15 of the FCC Rules. It is subject to cause electric shock. Operation is recommended that only cassette tapes that used . You may find the...
... harmful interference, and (2) this unit. Your Compact VHS Camcorder is equipped with the HQ System to comply with standard VHS equipment. This Camcorder is designed to record and play a Compact VHS Camcorder recording on , use only provided shielded interfacing cable with Part 15 of the FCC Rules. It is subject to cause electric shock. Operation is recommended that only cassette tapes that used . You may find the...

PVL751 User Guide
Page 4
... power-line surges. 4 For assistance, please call : 1-800-211-PANA(7262) or send e-mail to the video unit, be read before cleaning. Power-Cord Protection - If an outside antenna or cable system is connected to : consumerproducts@panasonic.com All warnings on a bed, sofa, rug, or other similar surface, or near a bath tub, wash bowl, kitchen sink, or laundry tub, in installation...
... power-line surges. 4 For assistance, please call : 1-800-211-PANA(7262) or send e-mail to the video unit, be read before cleaning. Power-Cord Protection - If an outside antenna or cable system is connected to : consumerproducts@panasonic.com All warnings on a bed, sofa, rug, or other similar surface, or near a bath tub, wash bowl, kitchen sink, or laundry tub, in installation...

PVL751 User Guide
Page 5
.... b. Adjust only those controls that could be sure the service technician has used replacement parts specified by the operating instructions, as opening or removing covers may result in damage and will not subject it to rain or water. this video unit, ask the service technician to perform safety checks to this indicates a need for outdoor use strong or abrasive detergents when cleaning your Camcorder. When replacement parts are no user serviceable parts...
.... b. Adjust only those controls that could be sure the service technician has used replacement parts specified by the operating instructions, as opening or removing covers may result in damage and will not subject it to rain or water. this video unit, ask the service technician to perform safety checks to this indicates a need for outdoor use strong or abrasive detergents when cleaning your Camcorder. When replacement parts are no user serviceable parts...
PVL751 User Guide
Page 6
... Battery Cord) . 9~10 Cassette Information 11 Using MENU Mode 12 Setting the Clock (Time Zone, Auto Daylight Saving Time 13~14 Built-in Auto Light (Using the Light, Replacing the Bulb 15 Camera Recording (Basic, Stand-by, Programmed Recording 16~18 8-Function Remote Control 19 Playing Back Recordings (Basic Playback, Visual Search, Still Picture, Tracking, TV/VCR Playback) ...... 20~21 Copying your Tapes (dubbing 22 Four-Speed Power Zoom 23 Backlight 23 Focus (Auto/Manual Focus 24 High Speed Shutter (Auto/Manual Shutter) . 25 Auto Fade 26 Color Digital...
... Battery Cord) . 9~10 Cassette Information 11 Using MENU Mode 12 Setting the Clock (Time Zone, Auto Daylight Saving Time 13~14 Built-in Auto Light (Using the Light, Replacing the Bulb 15 Camera Recording (Basic, Stand-by, Programmed Recording 16~18 8-Function Remote Control 19 Playing Back Recordings (Basic Playback, Visual Search, Still Picture, Tracking, TV/VCR Playback) ...... 20~21 Copying your Tapes (dubbing 22 Four-Speed Power Zoom 23 Backlight 23 Focus (Auto/Manual Focus 24 High Speed Shutter (Auto/Manual Shutter) . 25 Auto Fade 26 Color Digital...

PVL751 User Guide
Page 8
Insert Cassette 1Attach fully charged Battery (page 9). 2Slide TAPE EJECT to open , the EVF automatically turns OFF (page 16). 1 Press LCD-OPEN to unlock the LCD monitor. Camera Recording When the LCD monitor is open door. 3Insert cassette (page 11). 4Press here to : consumerproducts@panasonic.com Note: • Remove the Protection Film before use . Note: • Remove the Protection Film before operation (page 9). Swing it fully open , the EVF automatically turns OFF (page...
Insert Cassette 1Attach fully charged Battery (page 9). 2Slide TAPE EJECT to open , the EVF automatically turns OFF (page 16). 1 Press LCD-OPEN to unlock the LCD monitor. Camera Recording When the LCD monitor is open door. 3Insert cassette (page 11). 4Press here to : consumerproducts@panasonic.com Note: • Remove the Protection Film before use . Note: • Remove the Protection Film before operation (page 9). Swing it fully open , the EVF automatically turns OFF (page...

PVL751 User Guide
Page 11
... screwdriver. (Or, slide tab open door. 4 Insert cassette as shown. 5 Press here to close door. • To remove the cassette, slide the TAPE EJECT switch. Getting Started Cassette Information Cassette Insertion/Removal 1 3 2 4 5 1 Turn Tape Wheel in direction of arrow until there is no slack. 2 Attach Battery (page 9). 3 Slide TAPE EJECT to open .) 2 To record again, cover hole with the mark in this unit. Record/Playback Time Use tapes with adhesive tape. (Or, slide tab...
... screwdriver. (Or, slide tab open door. 4 Insert cassette as shown. 5 Press here to close door. • To remove the cassette, slide the TAPE EJECT switch. Getting Started Cassette Information Cassette Insertion/Removal 1 3 2 4 5 1 Turn Tape Wheel in direction of arrow until there is no slack. 2 Attach Battery (page 9). 3 Slide TAPE EJECT to open .) 2 To record again, cover hole with the mark in this unit. Record/Playback Time Use tapes with adhesive tape. (Or, slide tab...
PVL751 User Guide
Page 12
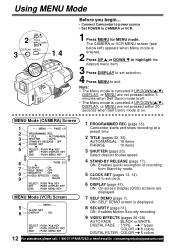
... 7). MENU - - - 5 CLOCK SET 6 D I TLE ; The CAMERA or VCR MENU screen (see below left) appears when Menu mode is on. AUTO STAND-BY RELEASE ; ON SELF DEMO ; Camcorder starts and stops recording at a preset time. 2 TITLE (pages 32, 33). FADE 9 BLACK SELECT : PUSH w/v KEY SET : PUSH DISPLAY KEY END : PUSH MENU KEY 4 STAND-BY RELEASE (page 17). Using MENU Mode FAR 2 UP FOCUS DOWN NEAR DISPLAY MENU 3 1, 4 Before you begin... • Connect Camcorder to power...
... 7). MENU - - - 5 CLOCK SET 6 D I TLE ; The CAMERA or VCR MENU screen (see below left) appears when Menu mode is on. AUTO STAND-BY RELEASE ; ON SELF DEMO ; Camcorder starts and stops recording at a preset time. 2 TITLE (pages 32, 33). FADE 9 BLACK SELECT : PUSH w/v KEY SET : PUSH DISPLAY KEY END : PUSH MENU KEY 4 STAND-BY RELEASE (page 17). Using MENU Mode FAR 2 UP FOCUS DOWN NEAR DISPLAY MENU 3 1, 4 Before you begin... • Connect Camcorder to power...
PVL751 User Guide
Page 14
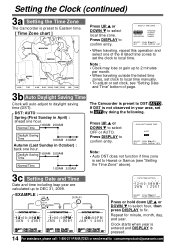
..., set clock, see "Setting the Time Zone" above). 3c Setting Date and Time Date and time including leap year are calculated up to 2 minutes per month. • When traveling outside the listed time zones, set clock to local time manually. • To adjust or set to OFF by doing the following. Clock starts when year is entered and DISPLAY is preset to DST: AUTO . Setting the Clock (continued) 3a Setting the Time Zone The Camcorder is set the clock...
..., set clock, see "Setting the Time Zone" above). 3c Setting Date and Time Date and time including leap year are calculated up to 2 minutes per month. • When traveling outside the listed time zones, set clock to local time manually. • To adjust or set to OFF by doing the following. Clock starts when year is entered and DISPLAY is preset to DST: AUTO . Setting the Clock (continued) 3a Setting the Time Zone The Camcorder is set the clock...
PVL751 User Guide
Page 15
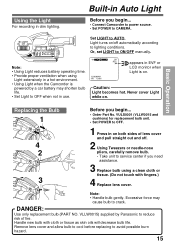
... cause bulb to ON/OFF manually. LIGHT ON OFF AUTO Set LIGHT to avoid possible burn hazard. 15 Light turns on . VULS0001 (VLLW0015 and cushions) for replacement bulb unit. • Set POWER to CAMERA. Remove lens cover and allow bulb to cool before replacing to AUTO. Before you begin ... • Connect Camcorder to power source. • Set POWER to OFF. 1 Press in dim lighting. DANGER: Use only replacement bulb (PART NO. Handle new bulb...
... cause bulb to ON/OFF manually. LIGHT ON OFF AUTO Set LIGHT to avoid possible burn hazard. 15 Light turns on . VULS0001 (VLLW0015 and cushions) for replacement bulb unit. • Set POWER to CAMERA. Remove lens cover and allow bulb to cool before replacing to AUTO. Before you begin ... • Connect Camcorder to power source. • Set POWER to OFF. 1 Press in dim lighting. DANGER: Use only replacement bulb (PART NO. Handle new bulb...

PVL751 User Guide
Page 16
... RECORD/ Tape speed SP PAUSE to avoid this when possible. • Using LCD monitor reduces battery operation time. This may block cassette door and damage Camcorder body. 3 VISION ADJUSTMENT SPEED Built-in Twin Capsule 2-Way Microphone System 4 Lens Cover opens. EVF : Look into EVF and adjust POWER REC Power Lamp VISION ADJUSTMENT to monitor adjust LCD monitor brightness level. Return LCD monitor to locked position when not in CAMERA mode. RECORD 6 Set POWER to PHONE jack. Power Lamp lights...
... RECORD/ Tape speed SP PAUSE to avoid this when possible. • Using LCD monitor reduces battery operation time. This may block cassette door and damage Camcorder body. 3 VISION ADJUSTMENT SPEED Built-in Twin Capsule 2-Way Microphone System 4 Lens Cover opens. EVF : Look into EVF and adjust POWER REC Power Lamp VISION ADJUSTMENT to monitor adjust LCD monitor brightness level. Return LCD monitor to locked position when not in CAMERA mode. RECORD 6 Set POWER to PHONE jack. Power Lamp lights...

PVL751 User Guide
Page 17
... recording. B a Press REWIND/SEARCH to CAMERA. C Set POWER to rewind a few seconds of tape. FAR UP FOCUS DOWN NEAR DISPLAY MENU 2, 3, 4 c STILL DEL b PLAY REW FF + a STOP PHOTO VCR OFF CAMERA 1, b, c, a, d, B A, C D Stand-by Quick Release If left ) if more than 24 hours before recording is resumed. 17 AUTO/MANUAL MENU mode. A Set POWER to conserve battery. D Press RECORD/PAUSE to continue recording. Camera Recording Basic Operation Before you resume recording by pressing RECORD/PAUSE two times. SHUTTER ; Manual...
... recording. B a Press REWIND/SEARCH to CAMERA. C Set POWER to rewind a few seconds of tape. FAR UP FOCUS DOWN NEAR DISPLAY MENU 2, 3, 4 c STILL DEL b PLAY REW FF + a STOP PHOTO VCR OFF CAMERA 1, b, c, a, d, B A, C D Stand-by Quick Release If left ) if more than 24 hours before recording is resumed. 17 AUTO/MANUAL MENU mode. A Set POWER to conserve battery. D Press RECORD/PAUSE to continue recording. Camera Recording Basic Operation Before you resume recording by pressing RECORD/PAUSE two times. SHUTTER ; Manual...
PVL751 User Guide
Page 18
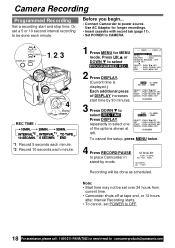
Camera Recording Programmed Recording Set a recording start time by mode. Before you begin... • Connect Camcorder to select REC TIME . MENU - - - SELECT : PUSH w/v KEY SET : PUSH DISPLAY KEY START : PUSH RECORD KEY CANCEL: PUSH MENU KEY 10:20:00PM 3 Press DOWN w to power source. Or, set a 5 or 10 second interval recording to place Camcorder in stand-by 30 minutes. - - - AUTO/MANUAL SHUTTER ; OFF CLOCK SET w SELECT : PUSH w/v KEY SET : PUSH DISPLAY KEY END : PUSH MENU KEY START ; 10...
Camera Recording Programmed Recording Set a recording start time by mode. Before you begin... • Connect Camcorder to select REC TIME . MENU - - - SELECT : PUSH w/v KEY SET : PUSH DISPLAY KEY START : PUSH RECORD KEY CANCEL: PUSH MENU KEY 10:20:00PM 3 Press DOWN w to power source. Or, set a 5 or 10 second interval recording to place Camcorder in stand-by 30 minutes. - - - AUTO/MANUAL SHUTTER ; OFF CLOCK SET w SELECT : PUSH w/v KEY SET : PUSH DISPLAY KEY END : PUSH MENU KEY START ; 10...
PVL751 User Guide
Page 20
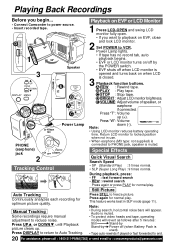
... connected to reduce noise. Audio is muted. • To protect video heads and tape, operating modes will appear. Power Lamp lights. • If tape has no record tab, auto playback begins. • EVF or LCD monitor turns on/off by Power off when LCD monitor is opened and turns back on EVF, close and lock LCD monitor. 2 Set POWER to freeze picture. Return LCD monitor to locked position when not in SLP mode (page 11). Manual Tracking Some recordings require manual adjustment...
... connected to reduce noise. Audio is muted. • To protect video heads and tape, operating modes will appear. Power Lamp lights. • If tape has no record tab, auto playback begins. • EVF or LCD monitor turns on/off by Power off when LCD monitor is opened and turns back on EVF, close and lock LCD monitor. 2 Set POWER to freeze picture. Return LCD monitor to locked position when not in SLP mode (page 11). Manual Tracking Some recordings require manual adjustment...

PVL751 User Guide
Page 21
...; Replace battery when tape loading/unloading takes longer than usual. 3 Remove Cassette a Slide RELEASE and wait for lid to LINE INPUT. b Slide RELEASE to view playback or recordings in bottom of PlayPak with the window up any slack. Before you begin... • Connect Camcorder to : VCR © view playback. Connections T V Audio/ Video Out To Audio To Video In In Audio/Video Cable (Supplied) 1 Set POWER to power source. • Make all TV-Camcorder connections. CAMERA © view picture as practical. Load Detector 21 Playing Back Recordings TV...
...; Replace battery when tape loading/unloading takes longer than usual. 3 Remove Cassette a Slide RELEASE and wait for lid to LINE INPUT. b Slide RELEASE to view playback or recordings in bottom of PlayPak with the window up any slack. Before you begin... • Connect Camcorder to : VCR © view playback. Connections T V Audio/ Video Out To Audio To Video In In Audio/Video Cable (Supplied) 1 Set POWER to power source. • Make all TV-Camcorder connections. CAMERA © view picture as practical. Load Detector 21 Playing Back Recordings TV...

PVL751 User Guide
Page 36
..., the image is displayed. • If "CF CARD ERROR" appears on-screen, see page 56. Set Power to CAMERA or change POWER setting to OFF, then insert the CompactFlash Card. • Pictures captured with other brand products cannot be played back on this Camcorder. • Do not change recording mode while "PLEASE WAIT" is captured, then the light goes out. LIGHT ON OFF AUTO Using the Light For capture of still...
..., the image is displayed. • If "CF CARD ERROR" appears on-screen, see page 56. Set Power to CAMERA or change POWER setting to OFF, then insert the CompactFlash Card. • Pictures captured with other brand products cannot be played back on this Camcorder. • Do not change recording mode while "PLEASE WAIT" is captured, then the light goes out. LIGHT ON OFF AUTO Using the Light For capture of still...

PVL751 User Guide
Page 54
...@panasonic.com AC Adaptor: 0.3 kg 0.66 Ibs. Designs and specifications are approximate. Specifications Power Source: Compact VHS Camcorder: DC 6 V AC Adaptor: 110/120/220/240 V AC, 50/60 Hz Battery: Nickel-Cadmium Type DC 6 V Power Consumption: Compact VHS Camcorder: 6V DC 8.5 W (Max. 11.5 W) AC Adaptor: 19 W 1.2 W (when not in use.) Video Signal: EIA Standard (525 lines, 60 fields) NTSC color signal Video Recording System: 2 rotary heads plus flying...
...@panasonic.com AC Adaptor: 0.3 kg 0.66 Ibs. Designs and specifications are approximate. Specifications Power Source: Compact VHS Camcorder: DC 6 V AC Adaptor: 110/120/220/240 V AC, 50/60 Hz Battery: Nickel-Cadmium Type DC 6 V Power Consumption: Compact VHS Camcorder: 6V DC 8.5 W (Max. 11.5 W) AC Adaptor: 19 W 1.2 W (when not in use.) Video Signal: EIA Standard (525 lines, 60 fields) NTSC color signal Video Recording System: 2 rotary heads plus flying...
PVL751 User Guide
Page 55
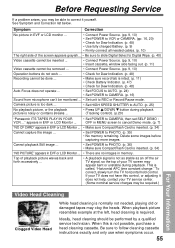
.... (p. 48) • Use fully charged Battery. (p. 9) • Firmly connect all needed , playing old or damaged tapes may clog the heads. Cannot playback Still image ... • Set POWER to PHOTO. (p. 36) • Make sure CompactFlash Card is normally not needed cables. (p. 10) The right side of your TV screen may appear bent or unstable during playback (Tracking Control). (p.20) "Panasonic ITS TAPES PLAY IN YOUR • Set POWER to CAMERA, then set SELF DEMO : VCR ..." If your...
.... (p. 48) • Use fully charged Battery. (p. 9) • Firmly connect all needed , playing old or damaged tapes may clog the heads. Cannot playback Still image ... • Set POWER to PHOTO. (p. 36) • Make sure CompactFlash Card is normally not needed cables. (p. 10) The right side of your TV screen may appear bent or unstable during playback (Tracking Control). (p.20) "Panasonic ITS TAPES PLAY IN YOUR • Set POWER to CAMERA, then set SELF DEMO : VCR ..." If your...
PVL751 User Guide
Page 57
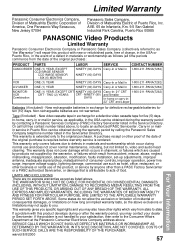
... Department at the Panasonic Consumer Electronics Company address above . Some states do not allow the exclusion or limitation of consumer controls, improper operation, power line surge, improper voltage supply, lightning damage, commercial use such as hotel, office, restaurant, or other business or rental use and does not cover normal maintenance, including, but not limited to, video and audio head cleaning. The warranty...
... Department at the Panasonic Consumer Electronics Company address above . Some states do not allow the exclusion or limitation of consumer controls, improper operation, power line surge, improper voltage supply, lightning damage, commercial use such as hotel, office, restaurant, or other business or rental use and does not cover normal maintenance, including, but not limited to, video and audio head cleaning. The warranty...
PVL751 User Guide
Page 60
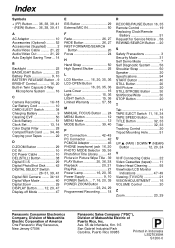
... C Camera Recording ......... 16~18 Car Battery Cord 10 CARD EJECT Switch 34 Charging Battery 9 Cleaning EVF 50 Clock Battery 51 Clock Set 13, 14 Color Digital Filter 28 CompactFlash Card ....... 34, 46 Copying your Tapes 22 D D.ZOOM Button 29 DC IN 10 DC Power Cable 10 DEL(STILL) Button 38 Digital E.I.S 29 Digital PhotoShot Disk ......... 42 DIGITAL SELECT Switch 26~31, 39, 41 Digital Still Camera ........ 34~41 Digital Wipe Mode 40 Digital Zoom 29 DISPLAY Button ....... 12...
... C Camera Recording ......... 16~18 Car Battery Cord 10 CARD EJECT Switch 34 Charging Battery 9 Cleaning EVF 50 Clock Battery 51 Clock Set 13, 14 Color Digital Filter 28 CompactFlash Card ....... 34, 46 Copying your Tapes 22 D D.ZOOM Button 29 DC IN 10 DC Power Cable 10 DEL(STILL) Button 38 Digital E.I.S 29 Digital PhotoShot Disk ......... 42 DIGITAL SELECT Switch 26~31, 39, 41 Digital Still Camera ........ 34~41 Digital Wipe Mode 40 Digital Zoom 29 DISPLAY Button ....... 12...


