

Digital Video Camcorder
Page 13
...) Reset Button [RESET] -73- (41) Cassette Eject Lever [OPEN/EJECT] -18- (42) Speaker -44- (43) Sub Recording Start/Stop Button ≥This button makes it goes. ≥A compatible plug-in , stereo) -32-, -34(26) Focus/Zoom Button [FOCUS/ZOOM] -38(27) Shutter/Iris Button [SHUTTER/IRIS] -37-, -38(28) White Balance Button [WB] -36(29) Eyecup (30) Power LCD Button [POWER LCD] -21- Before Use (14) Soft Skin Button [SOFT SKIN] -34(15) Tele Macro Button [TELE MACRO] -32(16) Menu Button [MENU] -21(17) Pause Button...
...) Reset Button [RESET] -73- (41) Cassette Eject Lever [OPEN/EJECT] -18- (42) Speaker -44- (43) Sub Recording Start/Stop Button ≥This button makes it goes. ≥A compatible plug-in , stereo) -32-, -34(26) Focus/Zoom Button [FOCUS/ZOOM] -38(27) Shutter/Iris Button [SHUTTER/IRIS] -37-, -38(28) White Balance Button [WB] -36(29) Eyecup (30) Power LCD Button [POWER LCD] -21- Before Use (14) Soft Skin Button [SOFT SKIN] -34(15) Tele Macro Button [TELE MACRO] -32(16) Menu Button [MENU] -21(17) Pause Button...
Digital Video Camcorder
Page 17
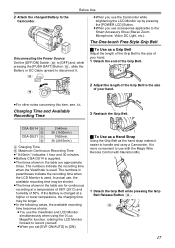
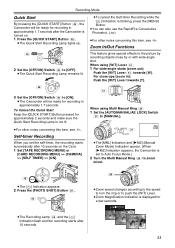
...-touch Free Style Grip Belt Disconnecting the Power Source Set the [OFF/ON] Switch (48) to [OFF] and, while pressing the [PUSH BATT] Button (55), slide the Battery or DC Cable upward to disconnect it. (55) PUSH BATT (48) O ON FF ª To Use as the hand strap makes it easier to the Smart Accessory Shoe (Stereo Zoom Microphone, Video DC Light...
...-touch Free Style Grip Belt Disconnecting the Power Source Set the [OFF/ON] Switch (48) to [OFF] and, while pressing the [PUSH BATT] Button (55), slide the Battery or DC Cable upward to disconnect it. (55) PUSH BATT (48) O ON FF ª To Use as the hand strap makes it easier to the Smart Accessory Shoe (Stereo Zoom Microphone, Video DC Light...
Digital Video Camcorder
Page 20
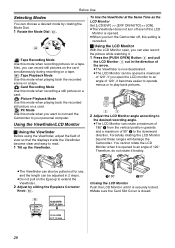
... Camcorder. Therefore, do not rotate it becomes easier to operate menus or to read. 1 Tilt up the Viewfinder. Using the Viewfinder/LCD Monitor ª Using the Viewfinder Before using the Viewfinder, adjust the field of view so that the displays inside the Viewfinder become clear and easy to play back pictures. S (44) :Tape Recording Mode Use this setting is now deactivated. ≥The LCD Monitor can be opened...
... Camcorder. Therefore, do not rotate it becomes easier to operate menus or to read. 1 Tilt up the Viewfinder. Using the Viewfinder/LCD Monitor ª Using the Viewfinder Before using the Viewfinder, adjust the field of view so that the displays inside the Viewfinder become clear and easy to play back pictures. S (44) :Tape Recording Mode Use this setting is now deactivated. ≥The LCD Monitor can be opened...
Digital Video Camcorder
Page 22
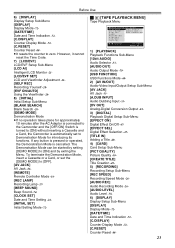
... USB FUNCTION DISPLAY REC MODE LCD/EVF RED EYE INITIAL FLASH LEVEL ;/∫:SELECT %:NEXT MENU:EXIT 1) [CAMERA] Camera Setup Sub-Menu [PROG.AE] Auto Exposure Mode -35[EIS] Image Stabilizer -32[D.ZOOM] Digital Zoom -32[SELF TIMER] Self-timer Recording -31[USB FUNCTION] USB Functions Mode -60- [REC MODE] Recording Mode [RED EYE] Red Eye Reduction -41[FLASH LEVEL] Flash Level -41≥If you press [6] Button, the menu changes back to the previous screen. 2) [ADVANCED] Advanced Functions Sub-Menu [ZEBRA] Zebra Pattern -39[PICTURE ADJ.] Picture Adjustment -39[MIC LEVEL] Microphones...
... USB FUNCTION DISPLAY REC MODE LCD/EVF RED EYE INITIAL FLASH LEVEL ;/∫:SELECT %:NEXT MENU:EXIT 1) [CAMERA] Camera Setup Sub-Menu [PROG.AE] Auto Exposure Mode -35[EIS] Image Stabilizer -32[D.ZOOM] Digital Zoom -32[SELF TIMER] Self-timer Recording -31[USB FUNCTION] USB Functions Mode -60- [REC MODE] Recording Mode [RED EYE] Red Eye Reduction -41[FLASH LEVEL] Flash Level -41≥If you press [6] Button, the menu changes back to the previous screen. 2) [ADVANCED] Advanced Functions Sub-Menu [ZEBRA] Zebra Pattern -39[PICTURE ADJ.] Picture Adjustment -39[MIC LEVEL] Microphones...
Digital Video Camcorder
Page 23
...86- [REMOTE] Remote Controller Mode -16- [REC LAMP] Recording Lamp -27- [BEEP SOUND] Beep Sound -74- [CLOCK SET] Date and Time Setting -26- [INITIAL SET] Initial Setting Mode -72- ª [TAPE PLAYBACK MENU] Tape Playback Menu TAPE PLAYBACK MENU PLAYBACK !12bit AUDIO AV IN/OUT AUDIO OUT DIGITAL USB FUNCTION CARD RECORDING DISPLAY LCD/EVF INITIAL ;/∫:SELECT %:NEXT MENU:EXIT 1) [PLAYBACK] Playback Functions Sub-Menu [12bit AUDIO] Audio Selector -53[AUDIO OUT] Audio Output Mode -79[USB FUNCTION] USB Functions Mode -602) [AV IN/OUT] Audio-Video Input/Output Setup Sub-Menu [AV...
...86- [REMOTE] Remote Controller Mode -16- [REC LAMP] Recording Lamp -27- [BEEP SOUND] Beep Sound -74- [CLOCK SET] Date and Time Setting -26- [INITIAL SET] Initial Setting Mode -72- ª [TAPE PLAYBACK MENU] Tape Playback Menu TAPE PLAYBACK MENU PLAYBACK !12bit AUDIO AV IN/OUT AUDIO OUT DIGITAL USB FUNCTION CARD RECORDING DISPLAY LCD/EVF INITIAL ;/∫:SELECT %:NEXT MENU:EXIT 1) [PLAYBACK] Playback Functions Sub-Menu [12bit AUDIO] Audio Selector -53[AUDIO OUT] Audio Output Mode -79[USB FUNCTION] USB Functions Mode -602) [AV IN/OUT] Audio-Video Input/Output Setup Sub-Menu [AV...

Digital Video Camcorder
Page 24
... with no input signals supplied. ≥When recording involves the use of titles. 7) [LCD/EVF] LCD/EVF Setup Sub-Menu [LCD AI] Intelligent LCD Monitor -21[LCD/EVF SET] LCD and Viewfinder Adjustment -21[EVF ON/AUTO] Using the Viewfinder -208) [INITIAL] Initial Setup Sub-Menu [BLANK SEARCH] Blank Search -28[REMOTE] Remote Controller Mode -16[BEEP SOUND] Beep Sound -74- ª [CARD RECORDING MENU] Card Recording Menu CARD RECORDING MENU CAMERA !PROG.AE ADVANCED EIS DIGITAL SHTR EFFECT CARD SELF TIMER RECORDING RED EYE DISPLAY FLASH LEVEL LCD/EVF INITIAL...
... with no input signals supplied. ≥When recording involves the use of titles. 7) [LCD/EVF] LCD/EVF Setup Sub-Menu [LCD AI] Intelligent LCD Monitor -21[LCD/EVF SET] LCD and Viewfinder Adjustment -21[EVF ON/AUTO] Using the Viewfinder -208) [INITIAL] Initial Setup Sub-Menu [BLANK SEARCH] Blank Search -28[REMOTE] Remote Controller Mode -16[BEEP SOUND] Beep Sound -74- ª [CARD RECORDING MENU] Card Recording Menu CARD RECORDING MENU CAMERA !PROG.AE ADVANCED EIS DIGITAL SHTR EFFECT CARD SELF TIMER RECORDING RED EYE DISPLAY FLASH LEVEL LCD/EVF INITIAL...
Digital Video Camcorder
Page 28
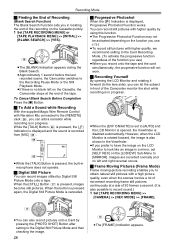
... set [SELF REC] on the [LCD/EVF] Sub-Menu to record sound.) 1 Set [TAPE RECORDING MENU] >> [CAMERA] >> [REC MODE] >> [FRAME]. (17) STILL ENTER FADE ≥You can also record pictures onto a Card by Digital Still Picture Mode onto a tape. While the [TALK] Button (92) is pressed, the [ ] Indication is displayed and the sound is recorded from [MIC] (88). (88) REC (92) ≥While the [TALK] Button is pressed, the built-in a mirror, set to [AUTO] and the LCD Monitor is opened...
... set [SELF REC] on the [LCD/EVF] Sub-Menu to record sound.) 1 Set [TAPE RECORDING MENU] >> [CAMERA] >> [REC MODE] >> [FRAME]. (17) STILL ENTER FADE ≥You can also record pictures onto a Card by Digital Still Picture Mode onto a tape. While the [TALK] Button (92) is pressed, the [ ] Indication is displayed and the sound is recorded from [MIC] (88). (88) REC (92) ≥While the [TALK] Button is pressed, the built-in a mirror, set to [AUTO] and the LCD Monitor is opened...
Digital Video Camcorder
Page 31
... [OFF]. ≥The Quick Start Recording Lamp remains lit. (48) O ON FF 3 Set the [OFF/ON] Switch (48) to zoom in/out. (16) MENU STILL ENTER FADE ≥The [ ] Indication appears. 2 Press the [PHOTO SHOT] Button (52). (52) PHOTO SHOT ≥The Recording Lamp (34) and the [ ] Indication flash and the recording starts after 10 seconds on the Card. 1 Set [TAPE RECORDING MENU] or [CARD RECORDING MENU] >> [CAMERA] >> [SELF TIMER] >> [ON...
... [OFF]. ≥The Quick Start Recording Lamp remains lit. (48) O ON FF 3 Set the [OFF/ON] Switch (48) to zoom in/out. (16) MENU STILL ENTER FADE ≥The [ ] Indication appears. 2 Press the [PHOTO SHOT] Button (52). (52) PHOTO SHOT ≥The Recording Lamp (34) and the [ ] Indication flash and the recording starts after 10 seconds on the Card. 1 Set [TAPE RECORDING MENU] or [CARD RECORDING MENU] >> [CAMERA] >> [SELF TIMER] >> [ON...
Digital Video Camcorder
Page 39
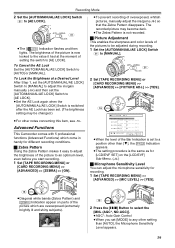
...*: Auto Gain Control ≥When you start recording. 1 Set [TAPE RECORDING MENU] or [CARD RECORDING MENU] >> [ADVANCED] >> [ZEBRA] >> [ON]. STILL (16) MENU ENTER FADE ≥Diagonal white bands (Zebra Pattern) and [ ZEBRA ] Indication appear on the [LCD/EVF] Sub-Menu. (-21-) ª Microphone Sensitivity Level You can adjust the microphone sensitivity for recording. 1 Set [TAPE RECORDING MENU] >> [ADVANCED] >> [MIC LEVEL] >> [YES]. (16) MENU STILL ENTER FADE 2 Press the [;/∫] Button to a position other than [AUTO], the Microphone Sensitivity Level appears...
...*: Auto Gain Control ≥When you start recording. 1 Set [TAPE RECORDING MENU] or [CARD RECORDING MENU] >> [ADVANCED] >> [ZEBRA] >> [ON]. STILL (16) MENU ENTER FADE ≥Diagonal white bands (Zebra Pattern) and [ ZEBRA ] Indication appear on the [LCD/EVF] Sub-Menu. (-21-) ª Microphone Sensitivity Level You can adjust the microphone sensitivity for recording. 1 Set [TAPE RECORDING MENU] >> [ADVANCED] >> [MIC LEVEL] >> [YES]. (16) MENU STILL ENTER FADE 2 Press the [;/∫] Button to a position other than [AUTO], the Microphone Sensitivity Level appears...
Digital Video Camcorder
Page 58
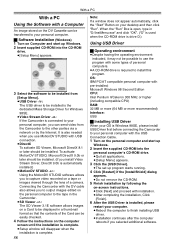
... image stored on the DV Cassette can be transferred to your personal computer. ª Software Installation (Windows) 1 Turn on Computer and start up Windows. 2 Insert the supplied CD-ROM into the personal computer's CD-ROM drive. ≥Quit all applications. ≥[Setup Menu] appears. 3 Click the [USB Driver]. ≥The set up Windows. 2 Insert supplied CD-ROM into the CD-ROM drive. ≥[Setup Menu] appears. 3 Select the software to be installed from the Camcorder...
... image stored on the DV Cassette can be transferred to your personal computer. ª Software Installation (Windows) 1 Turn on Computer and start up Windows. 2 Insert the supplied CD-ROM into the personal computer's CD-ROM drive. ≥Quit all applications. ≥[Setup Menu] appears. 3 Click the [USB Driver]. ≥The set up Windows. 2 Insert supplied CD-ROM into the CD-ROM drive. ≥[Setup Menu] appears. 3 Select the software to be installed from the Camcorder...
Digital Video Camcorder
Page 60
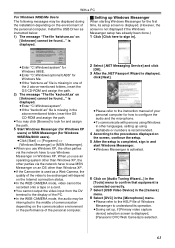
... [Setup] screen appears. 2 Click [Video Stream Driver]. ≥The set [PLAYBACK] >> [USB FUNCTION] >> [WEB CAMERA] on Tape Playback Mode before connecting the Camcorder to your personal computer. 4 Connect the Camcorder to a personal computer with the USB Connection Cable. ≥When the Camcorder and personal computer (with Windows 2000. Click [Yes] and proceed. ≥For Windows 98SE/Me users, "USB Audio Device" is needed. ≥To upgrade Windows XP to SP1, click [Start] >> [All Programs] >> [Windows Update]. (Requires Internet connection.) ≥To upgrade Windows 2000...
... [Setup] screen appears. 2 Click [Video Stream Driver]. ≥The set [PLAYBACK] >> [USB FUNCTION] >> [WEB CAMERA] on Tape Playback Mode before connecting the Camcorder to your personal computer. 4 Connect the Camcorder to a personal computer with the USB Connection Cable. ≥When the Camcorder and personal computer (with Windows 2000. Click [Yes] and proceed. ≥For Windows 98SE/Me users, "USB Audio Device" is needed. ≥To upgrade Windows XP to SP1, click [Start] >> [All Programs] >> [Windows Update]. (Requires Internet connection.) ≥To upgrade Windows 2000...
Digital Video Camcorder
Page 61
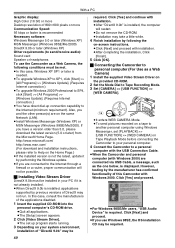
... use an operating system other than Windows XP, the other parties via the network have to use Windows Messenger on Windows XP. Install the USB Driver as a Web Camera, the quality of the video to be exchanged will depend on the Internet connection status. ≥In the WEB CAMERA mode, video cannot be recorded onto a tape or a card. ≥You cannot output the video input from the DV terminal to the display...
... use an operating system other than Windows XP, the other parties via the network have to use Windows Messenger on Windows XP. Install the USB Driver as a Web Camera, the quality of the video to be exchanged will depend on the Internet connection status. ≥In the WEB CAMERA mode, video cannot be recorded onto a tape or a card. ≥You cannot output the video input from the DV terminal to the display...
Digital Video Camcorder
Page 68
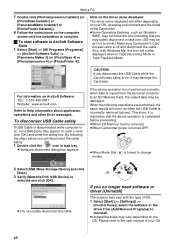
...) is turned to change modes. 2 Select [USB Mass Storage Device] and click [Stop]. 3 Verify [Matshita DVC USB Device] is on the OS. Please refer to the user manual of your OS, operating environment and the mode of OS. 1 Select [Start] (>> [Settings]) >> [Control Panel], select the software or the driver from the personal computer to an SD Memory Card, the copied data may vary depending on , error dialog box may damage the Card data...
...) is turned to change modes. 2 Select [USB Mass Storage Device] and click [Stop]. 3 Verify [Matshita DVC USB Device] is on the OS. Please refer to the user manual of your OS, operating environment and the mode of OS. 1 Select [Start] (>> [Settings]) >> [Control Panel], select the software or the driver from the personal computer to an SD Memory Card, the copied data may vary depending on , error dialog box may damage the Card data...

Digital Video Camcorder
Page 69
... the Camcorder is connected in the PC Mode, the [Removable Disk] icon representing the Memory Card drive is displayed in Memory Card such as the power source for the Camcorder when using may differ from the names given in these instructions may not necessarily match what you are using USB Connection Kit. In this case, delete the USB Driver from [Device Manager]. 2 Set the Camcorder to PC Mode and delete [Panasonic DVC USB Storage] (Windows 98SE). 69 in these Operating Instructions...
... the Camcorder is connected in the PC Mode, the [Removable Disk] icon representing the Memory Card drive is displayed in Memory Card such as the power source for the Camcorder when using may differ from the names given in these instructions may not necessarily match what you are using USB Connection Kit. In this case, delete the USB Driver from [Device Manager]. 2 Set the Camcorder to PC Mode and delete [Panasonic DVC USB Storage] (Windows 98SE). 69 in these Operating Instructions...

Digital Video Camcorder
Page 71
...: Long Play Mode (Recording INDEX: Speed Mode) -26Index signal recording -46- REC: PAUSE: Recording -27Recording Pause -27- : Self-Timer Recording -31- : When connecting the Magic Wire Remote Control with Narration Mic to [REMOTE] Jack and the [TALK] Button is pressed, this indicator appears. Others Others Indicators Various functions and Camcorder status are shown on the screen. SLIDE!: SLIDE;: F1.7: -37Slide Show Playback -48Slide Show Playback Pause -48When you adjust shutter speed manually, this indicator appears. -28- : External microphone supported by...
...: Long Play Mode (Recording INDEX: Speed Mode) -26Index signal recording -46- REC: PAUSE: Recording -27Recording Pause -27- : Self-Timer Recording -31- : When connecting the Magic Wire Remote Control with Narration Mic to [REMOTE] Jack and the [TALK] Button is pressed, this indicator appears. Others Others Indicators Various functions and Camcorder status are shown on the screen. SLIDE!: SLIDE;: F1.7: -37Slide Show Playback -48Slide Show Playback Pause -48When you adjust shutter speed manually, this indicator appears. -28- : External microphone supported by...

Digital Video Camcorder
Page 73
... setting the Digital Effect [MULTI] of the Camcorder. 3DEW (DEW DETECT/EJECT TAPE): Condensation has occurred. -83Y (CHECK REC TAB): The accidental erasure prevention switch on the SD Memory Card is connected to [LOCK]. INCOMPATIBLE TAPE: This cassette is not inserted. NO CARD: Card is incompatible. CANNOT USE USB CHANGE MODE: The USB Cable is set to the Camcorder in LP Mode, audio dubbing cannot be recorded correctly. CARD LOCKED: The write protection switch on the inserted Cassette is open...
... setting the Digital Effect [MULTI] of the Camcorder. 3DEW (DEW DETECT/EJECT TAPE): Condensation has occurred. -83Y (CHECK REC TAB): The accidental erasure prevention switch on the SD Memory Card is connected to [LOCK]. INCOMPATIBLE TAPE: This cassette is not inserted. NO CARD: Card is incompatible. CANNOT USE USB CHANGE MODE: The USB Cable is set to the Camcorder in LP Mode, audio dubbing cannot be recorded correctly. CARD LOCKED: The write protection switch on the inserted Cassette is open...

Digital Video Camcorder
Page 80
... longer than usual depending on the picture. ª Creating a Title ≥If the [PICTURE SIZE] is set to a size other than 1 minute. ª Playback Zoom Function ≥You cannot adjust the sound volume with the Remote Controller in Playback Zoom Mode. ≥If you turn off the Camcorder power or if you operate the Mode Dial, Playback Zoom Mode is automatically cancelled. ≥Even if Playback Zoom Functions are being used, images that are output from the DV Terminal (-14...
... longer than usual depending on the picture. ª Creating a Title ≥If the [PICTURE SIZE] is set to a size other than 1 minute. ª Playback Zoom Function ≥You cannot adjust the sound volume with the Remote Controller in Playback Zoom Mode. ≥If you turn off the Camcorder power or if you operate the Mode Dial, Playback Zoom Mode is automatically cancelled. ≥Even if Playback Zoom Functions are being used, images that are output from the DV Terminal (-14...

Digital Video Camcorder
Page 83
... the playback image, or the screen as a whole becomes black. Causes of Dirty Heads ≥Large quantity of dust in the air ≥High-temperature and high-humidity environment ≥Damaged tape ≥Long operating hours Using Mini-DV Format Digital Video Head Cleaner 1 Insert the Head Cleaner into the Camcorder in red: Dew is adhering to the Tape Recording/Playback Mode and then check if the Condensation Indicator disappears. Blinking in...
... the playback image, or the screen as a whole becomes black. Causes of Dirty Heads ≥Large quantity of dust in the air ≥High-temperature and high-humidity environment ≥Damaged tape ≥Long operating hours Using Mini-DV Format Digital Video Head Cleaner 1 Insert the Head Cleaner into the Camcorder in red: Dew is adhering to the Tape Recording/Playback Mode and then check if the Condensation Indicator disappears. Blinking in...

Digital Video Camcorder
Page 86
... Cassette open (set to [SAVE]), recording cannot be performed. (-19-) • Is the tape wound to [OUT]. 86 Wait until the Condensation Indicator disappears. (-83-) Other Recording 1: Auto Focus Function does not work. • Is Manual Focus Mode selected? LP Mode does not allow audio dubbing to Playback Mode? If not, the playback function cannot be used for which the Auto Focus Function does not operate correctly. Playback (Pictures) 1: Pictures cannot be played back even when the [1] Button is automatically adjusted...
... Cassette open (set to [SAVE]), recording cannot be performed. (-19-) • Is the tape wound to [OUT]. 86 Wait until the Condensation Indicator disappears. (-83-) Other Recording 1: Auto Focus Function does not work. • Is Manual Focus Mode selected? LP Mode does not allow audio dubbing to Playback Mode? If not, the playback function cannot be used for which the Auto Focus Function does not operate correctly. Playback (Pictures) 1: Pictures cannot be played back even when the [1] Button is automatically adjusted...

Digital Video Camcorder
Page 87
... a dealer. Playback (Sound) 1: Sound is analog (the same as digital signals. Set [PICT QUALITY] to [ST2]? To play back a Cassette with no audio dubbing, [12bit AUDIO] must be damaged. Others 1: The Magic Wire Remote Control with S-VHS or VHS video or a TV for recording image and sound data, it automatically records data, such as Time Code and Date/Time, as conventional video systems), this Camcorder employs a digital system for playback. 87 Others 4: Playback picture is disconnected, an error message will...
... a dealer. Playback (Sound) 1: Sound is analog (the same as digital signals. Set [PICT QUALITY] to [ST2]? To play back a Cassette with no audio dubbing, [12bit AUDIO] must be damaged. Others 1: The Magic Wire Remote Control with S-VHS or VHS video or a TV for recording image and sound data, it automatically records data, such as Time Code and Date/Time, as conventional video systems), this Camcorder employs a digital system for playback. 87 Others 4: Playback picture is disconnected, an error message will...


