
PVDV201 User Guide
Page 1
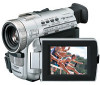
PV-DV201/ PV-DV401 [ PV-DV401 shown ] Mini *0364A* Before attempting to : consumerproducts@panasonic.com LSQT0364A Spanish Quick Use Guide is included. Guía para rápida consulta en español está incluida. For assistance, please call : 1-800-211-PANA(7262) or send e-mail to connect, operate or adjust this product, please read these instructions thoroughly. R R Digital Video Camcorder Operating Instructions Models No.
PV-DV201/ PV-DV401 [ PV-DV401 shown ] Mini *0364A* Before attempting to : consumerproducts@panasonic.com LSQT0364A Spanish Quick Use Guide is included. Guía para rápida consulta en español está incluida. For assistance, please call : 1-800-211-PANA(7262) or send e-mail to connect, operate or adjust this product, please read these instructions thoroughly. R R Digital Video Camcorder Operating Instructions Models No.
PVDV201 User Guide
Page 2
... used . Operation is designed to comply with Part 15 of the FCC Rules. FCC Warning: To assure continued FCC compliance, use only the provided shielded interface cable when connecting digital video camera to fill in accordance with any inside part of this device must accept any kind of contact with instruction herein. Please take time to computer in the information below. Serial No. Your Mini...
... used . Operation is designed to comply with Part 15 of the FCC Rules. FCC Warning: To assure continued FCC compliance, use only the provided shielded interface cable when connecting digital video camera to fill in accordance with any inside part of this device must accept any kind of contact with instruction herein. Please take time to computer in the information below. Serial No. Your Mini...
PVDV201 User Guide
Page 3
... 810-21) GROUND CLAMPS POWER SERVICE GROUNDING ELECTRODE SYSTEM (NEC ART 250, PART H) 14. Important Safeguards 1. for ventilation and to ensure reliable operation of the video unit and to provide some protection against them, paying particular attention to cords of plugs, convenience receptacles, and the point where they are not sure of the type of power source indicated on an...
... 810-21) GROUND CLAMPS POWER SERVICE GROUNDING ELECTRODE SYSTEM (NEC ART 250, PART H) 14. Important Safeguards 1. for ventilation and to ensure reliable operation of the video unit and to provide some protection against them, paying particular attention to cords of plugs, convenience receptacles, and the point where they are not sure of the type of power source indicated on an...

PVDV201 User Guide
Page 4
... replacement parts are no user serviceable parts inside a closed car, next to a warm place, moisture may result in damage and will not subject it can fall into this video unit through openings as the original part. Unplug your Palmcorder. DO NOT LEAVE YOUR PALMCORDER OR THE POWER SUPPLY TURNED ON WHEN NOT IN USE. Improper cleaning can result in direct sunlight, inside . When installing...
... replacement parts are no user serviceable parts inside a closed car, next to a warm place, moisture may result in damage and will not subject it can fall into this video unit through openings as the original part. Unplug your Palmcorder. DO NOT LEAVE YOUR PALMCORDER OR THE POWER SUPPLY TURNED ON WHEN NOT IN USE. Improper cleaning can result in direct sunlight, inside . When installing...
PVDV201 User Guide
Page 5
... Things You Should Know 2 Important Safeguards ...3 Precautions ...4 Before Using ...6 Quick Guide ...9 Supplying Power ...11 Setting the Clock ...13 Using the Palmcorder Menu 14 MENU OSD ...15 Electronic Viewfinder/LCD Monitor Indications 19 Basic Operation Camera Recording ...22 Remote Control (Optional 26 Playback Your Recordings 27 Special Features Card Features ...32 Dual Digital Electronic Image Stabilization System (D.E.I.S 39 Digital Zoom ...40 Digital PhotoShot ...41 Index Search ...41 White Balance ...42 Recording Still Pictures 42 MAGICVU/0LUX (PV-DV401...
... Things You Should Know 2 Important Safeguards ...3 Precautions ...4 Before Using ...6 Quick Guide ...9 Supplying Power ...11 Setting the Clock ...13 Using the Palmcorder Menu 14 MENU OSD ...15 Electronic Viewfinder/LCD Monitor Indications 19 Basic Operation Camera Recording ...22 Remote Control (Optional 26 Playback Your Recordings 27 Special Features Card Features ...32 Dual Digital Electronic Image Stabilization System (D.E.I.S 39 Digital Zoom ...40 Digital PhotoShot ...41 Index Search ...41 White Balance ...42 Recording Still Pictures 42 MAGICVU/0LUX (PV-DV401...
PVDV201 User Guide
Page 6
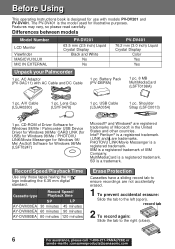
... Crystal Display Black and White No No PV-DV401 76.2 mm (3.0 inch) Liquid Crystal Display Color Yes Yes Unpack your Palmcorder 1 pc. Record Speed/Playback Time Use only those tapes having the Mini logo indicating the 6.35 mm digital standard. i.LINK and are registered trademarks of Driver Software for Windows 98/Me / Palmcorder USB Device Driver for Windows 98/Me/ CARD LINK (for USB) for Windows 98/Me / PHOTOVU LINK/Movie Messenger for Windows 98...
... Crystal Display Black and White No No PV-DV401 76.2 mm (3.0 inch) Liquid Crystal Display Color Yes Yes Unpack your Palmcorder 1 pc. Record Speed/Playback Time Use only those tapes having the Mini logo indicating the 6.35 mm digital standard. i.LINK and are registered trademarks of Driver Software for Windows 98/Me / Palmcorder USB Device Driver for Windows 98/Me/ CARD LINK (for USB) for Windows 98/Me / PHOTOVU LINK/Movie Messenger for Windows 98...

PVDV201 User Guide
Page 7
...; Using the light will reduce battery operating time. • Be sure to provide adequate ventilation if using Light in a hot environment for tape insertion or ejection. Make sure nothing covers the Light during operation. Insert a cassette record tab up, 3 window side facing out. Press PUSH TO CLOSE mark to open the 2 Cassette Compartment Cover. Note • If hand strap is tight it faces in the right direction...
...; Using the light will reduce battery operating time. • Be sure to provide adequate ventilation if using Light in a hot environment for tape insertion or ejection. Make sure nothing covers the Light during operation. Insert a cassette record tab up, 3 window side facing out. Press PUSH TO CLOSE mark to open the 2 Cassette Compartment Cover. Note • If hand strap is tight it faces in the right direction...
PVDV201 User Guide
Page 14
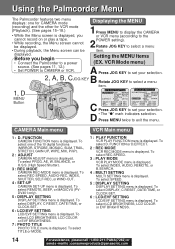
... (High Speed Shutter). 3 : REC MODE CAMERA REC-MODE menu is displayed. To select DISPLAY, C.RESET, DATE/TIME, or CLOCK-SET. 6 : LCD/EVF SETTING LCD/EVF SETTING menu is displayed, you begin • Connect the Palmcorder to : consumerproducts@panasonic.com Using the Palmcorddeerr MMeennuu The Palmcorder features two menu displays: one of the 10 digital functions (MIRROR, STROBE, MOSAIC, SLIM, TRAIL, STRETCH, GAIN-UP, WIPE, MIX, PinP). 2 : ADJUST CAMERA ADJUST menu is displayed. To select one for CAMERA mode Displaying the MENU (recording) and the other for VCR mode (Playback...
... (High Speed Shutter). 3 : REC MODE CAMERA REC-MODE menu is displayed. To select DISPLAY, C.RESET, DATE/TIME, or CLOCK-SET. 6 : LCD/EVF SETTING LCD/EVF SETTING menu is displayed, you begin • Connect the Palmcorder to : consumerproducts@panasonic.com Using the Palmcorddeerr MMeennuu The Palmcorder features two menu displays: one of the 10 digital functions (MIRROR, STROBE, MOSAIC, SLIM, TRAIL, STRETCH, GAIN-UP, WIPE, MIX, PinP). 2 : ADJUST CAMERA ADJUST menu is displayed. To select one for CAMERA mode Displaying the MENU (recording) and the other for VCR mode (Playback...

PVDV201 User Guide
Page 19
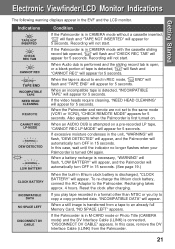
c Digital Zoom and other Digital Functions (See page 40.) This display appears when the digital zoom function has been activated. Time Code 0h00m00s00f The Palmcorder calculates and displays exactly where you are on any tape in VCR menu. IMPORTANT NOTE: • Display must be set to M 0:00:00 during audio dub, fast forward, or rewind. GGeettttiinngg SSttaarrtteedd Electronic Viewfinder/LCD Monitor Indications Here are some of hours, minutes, seconds, and...
c Digital Zoom and other Digital Functions (See page 40.) This display appears when the digital zoom function has been activated. Time Code 0h00m00s00f The Palmcorder calculates and displays exactly where you are on any tape in VCR menu. IMPORTANT NOTE: • Display must be set to M 0:00:00 during audio dub, fast forward, or rewind. GGeettttiinngg SSttaarrtteedd Electronic Viewfinder/LCD Monitor Indications Here are some of hours, minutes, seconds, and...
PVDV201 User Guide
Page 21
... cassette sliding record tab opened, " " will flash and "CHECK REC TAB" will appear. Indications Condition If the Palmcorder is in CAMERA mode without a cassette inserted, " " will flash and "TAPE NOT INSERTED" will appear for 5 seconds. When the tape is transferred from the Palmcorder. 21 To re-charge the lithium clock battery, connect the AC Adaptor to end in a format other than NTSC or you play tape recorded in REC mode, " END" will flash and "TAPE...
... cassette sliding record tab opened, " " will flash and "CHECK REC TAB" will appear. Indications Condition If the Palmcorder is in CAMERA mode without a cassette inserted, " " will flash and "TAPE NOT INSERTED" will appear for 5 seconds. When the tape is transferred from the Palmcorder. 21 To re-charge the lithium clock battery, connect the AC Adaptor to end in a format other than NTSC or you play tape recorded in REC mode, " END" will flash and "TAPE...
PVDV201 User Guide
Page 27
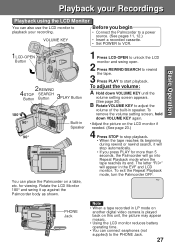
... a recorded cassette. • Set POWER to adjust the volume of the built-in the EVF and LCD monitor. To remove the volume setting screen, hold down VOLUME KEY until the volume setting screen appears. (See page 20). B Rotate VOLUME KEY to VCR. 1LCD-OPEN Button 2REWIND 4 3 STOP SEARCH Button Button PLAY Button 180° 90° 90° Built-in LP mode on another digital video camera is played back on this unit, the picture may appear mosaic. • Using the LCD...
... a recorded cassette. • Set POWER to adjust the volume of the built-in the EVF and LCD monitor. To remove the volume setting screen, hold down VOLUME KEY until the volume setting screen appears. (See page 20). B Rotate VOLUME KEY to VCR. 1LCD-OPEN Button 2REWIND 4 3 STOP SEARCH Button Button PLAY Button 180° 90° 90° Built-in LP mode on another digital video camera is played back on this unit, the picture may appear mosaic. • Using the LCD...

PVDV201 User Guide
Page 30
... the button is displayed in the VCR SLOW / PAUSE / SLOW / F.ADV SEL F.ADV INDEX STOP / INDEX SEARCH SET SEARCH B(INfaDstEfXorSwEarAdR) CBHuttonB STOP mode. Playback Your Recordings Special Effect Features During Playback (Continued) Note • Sound is a slow. Press INDEX SEARCH fast forward or rewind the number of each . • If the interval between scenes is fully turned to VCR position. 2 Press MENU to display the VCR mode menu screen. 3 Rotate JOG KEY to select PLAY MODE...
... the button is displayed in the VCR SLOW / PAUSE / SLOW / F.ADV SEL F.ADV INDEX STOP / INDEX SEARCH SET SEARCH B(INfaDstEfXorSwEarAdR) CBHuttonB STOP mode. Playback Your Recordings Special Effect Features During Playback (Continued) Note • Sound is a slow. Press INDEX SEARCH fast forward or rewind the number of each . • If the interval between scenes is fully turned to VCR position. 2 Press MENU to display the VCR mode menu screen. 3 Rotate JOG KEY to select PLAY MODE...

PVDV201 User Guide
Page 38
... WAIT" appears on-screen. • The Multi image screen is performed, Digital Function turns off. 5 • There are 12 pre-installed files. Then, "PHOTO TITLE SET" is displayed for approx. 3 seconds, and the screen goes back to the Camera mode screen. • After Photo Title is displayed. 2MENU Button 5REC/PAUSE Button 38 1POWER Switch 4 Rotate and press JOG KEY to ON, the selected image and Title will be used as a WIPE or...
... WAIT" appears on-screen. • The Multi image screen is performed, Digital Function turns off. 5 • There are 12 pre-installed files. Then, "PHOTO TITLE SET" is displayed for approx. 3 seconds, and the screen goes back to the Camera mode screen. • After Photo Title is displayed. 2MENU Button 5REC/PAUSE Button 38 1POWER Switch 4 Rotate and press JOG KEY to ON, the selected image and Title will be used as a WIPE or...
PVDV201 User Guide
Page 41
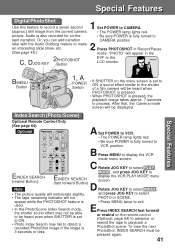
... (Photo/Scene) Optional Remote Control Only (See page 64) Optional CAMCORDER CAMERA A Set POWER to CAMERA. (approx.) still image from the current camera • The POWER lamp lights red. To view the next PhotoShot, INDEX SEARCH must be displayed. "PHOTO" will be pressed again. 41 Special Features Digital PhotoShot Use this feature to record a seven second 1 Set POWER to VCR. picture. After that, the Camera mode screen will appear in Record/Pause (See page 49.) mode. DISPLAY ON TV DATE / TIME PHOTO SHOT REC / PAUSE...
... (Photo/Scene) Optional Remote Control Only (See page 64) Optional CAMCORDER CAMERA A Set POWER to CAMERA. (approx.) still image from the current camera • The POWER lamp lights red. To view the next PhotoShot, INDEX SEARCH must be displayed. "PHOTO" will be pressed again. 41 Special Features Digital PhotoShot Use this feature to record a seven second 1 Set POWER to VCR. picture. After that, the Camera mode screen will appear in Record/Pause (See page 49.) mode. DISPLAY ON TV DATE / TIME PHOTO SHOT REC / PAUSE...

PVDV201 User Guide
Page 50
...stop Audio Dubbing. • If the microphone used for 12 bit AUDIO dubbed recordings only (sound recorded in NTSC format. 5 Press PAUSE to the original sound. B Rotate JOG KEY to select DISPLAY SETTING , and then press JOG KEY to D MEMORY. The tape will be audio dubbed. Only NTSC (National Television Standards Committee) recorded tapes can set to display the DISPLAY SETTING C menu. SPKR VOL + Optional DRESET Button AMENU Button CAMCORDER CAMERA DISPLAY ON TV DATE / TIME PHOTO SHOT COUNTER / A.DUB TC RESET REC REC / PAUSE T W MENU REW / PLAY FF / SLOW / PAUSE...
...stop Audio Dubbing. • If the microphone used for 12 bit AUDIO dubbed recordings only (sound recorded in NTSC format. 5 Press PAUSE to the original sound. B Rotate JOG KEY to select DISPLAY SETTING , and then press JOG KEY to D MEMORY. The tape will be audio dubbed. Only NTSC (National Television Standards Committee) recorded tapes can set to display the DISPLAY SETTING C menu. SPKR VOL + Optional DRESET Button AMENU Button CAMCORDER CAMERA DISPLAY ON TV DATE / TIME PHOTO SHOT COUNTER / A.DUB TC RESET REC REC / PAUSE T W MENU REW / PLAY FF / SLOW / PAUSE...
PVDV201 User Guide
Page 51
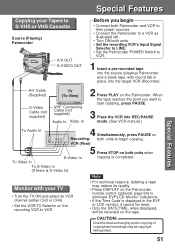
..., into REC/PAUSE mode. (See VCR manual.) SSppeecciiaall FFeeaattuurreess To Audio In 4 Simultaneously, press PAUSE on both units to eliminate EVF/LCD Monitor indications. • If the Time Code is completed. A/V Cable (Supplied) TV (To View) S-Video Cable (not supplied) VHF Connecting Cable (not supplied) Audio In Video In 2 Press PLAY on the tape. CAUTION: Unauthorized exchanging and/or copying of copyrighted recordings may reduce its quality. • Press DISPLAY on the Palmcorder remote control...
..., into REC/PAUSE mode. (See VCR manual.) SSppeecciiaall FFeeaattuurreess To Audio In 4 Simultaneously, press PAUSE on both units to eliminate EVF/LCD Monitor indications. • If the Time Code is completed. A/V Cable (Supplied) TV (To View) S-Video Cable (not supplied) VHF Connecting Cable (not supplied) Audio In Video In 2 Press PLAY on the tape. CAUTION: Unauthorized exchanging and/or copying of copyrighted recordings may reduce its quality. • Press DISPLAY on the Palmcorder remote control...
PVDV201 User Guide
Page 54
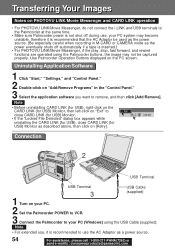
...) 2 Set the Palmcorder POWER to VCR. 3 Connect the Palmcorder to your PC system may not be used as the power eventually shuts off automatically if a tape is inserted.) • For PHOTOVU LINK/Movie Messenger, if the play, stop, fast forward, and rewind functions are operated using the USB Cable (supplied). Note • For extended use the AC Adaptor as described above, then click on [Retry]. Use Palmcorder Operation Buttons displayed...
...) 2 Set the Palmcorder POWER to VCR. 3 Connect the Palmcorder to your PC system may not be used as the power eventually shuts off automatically if a tape is inserted.) • For PHOTOVU LINK/Movie Messenger, if the play, stop, fast forward, and rewind functions are operated using the USB Cable (supplied). Note • For extended use the AC Adaptor as described above, then click on [Retry]. Use Palmcorder Operation Buttons displayed...

PVDV201 User Guide
Page 65
... (Secure Digital Music Initiative) standard. It has a write protect switch to prevent the data writing and card formatting, and it comes with a copyright protection function that complies with an SD Memory Card. • SD Logo is an external memory card with an even bigger memory capacity. These preset titles will also be erased when the Card is a compact, lightweight and removable external memory card. SD Memory Card The SD Memory Card (optional...
... (Secure Digital Music Initiative) standard. It has a write protect switch to prevent the data writing and card formatting, and it comes with a copyright protection function that complies with an SD Memory Card. • SD Logo is an external memory card with an even bigger memory capacity. These preset titles will also be erased when the Card is a compact, lightweight and removable external memory card. SD Memory Card The SD Memory Card (optional...

PVDV201 User Guide
Page 70
...) No operation starts when operation buttons are connected correctly and firmly. (p. 12) • Make sure the Lens Cap is removed. (p. 22) • Make sure the Power Source is connected. (pp. 11, 12) • Insert the cassette record tab up, window side facing out. (p. 9) Video cassette cannot be heard... • Make sure the Audio on the VCR MENU is set to REC or REC/ PAUSE mode. Video cassette cannot be something you have a problem with...
...) No operation starts when operation buttons are connected correctly and firmly. (p. 12) • Make sure the Lens Cap is removed. (p. 22) • Make sure the Power Source is connected. (pp. 11, 12) • Insert the cassette record tab up, window side facing out. (p. 9) Video cassette cannot be heard... • Make sure the Audio on the VCR MENU is set to REC or REC/ PAUSE mode. Video cassette cannot be something you have a problem with...
PVDV201 User Guide
Page 80
... C CARD EJECT Switch 10 Camera Recording 22, 23, 24, 25 Cleaning Care for Service Notice 20 42 25, 26, 64 70 S Safety Precautions Servicenter List Set the Date and Time Shoulder Strap Special Effects Playback Specifications STILL Picture Strobe Multi Mode 2 77 13 6, 8 28, 29, 30 67 28 46 T Tape Remaining Indications 19 Tape Speed 6 Tape Warning 21 V VHF Connecting Cable 51 Volume Display 27 W White Balance 42 Z Zoom In/Out 40 Panasonic Consumer Electronics Panasonic Sales...
... C CARD EJECT Switch 10 Camera Recording 22, 23, 24, 25 Cleaning Care for Service Notice 20 42 25, 26, 64 70 S Safety Precautions Servicenter List Set the Date and Time Shoulder Strap Special Effects Playback Specifications STILL Picture Strobe Multi Mode 2 77 13 6, 8 28, 29, 30 67 28 46 T Tape Remaining Indications 19 Tape Speed 6 Tape Warning 21 V VHF Connecting Cable 51 Volume Display 27 W White Balance 42 Z Zoom In/Out 40 Panasonic Consumer Electronics Panasonic Sales...


