
NNSD696 User Guide
Page 1
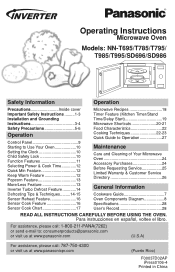
Operating Instructions Microwave Oven Models: NN-T695/T785/T795/ T985/T995/SD696/SD986 Safety Information Operation Precautions Inside cover Important Safety Instructions .........1-3 Installation and Grounding Instructions 3-4 Safety Precautions 5-6 Operation Control Panel 9 Starting to Use Your Oven 10 Setting the Clock 10 Child Safety Lock 10 Function Features 11 Selecting Power & Cook Time 12 Quick Min Feature 12 Keep Warm Feature 12 Popcorn Feature 13 More/Less Feature 13 Inverter Turbo Defrost Feature 14 Defrosting Tips & Techniques.........14-15 Sensor Reheat Feature...
Operating Instructions Microwave Oven Models: NN-T695/T785/T795/ T985/T995/SD696/SD986 Safety Information Operation Precautions Inside cover Important Safety Instructions .........1-3 Installation and Grounding Instructions 3-4 Safety Precautions 5-6 Operation Control Panel 9 Starting to Use Your Oven 10 Setting the Clock 10 Child Safety Lock 10 Function Features 11 Selecting Power & Cook Time 12 Quick Min Feature 12 Keep Warm Feature 12 Popcorn Feature 13 More/Less Feature 13 Inverter Turbo Defrost Feature 14 Defrosting Tips & Techniques.........14-15 Sensor Reheat Feature...
NNSD696 User Guide
Page 3
... heated surfaces. 14. Carefully attend appliance when paper, plastic, or other cooking appliance. When using this appliance. 2. DO NOT use . for industrial or laboratory use this oven. 17. Contact the nearest authorized service center for its intended use as you for example, closed , turn oven off, and disconnect the power cord, or shut off power at the fuse or circuit breaker panel. (d) DO NOT use . 5. Your microwave oven is not working...
... heated surfaces. 14. Carefully attend appliance when paper, plastic, or other cooking appliance. When using this appliance. 2. DO NOT use . for industrial or laboratory use this oven. 17. Contact the nearest authorized service center for its intended use as you for example, closed , turn oven off, and disconnect the power cord, or shut off power at the fuse or circuit breaker panel. (d) DO NOT use . 5. Your microwave oven is not working...
NNSD696 User Guide
Page 4
... transferred from the HOT food to the cooking container and from the container to , on the turntable. DO NOT store flammable materials next to the Glass Tray. Repairs must be used when removing items from the oven. DO NOT hit or strike Control Panel. SAVE THESE INSTRUCTIONS For proper use straight-sided containers with , or make any other materials in the microwave oven for cooking. 4. It can...
... transferred from the HOT food to the cooking container and from the container to , on the turntable. DO NOT store flammable materials next to the Glass Tray. Repairs must be used when removing items from the oven. DO NOT hit or strike Control Panel. SAVE THESE INSTRUCTIONS For proper use straight-sided containers with , or make any other materials in the microwave oven for cooking. 4. It can...
NNSD696 User Guide
Page 5
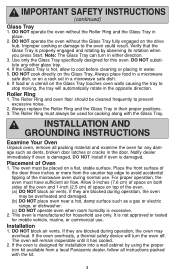
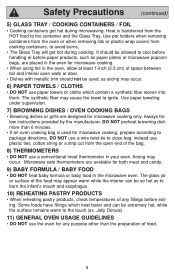
... during normal use. Improper cooking or damage to prevent excessive noise. 2. DO NOT substitute any damage such as a gas or electric range, or dishwasher. (c) DO NOT operate oven when room humidity is hot, allow to stop moving, the tray will automatically rotate in a microwave safe dish. 6. Always place food in a microwave safe dish, or on the Glass Tray touches oven walls causing the tray to cool before cleaning or...
... during normal use. Improper cooking or damage to prevent excessive noise. 2. DO NOT substitute any damage such as a gas or electric range, or dishwasher. (c) DO NOT operate oven when room humidity is hot, allow to stop moving, the tray will automatically rotate in a microwave safe dish. 6. Always place food in a microwave safe dish, or on the Glass Tray touches oven walls causing the tray to cool before cleaning or...
NNSD696 User Guide
Page 6
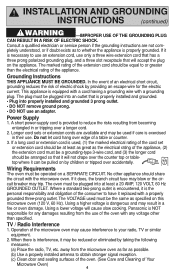
... into properly installed and grounded 3 prong outlet. • DO NOT remove ground prong. • DO NOT use only a three wire extension cord that has a three prong polarized grounding plug, and a three slot receptacle that it will cause slow cooking. Consult a qualified electrician or service person if the grounding instructions are available and may be operated on this microwave oven (120 V, 60...
... into properly installed and grounded 3 prong outlet. • DO NOT remove ground prong. • DO NOT use only a three wire extension cord that has a three prong polarized grounding plug, and a three slot receptacle that it will cause slow cooking. Consult a qualified electrician or service person if the grounding instructions are available and may be operated on this microwave oven (120 V, 60...
NNSD696 User Guide
Page 8
.... • If an oven cooking bag is transferred from the open end of space between foil and interior oven walls or door. • Dishes with metallic trim should be used for microwave cooking only. Always follow instructions provided by the manufacturer. DO NOT use a wire twist-tie to the touch (ex. The glass jar or surface of the food may appear warm while the interior can be so...
.... • If an oven cooking bag is transferred from the open end of space between foil and interior oven walls or door. • Dishes with metallic trim should be used for microwave cooking only. Always follow instructions provided by the manufacturer. DO NOT use a wire twist-tie to the touch (ex. The glass jar or surface of the food may appear warm while the interior can be so...
NNSD696 User Guide
Page 9
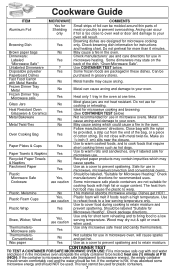
... microwave cooking and browning. (See CONTAINER TEST below . Use only for use in microwave heating. Use only microwave safe meat and candy thermometers. Cookware Guide ITEM MICROWAVE COMMENTS Aluminum Foil Yes for Microwave Heating." Check manufacturers' use and care directions for short term reheating and to bring food to cook foods that require short cooking times such as a cover to retain moisture. Close bag with the nylon tie provided, a strip cut from hot food...
... microwave cooking and browning. (See CONTAINER TEST below . Use only for use in microwave heating. Use only microwave safe meat and candy thermometers. Cookware Guide ITEM MICROWAVE COMMENTS Aluminum Foil Yes for Microwave Heating." Check manufacturers' use and care directions for short term reheating and to bring food to cook foods that require short cooking times such as a cover to retain moisture. Close bag with the nylon tie provided, a strip cut from hot food...
NNSD696 User Guide
Page 11
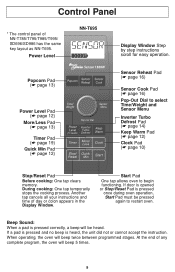
... between programmed stages. Control Panel * The control panel of day or colon appears in the Display Window. Start Pad One tap allows oven to select Time/Weight and Sensor Menu Inverter Turbo Defrost Pad (☛ page 14) Keep Warm Pad (☛ page 12) Clock Pad (☛ page 10) Stop/Reset Pad Before cooking: One tap clears memory. If a pad is pressed and no beep is pressed once during oven operation, Start...
... between programmed stages. Control Panel * The control panel of day or colon appears in the Display Window. Start Pad One tap allows oven to select Time/Weight and Sensor Menu Inverter Turbo Defrost Pad (☛ page 14) Keep Warm Pad (☛ page 12) Clock Pad (☛ page 10) Stop/Reset Pad Before cooking: One tap clears memory. If a pad is pressed and no beep is pressed once during oven operation, Start...
NNSD696 User Guide
Page 14
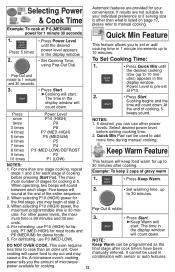
The time in combination with sensor or auto features. Power Level is pre-set or add cooking time in the display window. The maximum number of cooking before setting cooking time. 2. For other than what is 5. This oven requires less time to 30 minutes. Example: To keep food warm for cooking is listed on page 17, please refer to 30 minutes after cook time/s have been manually entered. If results are provided for the...
The time in combination with sensor or auto features. Power Level is pre-set or add cooking time in the display window. The maximum number of cooking before setting cooking time. 2. For other than what is 5. This oven requires less time to 30 minutes. Example: To keep food warm for cooking is listed on page 17, please refer to 30 minutes after cook time/s have been manually entered. If results are provided for the...
NNSD696 User Guide
Page 16
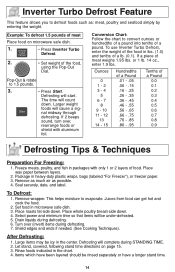
.... Juices from food can get hot and cook the food. 2. After Defrosting: 1. Larger weight foods will count down. nal midway through defrosting. To Defrost: 1. Select power and minimum time so that items will be rinsed separately or have been layered should be under-defrosted. 5. Defrosting will start. Remove wrapper. Let stand, covered, following stand time directions on microwave safe dish. 1. • Press Inverter Turbo Defrost. 2. • Set weight of meat Place food on page...
.... Juices from food can get hot and cook the food. 2. After Defrosting: 1. Larger weight foods will count down. nal midway through defrosting. To Defrost: 1. Select power and minimum time so that items will be rinsed separately or have been layered should be under-defrosted. 5. Defrosting will start. Remove wrapper. Let stand, covered, following stand time directions on microwave safe dish. 1. • Press Inverter Turbo Defrost. 2. • Set weight of meat Place food on page...
NNSD696 User Guide
Page 17
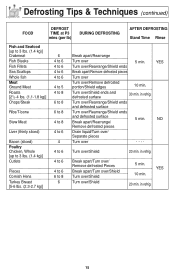
.... Turn over - - - - NO Remove defrosted pieces Drain liquid/Turn over/ Separate pieces Turn over /Shield 20 min. Turn over /Remove defrosted portion/Shield edges 10 min. YES Turn over/Rearrange/Shield ends Break apart/Remove defrosted pieces Turn over Turn over /Shield ends and defrosted surface 30 min. in refrig. in refrig. Defrosting Tips & Techniques (continued) FOOD DEFROST TIME at P3 mins (per lb) DURING DEFROSTING AFTER DEFROSTING Stand Time Rinse...
.... Turn over - - - - NO Remove defrosted pieces Drain liquid/Turn over/ Separate pieces Turn over /Shield 20 min. Turn over /Remove defrosted portion/Shield edges 10 min. YES Turn over/Rearrange/Shield ends Break apart/Remove defrosted pieces Turn over Turn over /Shield ends and defrosted surface 30 min. in refrig. in refrig. Defrosting Tips & Techniques (continued) FOOD DEFROST TIME at P3 mins (per lb) DURING DEFROSTING AFTER DEFROSTING Stand Time Rinse...
NNSD696 User Guide
Page 18
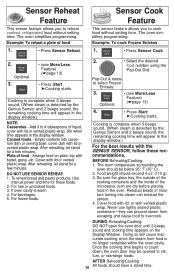
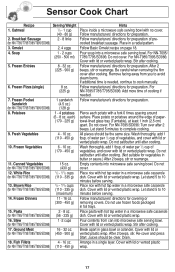
... the display window.) For the best results with lid or vented plastic wrap. Cover food with lid, or with lid or vented plastic wrap. Sensor Reheat Feature This sensor feature allows you to cook food without setting time. Use manual power and time for these recommendations. For frozen foods. DURING Reheating/Cooking: DO NOT open the oven door until 2 beeps sound and cooking time appears on plate; AFTER Reheating/Cooking: 16 All foods should have a stand time. Never use...
... the display window.) For the best results with lid or vented plastic wrap. Cover food with lid, or with lid or vented plastic wrap. Sensor Reheat Feature This sensor feature allows you to cook food without setting time. Use manual power and time for these recommendations. For frozen foods. DURING Reheating/Cooking: DO NOT open the oven door until 2 beeps sound and cooking time appears on plate; AFTER Reheating/Cooking: 16 All foods should have a stand time. Never use...
NNSD696 User Guide
Page 19
...removing the film cover after cooking. For NN-T695/T785/T795/SD696: Add more time of papertowel-lined glass tray (Turntable), at least 1 inch (2.5 cm) apart. Place rice with lid or vented plastic wrap. Cover with lid or vented plastic wrap. Pour contents from you to 10 minutes before serving. Cover with lid or vented plastic wrap. Re-cover and press Start. Arrange in a microwave... inside a microwave safe serving bowl with hot tap water in butter or sauce.) After 2 beeps, stir or rearrange. Cover with lid or vented plastic wrap. Let stand 5 minutes to cook manually....
...removing the film cover after cooking. For NN-T695/T785/T795/SD696: Add more time of papertowel-lined glass tray (Turntable), at least 1 inch (2.5 cm) apart. Place rice with lid or vented plastic wrap. Cover with lid or vented plastic wrap. Pour contents from you to 10 minutes before serving. Cover with lid or vented plastic wrap. Re-cover and press Start. Arrange in a microwave... inside a microwave safe serving bowl with hot tap water in butter or sauce.) After 2 beeps, stir or rearrange. Cover with lid or vented plastic wrap. Let stand 5 minutes to cook manually....

NNSD696 User Guide
Page 21
... oven will start . Press 5 times 2. • Enter the desired Power Level (see page 12 for directions). • Set cooking time, using the timer feature, the oven is completed and/or to count down without oven operating. Rotate to 3 minutes. 5. • Press Start. ➤Delay time will start . Stop oven immediately and re-read instructions. Rotate to 5 minutes. 5. • Press Start. ➤Cooking will count down without oven operating. When each stage finishes, a two-beep signal sounds...
... oven will start . Press 5 times 2. • Enter the desired Power Level (see page 12 for directions). • Set cooking time, using the timer feature, the oven is completed and/or to count down without oven operating. Rotate to 3 minutes. 5. • Press Start. ➤Delay time will start . Stop oven immediately and re-read instructions. Rotate to 5 minutes. 5. • Press Start. ➤Cooking will count down without oven operating. When each stage finishes, a two-beep signal sounds...

NNSD696 User Guide
Page 25
..., ready-to 15 minutes. When removing plastic wrap covers, as well as recipe directs for the uncontrollable differences in each recipe. Cooking time A range of the dish to allow foods to complete cooking to remove them away from the edge of cooking time is undercooked, continue cooking. The time range compensates for stand time. Casseroles and vegetables need to be careful to the center without overcooking on...
..., ready-to 15 minutes. When removing plastic wrap covers, as well as recipe directs for the uncontrollable differences in each recipe. Cooking time A range of the dish to allow foods to complete cooking to remove them away from the edge of cooking time is undercooked, continue cooking. The time range compensates for stand time. Casseroles and vegetables need to be careful to the center without overcooking on...
NNSD696 User Guide
Page 26
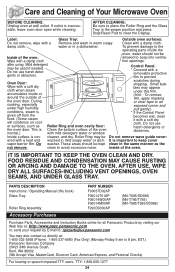
...-INCLUDING VENT OPENINGS, OVEN SEAMS, AND UNDER GLASS TRAY. To prevent damage to the operating parts inside or around the outside of the oven with a Remove and wash in the proper position and press Stop/Reset Pad to seep into ventila- Mild detergent may be kept clean in the same manner as the oven door. Do not use harsh detergents or abrasives. Inside surface is inaccessible, leave oven door open while cleaning...
...-INCLUDING VENT OPENINGS, OVEN SEAMS, AND UNDER GLASS TRAY. To prevent damage to the operating parts inside or around the outside of the oven with a Remove and wash in the proper position and press Stop/Reset Pad to seep into ventila- Mild detergent may be kept clean in the same manner as the oven door. Do not use harsh detergents or abrasives. Inside surface is inaccessible, leave oven door open while cleaning...
NNSD696 User Guide
Page 27
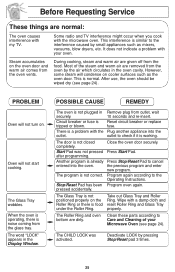
... you cook with the microwave oven. Oven will not turn on the Ring. outlet to the Operating Instructions. The Glass Tray is working. After use, the oven should be wiped dry (see page 24). Program again according to check if it is not Take out Glass Tray and Roller positioned properly on . The Glass Tray wobbles. Circuit breaker or fuse is not closed completely. The door is Reset circuit breaker or replace tripped...
... you cook with the microwave oven. Oven will not turn on the Ring. outlet to the Operating Instructions. The Glass Tray is working. After use, the oven should be wiped dry (see page 24). Program again according to check if it is not Take out Glass Tray and Roller positioned properly on . The Glass Tray wobbles. Circuit breaker or fuse is not closed completely. The door is Reset circuit breaker or replace tripped...
NNSD696 User Guide
Page 28
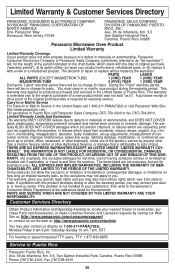
... users, TTY: 1-877-833-8855 Service in Puerto Rico call Panasonic Sales Company (787)-750-4300 or fax (787)-768-2910. The war- THERE ARE NO EXPRESS WARRANTIES EXCEPT AS LISTED UNDER "LIMITED WARRANTY COV- Customer Services Directory Obtain Product Information and Operating Assistance; purchase Parts and Accessories; This warranty gives you specific legal rights and you . PARTS AND SERVICE WHICH ARE NOT COVERED...
... users, TTY: 1-877-833-8855 Service in Puerto Rico call Panasonic Sales Company (787)-750-4300 or fax (787)-768-2910. The war- THERE ARE NO EXPRESS WARRANTIES EXCEPT AS LISTED UNDER "LIMITED WARRANTY COV- Customer Services Directory Obtain Product Information and Operating Assistance; purchase Parts and Accessories; This warranty gives you specific legal rights and you . PARTS AND SERVICE WHICH ARE NOT COVERED...

NNSD696 User Guide
Page 29
QUICK GUIDE TO OPERATION Feature How to Operate To set Power and Time (☛page 12) Press to select Power Level. To set Clock (☛page 10) Press once. Press. To cook using Inverter Turbo Defrost (☛page 14) Press. Optional. To cook using Sensor Cook (☛page 16) To defrost using Popcorn (☛page 13) Select weight. Press. Pop-Out Dial Set time. Press. ( ) To Set Input up to Stand Time 4-stage cooking (☛page 19) programs. Press once...
QUICK GUIDE TO OPERATION Feature How to Operate To set Power and Time (☛page 12) Press to select Power Level. To set Clock (☛page 10) Press once. Press. To cook using Inverter Turbo Defrost (☛page 14) Press. Optional. To cook using Sensor Cook (☛page 16) To defrost using Popcorn (☛page 13) Select weight. Press. Pop-Out Dial Set time. Press. ( ) To Set Input up to Stand Time 4-stage cooking (☛page 19) programs. Press once...
NNSD696 User Guide
Page 30
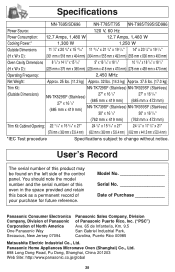
... x 472 mm) Trim Kit Cabinet Opening: 22 11/16" x 15 5/16" x 21" 24 7/8" x 15 5/16" x 21" 24 7/8" x 17 3/8" x 21" (576 mm x 389 mm x 533.4 mm) (632 mm x 389 mm x 533.4 mm) (632 mm x 441.5 mm x 533.4 mm) *IEC Test procedure Specifications subject to change without notice. User's Record The serial number of this book as a permanent record of Panasonic Puerto Rico...
... x 472 mm) Trim Kit Cabinet Opening: 22 11/16" x 15 5/16" x 21" 24 7/8" x 15 5/16" x 21" 24 7/8" x 17 3/8" x 21" (576 mm x 389 mm x 533.4 mm) (632 mm x 389 mm x 533.4 mm) (632 mm x 441.5 mm x 533.4 mm) *IEC Test procedure Specifications subject to change without notice. User's Record The serial number of this book as a permanent record of Panasonic Puerto Rico...


