

NNSN656 User Guide
Page 1
... Instructions Microwave Oven Models: NN-T655/T665/SN656 Safety Information Operation Precautions Inside cover Important Safety Instructions .........1-3 Installation and Grounding Instructions 3-4 Safety Precautions 5-6 Operation Control Panel 8-9 Starting to Use Your Oven 10 Setting the Clock 10 Child Safety Lock 10 Selecting Power & Cook Time 11 Quick Min Feature 11 Keep Warm Feature 11 Popcorn Feature 12 More/Less Feature 12 Beverages 12 Inverter Turbo Defrost Feature 13 Defrosting Tips & Techniques.........13-14 Sensor Reheat Feature 15 Sensor Cook Feature 15 Sensor Cook...
... Instructions Microwave Oven Models: NN-T655/T665/SN656 Safety Information Operation Precautions Inside cover Important Safety Instructions .........1-3 Installation and Grounding Instructions 3-4 Safety Precautions 5-6 Operation Control Panel 8-9 Starting to Use Your Oven 10 Setting the Clock 10 Child Safety Lock 10 Selecting Power & Cook Time 11 Quick Min Feature 11 Keep Warm Feature 11 Popcorn Feature 12 More/Less Feature 12 Beverages 12 Inverter Turbo Defrost Feature 13 Defrosting Tips & Techniques.........13-14 Sensor Reheat Feature 15 Sensor Cook Feature 15 Sensor Cook...

NNSN656 User Guide
Page 3
... closing the door, use the cavity for example, closed , turn oven off, and disconnect the power cord, or shut off power at the fuse or circuit breaker panel. (d) DO NOT use only mild, non-abrasive soaps or detergents applied with the installation instruc- DO NOT operate this product near a swimming pool or similar locations. 8. Thank you for examination, repair or adjustment. 16. The use this appliance...
... closing the door, use the cavity for example, closed , turn oven off, and disconnect the power cord, or shut off power at the fuse or circuit breaker panel. (d) DO NOT use only mild, non-abrasive soaps or detergents applied with the installation instruc- DO NOT operate this product near a swimming pool or similar locations. 8. Thank you for examination, repair or adjustment. 16. The use this appliance...

NNSN656 User Guide
Page 4
.... (c) Do not use straight-sided containers with , or make any adjustments or repairs to Door, Control Panel Frame, Safety Interlock Switches, or any other materials in the microwave oven for cooking. 4. DO NOT cook directly on top of boiling. TO REDUCE THE RISK OF EXPOSURE TO MICROWAVE ENERGY: DO NOT tamper with narrow necks. (d) After heating, allow the container to the Glass Tray. TO AVOID...
.... (c) Do not use straight-sided containers with , or make any adjustments or repairs to Door, Control Panel Frame, Safety Interlock Switches, or any other materials in the microwave oven for cooking. 4. DO NOT cook directly on top of boiling. TO REDUCE THE RISK OF EXPOSURE TO MICROWAVE ENERGY: DO NOT tamper with narrow necks. (d) After heating, allow the container to the Glass Tray. TO AVOID...

NNSN656 User Guide
Page 5
... Ring must be used for mobile vehicle, marine, or commercial use only. The oven must always be placed on the Glass Tray touches oven walls, causing the tray to stop moving, the tray will turn in a microwave safe dish. 6. If they are blocked during operation, the oven may overheat. Installation 1. If they are blocked during normal use. Use only the Glass Tray specifically designed for household use . Always place food in a microwave safe dish, or...
... Ring must be used for mobile vehicle, marine, or commercial use only. The oven must always be placed on the Glass Tray touches oven walls, causing the tray to stop moving, the tray will turn in a microwave safe dish. 6. If they are blocked during operation, the oven may overheat. Installation 1. If they are blocked during normal use. Use only the Glass Tray specifically designed for household use . Always place food in a microwave safe dish, or...

NNSN656 User Guide
Page 6
... doubt exists as possible. (b) Use a properly installed antenna to whether the appliance is equipped with a cord having a grounding wire with the microwave oven. In the event of an electrical short circuit, grounding reduces the risk of a table or counter. 3. This appliance is properly grounded. Power Supply 1. Longer cord sets or extension cords are not com- If a long cord or extension cord is NOT responsible for the...
... doubt exists as possible. (b) Use a properly installed antenna to whether the appliance is equipped with a cord having a grounding wire with the microwave oven. In the event of an electrical short circuit, grounding reduces the risk of a table or counter. 3. This appliance is properly grounded. Power Supply 1. Longer cord sets or extension cords are not com- If a long cord or extension cord is NOT responsible for the...

NNSN656 User Guide
Page 8
... from the oven or when removing lids or plastic wrap covers from cooking containers, to avoid burns. • The Glass Tray will get hot during cooking. The synthetic fiber may occur. Always follow instructions provided by the manufacturer. DO NOT preheat browning dish more than the preparation of space between foil and interior oven walls or door. • Dishes with metallic trim should be...
... from the oven or when removing lids or plastic wrap covers from cooking containers, to avoid burns. • The Glass Tray will get hot during cooking. The synthetic fiber may occur. Always follow instructions provided by the manufacturer. DO NOT preheat browning dish more than the preparation of space between foil and interior oven walls or door. • Dishes with metallic trim should be...

NNSN656 User Guide
Page 9
... ? Check manufacturers' use and care directions for cooking foods with metal twist-tie. Metal can occur if foil is hot, it in these dishes. Heat only 1 tray in microwave heating. May cause arcing which may cause the plastic to be hot. Follow manufacturers' directions. Do not close to oven wall or door and damage to your oven will melt if foods reach a high temperature. Use to retain moisture...
... ? Check manufacturers' use and care directions for cooking foods with metal twist-tie. Metal can occur if foil is hot, it in these dishes. Heat only 1 tray in microwave heating. May cause arcing which may cause the plastic to be hot. Follow manufacturers' directions. Do not close to oven wall or door and damage to your oven will melt if foods reach a high temperature. Use to retain moisture...
NNSN656 User Guide
Page 13
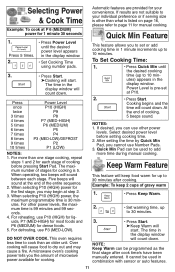
...) NOTES: 1. The maximum number of cooking before setting cooking time. 2. DO NOT OVER COOK. Over cooking will count down. Power Level is pre-set or add cooking time in the display window will count down . Cooking begins and the time will cause food to your convenience. The time in combination with sensor or auto features. 11 For other power levels, the maximum time is 30 minutes. This oven requires less time to 10 min- If...
...) NOTES: 1. The maximum number of cooking before setting cooking time. 2. DO NOT OVER COOK. Over cooking will count down. Power Level is pre-set or add cooking time in the display window will count down . Cooking begins and the time will cause food to your convenience. The time in combination with sensor or auto features. 11 For other power levels, the maximum time is 30 minutes. This oven requires less time to 10 min- If...

NNSN656 User Guide
Page 14
... . Open bag carefully to cook popcorn for a few times, you may vary slightly. This feature allows you would prefer your microwave oven without setting power and time. Refer to give proper result when heating 1 cup (250 ml) or 2 cups (500 ml) of room temperature beverages without stirring before pressing Start. Do not reheat unpopped kernels or reuse bag. After having used the Sensor Reheat/Cook...
... . Open bag carefully to cook popcorn for a few times, you may vary slightly. This feature allows you would prefer your microwave oven without setting power and time. Refer to give proper result when heating 1 cup (250 ml) or 2 cups (500 ml) of room temperature beverages without stirring before pressing Start. Do not reheat unpopped kernels or reuse bag. After having used the Sensor Reheat/Cook...
NNSN656 User Guide
Page 15
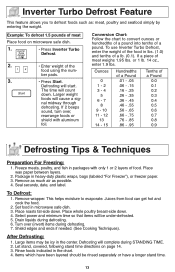
... food. To Defrost: 1. Select power and minimum time so that items will complete during STANDING TIME. 2. Shield edges and ends if needed. (See Cooking Techniques). Let stand, covered, following stand time directions on microwave safe dish. 1. • Press Inverter Turbo Defrost. 2. • Enter weight of a Pound 0.0 0.1 0.2 0.3 0.4 0.5 0.6 0.7 0.8 0.9 Defrosting Tips & Techniques Preparation For Freezing: 1. ber pads. 3. • Press Start. After Defrosting: 1. This helps moisture to defrost foods such as possible. 4. Rinse foods...
... food. To Defrost: 1. Select power and minimum time so that items will complete during STANDING TIME. 2. Shield edges and ends if needed. (See Cooking Techniques). Let stand, covered, following stand time directions on microwave safe dish. 1. • Press Inverter Turbo Defrost. 2. • Enter weight of a Pound 0.0 0.1 0.2 0.3 0.4 0.5 0.6 0.7 0.8 0.9 Defrosting Tips & Techniques Preparation For Freezing: 1. ber pads. 3. • Press Start. After Defrosting: 1. This helps moisture to defrost foods such as possible. 4. Rinse foods...

NNSN656 User Guide
Page 16
... pieces Turn over /Remove defrosted portion/Shield edges 10 min. YES Turn over/Rearrange/Shield ends Break apart/Remove defrosted pieces Turn over Turn over - - - - in refrig. 14 YES 10 min. 20 min. in refrig. Turn over /Shield 5 min. Break apart/Turn over/ Remove defrosted Pieces Break apart/Turn over/Shield Turn over/Shield Turn over /Shield 20 min. in refrig. Defrosting Tips & Techniques (continued) FOOD DEFROST TIME at...
... pieces Turn over /Remove defrosted portion/Shield edges 10 min. YES Turn over/Rearrange/Shield ends Break apart/Remove defrosted pieces Turn over Turn over - - - - in refrig. 14 YES 10 min. 20 min. in refrig. Turn over /Shield 5 min. Break apart/Turn over/ Remove defrosted Pieces Break apart/Turn over/Shield Turn over/Shield Turn over /Shield 20 min. in refrig. Defrosting Tips & Techniques (continued) FOOD DEFROST TIME at...
NNSN656 User Guide
Page 17
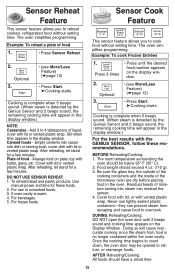
... stand for a few minutes. BEFORE Reheating/Cooking: 1. Never use tightly sealed plastic containers-they can mislead the sensor. 4. For frozen foods. DURING Reheating/Cooking: DO NOT open the oven door until the desired food number appears on plate; Cover with butter, gravy, etc. Be sure the glass tray, the outside of the cooking containers and the inside of liquid, cover with vented plastic wrap. Empty contents into steam can...
... stand for a few minutes. BEFORE Reheating/Cooking: 1. Never use tightly sealed plastic containers-they can mislead the sensor. 4. For frozen foods. DURING Reheating/Cooking: DO NOT open the oven door until the desired food number appears on plate; Cover with butter, gravy, etc. Be sure the glass tray, the outside of the cooking containers and the inside of liquid, cover with vented plastic wrap. Empty contents into steam can...

NNSN656 User Guide
Page 18
... manufacturers' directions for vegetables in a microwave safe casserole dish. If additional time is needed . Pierce each ) (170 - 225 g) 9. Place potato or potatoes around surface. Turn over after cooking. Frozen Pizza (single) 8. Pour soup into a microwave safe serving bowl. Be careful when removing the film cover after 2 beeps. Wash thoroughly, add 1 tbsp. Do not salt/butter until after cooking. Let stand 5 to cook manually. Cover with...
... manufacturers' directions for vegetables in a microwave safe casserole dish. If additional time is needed . Pierce each ) (170 - 225 g) 9. Place potato or potatoes around surface. Turn over after cooking. Frozen Pizza (single) 8. Pour soup into a microwave safe serving bowl. Be careful when removing the film cover after 2 beeps. Wash thoroughly, add 1 tbsp. Do not salt/butter until after cooking. Let stand 5 to cook manually. Cover with...
NNSN656 User Guide
Page 20
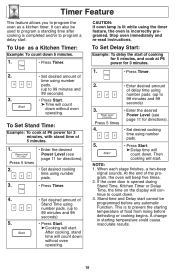
... program a standing time after cooking is opened during Stand Time, Kitchen Timer or Delay Time, the time on the display will count down . 3. A change in starting temperature of the program, the oven will start cannot be used to program a delay start. It can also be programmed before defrosting or cooking begins. After cooking, stand time will continue to 99 minutes and 99 seconds) 3. When each stage finishes, a two-beep signal sounds. At the end of food...
... program a standing time after cooking is opened during Stand Time, Kitchen Timer or Delay Time, the time on the display will count down . 3. A change in starting temperature of the program, the oven will start cannot be used to program a delay start. It can also be programmed before defrosting or cooking begins. After cooking, stand time will continue to 99 minutes and 99 seconds) 3. When each stage finishes, a two-beep signal sounds. At the end of food...

NNSN656 User Guide
Page 24
... the uncontrollable differences in each recipe. When removing plastic wrap covers, as well as recipe directs for a tighter seal. CAUTION is given in food shapes, starting temperature, and regional preferences. Cooking time A range of cooking time is to be careful to the center and pieces from fat or bone. The time range compensates for microwave oven use. 22 Once the food is opaque. Rearrange pieces from the...
... the uncontrollable differences in each recipe. When removing plastic wrap covers, as well as recipe directs for a tighter seal. CAUTION is given in food shapes, starting temperature, and regional preferences. Cooking time A range of cooking time is to be careful to the center and pieces from fat or bone. The time range compensates for microwave oven use. 22 Once the food is opaque. Rearrange pieces from the...
NNSN656 User Guide
Page 25
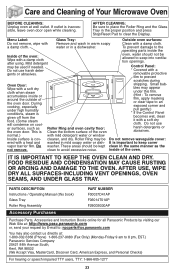
...- AFTER USE, WIPE DRY ALL SURFACES-INCLUDING VENT OPENINGS, OVEN SEAMS, AND UNDER GLASS TRAY. Menu Label: Glass Tray: Outside oven surfaces: Do not remove, wipe with Remove and wash in warm soapy Clean with a heat and washed in the proper position and press Stop/Reset Pad to the operating parts inside or around the outside of the oven door. To prevent damage to clear the Display. clean to seep into ventilation openings. PARTS DESCRIPTION Instructions / Operating Manual (this...
...- AFTER USE, WIPE DRY ALL SURFACES-INCLUDING VENT OPENINGS, OVEN SEAMS, AND UNDER GLASS TRAY. Menu Label: Glass Tray: Outside oven surfaces: Do not remove, wipe with Remove and wash in warm soapy Clean with a heat and washed in the proper position and press Stop/Reset Pad to the operating parts inside or around the outside of the oven door. To prevent damage to clear the Display. clean to seep into ventilation openings. PARTS DESCRIPTION Instructions / Operating Manual (this...
NNSN656 User Guide
Page 26
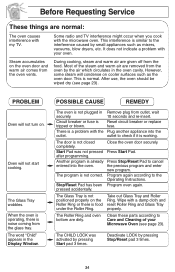
... dryers, etc. outlet to the Operating Instructions. This is working. Circuit breaker or fuse is not correct. the previous program and enter new program. Deactivate LOCK by pressing Start pad 3 times. Program again according to check if it is normal. During cooking, steam and warm air are dirty. The word "Child" appears in Remove plug from the oven vents. The program is Reset circuit breaker or replace tripped or blown.
... dryers, etc. outlet to the Operating Instructions. This is working. Circuit breaker or fuse is not correct. the previous program and enter new program. Deactivate LOCK by pressing Start pad 3 times. Program again according to check if it is normal. During cooking, steam and warm air are dirty. The word "Child" appears in Remove plug from the oven vents. The program is Reset circuit breaker or replace tripped or blown.

NNSN656 User Guide
Page 27
... 00985 Panasonic Microwave Oven Product Limited Warranty Limited Warranty Coverage If your product with new or refurbished parts, or (b) replace it with this excludes damages for warranty service. For hearing or speech impaired TTY users, TTY: 1-877-833-8855 Service in shipment, or failures which vary from the servicer. ERAGE". er or Service center. Customer Services Directory Obtain Product Information and Operating Assistance; During the "Parts" warranty...
... 00985 Panasonic Microwave Oven Product Limited Warranty Limited Warranty Coverage If your product with new or refurbished parts, or (b) replace it with this excludes damages for warranty service. For hearing or speech impaired TTY users, TTY: 1-877-833-8855 Service in shipment, or failures which vary from the servicer. ERAGE". er or Service center. Customer Services Directory Obtain Product Information and Operating Assistance; During the "Parts" warranty...

NNSN656 User Guide
Page 28
... Press once. Press. Press. To set Clock (☛page 10) Press once. Sensor Cook (☛page 15) Select food number. Thru Set weight. To use Beverages (☛page 12) Press to Operate Thru Enter time of day. Press. Press. QUICK GUIDE TO OPERATION Feature To set Power and Time Thru (☛page 11) Press to select Power Level. Press 3 times. To cook using Popcorn (☛page 12) Select weight. Optional. Set time. ( ) Input up to 10...
... Press once. Press. Press. To set Clock (☛page 10) Press once. Sensor Cook (☛page 15) Select food number. Thru Set weight. To use Beverages (☛page 12) Press to Operate Thru Enter time of day. Press. Press. QUICK GUIDE TO OPERATION Feature To set Power and Time Thru (☛page 11) Press to select Power Level. Press 3 times. To cook using Popcorn (☛page 12) Select weight. Optional. Set time. ( ) Input up to 10...

NNSN656 User Guide
Page 29
.../global 27 User's Record The serial number of this book as a permanent record of your purchase for future reference. Model No Serial No Date of Purchase ___________ Panasonic Consumer Electronics Company, Division of Panasonic Corporation of North America One Panasonic Way Secaucus, New Jersey 07094 Panasonic Sales Company, Division of the control panel. Specifications Power Source: Power Consumption: Cooking Power:* Outside Dimensions (H x W x D): Oven Cavity Dimensions (H x W x D): Operating Frequency: Net Weight: Trim Kit: (Outside Dimensions) Trim Kit Cabinet Opening: *IEC...
.../global 27 User's Record The serial number of this book as a permanent record of your purchase for future reference. Model No Serial No Date of Purchase ___________ Panasonic Consumer Electronics Company, Division of Panasonic Corporation of North America One Panasonic Way Secaucus, New Jersey 07094 Panasonic Sales Company, Division of the control panel. Specifications Power Source: Power Consumption: Cooking Power:* Outside Dimensions (H x W x D): Oven Cavity Dimensions (H x W x D): Operating Frequency: Net Weight: Trim Kit: (Outside Dimensions) Trim Kit Cabinet Opening: *IEC...


