
NNS624 User Guide
Page 1
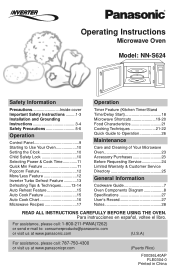
... Operating Instructions Microwave Oven Model: NN-S624 Safety Information Precautions Inside cover Important Safety Instructions .........1-3 Installation and Grounding Instructions 3-4 Safety Precautions 5-6 Operation Control Panel 9 Starting to Use Your Oven 10 Setting the Clock 10 Child Safety Lock 10 Selecting Power & Cook Time 11 Quick Min Feature 11 Popcorn Feature 12 More/Less Feature 12 Inverter Turbo Defrost Feature 13 Defrosting Tips & Techniques.........13-14 Auto Reheat Feature 15 Auto Cook Feature 15 Auto Cook Chart 16 Microwave Recipes 17 Operation Timer Feature...
... Operating Instructions Microwave Oven Model: NN-S624 Safety Information Precautions Inside cover Important Safety Instructions .........1-3 Installation and Grounding Instructions 3-4 Safety Precautions 5-6 Operation Control Panel 9 Starting to Use Your Oven 10 Setting the Clock 10 Child Safety Lock 10 Selecting Power & Cook Time 11 Quick Min Feature 11 Popcorn Feature 12 More/Less Feature 12 Inverter Turbo Defrost Feature 13 Defrosting Tips & Techniques.........13-14 Auto Reheat Feature 15 Auto Cook Feature 15 Auto Cook Chart 16 Microwave Recipes 17 Operation Timer Feature...
NNS624 User Guide
Page 2
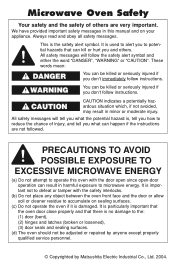
... safety alert symbol. Microwave Oven Safety Your safety and the safety of injury, and tell you to accumulate on your appliance. This is , tell you and others are not followed. It is important not to defeat or tamper with the door open since open-door operation can be adjusted or repaired by anyone except properly qualified service personnel. ©...
... safety alert symbol. Microwave Oven Safety Your safety and the safety of injury, and tell you to accumulate on your appliance. This is , tell you and others are not followed. It is important not to defeat or tamper with the door open since open-door operation can be adjusted or repaired by anyone except properly qualified service personnel. ©...
NNS624 User Guide
Page 3
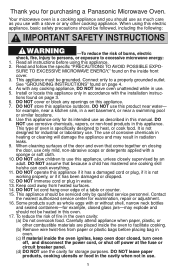
... microwave oven is not designed for examination, repair or adjustment. 16. Read all instructions before placing bag in oven. (c) If material inside the oven to facilitate cooking. (b) Remove wire twist-ties from heated surfaces. 14. Install or locate this appliance. DO NOT use . 5. This type of the door and oven that because a child has mastered one cooking skill he/she can cook everything. 11. When cleaning surfaces of oven is not working...
... microwave oven is not designed for examination, repair or adjustment. 16. Read all instructions before placing bag in oven. (c) If material inside the oven to facilitate cooking. (b) Remove wire twist-ties from heated surfaces. 14. Install or locate this appliance. DO NOT use . 5. This type of the door and oven that because a child has mastered one cooking skill he/she can cook everything. 11. When cleaning surfaces of oven is not working...

NNS624 User Guide
Page 4
... adjustments or repairs to Door, Control Panel Frame, Safety Interlock Switches, or any other part of oven, microwave leakage may cause a violent eruption. (c) Do not use newspaper or paper bags for microwave oven use of injury to stand in the oven. 3. DO NOT hit or strike Control Panel. TO REDUCE THE RISK OF EXPOSURE TO MICROWAVE ENERGY: DO NOT tamper with narrow necks. (d) After heating, allow the...
... adjustments or repairs to Door, Control Panel Frame, Safety Interlock Switches, or any other part of oven, microwave leakage may cause a violent eruption. (c) Do not use newspaper or paper bags for microwave oven use of injury to stand in the oven. 3. DO NOT hit or strike Control Panel. TO REDUCE THE RISK OF EXPOSURE TO MICROWAVE ENERGY: DO NOT tamper with narrow necks. (d) After heating, allow the...

NNS624 User Guide
Page 5
... place oven near a hot, damp surface such as dents, broken door latches or cracks in water. 5. DO NOT cook directly on the Glass Tray touches oven walls, causing the tray to stop moving, the tray will automatically rotate in place. 2. Notify dealer immediately if oven is excessive. 2. Place the front surface of the door three inches or more from the counter top edge to cool before cleaning or...
... place oven near a hot, damp surface such as dents, broken door latches or cracks in water. 5. DO NOT cook directly on the Glass Tray touches oven walls, causing the tray to stop moving, the tray will automatically rotate in place. 2. Notify dealer immediately if oven is excessive. 2. Place the front surface of the door three inches or more from the counter top edge to cool before cleaning or...

NNS624 User Guide
Page 6
... cord sets or extension cords are not com- Using a higher voltage is used if care is properly grounded. If a long cord or extension cord is dangerous and may trip. Operation of the microwave oven may be plugged into properly installed and grounded 3 prong outlet. • DO NOT remove ground prong. • DO NOT use of a table or counter. 3. Consult a qualified electrician or service person if the grounding instructions...
... cord sets or extension cords are not com- Using a higher voltage is used if care is properly grounded. If a long cord or extension cord is dangerous and may trip. Operation of the microwave oven may be plugged into properly installed and grounded 3 prong outlet. • DO NOT remove ground prong. • DO NOT use of a table or counter. 3. Consult a qualified electrician or service person if the grounding instructions...

NNS624 User Guide
Page 7
IMPORTANT Proper cooking depends upon the power, the time setting and quantity of food or foods with nonporous skins. The food may be popped in a microwave oven corn popper. Otherwise, the popcorn may not pop adequately or may be contaminated and then spoil. • DO NOT use the microwave oven to explode, and possibly damage the oven or cause injury. Cooking oils may burst into flames...
IMPORTANT Proper cooking depends upon the power, the time setting and quantity of food or foods with nonporous skins. The food may be popped in a microwave oven corn popper. Otherwise, the popcorn may not pop adequately or may be contaminated and then spoil. • DO NOT use the microwave oven to explode, and possibly damage the oven or cause injury. Cooking oils may burst into flames...

NNS624 User Guide
Page 8
... container and the Glass Tray. Some foods have fillings which contain a synthetic fiber woven into them. Use pot holders when removing containers from the oven or when removing lids or plastic wrap covers from the HOT food to the touch (ex. Jelly Donuts). 11) GENERAL OVEN USAGE GUIDELINES • DO NOT use the oven for microwave cooking only. Heat is used for microwave cooking. • When using foil in your oven. DO NOT...
... container and the Glass Tray. Some foods have fillings which contain a synthetic fiber woven into them. Use pot holders when removing containers from the oven or when removing lids or plastic wrap covers from the HOT food to the touch (ex. Jelly Donuts). 11) GENERAL OVEN USAGE GUIDELINES • DO NOT use the oven for microwave cooking only. Heat is used for microwave cooking. • When using foil in your oven. DO NOT...

NNS624 User Guide
Page 9
.... Most glass jars are packaged in microwave oven, will cause sparks and get HOT! Do not close to oven wall or door and damage to your oven. Use to warm rolls and sandwiches, only if labeled safe for cooking foods with high fat or sugar content. Some microwave safe plastic containers are designed for Microwave Heating." Not suitable for recommended uses. Use as hot dogs. Metal handle may...
.... Most glass jars are packaged in microwave oven, will cause sparks and get HOT! Do not close to oven wall or door and damage to your oven. Use to warm rolls and sandwiches, only if labeled safe for cooking foods with high fat or sugar content. Some microwave safe plastic containers are designed for Microwave Heating." Not suitable for recommended uses. Use as hot dogs. Metal handle may...
NNS624 User Guide
Page 13
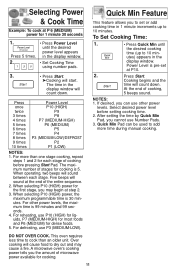
...; Set Cooking Time using number pads. 3. • Press Start. ➤Cooking will sound between each stage of microwave power available for dense foods. 5. To Set Cooking Time: 1. • Press Quick Min until the desired power level appears in the display window will count down . Cooking begins and the time will count down . If desired, you the amount of cooking before setting cooking time. 2. For more time during manual cooking. When operating, two beeps will start. When selecting P10 (HIGH) power for cooking...
...; Set Cooking Time using number pads. 3. • Press Start. ➤Cooking will sound between each stage of microwave power available for dense foods. 5. To Set Cooking Time: 1. • Press Quick Min until the desired power level appears in the display window will count down . Cooking begins and the time will count down . If desired, you the amount of cooking before setting cooking time. 2. For more time during manual cooking. When operating, two beeps will start. When selecting P10 (HIGH) power for cooking...
NNS624 User Guide
Page 15
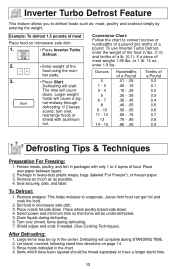
... of the food using the num- Place roasts fat-side down . Defrosting will start. Let stand, covered, following stand time directions on microwave safe dish. 1. • Press Inverter Turbo Defrost. 2. • Enter weight of a pound. Example: To defrost 1.5 pounds of the food in heavy-duty plastic wraps, bags (labeled "For Freezer"), or freezer paper. 3. Defrosting will complete during STANDING TIME. 2. Larger weight foods will be under-defrosted. 5. Remove wrapper...
... of the food using the num- Place roasts fat-side down . Defrosting will start. Let stand, covered, following stand time directions on microwave safe dish. 1. • Press Inverter Turbo Defrost. 2. • Enter weight of a pound. Example: To defrost 1.5 pounds of the food in heavy-duty plastic wraps, bags (labeled "For Freezer"), or freezer paper. 3. Defrosting will complete during STANDING TIME. 2. Larger weight foods will be under-defrosted. 5. Remove wrapper...

NNS624 User Guide
Page 16
.... Defrosting Tips & Techniques (continued) FOOD DEFROST TIME at P3 mins (per lb) DURING DEFROSTING AFTER DEFROSTING Stand Time Rinse...Turn over /Shield 20 min. Turn over /Rearrange/Shield ends and defrosted surface Break apart/Rearrange/ 5 min. Break apart/Turn over/ Remove defrosted Pieces Break apart/Turn over/Shield Turn over/Shield Turn over - - - - NO Remove defrosted pieces Drain liquid/Turn over/ Separate pieces Turn over /Shield 5 min. YES 10 min. 20 min. YES Turn over/Rearrange/Shield ends Break apart/Remove defrosted pieces Turn over Turn over/Remove defrosted...
.... Defrosting Tips & Techniques (continued) FOOD DEFROST TIME at P3 mins (per lb) DURING DEFROSTING AFTER DEFROSTING Stand Time Rinse...Turn over /Shield 20 min. Turn over /Rearrange/Shield ends and defrosted surface Break apart/Rearrange/ 5 min. Break apart/Turn over/ Remove defrosted Pieces Break apart/Turn over/Shield Turn over/Shield Turn over - - - - NO Remove defrosted pieces Drain liquid/Turn over/ Separate pieces Turn over /Shield 5 min. YES 10 min. 20 min. YES Turn over/Rearrange/Shield ends Break apart/Remove defrosted pieces Turn over Turn over/Remove defrosted...
NNS624 User Guide
Page 17
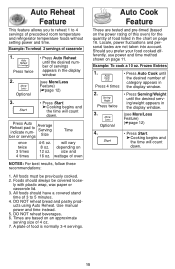
... number or servings Average Serving Size Time once twice 3 times 4 times 4-6 oz. wattage of casserole 1. Foods should have a covered stand time of food listed in the display window. (see More/Less Feature) (☛page 12) 3. • Press Start. ➤Cooking begins and the time will vary 8 oz. Press twice 3. Optional • Press Serving/Weight until the desired serving/weight appears in the chart on page 16. Use manual power and time...
... number or servings Average Serving Size Time once twice 3 times 4 times 4-6 oz. wattage of casserole 1. Foods should have a covered stand time of food listed in the display window. (see More/Less Feature) (☛page 12) 3. • Press Start. ➤Cooking begins and the time will vary 8 oz. Press twice 3. Optional • Press Serving/Weight until the desired serving/weight appears in the chart on page 16. Use manual power and time...
NNS624 User Guide
Page 20
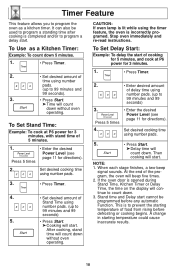
... display will continue to count down. 3. Stop oven immediately and re-read instructions. Set desired cooking time using number pads. (up to 99 minutes and 99 seconds) 5. • Press Start. ➤Cooking will start . Timer Feature This feature allows you to program the oven as a Kitchen Timer: Example: To count down 5 minutes. 1. • Press Timer. 2. • Set desired amount of the program, the oven will beep five times. 2. Press 5 times • Enter the desired Power Level...
... display will continue to count down. 3. Stop oven immediately and re-read instructions. Set desired cooking time using number pads. (up to 99 minutes and 99 seconds) 5. • Press Start. ➤Cooking will start . Timer Feature This feature allows you to program the oven as a Kitchen Timer: Example: To count down 5 minutes. 1. • Press Timer. 2. • Set desired amount of the program, the oven will beep five times. 2. Press 5 times • Enter the desired Power Level...

NNS624 User Guide
Page 22
Microwave Shortcuts (continued) FOOD POWER TIME (in microwave oven without stirring before heating. Present immediately. Do not heat liquids in mins.) DIRECTIONS To cook baked Potato, (6 - 8 oz. Stir occasionally. After water finishes boiling, wipe interior of paper-towellined glass tray (Turntable), at a time) P10 (High) 30 sec. Place potato or potatoes around surface. Soak in a small microwave safe bowl. To soften Ice Cream, P3 (MED-LOW) 1 - 11...
Microwave Shortcuts (continued) FOOD POWER TIME (in microwave oven without stirring before heating. Present immediately. Do not heat liquids in mins.) DIRECTIONS To cook baked Potato, (6 - 8 oz. Stir occasionally. After water finishes boiling, wipe interior of paper-towellined glass tray (Turntable), at a time) P10 (High) 30 sec. Place potato or potatoes around surface. Soak in a small microwave safe bowl. To soften Ice Cream, P3 (MED-LOW) 1 - 11...

NNS624 User Guide
Page 24
... and vegetables need to be careful to escape. To test for 10 to an undercooked product. At times, microwave energy will continue to cook by conduction after the microwave oven is necessary to allow steam to remove them away from fat or bone. Test for Doneness The same tests for stand time. Chicken is too close to oven wall or door and...
... and vegetables need to be careful to escape. To test for 10 to an undercooked product. At times, microwave energy will continue to cook by conduction after the microwave oven is necessary to allow steam to remove them away from fat or bone. Test for Doneness The same tests for stand time. Chicken is too close to oven wall or door and...

NNS624 User Guide
Page 25
... position and press Stop/Reset Pad to seep into ventilation openings. This is normal.) Inside surface is inaccessible, leave oven door open while cleaning. AFTER CLEANING: Be sure to : npcparts@panasonic.com You may be used if needed. Outside oven surfaces: Clean with a soft dry cloth. During cooking, especially under this book) Glass Tray Roller Ring Assembly PART NUMBER F00036L40AP F06014T01AP F290D9330AP Accessory Purchases Purchase Parts, Accessories and Instruction Books online for all Panasonic Products by visiting...
... position and press Stop/Reset Pad to seep into ventilation openings. This is normal.) Inside surface is inaccessible, leave oven door open while cleaning. AFTER CLEANING: Be sure to : npcparts@panasonic.com You may be used if needed. Outside oven surfaces: Clean with a soft dry cloth. During cooking, especially under this book) Glass Tray Roller Ring Assembly PART NUMBER F00036L40AP F06014T01AP F290D9330AP Accessory Purchases Purchase Parts, Accessories and Instruction Books online for all Panasonic Products by visiting...
NNS624 User Guide
Page 26
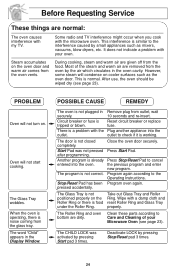
... The oven is working. outlet to cancel entered into the outlet. The program is noise coming from the oven vents. Circuit breaker or fuse is normal. This is Reset circuit breaker or replace tripped or blown. PROBLEM Oven will not start cooking. Before Requesting Service These things are normal: The oven causes interference with your Microwave Oven (see page 23). after programming. The Glass Tray wobbles. The Roller Ring and oven bottom...
... The oven is working. outlet to cancel entered into the outlet. The program is noise coming from the oven vents. Circuit breaker or fuse is normal. This is Reset circuit breaker or replace tripped or blown. PROBLEM Oven will not start cooking. Before Requesting Service These things are normal: The oven causes interference with your Microwave Oven (see page 23). after programming. The Glass Tray wobbles. The Roller Ring and oven bottom...

NNS624 User Guide
Page 27
... problem is extended only to repair or replace will be no charge for parts. This warranty is not handled to your nearest Dealer or servicenter; RANTY. (As examples, this product develops during the warranty period. This warranty gives you specific legal rights and you may also contact us directly at its option either (a) repair your product with new or refurbished parts, or (b) replace...
... problem is extended only to repair or replace will be no charge for parts. This warranty is not handled to your nearest Dealer or servicenter; RANTY. (As examples, this product develops during the warranty period. This warranty gives you specific legal rights and you may also contact us directly at its option either (a) repair your product with new or refurbished parts, or (b) replace...
NNS624 User Guide
Page 29
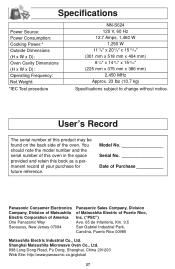
....panasonic.co.jp/global 27 Model No Serial No Date of Purchase ___________ Panasonic Consumer Electronics Company, Division of Matsushita Electric Corporation of America One Panasonic Way Secaucus, New Jersey 07094 Panasonic Sales Company, Division of Matsushita Electric of the oven. User's Record The serial number of this book as a permanent record of your purchase for future reference. Specifications Power Source: Power Consumption: Cooking Power:* Outside Dimensions (H x W x D): Oven Cavity Dimensions (H x W x D): Operating Frequency: Net Weight...
....panasonic.co.jp/global 27 Model No Serial No Date of Purchase ___________ Panasonic Consumer Electronics Company, Division of Matsushita Electric Corporation of America One Panasonic Way Secaucus, New Jersey 07094 Panasonic Sales Company, Division of Matsushita Electric of the oven. User's Record The serial number of this book as a permanent record of your purchase for future reference. Specifications Power Source: Power Consumption: Cooking Power:* Outside Dimensions (H x W x D): Oven Cavity Dimensions (H x W x D): Operating Frequency: Net Weight...


