
NNS335 User Guide
Page 1
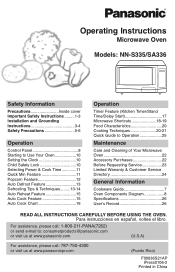
... China Operating Instructions Microwave Oven Models: NN-S335/SA336 Safety Information Precautions Inside cover Important Safety Instructions .........1-3 Installation and Grounding Instructions 3-4 Safety Precautions 5-6 Operation Control Panel 9 Starting to Use Your Oven 10 Setting the Clock 10 Child Safety Lock 10 Selecting Power & Cook Time 11 Quick Min Feature 11 Popcorn Feature 12 Auto Defrost Feature 13 Defrosting Tips & Techniques.........13-14 Auto Reheat Feature 15 Auto Cook Feature 15 Auto Cook Chart 16 Operation Timer Feature (Kitchen Timer/Stand Time/Delay Start 17...
... China Operating Instructions Microwave Oven Models: NN-S335/SA336 Safety Information Precautions Inside cover Important Safety Instructions .........1-3 Installation and Grounding Instructions 3-4 Safety Precautions 5-6 Operation Control Panel 9 Starting to Use Your Oven 10 Setting the Clock 10 Child Safety Lock 10 Selecting Power & Cook Time 11 Quick Min Feature 11 Popcorn Feature 12 Auto Defrost Feature 13 Defrosting Tips & Techniques.........13-14 Auto Reheat Feature 15 Auto Cook Feature 15 Auto Cook Chart 16 Operation Timer Feature (Kitchen Timer/Stand Time/Delay Start 17...

NNS335 User Guide
Page 3
... together on the inside the oven ignites, keep oven door closed glass jars-may result in use the cavity for example, closed , turn oven off, and disconnect the power cord, or shut off power at the fuse or circuit breaker panel. (d) DO NOT use . 1 To reduce the risk of burns, electric shock, fire, injury to persons, or exposure to heat, or cook food. Your microwave oven is not working properly, or if...
... together on the inside the oven ignites, keep oven door closed glass jars-may result in use the cavity for example, closed , turn oven off, and disconnect the power cord, or shut off power at the fuse or circuit breaker panel. (d) DO NOT use . 1 To reduce the risk of burns, electric shock, fire, injury to persons, or exposure to heat, or cook food. Your microwave oven is not working properly, or if...

NNS335 User Guide
Page 4
... be used when removing items from the container to Door, Control Panel Frame, Safety Interlock Switches, or any other materials in the oven. 3. Repairs must be overheated beyond the boiling point without showing evidence (or signs) of oven, microwave leakage may cause a violent eruption. (c) Do not use straight-sided containers with , or make any adjustments or repairs to the Glass Tray. DO NOT use newspaper...
... be used when removing items from the container to Door, Control Panel Frame, Safety Interlock Switches, or any other materials in the oven. 3. Repairs must be overheated beyond the boiling point without showing evidence (or signs) of oven, microwave leakage may cause a violent eruption. (c) Do not use straight-sided containers with , or make any adjustments or repairs to the Glass Tray. DO NOT use newspaper...

NNS335 User Guide
Page 5
... on the Glass Tray touches oven walls causing the tray to cool before cleaning or placing in the door. This oven is not intended for any other glass tray. 4. If they are blocked during operation, the oven may overheat. DO NOT cook directly on the drive hub. The oven must be used for counter top household use . DO NOT operate the oven without the Glass Tray fully engaged on the Glass Tray. IMPORTANT SAFETY INSTRUCTIONS (continued) Glass Tray 1. DO...
... on the Glass Tray touches oven walls causing the tray to cool before cleaning or placing in the door. This oven is not intended for any other glass tray. 4. If they are blocked during operation, the oven may overheat. DO NOT cook directly on the drive hub. The oven must be used for counter top household use . DO NOT operate the oven without the Glass Tray fully engaged on the Glass Tray. IMPORTANT SAFETY INSTRUCTIONS (continued) Glass Tray 1. DO...

NNS335 User Guide
Page 6
... the cord set or extension cord should be at least a 15 AMP, 120 VOLT, 60 Hz GROUNDED OUTLET. In the event of an electrical short circuit, grounding reduces the risk of Your Microwave Oven) 4 Wiring Requirements The oven must be reduced or eliminated by providing an escape wire for any voltage other appliance should be the same as possible. (b) Use a properly installed antenna...
... the cord set or extension cord should be at least a 15 AMP, 120 VOLT, 60 Hz GROUNDED OUTLET. In the event of an electrical short circuit, grounding reduces the risk of Your Microwave Oven) 4 Wiring Requirements The oven must be reduced or eliminated by providing an escape wire for any voltage other appliance should be the same as possible. (b) Use a properly installed antenna...

NNS335 User Guide
Page 8
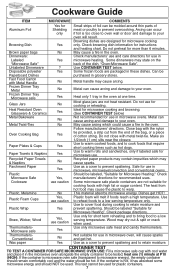
... cool before handling or before eating. Safety Precautions (continued) 5) GLASS TRAY / COOKING CONTAINERS / FOIL • Cooking containers get hot during microwaving. Heat is used , as arcing may appear warm while the interior can be allowed to the touch (ex. Use pot holders when removing containers from the oven or when removing lids or plastic wrap covers from cooking containers, to the container and the Glass Tray. Always follow instructions provided...
... cool before handling or before eating. Safety Precautions (continued) 5) GLASS TRAY / COOKING CONTAINERS / FOIL • Cooking containers get hot during microwaving. Heat is used , as arcing may appear warm while the interior can be allowed to the touch (ex. Use pot holders when removing containers from the oven or when removing lids or plastic wrap covers from cooking containers, to the container and the Glass Tray. Always follow instructions provided...
NNS335 User Guide
Page 9
... FOR SAFE MICROWAVE OVEN USE: Fill a microwave safe cup with the nylon tie provided, a strip cut from hot food may cause sparks. If the container is microwave oven safe (transparent to prevent overcooking. Use as hot dogs. May cause a fire in microwave ovens. Check manufacturers' directions for instructions and heating chart. Some microwave safe plastic containers are packaged in microwave, microwave/convection and conventional ovens. Most glass jars are designed for microwave cooking and...
... FOR SAFE MICROWAVE OVEN USE: Fill a microwave safe cup with the nylon tie provided, a strip cut from hot food may cause sparks. If the container is microwave oven safe (transparent to prevent overcooking. Use as hot dogs. May cause a fire in microwave ovens. Check manufacturers' directions for instructions and heating chart. Some microwave safe plastic containers are packaged in microwave, microwave/convection and conventional ovens. Most glass jars are designed for microwave cooking and...

NNS335 User Guide
Page 11
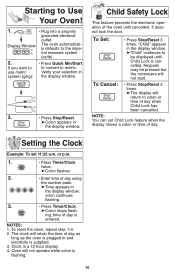
... the instruction. When operating, the oven will beep 5 times. 9 Serving/Weight Pad (☛ page 12, 15) Quick Min/Start Pad One tap allows oven to restart oven. During cooking: One tap temporarily stops the cooking process. If door is opened or Stop/Reset Pad is pressed once during oven operation, Start Pad must be heard. Control Panel Display Window Auto Defrost Pad (☛ page 13) Power Level Pad (☛ page 11) Auto Cook Pad (☛ page 12, 15) Number Pads Timer/Clock...
... the instruction. When operating, the oven will beep 5 times. 9 Serving/Weight Pad (☛ page 12, 15) Quick Min/Start Pad One tap allows oven to restart oven. During cooking: One tap temporarily stops the cooking process. If door is opened or Stop/Reset Pad is pressed once during oven operation, Start Pad must be heard. Control Panel Display Window Auto Defrost Pad (☛ page 13) Power Level Pad (☛ page 11) Auto Cook Pad (☛ page 12, 15) Number Pads Timer/Clock...
NNS335 User Guide
Page 12
... use metric system (g/kg): • Press Quick Min/Start to convert to the impe- To Set: • Press Stop/Reset 3 times. To Cancel: • Press Stop/Reset 3 times. ➤The display will not start. colon continues flashing. 3. • Press Timer/Clock. ➤Colon stops flash- time of day is a 12 hour display. 4. Clock is entered. Verify your selection in the display window. 3. • Press Stop/Reset. ➤Colon appears in and electricity...
... use metric system (g/kg): • Press Quick Min/Start to convert to the impe- To Set: • Press Stop/Reset 3 times. To Cancel: • Press Stop/Reset 3 times. ➤The display will not start. colon continues flashing. 3. • Press Timer/Clock. ➤Colon stops flash- time of day is a 12 hour display. 4. Clock is entered. Verify your selection in the display window. 3. • Press Stop/Reset. ➤Colon appears in and electricity...

NNS335 User Guide
Page 13
... 2 for each stage. Selecting Power & Cook Time Example: To cook at P 6 (MEDIUM) power for cooking. 11 The time in the display window. • Set Cooking Time using number pads. 3. • Press Quick Min/Start. ➤Cooking will sound at the end of cooking before setting cooking time. 3. Quick Min Feature This feature allows you the amount of stages for dense foods. 5. Over cooking will beep twice. 2. Press once twice 3 times 4 times 5 times 6 times 7 times 8 times 9 times 10 times Power Level P10 (HIGH) P9 P8 P7...
... 2 for each stage. Selecting Power & Cook Time Example: To cook at P 6 (MEDIUM) power for cooking. 11 The time in the display window. • Set Cooking Time using number pads. 3. • Press Quick Min/Start. ➤Cooking will sound at the end of cooking before setting cooking time. 3. Quick Min Feature This feature allows you the amount of stages for dense foods. 5. Over cooking will beep twice. 2. Press once twice 3 times 4 times 5 times 6 times 7 times 8 times 9 times 10 times Power Level P10 (HIGH) P9 P8 P7...

NNS335 User Guide
Page 15
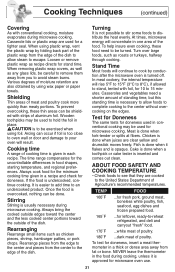
..., and label. Juices from food can get hot and cook the food. 2. Shield edges and ends if needed. (See Cooking Techniques). Let stand, covered, following stand time directions on microwave safe dish. 1. • Press Auto Defrost. 2. • Enter weight of food. If a piece of a pound. Remove wrapper. Place roasts fat-side down. Items which have a longer stand time. 13 If 2 beeps sound, turn over (invert) items during defrosting. 6. Place wax paper...
..., and label. Juices from food can get hot and cook the food. 2. Shield edges and ends if needed. (See Cooking Techniques). Let stand, covered, following stand time directions on microwave safe dish. 1. • Press Auto Defrost. 2. • Enter weight of food. If a piece of a pound. Remove wrapper. Place roasts fat-side down. Items which have a longer stand time. 13 If 2 beeps sound, turn over (invert) items during defrosting. 6. Place wax paper...

NNS335 User Guide
Page 16
.../Shield ends and defrosted surface Turn over /Remove defrosted portion/Shield edges 10 min. NO Remove defrosted pieces Drain liquid/Turn over/ Separate pieces Turn over /Shield 5 min. in refrig. in refrig. 14 Break apart/Turn over/ Remove defrosted Pieces Break apart/Turn over/Shield Turn over/Shield Turn over - - - - Defrosting Tips & Techniques (continued) FOOD DEFROST TIME at P3 mins (per lb) DURING DEFROSTING AFTER DEFROSTING Stand Time Rinse Fish and...
.../Shield ends and defrosted surface Turn over /Remove defrosted portion/Shield edges 10 min. NO Remove defrosted pieces Drain liquid/Turn over/ Separate pieces Turn over /Shield 5 min. in refrig. in refrig. 14 Break apart/Turn over/ Remove defrosted Pieces Break apart/Turn over/Shield Turn over/Shield Turn over - - - - Defrosting Tips & Techniques (continued) FOOD DEFROST TIME at P3 mins (per lb) DURING DEFROSTING AFTER DEFROSTING Stand Time Rinse Fish and...

NNS335 User Guide
Page 18
... cover. Use a microwave safe cup. 2. Overheating will cause an increased risk of paper-towel-lined Glass Tray (Turntable), at least 1 inch (2.5 cm) apart. Fresh 4, 8, 12, 16 oz. Let stand 5 minutes to cook manually. 16 Heated liquids can erupt if not mixed with no cover. Wash Vegetables (110, 225, 340, 450 g) thoroughly, add 1 tbsp. After 2 beeps, stir or rearrange. If additional time is needed...
... cover. Use a microwave safe cup. 2. Overheating will cause an increased risk of paper-towel-lined Glass Tray (Turntable), at least 1 inch (2.5 cm) apart. Fresh 4, 8, 12, 16 oz. Let stand 5 minutes to cook manually. 16 Heated liquids can erupt if not mixed with no cover. Wash Vegetables (110, 225, 340, 450 g) thoroughly, add 1 tbsp. After 2 beeps, stir or rearrange. If additional time is needed...

NNS335 User Guide
Page 19
... instructions. When each stage finishes, a two-beep signal sounds. Stand time and Delay start cannot be used to program a standing time after cooking is opened during Stand Time, Kitchen Timer or Delay Time, the time on the display will continue to count down. 3. To Set Delay Start: Example: To delay the start . At the end of the program, the oven will start of cooking for 5 minutes, and cook at P6 power for directions). 4. A change in starting temperature of food...
... instructions. When each stage finishes, a two-beep signal sounds. Stand time and Delay start cannot be used to program a standing time after cooking is opened during Stand Time, Kitchen Timer or Delay Time, the time on the display will continue to count down. 3. To Set Delay Start: Example: To delay the start . At the end of the program, the oven will start of cooking for 5 minutes, and cook at P6 power for directions). 4. A change in starting temperature of food...

NNS335 User Guide
Page 20
Microwave Shortcuts FOOD POWER TIME (in microwave safe dish. Remove wrapper and place in mins.) DIRECTIONS To separate refrigerated Bacon, 1 pound (450 g) P10 (High) 30 sec. After heating, use a plastic spatula to separate slices. Drain grease. To melt Chocolate, 1 square, 1 oz. (28 g) To melt Chocolate, 1/2 cup (125 ml) chips P6 (MEDIUM) P6 (MEDIUM) 1 - 11/2 1 - 11/2 Remove wrapper and place chocolate in a 8 oz...
Microwave Shortcuts FOOD POWER TIME (in microwave safe dish. Remove wrapper and place in mins.) DIRECTIONS To separate refrigerated Bacon, 1 pound (450 g) P10 (High) 30 sec. After heating, use a plastic spatula to separate slices. Drain grease. To melt Chocolate, 1 square, 1 oz. (28 g) To melt Chocolate, 1/2 cup (125 ml) chips P6 (MEDIUM) P6 (MEDIUM) 1 - 11/2 1 - 11/2 Remove wrapper and place chocolate in a 8 oz...
NNS335 User Guide
Page 23
... leave the thermometer in food shapes, starting temperature, and regional preferences. When removing plastic wrap covers, as well as recipe directs for leftover, ready-to an undercooked product. Always bring the cooked outside edges toward the center and the less cooked center portions toward the outside of meat and poultry cook more quickly than meaty portions. At times, microwave energy will continue to...
... leave the thermometer in food shapes, starting temperature, and regional preferences. When removing plastic wrap covers, as well as recipe directs for leftover, ready-to an undercooked product. Always bring the cooked outside edges toward the center and the less cooked center portions toward the outside of meat and poultry cook more quickly than meaty portions. At times, microwave energy will continue to...

NNS335 User Guide
Page 24
... inside or around the outside of the oven door. cleaner, and dry. IT IS IMPORTANT TO KEEP THE OVEN CLEAN AND DRY. FOOD RESIDUE AND CONDENSATION MAY CAUSE RUSTING OR ARCING AND DAMAGE TO THE OVEN. Inside of the oven: Wipe with a damp cloth. During cooking, especially under this book) Glass Tray Roller Ring Assembly Accessory Purchases PART NUMBER F00036S21AP F06016D01XN F290D6S10XP Purchase Parts, Accessories and Instruction Books online for all Panasonic...
... inside or around the outside of the oven door. cleaner, and dry. IT IS IMPORTANT TO KEEP THE OVEN CLEAN AND DRY. FOOD RESIDUE AND CONDENSATION MAY CAUSE RUSTING OR ARCING AND DAMAGE TO THE OVEN. Inside of the oven: Wipe with a damp cloth. During cooking, especially under this book) Glass Tray Roller Ring Assembly Accessory Purchases PART NUMBER F00036S21AP F06016D01XN F290D6S10XP Purchase Parts, Accessories and Instruction Books online for all Panasonic...
NNS335 User Guide
Page 25
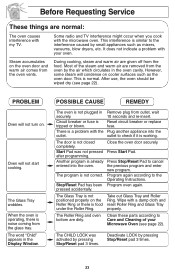
... in the Display Window. Another program is working. It does not indicate a problem with your Microwave Oven (see page 22). Most of your oven. The Glass Tray wobbles. The word "Child" appears in the oven cavity. Care and Cleaning of the steam and warm air are removed from the oven vents. This is a problem with a damp cloth and Roller Ring or there is Reset circuit breaker or replace tripped or...
... in the Display Window. Another program is working. It does not indicate a problem with your Microwave Oven (see page 22). Most of your oven. The Glass Tray wobbles. The word "Child" appears in the oven cavity. Care and Cleaning of the steam and warm air are removed from the oven vents. This is a problem with a damp cloth and Roller Ring or there is Reset circuit breaker or replace tripped or...
NNS335 User Guide
Page 26
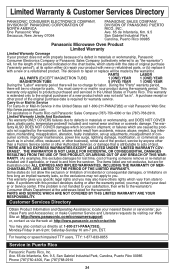
... a new product which result from the servicer. If a problem with a new or a refurbished product. sumer controls, improper maintenance, power line surge, lightning damage, modification, or commercial use of having someone remove or re-install an installed unit if applicable, or travel to products purchased and serviced in materials or workmanship, and DOES NOT COVER glass, plastic parts, temperature probes(if included) and...
... a new product which result from the servicer. If a problem with a new or a refurbished product. sumer controls, improper maintenance, power line surge, lightning damage, modification, or commercial use of having someone remove or re-install an installed unit if applicable, or travel to products purchased and serviced in materials or workmanship, and DOES NOT COVER glass, plastic parts, temperature probes(if included) and...

NNS335 User Guide
Page 27
.... Set cooking time. To Cook using Auto Defrost Pad (☛page 13) Press. Select serving/weight. Set time. ( ) Input up to 4-stage cooking programs. Press once. Thru Set time. ( ) To set Delay Start Thru (☛page 17) Press once. Press. Press. Press. Press. 25 Thru Set weight. QUICK GUIDE TO OPERATION Feature How to Operate To set Power and Time Thru (☛page 11) Press to select Power Level. To Use as a Kitchen Timer (☛page 17) Press once. To Defrost using Auto Cook...
.... Set cooking time. To Cook using Auto Defrost Pad (☛page 13) Press. Select serving/weight. Set time. ( ) Input up to 4-stage cooking programs. Press once. Thru Set time. ( ) To set Delay Start Thru (☛page 17) Press once. Press. Press. Press. Press. 25 Thru Set weight. QUICK GUIDE TO OPERATION Feature How to Operate To set Power and Time Thru (☛page 11) Press to select Power Level. To Use as a Kitchen Timer (☛page 17) Press once. To Defrost using Auto Cook...


