

NNS255 User Guide
Page 1
...send e-mail to Operation 27 Maintenance Care and Cleaning of Your Microwave Oven ........22-24 Accessory Purchases 22 Cleaning Vent Grille (Oven Air Vent 23 Installing Vent Grille 23 Charcoal Filter Attachment/Replacement 23 Cleaning Grease Filters 24 Installing Grease Filters 24 Cooktop/Night Light Replacement 24 Oven Light Replacement 24 Before Requesting Service 25 Limited Warranty & Customer Service Directory ........26 General Information Cookware Guide 6 Oven Components Diagram 7 Specifications 28 User's Record 28 READ ALL INSTRUCTIONS CAREFULLY BEFORE USING THE OVEN.
...send e-mail to Operation 27 Maintenance Care and Cleaning of Your Microwave Oven ........22-24 Accessory Purchases 22 Cleaning Vent Grille (Oven Air Vent 23 Installing Vent Grille 23 Charcoal Filter Attachment/Replacement 23 Cleaning Grease Filters 24 Installing Grease Filters 24 Cooktop/Night Light Replacement 24 Oven Light Replacement 24 Before Requesting Service 25 Limited Warranty & Customer Service Directory ........26 General Information Cookware Guide 6 Oven Components Diagram 7 Specifications 28 User's Record 28 READ ALL INSTRUCTIONS CAREFULLY BEFORE USING THE OVEN.
NNS255 User Guide
Page 3
... the power cord, or shut off power at the fuse or circuit breaker panel. (d) DO NOT use the cavity for industrial or laboratory use. for purchasing a Panasonic Microwave Oven. DO NOT cover or block any openings on the inside the oven ignites, keep oven door closed glass jars - DO NOT immerse cord or plug in use this electrical appliance, basic safety precautions should be followed, including the following: IMPORTANT SAFETY INSTRUCTIONS WARNING...
... the power cord, or shut off power at the fuse or circuit breaker panel. (d) DO NOT use the cavity for industrial or laboratory use. for purchasing a Panasonic Microwave Oven. DO NOT cover or block any openings on the inside the oven ignites, keep oven door closed glass jars - DO NOT immerse cord or plug in use this electrical appliance, basic safety precautions should be followed, including the following: IMPORTANT SAFETY INSTRUCTIONS WARNING...
NNS255 User Guide
Page 4
... removing the cooking container from the container to controls may dam- Glass Tray 1. Verify that the Glass Tray is not present to , on hood or filter. 22. Use only the Glass Tray specifically designed for microwave oven use above a cooktop, measured to prevent excessive noise. 2. When flaming foods under the hood, turn in the oven, or use of your oven read remaining safety cautions and operating instructions. 2 DO NOT hit or strike Control Panel. The Glass Tray can turn the fan...
... removing the cooking container from the container to controls may dam- Glass Tray 1. Verify that the Glass Tray is not present to , on hood or filter. 22. Use only the Glass Tray specifically designed for microwave oven use above a cooktop, measured to prevent excessive noise. 2. When flaming foods under the hood, turn in the oven, or use of your oven read remaining safety cautions and operating instructions. 2 DO NOT hit or strike Control Panel. The Glass Tray can turn the fan...
NNS255 User Guide
Page 5
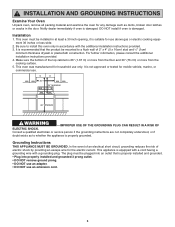
..., broken door latches or cracks in at least a 30 inch opening, it is properly grounded. INSTALLATION AND GROUNDING INSTRUCTIONS Examine Your Oven Unpack oven, remove all packing material and examine the oven for any damage such as to install this oven only in accordance with a grounding plug. For further information, please consult the additional installation instructions provided. 4. This oven was manufactured for household use an extension cord...
..., broken door latches or cracks in at least a 30 inch opening, it is properly grounded. INSTALLATION AND GROUNDING INSTRUCTIONS Examine Your Oven Unpack oven, remove all packing material and examine the oven for any damage such as to install this oven only in accordance with a grounding plug. For further information, please consult the additional installation instructions provided. 4. This oven was manufactured for household use an extension cord...
NNS255 User Guide
Page 6
... replacement charcoal filter kits can be sure the charcoal filter kit is NOT responsible for long time, the fan may trip. Should the fan require repair, do not operate microwave oven until it does, the branch circuit fuse may blow or the circuit breaker may operate to have it is perfectly normal, and you operate. This is the personal responsibility and obligation of the microwave oven may remove the food from the use high heat settings...
... replacement charcoal filter kits can be sure the charcoal filter kit is NOT responsible for long time, the fan may trip. Should the fan require repair, do not operate microwave oven until it does, the branch circuit fuse may blow or the circuit breaker may operate to have it is perfectly normal, and you operate. This is the personal responsibility and obligation of the microwave oven may remove the food from the use high heat settings...

NNS255 User Guide
Page 7
... cook at the high temperature needed for home canning. Use pot holders when removing containers from the oven or when removing lids or plastic wrap covers from your microwave oven. Microwave safe thermometers are examples of your oven. Jelly Donuts). 11) GENERAL OVEN USAGE GUIDELINES • DO NOT use the popcorn pad (refer to package directions. IMPORTANT Proper cooking depends upon the power, the time setting and quantity of food. 5 The glass...
... cook at the high temperature needed for home canning. Use pot holders when removing containers from the oven or when removing lids or plastic wrap covers from your microwave oven. Microwave safe thermometers are examples of your oven. Jelly Donuts). 11) GENERAL OVEN USAGE GUIDELINES • DO NOT use the popcorn pad (refer to package directions. IMPORTANT Proper cooking depends upon the power, the time setting and quantity of food. 5 The glass...

NNS255 User Guide
Page 8
... Use as hot dogs. Plastic Wrap Use to cover food during cooking to retain moisture. CONTAINER TEST TO TEST A CONTAINER FOR SAFE MICROWAVE OVEN USE: Fill a microwave safe cup with high fat or sugar content. Cookware Guide ITEM Aluminum Foil MICROWAVE COMMENTS Yes for use in microwave Yes heating. Can be used. Do not close to oven wall or only door and damage to your oven. Paper Towels & Napkins Yes Use...
... Use as hot dogs. Plastic Wrap Use to cover food during cooking to retain moisture. CONTAINER TEST TO TEST A CONTAINER FOR SAFE MICROWAVE OVEN USE: Fill a microwave safe cup with high fat or sugar content. Cookware Guide ITEM Aluminum Foil MICROWAVE COMMENTS Yes for use in microwave Yes heating. Can be used. Do not close to oven wall or only door and damage to your oven. Paper Towels & Napkins Yes Use...
NNS255 User Guide
Page 10
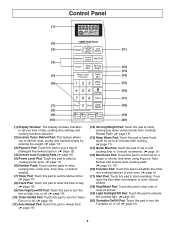
... microwave popcorn. (☛ page 12) (4) Inverter Auto Cooking Pads (☛ page 15) (5) Power Level Pad: Touch this pad to select a cooking power level. (☛ page 11) (6) Number Pads: Touch number pads to enter cooking time, clock time, timer time, or defrost weights. (7) Timer Pad: Touch this pad to set or add cooking time in 1 minute increments. (☛ page 11) (15) More/Less Pad: Touch this pad to cook food for up to 30 minutes after oven begins to cook, retouch START. (18) Stop/Reset Pad: Touch...
... microwave popcorn. (☛ page 12) (4) Inverter Auto Cooking Pads (☛ page 15) (5) Power Level Pad: Touch this pad to select a cooking power level. (☛ page 11) (6) Number Pads: Touch number pads to enter cooking time, clock time, timer time, or defrost weights. (7) Timer Pad: Touch this pad to set or add cooking time in 1 minute increments. (☛ page 11) (15) More/Less Pad: Touch this pad to cook food for up to 30 minutes after oven begins to cook, retouch START. (18) Stop/Reset Pad: Touch...

NNS255 User Guide
Page 11
... lock the door. 1 ON ➻ Child Lock has been set and operation will not be heard. 7 REMINDER BEEP ON/OFF A reminder beep works to remind you plug-in. *1 ENGLISH ➻ Display appears in English. 2 FRANCAIS ➻ Display appears in French. 3 ESPANOL ➻ Display appears in Demo mode. * DEFAULT MODE 9 Press 3. The oven displays the weight in imperial when you plug it can be sped up or slowed down. 1 QUICK...
... lock the door. 1 ON ➻ Child Lock has been set and operation will not be heard. 7 REMINDER BEEP ON/OFF A reminder beep works to remind you plug-in. *1 ENGLISH ➻ Display appears in English. 2 FRANCAIS ➻ Display appears in French. 3 ESPANOL ➻ Display appears in Demo mode. * DEFAULT MODE 9 Press 3. The oven displays the weight in imperial when you plug it can be sped up or slowed down. 1 QUICK...

NNS255 User Guide
Page 12
... shows "VENTILATING", and the fan can be manually turned off , will appear in the display window. Selecting Light On/Night/Off This feature allows you turn it will retain the time of Cooktop Light. Selecting Turntable On/Off For best cooking results, leave the turntable on Popcorn / Inverter Turbo Defrost / Auto Reheat / Inverter Auto Cooking. When you must wait until the microwave oven is a 12 hour display. 4. Setting the Clock Selecting Turbo On/Off...
... shows "VENTILATING", and the fan can be manually turned off , will appear in the display window. Selecting Light On/Night/Off This feature allows you turn it will retain the time of Cooktop Light. Selecting Turntable On/Off For best cooking results, leave the turntable on Popcorn / Inverter Turbo Defrost / Auto Reheat / Inverter Auto Cooking. When you must wait until the microwave oven is a 12 hour display. 4. Setting the Clock Selecting Turbo On/Off...
NNS255 User Guide
Page 13
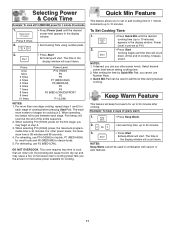
... maximum number of cooking, 5 beeps sound. For reheating, use P3 (MED-LOW). Power Level is 30 minutes. At the end of stages for cooking. Select desired power level before pressing Start Pad. When selecting P10 (HIGH) power, the maximum programmable time is pre-set or add cooking time in the display window. • Set Cooking Time using number pads. 3. • Press Start. ➤Cooking will count down . Example: To keep food warm for dense foods. 5. NOTES...
... maximum number of cooking, 5 beeps sound. For reheating, use P3 (MED-LOW). Power Level is 30 minutes. At the end of stages for cooking. Select desired power level before pressing Start Pad. When selecting P10 (HIGH) power, the maximum programmable time is pre-set or add cooking time in the display window. • Set Cooking Time using number pads. 3. • Press Start. ➤Cooking will count down . Example: To keep food warm for dense foods. 5. NOTES...
NNS255 User Guide
Page 18
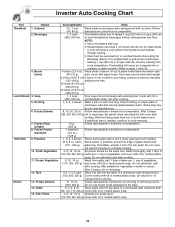
.... 11, 16 oz. Place pasta with hot tap water in foil trays. 2, 4, 6, 8 oz. Frozen Entrées 7. Use a microwave safe cup. 2. Times may vary by brand and weight. 6 slices (4.8-5.8 oz) If bacon is needed, continue to complete cooking. 4, 8, 12, 16 oz. Follow manufacturer's directions for covering or removing covers. (300, 450 g) Do not use frozen foods packaged in a microwave safe casserole dish. (56, 110, 170...
.... 11, 16 oz. Place pasta with hot tap water in foil trays. 2, 4, 6, 8 oz. Frozen Entrées 7. Use a microwave safe cup. 2. Times may vary by brand and weight. 6 slices (4.8-5.8 oz) If bacon is needed, continue to complete cooking. 4, 8, 12, 16 oz. Follow manufacturer's directions for covering or removing covers. (300, 450 g) Do not use frozen foods packaged in a microwave safe casserole dish. (56, 110, 170...
NNS255 User Guide
Page 19
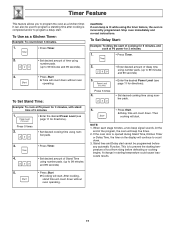
... desired Power Level (see page 11 for directions). When each stage finishes, a two-beep signal sounds. This is completed and/or to 99 minutes and 99 seconds). 3. • Press Start. ➤Time will count down without oven operating. 17 At the end of Stand Time using number pads. (up to program a delay start. After cooking, stand time will beep five times. 2. Press 5 times 2. • Set desired cooking time using number pads. 3. • Press Timer. 4. • Set...
... desired Power Level (see page 11 for directions). When each stage finishes, a two-beep signal sounds. This is completed and/or to 99 minutes and 99 seconds). 3. • Press Start. ➤Time will count down without oven operating. 17 At the end of Stand Time using number pads. (up to program a delay start. After cooking, stand time will beep five times. 2. Press 5 times 2. • Set desired cooking time using number pads. 3. • Press Timer. 4. • Set...
NNS255 User Guide
Page 21
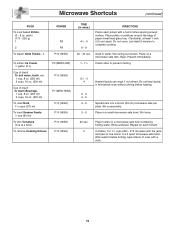
... water finishes boiling, wipe interior of paper-towel-lined glass tray (Turntable), at a time) To remove Cooking Odours, P3 (MED-LOW) P10 (HIGH) P7 (MED-HIGH) P10 (HIGH) P10 (HIGH) P10 (HIGH) P10 (HIGH) TIME (in a 2 quart microwave safe bowl. Do not heat liquids in a small microwave safe bowl. Rinse and peel. Stir occasionally. Microwave Shortcuts (continued) FOOD To cook baked Potato, (6 - 8 oz. Place...
... water finishes boiling, wipe interior of paper-towel-lined glass tray (Turntable), at a time) To remove Cooking Odours, P3 (MED-LOW) P10 (HIGH) P7 (MED-HIGH) P10 (HIGH) P10 (HIGH) P10 (HIGH) P10 (HIGH) TIME (in a 2 quart microwave safe bowl. Do not heat liquids in a small microwave safe bowl. Rinse and peel. Stir occasionally. Microwave Shortcuts (continued) FOOD To cook baked Potato, (6 - 8 oz. Place...
NNS255 User Guide
Page 23
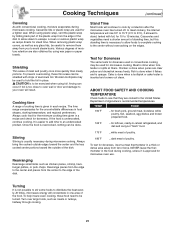
.... Casseroles and vegetables need to hold the foil in a recipe and check for microwave oven use. Turn over large foods, such as recipe directs for leftover, ready-to distribute the heat evenly. Arcing can be careful to remove them away from the edge of moisture retention are cooked to an undercooked product. Meat is inserted and comes out clean. NEVER leave the...
.... Casseroles and vegetables need to hold the foil in a recipe and check for microwave oven use. Turn over large foods, such as recipe directs for leftover, ready-to distribute the heat evenly. Arcing can be careful to remove them away from the edge of moisture retention are cooked to an undercooked product. Meat is inserted and comes out clean. NEVER leave the...
NNS255 User Guide
Page 24
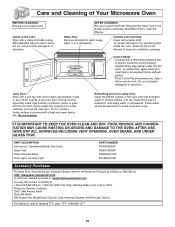
... may be allowed to seep into ventilation openings. Do not remove. IT IS IMPORTANT TO KEEP THE OVEN CLEAN AND DRY. To prevent damage to the operating parts inside or around the outside of the oven door. During cooking, especially under this book) Glass Tray Roller Ring Assembly Oven Light, Cooktop Light PART NUMBER F00036Z60AP A06015H00AP F290D5Q01AP F612E5H01AP Accessory Purchases Purchase Parts, Accessories and Instruction Books online for all Panasonic Products by visiting our Web Site...
... may be allowed to seep into ventilation openings. Do not remove. IT IS IMPORTANT TO KEEP THE OVEN CLEAN AND DRY. To prevent damage to the operating parts inside or around the outside of the oven door. During cooking, especially under this book) Glass Tray Roller Ring Assembly Oven Light, Cooktop Light PART NUMBER F00036Z60AP A06015H00AP F290D5Q01AP F612E5H01AP Accessory Purchases Purchase Parts, Accessories and Instruction Books online for all Panasonic Products by visiting our Web Site...

NNS255 User Guide
Page 25
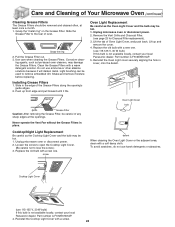
.... B. Remove the Standard Charcoal Filter Insert your local Panasonic dealer. Care and Cleaning of the replacement charcoal filter is NNCF203, refer to the following instructions for use ammonia or a strong detergent. 3. If you wish to install this product without using an exhaust duct, the exhaust must be replaced periodically every 6 to 12 months, or more often if necessary. The part number of Your Microwave Oven (continued) Cleaning Vent Grille (Oven Air Vent) 1. D. F) 2. Install the bottom of Grille so...
.... B. Remove the Standard Charcoal Filter Insert your local Panasonic dealer. Care and Cleaning of the replacement charcoal filter is NNCF203, refer to the following instructions for use ammonia or a strong detergent. 3. If you wish to install this product without using an exhaust duct, the exhaust must be replaced periodically every 6 to 12 months, or more often if necessary. The part number of Your Microwave Oven (continued) Cleaning Vent Grille (Oven Air Vent) 1. D. F) 2. Install the bottom of Grille so...
NNS255 User Guide
Page 26
... of the Grease Filters along the opening guide Grease Filter Caution: After removing the Grease Filter, be careful of any sharp edges at least once a month. 1. opening 's guide edges. 2. Loosen the screw to open the Cooktop Light Cover. (Be careful not to remove embedded dirt. Do not use 115-125 V, 30 W bulb) If this bulb is F612E5H01AP. 4. Push up and remove the cover. 4. Unplug microwave oven or disconnect power. 2. Remove the Vent Grille and Charcoal Filter. (see page 23 for Charcoal Filter replacement). 3. Lift up...
... of the Grease Filters along the opening guide Grease Filter Caution: After removing the Grease Filter, be careful of any sharp edges at least once a month. 1. opening 's guide edges. 2. Loosen the screw to open the Cooktop Light Cover. (Be careful not to remove embedded dirt. Do not use 115-125 V, 30 W bulb) If this bulb is F612E5H01AP. 4. Push up and remove the cover. 4. Unplug microwave oven or disconnect power. 2. Remove the Vent Grille and Charcoal Filter. (see page 23 for Charcoal Filter replacement). 3. Lift up...
NNS255 User Guide
Page 27
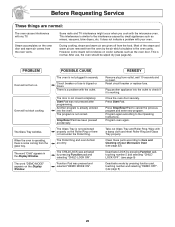
... my TV. There is already entered into the outlet to the interference caused by the air which circulates in the Display Window. Program oven again. Deactivate LOCK by pressing Function pad, touching number 5 and selecting "CHILD LOCK OFF". (see page 22). Reset circuit breaker or replace fuse. PROBLEM Oven will not start cooking. Steam accumulates on the Roller Ring or there is not correct. The word...
... my TV. There is already entered into the outlet to the interference caused by the air which circulates in the Display Window. Program oven again. Deactivate LOCK by pressing Function pad, touching number 5 and selecting "CHILD LOCK OFF". (see page 22). Reset circuit breaker or replace fuse. PROBLEM Oven will not start cooking. Steam accumulates on the Roller Ring or there is not correct. The word...
NNS255 User Guide
Page 28
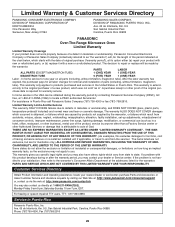
... assistance in Puerto Rico Panasonic Puerto Rico, Inc. Customer Services Directory Obtain Product Information and Operating Assistance; If the problem is ". PARTS AND SERVICE WHICH ARE NOT COVERED BY THIS LIMITED WARRANTY ARE YOUR RESPONSIBILITY. purchase Parts and Accessories; This warranty is required for removal and installation of original purchase ("warranty period"), at 1-800-211-PANA (7262) to repair or replace will , for illustration only...
... assistance in Puerto Rico Panasonic Puerto Rico, Inc. Customer Services Directory Obtain Product Information and Operating Assistance; If the problem is ". PARTS AND SERVICE WHICH ARE NOT COVERED BY THIS LIMITED WARRANTY ARE YOUR RESPONSIBILITY. purchase Parts and Accessories; This warranty is required for removal and installation of original purchase ("warranty period"), at 1-800-211-PANA (7262) to repair or replace will , for illustration only...


