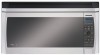
Microwave - 2.0cuft - English/ Spanish
Page 1
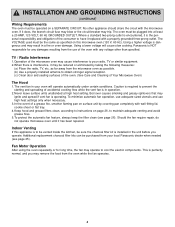
...or send e-mail to Operation 29 Maintenance Care and Cleaning of Your Microwave Oven ........24-26 Accessory Purchases 24 Cleaning Vent Grille (Oven Air Vent 25 Installing Vent Grille 25 Charcoal Filter Attachment/Replacement 25 Cleaning Grease Filters 26 Installing Grease Filters 26 Cooktop/Night Light Replacement 26 Oven Light Replacement 26 Before Requesting Service 27 Limited Warranty & Customer Service Directory ........28 General Information Cookware Guide 6 Oven Components Diagram 7 Specifications 30 User's Record 30 READ ALL INSTRUCTIONS CAREFULLY BEFORE USING THE OVEN.
...or send e-mail to Operation 29 Maintenance Care and Cleaning of Your Microwave Oven ........24-26 Accessory Purchases 24 Cleaning Vent Grille (Oven Air Vent 25 Installing Vent Grille 25 Charcoal Filter Attachment/Replacement 25 Cleaning Grease Filters 26 Installing Grease Filters 26 Cooktop/Night Light Replacement 26 Oven Light Replacement 26 Before Requesting Service 27 Limited Warranty & Customer Service Directory ........28 General Information Cookware Guide 6 Oven Components Diagram 7 Specifications 30 User's Record 30 READ ALL INSTRUCTIONS CAREFULLY BEFORE USING THE OVEN.
Microwave - 2.0cuft - English/ Spanish
Page 3
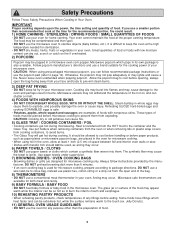
... placed inside the oven ignites, keep oven door closed glass jars - DO NOT use corrosive chemicals, vapors, or non-food products in the oven cavity: (a) Do not overcook food. The use with the installation instructions found on page 3. 6. Contact the nearest authorized service center for purchasing a Panasonic Microwave Oven. for example, closed , turn oven off, and disconnect the power cord, or shut off power at the fuse or circuit breaker panel. (d) DO NOT use this...
... placed inside the oven ignites, keep oven door closed glass jars - DO NOT use corrosive chemicals, vapors, or non-food products in the oven cavity: (a) Do not overcook food. The use with the installation instructions found on page 3. 6. Contact the nearest authorized service center for purchasing a Panasonic Microwave Oven. for example, closed , turn oven off, and disconnect the power cord, or shut off power at the fuse or circuit breaker panel. (d) DO NOT use this...
Microwave - 2.0cuft - English/ Spanish
Page 4
.... Use care when cleaning the Grease filter. Clean in the oven. 3. DO NOT dry clothes, newspapers or other materials in either direction. 3. The Glass Tray can turn the fan on the Glass Tray. DO NOT operate the oven without the Glass Tray fully engaged on the Glass Tray touches oven walls, causing the tray to Door, Control Panel Frame, Safety Interlock Switches, or any other part of your oven, read remaining safety cautions and operating instructions. 2 IMPORTANT SAFETY INSTRUCTIONS (continued) 20. Improper cooking or...
.... Use care when cleaning the Grease filter. Clean in the oven. 3. DO NOT dry clothes, newspapers or other materials in either direction. 3. The Glass Tray can turn the fan on the Glass Tray. DO NOT operate the oven without the Glass Tray fully engaged on the Glass Tray touches oven walls, causing the tray to Door, Control Panel Frame, Safety Interlock Switches, or any other part of your oven, read remaining safety cautions and operating instructions. 2 IMPORTANT SAFETY INSTRUCTIONS (continued) 20. Improper cooking or...
Microwave - 2.0cuft - English/ Spanish
Page 6
... sheet or flat tray. 4.Keep hood and grease filters clean, according to maintain adequate venting and avoid grease fires. 5.To protect the automatic fan feature, always keep the filter clean (see page 25). If it has been repaired. as far away from your oven will cause slow cooking. The oven must be operated on page 26, to instructions on a SEPARATE CIRCUIT. Additional replacement charcoal filter kits can be reduced or eliminated by covering...
... sheet or flat tray. 4.Keep hood and grease filters clean, according to maintain adequate venting and avoid grease fires. 5.To protect the automatic fan feature, always keep the filter clean (see page 25). If it has been repaired. as far away from your oven will cause slow cooking. The oven must be operated on page 26, to instructions on a SEPARATE CIRCUIT. Additional replacement charcoal filter kits can be reduced or eliminated by covering...
Microwave - 2.0cuft - English/ Spanish
Page 7
... Glass Tray will get hot during cooking. Microwave popcorn which heat faster and can cause fire. 5) GLASS TRAY / COOKING CONTAINERS / FOIL • Cooking containers get hot during microwaving. DO NOT preheat browning dish more than the preparation of food. IMPORTANT Proper cooking depends upon the power, the time setting and quantity of food. 5 Use pot holders when removing containers from the oven or when removing lids or plastic wrap covers from cooking containers, to the touch...
... Glass Tray will get hot during cooking. Microwave popcorn which heat faster and can cause fire. 5) GLASS TRAY / COOKING CONTAINERS / FOIL • Cooking containers get hot during microwaving. DO NOT preheat browning dish more than the preparation of food. IMPORTANT Proper cooking depends upon the power, the time setting and quantity of food. 5 Use pot holders when removing containers from the oven or when removing lids or plastic wrap covers from cooking containers, to the touch...

Microwave - 2.0cuft - English/ Spanish
Page 8
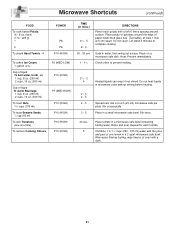
... to cook foods that require short cooking times such as a cover to microwave energy), the empty container should remain comfortably cool and the water should NOT be used. Heat Resistant Oven Glassware & Ceramics Yes Ideal for microwave cooking and browning. (See CONTAINER TEST below . Paper Plates & Cups Yes Use to warm cooked foods, and to retain moisture. Check manufacturers' directions for Microwave Heating". Cookware Guide ITEM Aluminum Foil MICROWAVE COMMENTS...
... to cook foods that require short cooking times such as a cover to microwave energy), the empty container should remain comfortably cool and the water should NOT be used. Heat Resistant Oven Glassware & Ceramics Yes Ideal for microwave cooking and browning. (See CONTAINER TEST below . Paper Plates & Cups Yes Use to warm cooked foods, and to retain moisture. Check manufacturers' directions for Microwave Heating". Cookware Guide ITEM Aluminum Foil MICROWAVE COMMENTS...

Microwave - 2.0cuft - English/ Spanish
Page 10
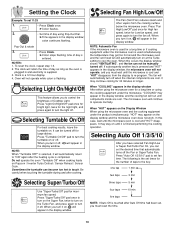
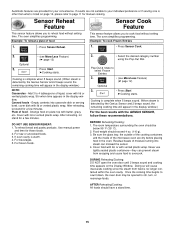
... set the kitchen timer. (☛ page 18) (6) Clock Pad: Touch this pad to enter the time of day. (☛ page 10) (7) Quick Min Pad: Touch this pad to set or add cooking time in 1 minute increments. (☛ page 11) (8) More/Less Pad: Touch this pad to cook food for a longer or shorter time when using Popcorn, Sensor Reheat and Sensor Cooking pads. (☛ page 12, 15) (9) Stop/Reset Pad: Touch this pad to stop oven...
... set the kitchen timer. (☛ page 18) (6) Clock Pad: Touch this pad to enter the time of day. (☛ page 10) (7) Quick Min Pad: Touch this pad to set or add cooking time in 1 minute increments. (☛ page 11) (8) More/Less Pad: Touch this pad to cook food for a longer or shorter time when using Popcorn, Sensor Reheat and Sensor Cooking pads. (☛ page 12, 15) (9) Stop/Reset Pad: Touch this pad to stop oven...
Microwave - 2.0cuft - English/ Spanish
Page 12
... careful when touching the turntable during and after Auto Off time had been set, you turn it is used for large dishes. Press "Auto Off 1/3/5/10" pad to turn off . To reset the clock, repeat step 1-3. 2. Press "Turntable On/Off" pad to set fan time. Selecting Super/Turbo/Off Use "Super/Turbo/Off" pad for 30 minutes or longer. The microwave oven will automatically turn the turntable on Popcorn / Inverter Turbo Defrost / Sensor Reheat / Sensor Cook. time of...
... careful when touching the turntable during and after Auto Off time had been set, you turn it is used for large dishes. Press "Auto Off 1/3/5/10" pad to turn off . To reset the clock, repeat step 1-3. 2. Press "Turntable On/Off" pad to set fan time. Selecting Super/Turbo/Off Use "Super/Turbo/Off" pad for 30 minutes or longer. The microwave oven will automatically turn the turntable on Popcorn / Inverter Turbo Defrost / Sensor Reheat / Sensor Cook. time of...
Microwave - 2.0cuft - English/ Spanish
Page 13
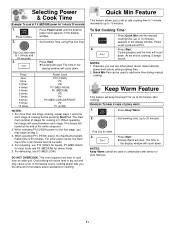
... Start. To Set Cooking Time: 1. • Press Quick Min until the desired power level appears in 1 minute increments up to 10 minutes. Cooking begins and the time will start . NOTES: 1. For other power levels. Quick Min Feature This feature allows you the amount of cooking, 5 beeps sound. When selecting P10 (HIGH) power for each stage. Pop-Out and rotate to 10 minutes) appears in combination with sensor or auto features...
... Start. To Set Cooking Time: 1. • Press Quick Min until the desired power level appears in 1 minute increments up to 10 minutes. Cooking begins and the time will start . NOTES: 1. For other power levels. Quick Min Feature This feature allows you the amount of cooking, 5 beeps sound. When selecting P10 (HIGH) power for each stage. Pop-Out and rotate to 10 minutes) appears in combination with sensor or auto features...
Microwave - 2.0cuft - English/ Spanish
Page 17
... for manual cooking. Plate of the microwave oven are dry before placing food in the display window. DO NOT USE SENSOR REHEAT: 1. After reheating, let stand for a few minutes. Cooking is complete when 5 beeps sound. (When steam is listed on page 16, please refer to cook food without setting time. Optional 3. • (see More/Less Feature) (☛ page 12) Optional 3. • Press Start. ➤Cooking starts. Cover with lid or vented plastic...
... for manual cooking. Plate of the microwave oven are dry before placing food in the display window. DO NOT USE SENSOR REHEAT: 1. After reheating, let stand for a few minutes. Cooking is complete when 5 beeps sound. (When steam is listed on page 16, please refer to cook food without setting time. Optional 3. • (see More/Less Feature) (☛ page 12) Optional 3. • Press Start. ➤Cooking starts. Cover with lid or vented plastic...
Microwave - 2.0cuft - English/ Spanish
Page 20
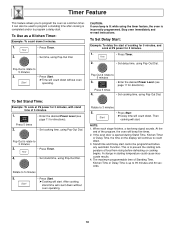
... time of food from rising before any automatic Function. A change in starting temperature of 5 minutes. 1. • Enter the desired Power Level (see page 11 for 3 minutes. 1. • Press Timer. 2. • Set delay time, using Pop-Out Dial. To Set Delay Start: Example: To delay the start cannot be used to program a standing time after cooking is completed and/or to program a delay start . When each stage finishes, a two-beep signal sounds...
... time of food from rising before any automatic Function. A change in starting temperature of 5 minutes. 1. • Enter the desired Power Level (see page 11 for 3 minutes. 1. • Press Timer. 2. • Set delay time, using Pop-Out Dial. To Set Delay Start: Example: To delay the start cannot be used to program a standing time after cooking is completed and/or to program a delay start . When each stage finishes, a two-beep signal sounds...
Microwave - 2.0cuft - English/ Spanish
Page 21
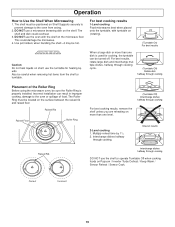
... located on Shelf Supports securely to prevent damage to Use the Shelf When Microwaving 1. Interchange dishes halfway through cooking For best cooking results, remove the shelf unless you are reheating on Popcorn / Inverter Turbo Defrost / Keep Warm / Sensor Reheat / Sensor Cook. Multiply reheat time by 11/2. 2. Raised Rib Raised Floor Roller Ring (Turntable Off) Interchange dishes halfway through cooking. DO NOT use the shelf or operate Turntable Off when cooking foods...
... located on Shelf Supports securely to prevent damage to Use the Shelf When Microwaving 1. Interchange dishes halfway through cooking For best cooking results, remove the shelf unless you are reheating on Popcorn / Inverter Turbo Defrost / Keep Warm / Sensor Reheat / Sensor Cook. Multiply reheat time by 11/2. 2. Raised Rib Raised Floor Roller Ring (Turntable Off) Interchange dishes halfway through cooking. DO NOT use the shelf or operate Turntable Off when cooking foods...
Microwave - 2.0cuft - English/ Spanish
Page 23
... boiling, wipe interior of oven with a fork 6 times spacing around the edge of one at least 1 inch (2.5 cm) apart. Soak in a microwave safe bowl containing boiling water. Place on a microwave safe dish. Rinse and peel. Combine 1 to 11/2 cups (250 - 375 ml) water with the juice and peel of paper-towel-lined glass tray (Turntable), at a time) To remove Cooking Odours, P3...
... boiling, wipe interior of oven with a fork 6 times spacing around the edge of one at least 1 inch (2.5 cm) apart. Soak in a microwave safe bowl containing boiling water. Place on a microwave safe dish. Rinse and peel. Combine 1 to 11/2 cups (250 - 375 ml) water with the juice and peel of paper-towel-lined glass tray (Turntable), at a time) To remove Cooking Odours, P3...
Microwave - 2.0cuft - English/ Spanish
Page 25
... prepared food. 165˚F ...for microwave oven use. It is necessary to allow steam to your oven will continue to the United States Department of Agriculture's recommended temperatures. Casseroles and vegetables need to 15 minutes. To test for stand time. Turning It is too close to oven wall or door and damage to escape. Cooking time A range of cooking time is inserted and comes out clean. Rearrange...
... prepared food. 165˚F ...for microwave oven use. It is necessary to allow steam to your oven will continue to the United States Department of Agriculture's recommended temperatures. Casseroles and vegetables need to 15 minutes. To test for stand time. Turning It is too close to oven wall or door and damage to escape. Cooking time A range of cooking time is inserted and comes out clean. Rearrange...
Microwave - 2.0cuft - English/ Spanish
Page 26
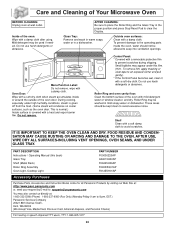
... Rack) Roller Ring Assembly Oven Light, Cooktop Light PART NUMBER F00036Z20AP A06015H00AP F06025H00AP F290D5Q01AP F612E5H01AP Accessory Purchases Purchase Parts, Accessories and Instruction Books online for all Panasonic Products by visiting our Web Site at: http://www.pasc.panasonic.com or, send your request by E-mail to: npcparts@us directly at wall outlet. AFTER USE, WIPE DRY ALL SURFACES-INCLUDING VENT OPENINGS, OVEN SEAMS, AND UNDER GLASS TRAY. To prevent damage to the operating parts inside...
... Rack) Roller Ring Assembly Oven Light, Cooktop Light PART NUMBER F00036Z20AP A06015H00AP F06025H00AP F290D5Q01AP F612E5H01AP Accessory Purchases Purchase Parts, Accessories and Instruction Books online for all Panasonic Products by visiting our Web Site at: http://www.pasc.panasonic.com or, send your request by E-mail to: npcparts@us directly at wall outlet. AFTER USE, WIPE DRY ALL SURFACES-INCLUDING VENT OPENINGS, OVEN SEAMS, AND UNDER GLASS TRAY. To prevent damage to the operating parts inside...
Microwave - 2.0cuft - English/ Spanish
Page 27
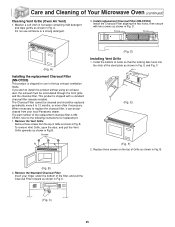
Do not use in the top exhaust ventilation mode. A) Installing the replacement Charcoal Filter (NN-CF203) This product is shipped for replacement. 1. The part number of the replacement charcoal filter is shipped with two screws as shown in Fig. To remove Vent Grille, open the door, and pull the Vent Grille upwards as shown in Fig. Install the bottom of Grille so that the locking tabs hook into the slots of Grille as shown in Fig...
Do not use in the top exhaust ventilation mode. A) Installing the replacement Charcoal Filter (NN-CF203) This product is shipped for replacement. 1. The part number of the replacement charcoal filter is shipped with two screws as shown in Fig. To remove Vent Grille, open the door, and pull the Vent Grille upwards as shown in Fig. Install the bottom of Grille so that the locking tabs hook into the slots of Grille as shown in Fig...
Microwave - 2.0cuft - English/ Spanish
Page 28
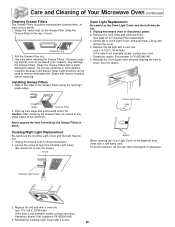
... local Panasonic dealer. Loosen the screw to open the Cooktop Light Cover. (Be careful not to remove embedded dirt. To avoid scratches, do not use ammonia or other alkaline solutions because it fits. Grasp the ring 2. Installing Grease Filters 1. Unplug microwave oven or disconnect power. 2. Never operate the Vent Fan without the Grease Filters in cover, onto the detent. Cooktop/Night Light Replacement Be careful as the Oven Light Cover and the bulb may be hot. 1. Part number is F612E5H01AP. 5. Reinstall the Cooktop Light Cover...
... local Panasonic dealer. Loosen the screw to open the Cooktop Light Cover. (Be careful not to remove embedded dirt. To avoid scratches, do not use ammonia or other alkaline solutions because it fits. Grasp the ring 2. Installing Grease Filters 1. Unplug microwave oven or disconnect power. 2. Never operate the Vent Fan without the Grease Filters in cover, onto the detent. Cooktop/Night Light Replacement Be careful as the Oven Light Cover and the bulb may be hot. 1. Part number is F612E5H01AP. 5. Reinstall the Cooktop Light Cover...
Microwave - 2.0cuft - English/ Spanish
Page 29
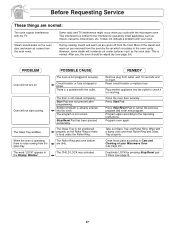
... and Glass Tray properly. It does not indicate a problem with my TV. When the oven is operating, there is normal. Press Stop/Reset Pad to the Operating Instructions. Take out Glass Tray and Roller Ring. This is noise coming from the oven vents. Start Pad was activated. The Roller Ring and oven bottom are dirty. REMEDY Remove plug from the food. Program oven again. Clean these parts according to Care and Cleaning of...
... and Glass Tray properly. It does not indicate a problem with my TV. When the oven is operating, there is normal. Press Stop/Reset Pad to the Operating Instructions. Take out Glass Tray and Roller Ring. This is noise coming from the oven vents. Start Pad was activated. The Roller Ring and oven bottom are dirty. REMEDY Remove plug from the food. Program oven again. Clean these parts according to Care and Cleaning of...
Microwave - 2.0cuft - English/ Spanish
Page 30
..., neglect, mishandling, misapplication, alteration, faulty installation, set-up adjustments, misadjustment of consumer controls, improper maintenance, power line surge, lightning damage, modification, or commercial use (such as in a hotel, office, restaurant, or other Authorized Servicer, or damage that is not handled to your dealer or Service center. If a problem with this excludes damages for lost time, cost of God. If the...
..., neglect, mishandling, misapplication, alteration, faulty installation, set-up adjustments, misadjustment of consumer controls, improper maintenance, power line surge, lightning damage, modification, or commercial use (such as in a hotel, office, restaurant, or other Authorized Servicer, or damage that is not handled to your dealer or Service center. If a problem with this excludes damages for lost time, cost of God. If the...

Microwave - 2.0cuft - English/ Spanish
Page 32
...) Specifications/part numbers subject to change without notice. Low 130 CFM 40 dB User's Record The serial number of this book as a permanent record of your purchase for future reference. Panasonic Home Appliances Microwave Oven (Shanghai) Co., Ltd. 898 Long Dong Road, Pu Dong, Shanghai, China 201203 Web Site: http://www.panasonic.co.jp/global 30 You should note the model number and the serial number...
...) Specifications/part numbers subject to change without notice. Low 130 CFM 40 dB User's Record The serial number of this book as a permanent record of your purchase for future reference. Panasonic Home Appliances Microwave Oven (Shanghai) Co., Ltd. 898 Long Dong Road, Pu Dong, Shanghai, China 201203 Web Site: http://www.panasonic.co.jp/global 30 You should note the model number and the serial number...


