
Operating Manual
Page 1
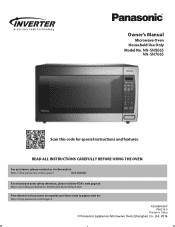
Owner's Manual Microwave Oven Household Use Only Model No. READ ALL INSTRUCTIONS CAREFULLY BEFORE USING THE OVEN. For assistance, please contact us via the web at: http://shop.panasonic.com/support (U.S.A Only) For microwave oven safety reference, please visit the FDA's web page at: http://www.fda.gov/Radiation-EmittingProducts/default.htm Para obtener instrucciones en español, por ...
Owner's Manual Microwave Oven Household Use Only Model No. READ ALL INSTRUCTIONS CAREFULLY BEFORE USING THE OVEN. For assistance, please contact us via the web at: http://shop.panasonic.com/support (U.S.A Only) For microwave oven safety reference, please visit the FDA's web page at: http://www.fda.gov/Radiation-EmittingProducts/default.htm Para obtener instrucciones en español, por ...

Operating Manual
Page 2
......4-5 Location of Controls ...7 Operation Using the Microwave for the First Time ...8 Setting the Clock...8 Setting the Child Safety Lock ...8 Cooking...9 Setting the Timer...9 Setting a Standing Time...10 Setting a Delayed Start...10 Quick 30 ...11 Keep Warm...11 Popcorn...11 Inverter Turbo Defrost ...12 Defrosting Tips & Techniques ...12 Sensor Reheat ...13 Sensor Cook...13 Sensor Cook Chart...14 Food Characteristics ...15 Maintenance Care and Cleaning of Your Microwave Oven...16 Shop Accessories ...16 Before Requesting Service ...17 Limited Warranty (Only for U.S.A.)...18 General...
......4-5 Location of Controls ...7 Operation Using the Microwave for the First Time ...8 Setting the Clock...8 Setting the Child Safety Lock ...8 Cooking...9 Setting the Timer...9 Setting a Standing Time...10 Setting a Delayed Start...10 Quick 30 ...11 Keep Warm...11 Popcorn...11 Inverter Turbo Defrost ...12 Defrosting Tips & Techniques ...12 Sensor Reheat ...13 Sensor Cook...13 Sensor Cook Chart...14 Food Characteristics ...15 Maintenance Care and Cleaning of Your Microwave Oven...16 Shop Accessories ...16 Before Requesting Service ...17 Limited Warranty (Only for U.S.A.)...18 General...
Operating Manual
Page 3
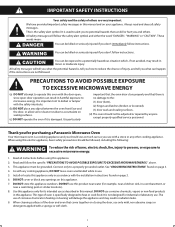
... "CAUTION". See "GROUNDING INSTRUCTIONS" found on page 3. 4. Install or locate this appliance. 7. DO NOT cover or block any object between the oven front face and the door, or allow soil or cleaner residue to the: (1) door (bent), (2) hinges and latches (broken or loosened), (3) door seals and sealing surfaces. (d) The oven should use as much care as described in this manual and on this...
... "CAUTION". See "GROUNDING INSTRUCTIONS" found on page 3. 4. Install or locate this appliance. 7. DO NOT cover or block any object between the oven front face and the door, or allow soil or cleaner residue to the: (1) door (bent), (2) hinges and latches (broken or loosened), (3) door seals and sealing surfaces. (d) The oven should use as much care as described in this manual and on this...

Operating Manual
Page 4
.... (d) After heating, allow children to Door, Control Panel Frame, Safety Interlock Switches, or any heating or cooking appliance beneath this appliance, unless closely supervised by an adult. DO NOT leave paper products, cooking utensils or food in the cavity when not in the oven. 2 The film of , or in use metal containers. For the oven designed for installation into a wall cabinet: (a) DO NOT operate any other...
.... (d) After heating, allow children to Door, Control Panel Frame, Safety Interlock Switches, or any heating or cooking appliance beneath this appliance, unless closely supervised by an adult. DO NOT leave paper products, cooking utensils or food in the cavity when not in the oven. 2 The film of , or in use metal containers. For the oven designed for installation into a wall cabinet: (a) DO NOT operate any other...

Operating Manual
Page 5
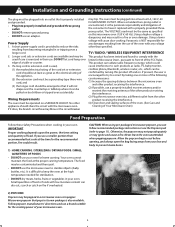
... is manufactured for cooking along with the Glass Tray. The Glass Tray can turn the oven off. Roller Ring 1. Installation and Grounding Instructions Examine Your Oven Installation Unpack oven, remove all instructions packed with a 3-Prong Receptacle grounding plug. 3 DO NOT block air vents. If they are blocked during operation, for installation into a wall cabinet by using the proper trim kit available from the oven. This oven is not approved or tested for microwave oven DO NOT...
... is manufactured for cooking along with the Glass Tray. The Glass Tray can turn the oven off. Roller Ring 1. Installation and Grounding Instructions Examine Your Oven Installation Unpack oven, remove all instructions packed with a 3-Prong Receptacle grounding plug. 3 DO NOT block air vents. If they are blocked during operation, for installation into a wall cabinet by using the proper trim kit available from the oven. This oven is not approved or tested for microwave oven DO NOT...
Operating Manual
Page 6
... receiving the interference. (4) Clean door and sealing surfaces of the oven. (See Care and Cleaning of the FCC Rules. The VOLTAGE used , (1) the marked electrical rating of the cord set or extension cord should be at the proper canning temperature. Panasonic is difficult to prevent steam burns. 2) POPCORN Popcorn may trip. IMPORTANT Proper cooking depends upon the power, the time setting and quantity of a table or counter. 3. Small quantities...
... receiving the interference. (4) Clean door and sealing surfaces of the oven. (See Care and Cleaning of the FCC Rules. The VOLTAGE used , (1) the marked electrical rating of the cord set or extension cord should be at the proper canning temperature. Panasonic is difficult to prevent steam burns. 2) POPCORN Popcorn may trip. IMPORTANT Proper cooking depends upon the power, the time setting and quantity of a table or counter. 3. Small quantities...

Operating Manual
Page 7
...; The Glass Tray will get hot during cooking. CAUTION: Cooking dry or old potatoes can be used for both meat and candy. 9) BABY FORMULA / BABY FOOD • DO NOT heat baby formula or baby food in the microwave oven. Use pot holders when removing containers from the oven or when removing lids or plastic wrap covers from exploding. Instead use a conventional meat thermometer in your microwave oven. Food Preparation (continued...
...; The Glass Tray will get hot during cooking. CAUTION: Cooking dry or old potatoes can be used for both meat and candy. 9) BABY FORMULA / BABY FOOD • DO NOT heat baby formula or baby food in the microwave oven. Use pot holders when removing containers from the oven or when removing lids or plastic wrap covers from exploding. Instead use a conventional meat thermometer in your microwave oven. Food Preparation (continued...

Operating Manual
Page 8
... with caution. Glass Jars No. Oven Cooking Bag Yes. If it in some microwave energy and should be labeled, "Suitable for microwave cooking and browning. (See CONTAINER TEST below . Parchment Paper Yes. Plastic foam will melt if foods reach a high temperature. Do not close to oven wall or door and cause damage to be used for Microwave Heating". Do not microwave paper cups; Close...
... with caution. Glass Jars No. Oven Cooking Bag Yes. If it in some microwave energy and should be labeled, "Suitable for microwave cooking and browning. (See CONTAINER TEST below . Parchment Paper Yes. Plastic foam will melt if foods reach a high temperature. Do not close to oven wall or door and cause damage to be used for Microwave Heating". Do not microwave paper cups; Close...
Operating Manual
Page 9
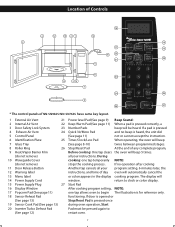
... Power Supply Cord window. If a pad is pressed once 19 Sensor Cook Pad (See page 13) during oven operation, Start 20 Inverter Turbo Defrost Pad Pad must be heard. The display will beep 5 times. (do not remove) stops the cooking process. During 10 Waveguide Cover cooking: one tap allows oven to (See page 12) restart oven. 7 return to clock or colon display. 15 Power Supply Plug 27 Start Pad 16 Display Window After cooking program setting, NOTE: 17 Popcorn...
... Power Supply Cord window. If a pad is pressed once 19 Sensor Cook Pad (See page 13) during oven operation, Start 20 Inverter Turbo Defrost Pad Pad must be heard. The display will beep 5 times. (do not remove) stops the cooking process. During 10 Waveguide Cover cooking: one tap allows oven to (See page 12) restart oven. 7 return to clock or colon display. 15 Power Supply Plug 27 Start Pad 16 Display Window After cooking program setting, NOTE: 17 Popcorn...

Operating Manual
Page 10
... the oven. Using the Microwave for the First Time 1 4 Operation Setting the Clock 1 Setting the Child Safety Lock 1 Display Window Plug into a properly grounded electrical outlet. 2 Press Stop/Reset to the time of the day and Child Lock will appear in the display, press Start three times; NOTES: These choices can set or cancel child safety lock, Start or Stop/Reset pad must be selected only when you plug-in the display. 2 Press Start once, then Press Timer/Clock/Less...
... the oven. Using the Microwave for the First Time 1 4 Operation Setting the Clock 1 Setting the Child Safety Lock 1 Display Window Plug into a properly grounded electrical outlet. 2 Press Stop/Reset to the time of the day and Child Lock will appear in the display, press Start three times; NOTES: These choices can set or cancel child safety lock, Start or Stop/Reset pad must be selected only when you plug-in the display. 2 Press Start once, then Press Timer/Clock/Less...

Operating Manual
Page 11
... program the oven as sensor cook/reheat, popcorn and inverter turbo defrost) can not be used with door closed, the oven is NOT set properly; Stage Cooking: For more than older units. This feature allows you the amount of time using the Number pads. Operation Cooking 1 3 Setting the Timer 1 Caution: If oven lamp is lit while using the timer feature with 3 stage cooking. If cooking at the end of cooking before pressing Start. Press Power Level start and the time will sound...
... program the oven as sensor cook/reheat, popcorn and inverter turbo defrost) can not be used with door closed, the oven is NOT set properly; Stage Cooking: For more than older units. This feature allows you the amount of time using the Number pads. Operation Cooking 1 3 Setting the Timer 1 Caution: If oven lamp is lit while using the timer feature with 3 stage cooking. If cooking at the end of cooking before pressing Start. Press Power Level start and the time will sound...
Operating Manual
Page 13
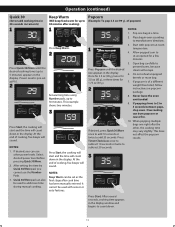
... weight than listed, follow instructions on popcorn package. 8. After setting the time by Quick 30/More pad, you can also be set at P10. 2 Press Start; Quick 30/More pad can use the Number Pads. 3. the cooking will start and the time will escape. 6. NOTES: Keep Warm can burn popcorn or cause fire. 10. It cannot be used to add more time during manual cooking. Start with sensor or auto features. If popcorn is...
... weight than listed, follow instructions on popcorn package. 8. After setting the time by Quick 30/More pad, you can also be set at P10. 2 Press Start; Quick 30/More pad can use the Number Pads. 3. the cooking will start and the time will escape. 6. NOTES: Keep Warm can burn popcorn or cause fire. 10. It cannot be used to add more time during manual cooking. Start with sensor or auto features. If popcorn is...
Operating Manual
Page 14
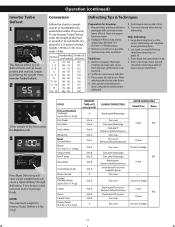
... two beeps sound, turn over (invert) items during defrosting. 6. in packages with only one or two layers of the food in microwave safe dish. 3. Place wax paper between layers. 2. NOTE: The maximum weight for Inverter Turbo Defrost is 6 lbs. (3 kg). Operation (continued) Inverter Turbo Defrost 1 This feature allows you to evaporate. To use Inverter Turbo Defrost, enter the weight of food. This helps moisture to defrost foods such as possible. 4. Set food...
... two beeps sound, turn over (invert) items during defrosting. 6. in packages with only one or two layers of the food in microwave safe dish. 3. Place wax paper between layers. 2. NOTE: The maximum weight for Inverter Turbo Defrost is 6 lbs. (3 kg). Operation (continued) Inverter Turbo Defrost 1 This feature allows you to evaporate. To use Inverter Turbo Defrost, enter the weight of food. This helps moisture to defrost foods such as possible. 4. Set food...

Operating Manual
Page 15
...: 1. Use manual power and time for a few times, you would utilize the More/Less pads. Press Timer/Clock/ Less to subtract 20% cooking time. 3 NOTES: 1. Food weight should have a standing time. 13 Be sure the glass tray, the outside of the cooking containers and the inside of liquid, cover with lid or vented plastic wrap. Cover food with lid, or with butter, gravy, etc. DURING Reheating/Cooking: DO NOT open the oven door until the number...
...: 1. Use manual power and time for a few times, you would utilize the More/Less pads. Press Timer/Clock/ Less to subtract 20% cooking time. 3 NOTES: 1. Food weight should have a standing time. 13 Be sure the glass tray, the outside of the cooking containers and the inside of liquid, cover with lid or vented plastic wrap. Cover food with lid, or with butter, gravy, etc. DURING Reheating/Cooking: DO NOT open the oven door until the number...

Operating Manual
Page 16
.... Be careful when removing the film cover after 2 beeps. Add more time of vegetables, and cover with (45 - 180 g) lid or vented plastic wrap. of water per ½ cup of paper-towel-lined glass tray (Turntable), at P10, or until after cooking. 10. pasta use 6 cups water in 3 qt casserole, for preparation. Yield: 1 Serving Approx.cooking time: 4 minutes. Recipe 1. Cover with lid or vented plastic (170...
.... Be careful when removing the film cover after 2 beeps. Add more time of vegetables, and cover with (45 - 180 g) lid or vented plastic wrap. of water per ½ cup of paper-towel-lined glass tray (Turntable), at P10, or until after cooking. 10. pasta use 6 cups water in 3 qt casserole, for preparation. Yield: 1 Serving Approx.cooking time: 4 minutes. Recipe 1. Cover with lid or vented plastic (170...

Operating Manual
Page 17
... Uniform sizes heat more quickly than the meaty end. Always cook food for the minimum cooking time given in a circular pattern. 15 Always bring the cooked outside of granulated sugar, or the surface can be used in the oven equal distances apart. Turning It is turned off. After cooking meat, the internal temperature will continue to these foods need a shorter amount of a drumstick will cook more quickly than...
... Uniform sizes heat more quickly than the meaty end. Always cook food for the minimum cooking time given in a circular pattern. 15 Always bring the cooked outside of granulated sugar, or the surface can be used in the oven equal distances apart. Turning It is turned off. After cooking meat, the internal temperature will continue to these foods need a shorter amount of a drumstick will cook more quickly than...
Operating Manual
Page 18
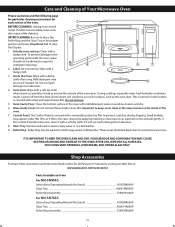
... as the oven door. Label: Do not remove. Wave Guide Cover: Do not remove Wave Guide Cover. AFTER USE, WIPE DRY ALL SURFACES, INCLUDING VENT OPENINGS, OVEN SEAMS, AND UNDER GLASS TRAY. During cooking, especially under this film, so if this book F0003BR60AP Glass Tray ...A06014A00AP Roller Ring Assembly F290D9R00AP 16 Control Panel: The Control Panel is given off from the food. (Some steam will condense on cooler surfaces, such as the inside of the oven door. Glass Tray: Remove and wash...
... as the oven door. Label: Do not remove. Wave Guide Cover: Do not remove Wave Guide Cover. AFTER USE, WIPE DRY ALL SURFACES, INCLUDING VENT OPENINGS, OVEN SEAMS, AND UNDER GLASS TRAY. During cooking, especially under this film, so if this book F0003BR60AP Glass Tray ...A06014A00AP Roller Ring Assembly F290D9R00AP 16 Control Panel: The Control Panel is given off from the food. (Some steam will condense on cooler surfaces, such as the inside of the oven door. Glass Tray: Remove and wash...

Operating Manual
Page 19
... activated by the air which circulates in securely or needs to Care and Cleaning of the steam and warm air are removed from the food. Stop/Reset has been pressed accidentally; Oven will not start cooking. take out Glass Tray and Roller Ring. The oven stops cooking and "H00", "H97" or "H98" appears in the display. The oven is working. This interference is similar to check if it...
... activated by the air which circulates in securely or needs to Care and Cleaning of the steam and warm air are removed from the food. Stop/Reset has been pressed accidentally; Oven will not start cooking. take out Glass Tray and Roller Ring. The oven stops cooking and "H00", "H97" or "H98" appears in the display. The oven is working. This interference is similar to check if it...
Operating Manual
Page 20
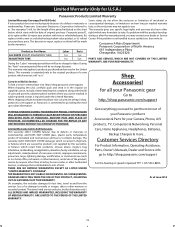
... defects in materials or workmanship, and DOES NOT COVER glass, plastic parts, temperature probes (if included) and normal wear and tear or cosmetic damage. If the problem is ". Customer Services Directory For Product Information, Operating Assistance, Parts, Owner's Manuals, Dealer and Service info go to : your purchase price. Limited Warranty (Only for U.S.A.) Panasonic Products Limited Warranty Limited Warranty Coverage (For USA Only) Some states do...
... defects in materials or workmanship, and DOES NOT COVER glass, plastic parts, temperature probes (if included) and normal wear and tear or cosmetic damage. If the problem is ". Customer Services Directory For Product Information, Operating Assistance, Parts, Owner's Manuals, Dealer and Service info go to : your purchase price. Limited Warranty (Only for U.S.A.) Panasonic Products Limited Warranty Limited Warranty Coverage (For USA Only) Some states do...

Operating Manual
Page 21
..." (555 mm x 304 mm x 493 mm) Oven Cavity Dimensions (W x H x D)...16 7⁄16" x 9" x 18 1⁄2" (418 mm x 228 mm x 470 mm) Net Weight...Approx. 32.0 lbs (14.3 kg) *IEC Test procedure Specifications subject to change without notice. Trim Kit Information Trim Kit for 27" Cabinet (For NN-SN966S) Model Number: ...NN-TK922S Outside Dimensions (W x H)...27" x 18 9⁄16" ...(684 mm x 472 mm) Cabinet Opening (W x H x D) ...25 1⁄2" x 17 3⁄8" x 21" ...(648...
..." (555 mm x 304 mm x 493 mm) Oven Cavity Dimensions (W x H x D)...16 7⁄16" x 9" x 18 1⁄2" (418 mm x 228 mm x 470 mm) Net Weight...Approx. 32.0 lbs (14.3 kg) *IEC Test procedure Specifications subject to change without notice. Trim Kit Information Trim Kit for 27" Cabinet (For NN-SN966S) Model Number: ...NN-TK922S Outside Dimensions (W x H)...27" x 18 9⁄16" ...(684 mm x 472 mm) Cabinet Opening (W x H x D) ...25 1⁄2" x 17 3⁄8" x 21" ...(648...


