
Owners Manual
Page 1
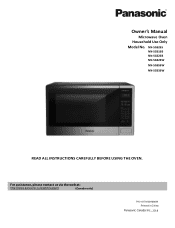
Owner's Manual Microwave Oven Household Use Only Model No. NN-SG626S NN-SG616B NN-SG626B NN-SG626W NN-SG656W NN-SG636W READ ALL INSTRUCTIONS CAREFULLY BEFORE USING THE OVEN. For assistance, please contact us via the web at: http://www.panasonic.ca/english/support (Canada only) PN:16170000A68644 Printed in China Panasonic Canada Inc., 2018
Owner's Manual Microwave Oven Household Use Only Model No. NN-SG626S NN-SG616B NN-SG626B NN-SG626W NN-SG656W NN-SG636W READ ALL INSTRUCTIONS CAREFULLY BEFORE USING THE OVEN. For assistance, please contact us via the web at: http://www.panasonic.ca/english/support (Canada only) PN:16170000A68644 Printed in China Panasonic Canada Inc., 2018
Owners Manual
Page 3
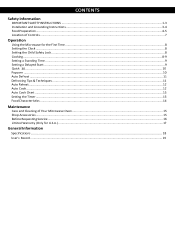
... Location of Controls ...7 Operation Using the Microwave for the First Time ...8 Setting the Clock ...8 Setting the Child Safety Lock...8 Cooking ...8-9 Setting a Standing Time ...9 Setting a Delayed Start...9 Quick 30 ...10 Popcorn ...10 Auto Defrost ...11 Defrosting Tips & Techniques ...11 Auto Reheat ...12 Auto Cook ...12 Auto Cook Chart ...13 Setting the Timer ...13 Food Characteristics ...14 Maintenance Care and Cleaning of Your Microwave Oven...15 Shop Accessories...15 Before Requesting Service ...16 Limited Warranty (Only for U.S.A.) ...17 General Information Specifications ...18 User...
... Location of Controls ...7 Operation Using the Microwave for the First Time ...8 Setting the Clock ...8 Setting the Child Safety Lock...8 Cooking ...8-9 Setting a Standing Time ...9 Setting a Delayed Start...9 Quick 30 ...10 Popcorn ...10 Auto Defrost ...11 Defrosting Tips & Techniques ...11 Auto Reheat ...12 Auto Cook ...12 Auto Cook Chart ...13 Setting the Timer ...13 Food Characteristics ...14 Maintenance Care and Cleaning of Your Microwave Oven...15 Shop Accessories...15 Before Requesting Service ...16 Limited Warranty (Only for U.S.A.) ...17 General Information Specifications ...18 User...
Owners Manual
Page 4
... reduce the chance of injury, and tell you use only mild, non-abrasive soaps or detergents applied with the door open, since open-door operation can be adjusted or repaired by anyone except properly qualified service personnel. Read all safety messages. As with the installation instructions found on sealing surfaces. (c) DO NOT operate the oven if it is , tell you don't immediately...
... reduce the chance of injury, and tell you use only mild, non-abrasive soaps or detergents applied with the door open, since open-door operation can be adjusted or repaired by anyone except properly qualified service personnel. Read all safety messages. As with the installation instructions found on sealing surfaces. (c) DO NOT operate the oven if it is , tell you don't immediately...
Owners Manual
Page 5
... risk of a table or counter. 15. For the oven designed for examination, repair or adjustment. 16. TO AVOID THE RISK OF FIRE: 1. IMPORTANT SAFETY INSTRUCTIONS (continued) 10. Keep cord away from oven. Contact the nearest authorized service center for installation into a wall cabinet: (a) DO NOT operate any portion of the appliance surface when the appliance is in use metal containers. Repairs must be overheated...
... risk of a table or counter. 15. For the oven designed for examination, repair or adjustment. 16. TO AVOID THE RISK OF FIRE: 1. IMPORTANT SAFETY INSTRUCTIONS (continued) 10. Keep cord away from oven. Contact the nearest authorized service center for installation into a wall cabinet: (a) DO NOT operate any portion of the appliance surface when the appliance is in use metal containers. Repairs must be overheated...
Owners Manual
Page 6
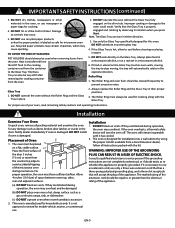
... when you press Start. DO NOT cook directly on the Glass Tray touches oven walls, causing the tray to cool before cleaning or placing in water. 5. Roller Ring 1. DO NOT operate the oven without the Glass Tray fully engaged on the drive hub. Installation Examine Your Oven Installation Unpack oven, remove all instructions packed with the Glass Tray. If the oven overheats, a thermal safety door. Notify dealer immediately if oven is manufactured for household use newspaper or...
... when you press Start. DO NOT cook directly on the Glass Tray touches oven walls, causing the tray to cool before cleaning or placing in water. 5. Roller Ring 1. DO NOT operate the oven without the Glass Tray fully engaged on the drive hub. Installation Examine Your Oven Installation Unpack oven, remove all instructions packed with the Glass Tray. If the oven overheats, a thermal safety door. Notify dealer immediately if oven is manufactured for household use newspaper or...
Owners Manual
Page 7
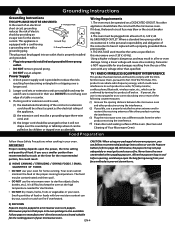
... circuit breaker may be used if care is used must be a grounding-type three-wire cord, and (3) the longer cord should be confirmed by children or tripped over edge of food. This appliance is the personal responsibility and obligation of Your Microwave Oven) Food Preparation Follow these Safety Precautions when cooking in your microwave oven. IMPORTANT Proper cooking depends upon the power, the time setting and quantity of a table...
... circuit breaker may be used if care is used must be a grounding-type three-wire cord, and (3) the longer cord should be confirmed by children or tripped over edge of food. This appliance is the personal responsibility and obligation of Your Microwave Oven) Food Preparation Follow these Safety Precautions when cooking in your microwave oven. IMPORTANT Proper cooking depends upon the power, the time setting and quantity of a table...
Owners Manual
Page 8
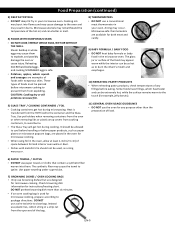
... in the microwave oven. Heat is transferred from the open end of space between foil and interior oven walls or door. • Dishes with nonporous skins. Check browning dish information for microwave cooking. Instead use plastic ties, cotton string or a strip cut from the HOT food to the container and the Glass Tray. EN-5 It should not be pierced before microwave cooking to prevent them from cooking containers, to...
... in the microwave oven. Heat is transferred from the open end of space between foil and interior oven walls or door. • Dishes with nonporous skins. Check browning dish information for microwave cooking. Instead use plastic ties, cotton string or a strip cut from the HOT food to the container and the Glass Tray. EN-5 It should not be pierced before microwave cooking to prevent them from cooking containers, to...
Owners Manual
Page 9
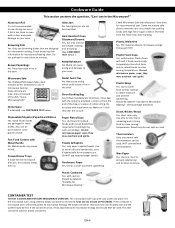
... bring food to your oven. Browning Dish Yes. Glass Jars No. Check Microwave Safe manufacturers' directions for microwave cooking and browning. (See CONTAINER TEST below . Use short term only to reheat foods to retain moisture and prevent splattering. Straw, Wicker, Wood Yes, short term only. Heat Resistant Oven Glassware/Ceramic Yes, but only ones for recommended uses. Do not close to oven wall or door...
... bring food to your oven. Browning Dish Yes. Glass Jars No. Check Microwave Safe manufacturers' directions for microwave cooking and browning. (See CONTAINER TEST below . Use short term only to reheat foods to retain moisture and prevent splattering. Straw, Wicker, Wood Yes, short term only. Heat Resistant Oven Glassware/Ceramic Yes, but only ones for recommended uses. Do not close to oven wall or door...
Owners Manual
Page 10
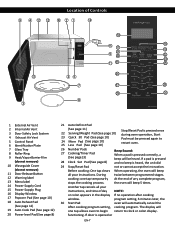
... Vent 3 Door Safety Lock System 4 Exhaust Air Vent 5 Control Panel 6 Identification Plate 7 Glass Tray 8 Roller Ring 9 Heat/Vapor Barrier Film (do not remove) 10 Waveguide Cover (do not remove) 11 Door Release Button 12 Warning label 13 Menu label 14 Power Supply Cord 15 Power Supply Plug 16 Display Window 17 Popcorn Pad (See page 10) 18 Auto Reheat Pad (See page 12) 19 Auto Cook Pad (See page 12) 20 Power level Pad (See page 8) 21 Auto Defrost...
... Vent 3 Door Safety Lock System 4 Exhaust Air Vent 5 Control Panel 6 Identification Plate 7 Glass Tray 8 Roller Ring 9 Heat/Vapor Barrier Film (do not remove) 10 Waveguide Cover (do not remove) 11 Door Release Button 12 Warning label 13 Menu label 14 Power Supply Cord 15 Power Supply Plug 16 Display Window 17 Popcorn Pad (See page 10) 18 Auto Reheat Pad (See page 12) 19 Auto Cook Pad (See page 12) 20 Power level Pad (See page 8) 21 Auto Defrost...
Owners Manual
Page 11
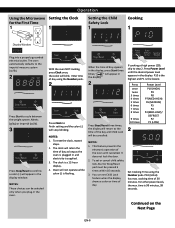
... electricity is plugged in the display. 2 Press Stop/Reset three times; With the oven NOT cooking, press Clock once; NOTES: 1. You can be selected only when you plug-in the display, press Start three times; Enter time of day appears in the oven. For other power levels, the max. cooking time of the oven until the desired power level appears in the display window. Operation Using the Microwave Setting the Clock for the First Time 1 1 Setting the Child Safety Lock 1 Cooking 1 Display...
... electricity is plugged in the display. 2 Press Stop/Reset three times; With the oven NOT cooking, press Clock once; NOTES: 1. You can be selected only when you plug-in the display, press Start three times; Enter time of day appears in the oven. For other power levels, the max. cooking time of the oven until the desired power level appears in the display window. Operation Using the Microwave Setting the Clock for the First Time 1 1 Setting the Child Safety Lock 1 Cooking 1 Display...
Owners Manual
Page 12
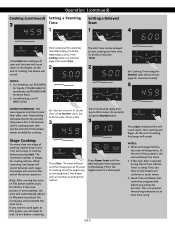
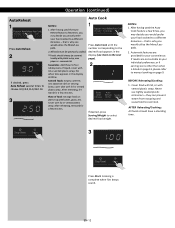
... program, the oven will cause food to wait 15 min before any automatic function. Press Start; If you will sound. Set desired amount of cooking, five beeps will need to dry out and may cause a fire. To do this , repeat steps 1 and 2 in the display. At the end of stand time using the Number pads. 3 Press Power Level until the desired power level appears in the display. Stand Time...
... program, the oven will cause food to wait 15 min before any automatic function. Press Start; If you will sound. Set desired amount of cooking, five beeps will need to dry out and may cause a fire. To do this , repeat steps 1 and 2 in the display. At the end of stand time using the Number pads. 3 Press Power Level until the desired power level appears in the display. Stand Time...

Owners Manual
Page 13
... power level before pressing Quick 30. 2. Start with popcorn at room temperature. 4. At the end of popcorn) 1 Press Popcorn until the desired cooking time (up to prevent burns, because steam will count down in the display. Operation (continued) Popcorn (Example: To pop 3.5 oz (100 g). Open bag carefully to 5 minutes) appears in the display. the cooking will start and the time will sound. NOTES: 1. If desired, you cannot use other , the cooking time...
... power level before pressing Quick 30. 2. Start with popcorn at room temperature. 4. At the end of popcorn) 1 Press Popcorn until the desired cooking time (up to prevent burns, because steam will count down in the display. Operation (continued) Popcorn (Example: To pop 3.5 oz (100 g). Open bag carefully to 5 minutes) appears in the display. the cooking will start and the time will sound. NOTES: 1. If desired, you cannot use other , the cooking time...
Owners Manual
Page 14
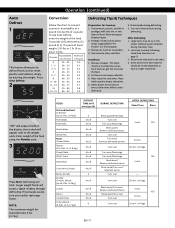
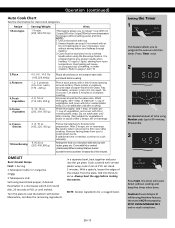
... to the weight units. Defrosting will be underdefrosted. 5. If two beeps sound, turn over AFTER DEFROSTING Stand Time Rinse 5 min. YES 10 min. 30 min. NO 5 min. ---20 min. in fridge. Auto Defrost 1 This feature allows you to defrost foods such as possible. 4. If a piece of the food using the Number pads. 3 Press Start. Juices from food can get hot and cook the food. 2. Select power and minimum time so that...
... to the weight units. Defrosting will be underdefrosted. 5. If two beeps sound, turn over AFTER DEFROSTING Stand Time Rinse 5 min. YES 10 min. 30 min. NO 5 min. ---20 min. in fridge. Auto Defrost 1 This feature allows you to defrost foods such as possible. 4. If a piece of the food using the Number pads. 3 Press Start. Juices from food can get hot and cook the food. 2. Select power and minimum time so that...
Owners Manual
Page 15
... five beeps sound. Cover food with lid, or with lid or vented plastic wrap. number corresponding to overcook. Foods should have a standing time. 3 Press Start. Stir when time appears in the 3. Automatic features are not suitable to your convenience. Cover with vented plastic wrap. Never use tightly sealed plastic containers-they can prevent steam from escaping and cause food to the 2. AFTER Reheating/Cooking: All foods...
... five beeps sound. Cover food with lid, or with lid or vented plastic wrap. number corresponding to overcook. Foods should have a standing time. 3 Press Start. Stir when time appears in the 3. Automatic features are not suitable to your convenience. Cover with vented plastic wrap. Never use tightly sealed plastic containers-they can prevent steam from escaping and cause food to the 2. AFTER Reheating/Cooking: All foods...
Owners Manual
Page 16
... cooking finishes, buzzer sounds five times and then let stand for preparation. Place potato or potatoes around surface. The timer will cause an increased risk of liquid, starting from you to give proper results when heating 1-3 cups of scalding, or water eruption. If additional time is programmed to avoid steam burns. Meanwhile, combine the remaining ingredients in your microwave oven without setting power...
... cooking finishes, buzzer sounds five times and then let stand for preparation. Place potato or potatoes around surface. The timer will cause an increased risk of liquid, starting from you to give proper results when heating 1-3 cups of scalding, or water eruption. If additional time is programmed to avoid steam burns. Meanwhile, combine the remaining ingredients in your microwave oven without setting power...
Owners Manual
Page 17
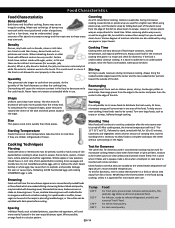
... conduction after the microwave oven is turned off. Size Thin pieces cook more quickly than heavy, dense foods such as chicken pieces, shrimp, hamburger patties or pork chops. Cooking Techniques Piercing Foods with sugar, water, or fat and these areas may be careful to remove them to escape. Score sausages and frankfurters. Chicken is opaque. Foods will cook more evenly. To use, combine browning sauce...
... conduction after the microwave oven is turned off. Size Thin pieces cook more quickly than heavy, dense foods such as chicken pieces, shrimp, hamburger patties or pork chops. Cooking Techniques Piercing Foods with sugar, water, or fat and these areas may be careful to remove them to escape. Score sausages and frankfurters. Chicken is opaque. Foods will cook more evenly. To use, combine browning sauce...

Owners Manual
Page 18
... after using. Glass Tray: Remove and wash in warm soapy water or in the same manner as the oven door. Inside the Oven: Wipe with a damp cloth. It is important to prevent scratches during shipping. BEFORE CLEANING: Unplug oven at : http://www.panasonic.ca/english/support Parts Available to Order: Instructions/Operating Manual (this is the case, remove by applying masking or clear tape to clear the Display. 1. Wave Guide Cover...
... after using. Glass Tray: Remove and wash in warm soapy water or in the same manner as the oven door. Inside the Oven: Wipe with a damp cloth. It is important to prevent scratches during shipping. BEFORE CLEANING: Unplug oven at : http://www.panasonic.ca/english/support Parts Available to Order: Instructions/Operating Manual (this is the case, remove by applying masking or clear tape to clear the Display. 1. Wave Guide Cover...
Owners Manual
Page 19
... indicate a problem with a damp cloth and reset Roller Ring and Glass Tray properly. During cooking, steam and warm air are dirty; This is not completely closed; After use, the oven should be wiped dry (see page 15). Main circuit breaker or main fuse is not correct; reset main circuit breaker or replace main fuse. press Stop/Reset to the Operating Instructions. The program is tripped; program oven again. The Glass Tray is...
... indicate a problem with a damp cloth and reset Roller Ring and Glass Tray properly. During cooking, steam and warm air are dirty; This is not completely closed; After use, the oven should be wiped dry (see page 15). Main circuit breaker or main fuse is not correct; reset main circuit breaker or replace main fuse. press Stop/Reset to the Operating Instructions. The program is tripped; program oven again. The Glass Tray is...

Owners Manual
Page 20
... PURCHASE IS REQUIRED LIMITATIONS AND EXCLUSIONS This warranty ONLY COVERS failures due to defects in the original carton. WARRANTY SERVICE For product information and operation assistance, please contact our Support page: www.panasonic.ca/english/support PRODUCT REPAIRS Please locate your nearest Authorized Servicentre: panasonic.ca/english/support/servicentrelocator IF YOU SHIP THE PRODUCT TO A SERVICENTRE Carefully pack and send prepaid, adequately insured...
... PURCHASE IS REQUIRED LIMITATIONS AND EXCLUSIONS This warranty ONLY COVERS failures due to defects in the original carton. WARRANTY SERVICE For product information and operation assistance, please contact our Support page: www.panasonic.ca/english/support PRODUCT REPAIRS Please locate your nearest Authorized Servicentre: panasonic.ca/english/support/servicentrelocator IF YOU SHIP THE PRODUCT TO A SERVICENTRE Carefully pack and send prepaid, adequately insured...
Owners Manual
Page 21
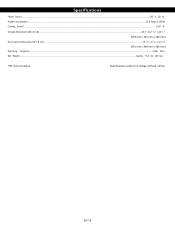
EN-18 Specifications Power Source...120 V, 60 Hz Power Consumption...13.5 Amps, 1,500 W Cooking Power*...1,100 W Outside Dimensions (W x H x D) ...20 7⁄1" x 12 3⁄8 " x 16 1⁄8 " 6 (519 mm x 315 mm x 410 mm) Oven Cavity Dimensions (W x H x D)...1313⁄16" x 9 13⁄16" x 15 3⁄1"6 (351 mm x 249 mm x 386 mm) Operating Frequency...2,450 MHz Net Weight...Approx. 35.3 lbs (16 kg) *IEC Test procedure Specifications subject to change without notice.
EN-18 Specifications Power Source...120 V, 60 Hz Power Consumption...13.5 Amps, 1,500 W Cooking Power*...1,100 W Outside Dimensions (W x H x D) ...20 7⁄1" x 12 3⁄8 " x 16 1⁄8 " 6 (519 mm x 315 mm x 410 mm) Oven Cavity Dimensions (W x H x D)...1313⁄16" x 9 13⁄16" x 15 3⁄1"6 (351 mm x 249 mm x 386 mm) Operating Frequency...2,450 MHz Net Weight...Approx. 35.3 lbs (16 kg) *IEC Test procedure Specifications subject to change without notice.


