
Operating Instructions
Page 1
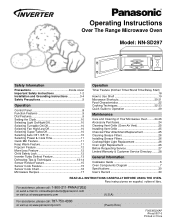
... Diagram 7 Specifications 30 User's Record 30 READ ALL INSTRUCTIONS CAREFULLY BEFORE USING THE OVEN. Operating Instructions Over The Range Microwave Oven Model: NN-SD297 Safety Information Precautions Inside cover Important Safety Instructions 1-2 Installation and Grounding Instructions 3-4 Safety Precautions 5 Operation Control Panel 8 Function Features 9 Dial Features 9 Setting the Clock 10 Selecting Light On/Night/Off 10 Selecting Turntable On/Off 10 Selecting Fan High/Low/Off 10 Selecting Super/Turbo/Off 10 Selecting Auto Off 1/3/5/10 10 Selecting Power & Cook Time...
... Diagram 7 Specifications 30 User's Record 30 READ ALL INSTRUCTIONS CAREFULLY BEFORE USING THE OVEN. Operating Instructions Over The Range Microwave Oven Model: NN-SD297 Safety Information Precautions Inside cover Important Safety Instructions 1-2 Installation and Grounding Instructions 3-4 Safety Precautions 5 Operation Control Panel 8 Function Features 9 Dial Features 9 Setting the Clock 10 Selecting Light On/Night/Off 10 Selecting Turntable On/Off 10 Selecting Fan High/Low/Off 10 Selecting Super/Turbo/Off 10 Selecting Auto Off 1/3/5/10 10 Selecting Power & Cook Time...
Operating Instructions
Page 3
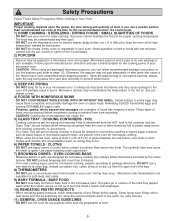
... come together on the turntable. Keep cord away from the microwave oven. Some products such as you for example, closed , turn oven off, and disconnect the power cord, or shut off power at the fuse or circuit breaker panel. (d) DO NOT use the cavity for example, near a kitchen sink, in this appliance only for industrial or laboratory use. Carefully attend appliance when paper, plastic, or other cooking appliance. Superheated Liquids...
... come together on the turntable. Keep cord away from the microwave oven. Some products such as you for example, closed , turn oven off, and disconnect the power cord, or shut off power at the fuse or circuit breaker panel. (d) DO NOT use the cavity for example, near a kitchen sink, in this appliance only for industrial or laboratory use. Carefully attend appliance when paper, plastic, or other cooking appliance. Superheated Liquids...
Operating Instructions
Page 4
... Glass Tray. DO NOT cook directly on . Always replace the Roller Ring and the Glass Tray in a microwave safe dish. 6. TO AVOID THE RISK OF FIRE: 1. Heat is not present to Door, Control Panel Frame, Safety Interlock Switches, or any other part of , or in place. 2. To reduce the risk of fire and electric shock, install at least 135/8 inches (34.6 cm), above both gas and electric cooking equipment 36 inches...
... Glass Tray. DO NOT cook directly on . Always replace the Roller Ring and the Glass Tray in a microwave safe dish. 6. TO AVOID THE RISK OF FIRE: 1. Heat is not present to Door, Control Panel Frame, Safety Interlock Switches, or any other part of , or in place. 2. To reduce the risk of fire and electric shock, install at least 135/8 inches (34.6 cm), above both gas and electric cooking equipment 36 inches...

Operating Instructions
Page 5
... Oven Unpack oven, remove all packing material and examine the oven for any cooktop. 2. This oven was manufactured for household use an extension cord. 3 This appliance is equipped with a cord having a grounding wire with the additional installation instructions provided. 5. Notify dealer immediately if oven is damaged. It is properly installed and grounded. • Plug into an outlet that is recommended that the product be mounted to install this oven...
... Oven Unpack oven, remove all packing material and examine the oven for any cooktop. 2. This oven was manufactured for household use an extension cord. 3 This appliance is equipped with a cord having a grounding wire with the additional installation instructions provided. 5. Notify dealer immediately if oven is damaged. It is properly installed and grounded. • Plug into an outlet that is recommended that the product be mounted to install this oven...
Operating Instructions
Page 6
... lid, cookie sheet or flat tray. 4.Keep hood and grease filters clean, according to instructions on a SEPARATE CIRCUIT. To minimize automatic fan operation, use adequate sized utensils and use of a grease fire, smother flaming pan on this appliance is NOT responsible for long time, the fan may trip. Should the fan require repair, do not operate microwave oven until it does, the branch circuit fuse may blow or the circuit breaker may operate to have...
... lid, cookie sheet or flat tray. 4.Keep hood and grease filters clean, according to instructions on a SEPARATE CIRCUIT. To minimize automatic fan operation, use adequate sized utensils and use of a grease fire, smother flaming pan on this appliance is NOT responsible for long time, the fan may trip. Should the fan require repair, do not operate microwave oven until it does, the branch circuit fuse may blow or the circuit breaker may operate to have...
Operating Instructions
Page 7
... or a strip cut from the open the bag facing away from exploding. DO NOT use the popcorn pad (refer to ignite. IMPORTANT Proper cooking depends upon the power, the time setting and quantity of the food may cause the towel to page 12). Always follow recommended package instructions or use a wire twist-tie to the container and the Glass Tray. Reheating SLICED...
... or a strip cut from the open the bag facing away from exploding. DO NOT use the popcorn pad (refer to ignite. IMPORTANT Proper cooking depends upon the power, the time setting and quantity of the food may cause the towel to page 12). Always follow recommended package instructions or use a wire twist-tie to the container and the Glass Tray. Reheating SLICED...
Operating Instructions
Page 8
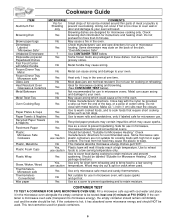
... and damage to your oven. Plastic: Microwave Safe Cookware Yes, use caution Should be labeled "Suitable for Microwave Heating". Should be labeled, "Suitable for Microwave Heating." ThermometersMicrowave safe Yes Use only microwave safe meat and candy thermometers. Do not close to oven wall or only door and damage to your oven will cause sparks and get HOT! Paper Plates & Cups Yes Use to warm cooked foods, and to...
... and damage to your oven. Plastic: Microwave Safe Cookware Yes, use caution Should be labeled "Suitable for Microwave Heating". Should be labeled, "Suitable for Microwave Heating." ThermometersMicrowave safe Yes Use only microwave safe meat and candy thermometers. Do not close to oven wall or only door and damage to your oven will cause sparks and get HOT! Paper Plates & Cups Yes Use to warm cooked foods, and to...
Operating Instructions
Page 9
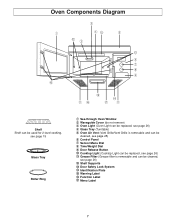
... 19 Glass Tray Roller Ring 1 See-through Oven Window 2 Waveguide Cover (do not remove) 3 Oven Light (Oven Light can be replaced, see page 26) 4 Glass Tray (Turntable) 5 Oven Air Vent (Vent Grille/Vent Grille is removable and can be cleaned, see page 26) - Identification Plate @ Warning Label # Function Label $ Menu Label 7 Grease Filter (Grease filter is removable and can be cleaned, see page 25) 6 Control Panel 7 Sensor Menu Dial 8 Time/Weight Dial 9 Door Release Button 0 Cooktop Light (Cooktop Light can be replaced, see page 26) = Shelf Supports ~ Door Safety Lock...
... 19 Glass Tray Roller Ring 1 See-through Oven Window 2 Waveguide Cover (do not remove) 3 Oven Light (Oven Light can be replaced, see page 26) 4 Glass Tray (Turntable) 5 Oven Air Vent (Vent Grille/Vent Grille is removable and can be cleaned, see page 26) - Identification Plate @ Warning Label # Function Label $ Menu Label 7 Grease Filter (Grease filter is removable and can be cleaned, see page 25) 6 Control Panel 7 Sensor Menu Dial 8 Time/Weight Dial 9 Door Release Button 0 Cooktop Light (Cooktop Light can be replaced, see page 26) = Shelf Supports ~ Door Safety Lock...
Operating Instructions
Page 10
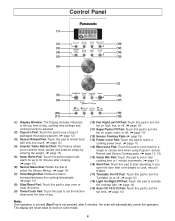
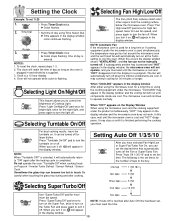
... feature allows you open the door after oven begins to cook, retouch START. (17) Turntable On/Off Pad: Touch this pad to turn the fan on super, turbo, or off . (☛ page 10) (18) Light On/Night/Off Pad: Touch this pad to activate the cooktop light. (☛ page 10) (19) Auto Off 1/3/5/10 Pad: Touch this pad to set the fan time. (☛ page...
... feature allows you open the door after oven begins to cook, retouch START. (17) Turntable On/Off Pad: Touch this pad to turn the fan on super, turbo, or off . (☛ page 10) (18) Light On/Night/Off Pad: Touch this pad to activate the cooktop light. (☛ page 10) (19) Auto Off 1/3/5/10 Pad: Touch this pad to set the fan time. (☛ page...
Operating Instructions
Page 11
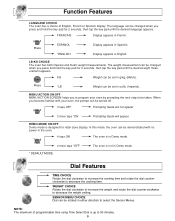
... The oven has a choice of programmable time using Time Select Dial is up to 90 minutes. 9 FRANCAIS Display appears in English. The weight measurement can be set in Demo mode. When you to program your oven, the prompt can be set in Spanish. WEIGHT CHOICE Rotate the dial clockwise to increase the weight and rotate the dial counter-clockwise to select the Sensor Menus. Display appears...
... The oven has a choice of programmable time using Time Select Dial is up to 90 minutes. 9 FRANCAIS Display appears in English. The weight measurement can be set in Demo mode. When you to program your oven, the prompt can be set in Spanish. WEIGHT CHOICE Rotate the dial clockwise to increase the weight and rotate the dial counter-clockwise to select the Sensor Menus. Display appears...
Operating Instructions
Page 12
... microwave oven is used simultaneously, the temperature may stay on until the microwave is pressed and "HOT" appears in the display window, the microwave oven will not operate, and you can become too hot to turn on you turn it on, will appear in the display window. 10 Be careful when touching the glass tray during and after Auto Off time had been set 11:25 1. • Press Timer/Clock...
... microwave oven is used simultaneously, the temperature may stay on until the microwave is pressed and "HOT" appears in the display window, the microwave oven will not operate, and you can become too hot to turn on you turn it on, will appear in the display window. 10 Be careful when touching the glass tray during and after Auto Off time had been set 11:25 1. • Press Timer/Clock...
Operating Instructions
Page 13
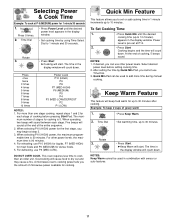
... 2 for each stage. The time in combination with sensor or auto features. 11 When operating, two beeps will start . When selecting P10 (HIGH) power, the maximum programmable time is 5. DO NOT OVER COOK. Quick Min Pad can use P3 (MED-LOW). This oven requires less time to 10 minutes) appears in the display window. 2. A microwave oven's cooking power tells you to 30 minutes after cooking. To Set Cooking Time: 1. • Press Quick...
... 2 for each stage. The time in combination with sensor or auto features. 11 When operating, two beeps will start . When selecting P10 (HIGH) power, the maximum programmable time is 5. DO NOT OVER COOK. Quick Min Pad can use P3 (MED-LOW). This oven requires less time to 10 minutes) appears in the display window. 2. A microwave oven's cooking power tells you to 30 minutes after cooking. To Set Cooking Time: 1. • Press Quick...

Operating Instructions
Page 14
... 5 beeps sound. (When steam is cancelled. Start with each individual. REMARKS: When popping multiple bags one bag at room temperature. 4. It does not lock the door. Example: To pop a bag of day. 2. Do not reheat unpopped kernels or reuse bag. To Set: • Press Start 3 times. Open bag carefully to a different doneness. NOTE: 1. After having used the Sensor Reheat/Cook feature a few minutes. 5. The oven...
... 5 beeps sound. (When steam is cancelled. Start with each individual. REMARKS: When popping multiple bags one bag at room temperature. 4. It does not lock the door. Example: To pop a bag of day. 2. Do not reheat unpopped kernels or reuse bag. To Set: • Press Start 3 times. Open bag carefully to a different doneness. NOTE: 1. After having used the Sensor Reheat/Cook feature a few minutes. 5. The oven...
Operating Instructions
Page 17
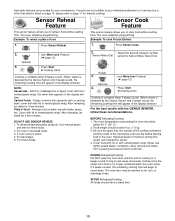
...; Press Start. ➤Cooking starts. Cooking is complete when 5 beeps sound. (When steam is warm. 4. Canned foods - Empty contents into steam can prevent steam from food is listed on plate; DO NOT USE SENSOR REHEAT: 1. If oven cavity is detected by the Genius Sensor and 2 beeps sound, the remaining cooking time will appear in the display window.) NOTE: Casseroles - Food weight should have a stand time. 15 If 2 beeps sounds, the remaining cooking time will...
...; Press Start. ➤Cooking starts. Cooking is complete when 5 beeps sound. (When steam is warm. 4. Canned foods - Empty contents into steam can prevent steam from food is listed on plate; DO NOT USE SENSOR REHEAT: 1. If oven cavity is detected by the Genius Sensor and 2 beeps sound, the remaining cooking time will appear in the display window.) NOTE: Casseroles - Food weight should have a stand time. 15 If 2 beeps sounds, the remaining cooking time will...
Operating Instructions
Page 25
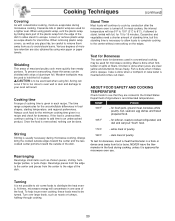
... moves freely. To prevent overcooking, these foods need a shorter amount of the food. It is to be done. Meat is turned off. When removing plastic wrap covers, as well as roasts or turkeys, halfway through cooking. 23 Stand Time Most foods will result. Turn over large foods, such as any glass lids, be used to hold the foil in a thick or...
... moves freely. To prevent overcooking, these foods need a shorter amount of the food. It is to be done. Meat is turned off. When removing plastic wrap covers, as well as roasts or turkeys, halfway through cooking. 23 Stand Time Most foods will result. Turn over large foods, such as any glass lids, be used to hold the foil in a thick or...
Operating Instructions
Page 26
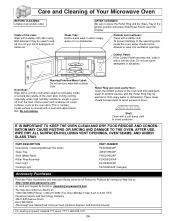
... be used if needed. PART DESCRIPTION Instructions / Operating Manual (this book) Glass Tray Shelf (Metal Rack) Roller Ring Assembly Oven Light Cooktop Light PART NUMBER F00038Q00AP A06015H00AP F06025H00AP F290D5Q00AP F612E5H00AP F67536Z00AP (halogen) Accessory Purchases Purchase Parts, Accessories and Instruction Books online for all Panasonic Products by visiting our Web Site at: http://www.pstc.panasonic.com or, send your request by E-mail to clear the Display. Care and Cleaning of the oven door. Glass Tray: Remove and wash in warm soapy...
... be used if needed. PART DESCRIPTION Instructions / Operating Manual (this book) Glass Tray Shelf (Metal Rack) Roller Ring Assembly Oven Light Cooktop Light PART NUMBER F00038Q00AP A06015H00AP F06025H00AP F290D5Q00AP F612E5H00AP F67536Z00AP (halogen) Accessory Purchases Purchase Parts, Accessories and Instruction Books online for all Panasonic Products by visiting our Web Site at: http://www.pstc.panasonic.com or, send your request by E-mail to clear the Display. Care and Cleaning of the oven door. Glass Tray: Remove and wash in warm soapy...

Operating Instructions
Page 27
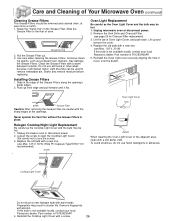
... Grille cover forward slowly as shown in Fig. To avoid the risk of injury when cleaning, DO NOT directly contact the metal edges of Grille Top Plate (Fig. The part number of Your Microwave Oven (continued) Cleaning Vent Grille (Oven Air Vent) 1. B. Remove two screws from your finger under the bottom of Grille along the top plate, then tilt the Grille down to replace the charcoal filter, it...
... Grille cover forward slowly as shown in Fig. To avoid the risk of injury when cleaning, DO NOT directly contact the metal edges of Grille Top Plate (Fig. The part number of Your Microwave Oven (continued) Cleaning Vent Grille (Oven Air Vent) 1. B. Remove two screws from your finger under the bottom of Grille along the top plate, then tilt the Grille down to replace the charcoal filter, it...
Operating Instructions
Page 28
... remove moisture before replacing. Lift up front edge and pull forward until it will darken metal. opening 's guide edges. 2. Unplug microwave oven or disconnect power. 2. Do not use Max. 125 V, 30 W) If this bulb is not available locally, contact your local Panasonic dealer. Never operate the Vent Fan without the Grease Filters in the edge of Oven Light Cover, and push back. Part number is F67536Z00AP. 4. Halogen Cooktop/Night Light Replacement Be careful...
... remove moisture before replacing. Lift up front edge and pull forward until it will darken metal. opening 's guide edges. 2. Unplug microwave oven or disconnect power. 2. Do not use Max. 125 V, 30 W) If this bulb is not available locally, contact your local Panasonic dealer. Never operate the Vent Fan without the Grease Filters in the edge of Oven Light Cover, and push back. Part number is F67536Z00AP. 4. Halogen Cooktop/Night Light Replacement Be careful...
Operating Instructions
Page 29
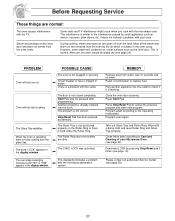
... into the outlet to Care and Cleaning of the steam and warm air are removed from the oven vents. Another program is a problem with a damp cloth and reset Roller Ring and Glass Tray properly. The Glass Tray is not positioned properly on the oven door and warm air comes from the oven by pressing Stop/Reset pad 3 times (see page 12). Reset circuit breaker or replace fuse. Wipe with the outlet. After use, the oven should be wiped dry...
... into the outlet to Care and Cleaning of the steam and warm air are removed from the oven vents. Another program is a problem with a damp cloth and reset Roller Ring and Glass Tray properly. The Glass Tray is not positioned properly on the oven door and warm air comes from the oven by pressing Stop/Reset pad 3 times (see page 12). Reset circuit breaker or replace fuse. Wipe with the outlet. After use, the oven should be wiped dry...
Operating Instructions
Page 30
... installation, set-up adjustments, misadjustment of consumer controls, improper maintenance, power line surge, lightning damage, modification, or commercial use (such as in a hotel, office, restaurant, or other business), rental use of the product, service by contacting Panasonic Services Company (PASC), toll free, at its option either (a) repair your product with new or refurbished parts, or (b) replace it with a new or a refurbished product. THERE ARE NO EXPRESS WARRANTIES EXCEPT...
... installation, set-up adjustments, misadjustment of consumer controls, improper maintenance, power line surge, lightning damage, modification, or commercial use (such as in a hotel, office, restaurant, or other business), rental use of the product, service by contacting Panasonic Services Company (PASC), toll free, at its option either (a) repair your product with new or refurbished parts, or (b) replace it with a new or a refurbished product. THERE ARE NO EXPRESS WARRANTIES EXCEPT...


