
Operating Instructions
Page 1
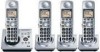
...-TG1032. Operating Instructions Expandable Digital Cordless Answering System with Caller ID. Charge the handset batteries for 7 hours before using the unit and save for customers in the U.S.A. or Puerto Rico. KX-TG1034 with 3 Handsets Model No. To use . KX-TG1035 Model shown is compatible with 2 Handsets Model No. KX-TG1032 with 5 Handsets Model No. Please read...
...-TG1032. Operating Instructions Expandable Digital Cordless Answering System with Caller ID. Charge the handset batteries for 7 hours before using the unit and save for customers in the U.S.A. or Puerto Rico. KX-TG1034 with 3 Handsets Model No. To use . KX-TG1035 Model shown is compatible with 2 Handsets Model No. KX-TG1032 with 5 Handsets Model No. Please read...

Operating Instructions
Page 2
...call 17 Phonebook Handset phonebook 18 Copying handset phonebook items . 20 Caller ID Service Using Caller ID service 21 Caller list 21 Programming Programmable settings 23 Answering System Answering system 26 Turning the answering system on/off ...handsets, conference calls 34 Registering a handset 35 Useful Information Wall mounting (Base unit only) . . . . 36 Belt clip 37 Headset (optional 38 Error messages 39 Troubleshooting 40 FCC and other information 44 Specifications 47 Customer services 48 Warranty 49 Index Index 51 2 For assistance, please visit http://www.panasonic...
...call 17 Phonebook Handset phonebook 18 Copying handset phonebook items . 20 Caller ID Service Using Caller ID service 21 Caller list 21 Programming Programmable settings 23 Answering System Answering system 26 Turning the answering system on/off ...handsets, conference calls 34 Registering a handset 35 Useful Information Wall mounting (Base unit only) . . . . 36 Belt clip 37 Headset (optional 38 Error messages 39 Troubleshooting 40 FCC and other information 44 Specifications 47 Customer services 48 Warranty 49 Index Index 51 2 For assistance, please visit http://www.panasonic...

Operating Instructions
Page 3
Introduction Product information Thank you for the following models: KX-TG1032 KX-TG1033 KX-TG1034 KX-TG1035 Expanding your phone system You can be registered to a single base unit. Handset (optional): KX-TGA101 For assistance, please visit http://www.panasonic.com/help 3 These operating instructions can be used for purchasing a Panasonic cordless telephone. L A maximum of 6 total handsets (included and optional) can expand the phone system by registering optional handsets to a single base unit.
Introduction Product information Thank you for the following models: KX-TG1032 KX-TG1033 KX-TG1034 KX-TG1035 Expanding your phone system You can be registered to a single base unit. Handset (optional): KX-TGA101 For assistance, please visit http://www.panasonic.com/help 3 These operating instructions can be used for purchasing a Panasonic cordless telephone. L A maximum of 6 total handsets (included and optional) can expand the phone system by registering optional handsets to a single base unit.

Operating Instructions
Page 4
HHR- 55AAABU) 5 Handset PQYNTG1032SR 2 2 3 4 4 5 cover*1 6 Belt clip PQKE10456Z2 2 2 3 4 4 5 7 Charger PQLV30053ZS 1 - 2 3 - 4 PQLV30053ZB - 1 - - 3 - 8 AC adaptor PQLV209V for base unit 1 1 1 1 1 1 2 Telephone PQJA10075Z line cord 1 1 1 1 1 1 3 Wall mounting adaptor ...1033S 1034S 1034B 1035S 1 AC adaptor PQLV207V for charger 1 1 2 3 3 4 *1 The handset cover comes attached to the handset. 1 2 3 4 5 6 7 8 4 For assistance, please visit http://www.panasonic.com/help Introduction Accessory information Included accessories No.
HHR- 55AAABU) 5 Handset PQYNTG1032SR 2 2 3 4 4 5 cover*1 6 Belt clip PQKE10456Z2 2 2 3 4 4 5 7 Charger PQLV30053ZS 1 - 2 3 - 4 PQLV30053ZB - 1 - - 3 - 8 AC adaptor PQLV209V for base unit 1 1 1 1 1 1 2 Telephone PQJA10075Z line cord 1 1 1 1 1 1 3 Wall mounting adaptor ...1033S 1034S 1034B 1035S 1 AC adaptor PQLV207V for charger 1 1 2 3 3 4 *1 The handset cover comes attached to the handset. 1 2 3 4 5 6 7 8 4 For assistance, please visit http://www.panasonic.com/help Introduction Accessory information Included accessories No.

Operating Instructions
Page 5
Introduction Additional/replacement accessories Accessory item Rechargeable nickel metal hydride (Ni-MH) batteries Accessory handset with charger Headset T-adaptor Order number HHR-4DPA KX-TGA101 KX-TCA60, KX-TCA86, KX-TCA88HA, KXTCA92, KX-TCA93, KX-TCA94, or KX-TCA95 KX-J66 Sales and support information L To order additional/replacement accessories, call 1-866-605-1277. For assistance, please visit http://www.panasonic.com/help 5 L TTY users (hearing or speech impaired users) can call 1-800-332-5368.
Introduction Additional/replacement accessories Accessory item Rechargeable nickel metal hydride (Ni-MH) batteries Accessory handset with charger Headset T-adaptor Order number HHR-4DPA KX-TGA101 KX-TCA60, KX-TCA86, KX-TCA88HA, KXTCA92, KX-TCA93, KX-TCA94, or KX-TCA95 KX-J66 Sales and support information L To order additional/replacement accessories, call 1-866-605-1277. For assistance, please visit http://www.panasonic.com/help 5 L TTY users (hearing or speech impaired users) can call 1-800-332-5368.
Operating Instructions
Page 8
...the product with a soft moist cloth. Routine care L Wipe the outer surface of mobile phone cell stations (avoid putting the base unit on a bay window or near a window). ...maximum coverage and noise- at a convenient, high, and central location with each other compatible Panasonic units use radio waves to another location for better reception. avoid facing radio frequency transmitters, ...location is not satisfactory, move the base unit to communicate with no obstructions between the handset and base unit in an indoor environment. - Introduction determine if they are adequately shielded...
...the product with a soft moist cloth. Routine care L Wipe the outer surface of mobile phone cell stations (avoid putting the base unit on a bay window or near a window). ...maximum coverage and noise- at a convenient, high, and central location with each other compatible Panasonic units use radio waves to another location for better reception. avoid facing radio frequency transmitters, ...location is not satisfactory, move the base unit to communicate with no obstructions between the handset and base unit in an indoor environment. - Introduction determine if they are adequately shielded...

Operating Instructions
Page 9
...AC adaptor should be connected to prevent it from being disconnected. For assistance, please visit http://www.panasonic.com/help 9 Preparation Setting up the handset Connecting the AC adaptor L Use only the included Panasonic AC adaptor PQLV209. (120 V AC, 60 Hz) Bottom of the charger Hooks Hooks Fasten the...base unit Connecting the AC adaptor and telephone line cord Connect the telephone line cord until it to the same telephone line jack using a Panasonic T-adaptor (page 5). If you subscribe to a DSL service Please attach a noise filter (contact your DSL provider) to the telephone line...
...AC adaptor should be connected to prevent it from being disconnected. For assistance, please visit http://www.panasonic.com/help 9 Preparation Setting up the handset Connecting the AC adaptor L Use only the included Panasonic AC adaptor PQLV209. (120 V AC, 60 Hz) Bottom of the charger Hooks Hooks Fasten the...base unit Connecting the AC adaptor and telephone line cord Connect the telephone line cord until it to the same telephone line jack using a Panasonic T-adaptor (page 5). If you subscribe to a DSL service Please attach a noise filter (contact your DSL provider) to the telephone line...

Operating Instructions
Page 10
... on page 5, 7. L Do NOT use . Close the handset cover. Preparation Battery installation/ replacement 1 Press the notch of the arrow. Cd batteries. L When replacing batteries, we recommend using the Panasonic rechargeable batteries noted on how to recycle this battery. Charge contacts... 10 For assistance, please visit http://www.panasonic.com/help Battery charge Place the handset on the handset lights. L Install the batteries in the direction of the handset cover firmly, and slide it in proper order (S, T), matching the correct...
... on page 5, 7. L Do NOT use . Close the handset cover. Preparation Battery installation/ replacement 1 Press the notch of the arrow. Cd batteries. L When replacing batteries, we recommend using the Panasonic rechargeable batteries noted on how to recycle this battery. Charge contacts... 10 For assistance, please visit http://www.panasonic.com/help Battery charge Place the handset on the handset lights. L Install the batteries in the direction of the handset cover firmly, and slide it in proper order (S, T), matching the correct...

Operating Instructions
Page 11
..., the entire display may go blank after you want to use the handset immediately, charge the batteries for at least 15 minutes. Panasonic battery performance Operation While in use (talking) While not in use. L After the handset is fully charged, displaying "Charge completed", it charge for 7 hours.... For assistance, please visit http://www.panasonic.com/help 11 L The battery level may not be displayed correctly or the entire display...
..., the entire display may go blank after you want to use the handset immediately, charge the batteries for at least 15 minutes. Panasonic battery performance Operation While in use (talking) While not in use. L After the handset is fully charged, displaying "Charge completed", it charge for 7 hours.... For assistance, please visit http://www.panasonic.com/help 11 L The battery level may not be displayed correctly or the entire display...

Operating Instructions
Page 12
F " " The words in the Button name brackets indicate A BC button names on the JI H G display. Example: D {C}, {OFF} E i Proceed to {V}/{^}: "Off" select "Off". Preparation Symbols used in these operating instructions Controls Symbol Meaning Base unit { } The words in Example: "Alarm" quotations indicate the menu on the handset and base unit. A Speaker Example: Press {V} or {^} to the next operation. B {} (SKIP) D {ANSWER ON} ANSWER ON indicator E {STOP} F {ERASE} G {MESSAGE} MESSAGE indicator H VOLUME {>} {
F " " The words in the Button name brackets indicate A BC button names on the JI H G display. Example: D {C}, {OFF} E i Proceed to {V}/{^}: "Off" select "Off". Preparation Symbols used in these operating instructions Controls Symbol Meaning Base unit { } The words in Example: "Alarm" quotations indicate the menu on the handset and base unit. A Speaker Example: Press {V} or {^} to the next operation. B {} (SKIP) D {ANSWER ON} ANSWER ON indicator E {STOP} F {ERASE} G {MESSAGE} MESSAGE indicator H VOLUME {>} {
Operating Instructions
Page 13
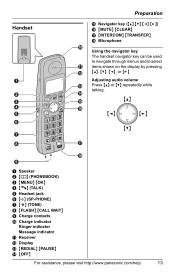
...} D {C} (TALK) E Headset jack F {s} (SP-PHONE) G {*} (TONE) H {FLASH} {CALL WAIT} I Charge contacts J Charge indicator Ringer indicator Message indicator K Receiver L Display M {REDIAL} {PAUSE} N {OFF} For assistance, please visit http://www.panasonic.com/help 13 Handset A B C D E F G H PHONEBOOK OK PAUSE Preparation O Navigator key ({^} {V} {}) P {MUTE} {CLEAR} Q {INTERCOM} {TRANSFER} R Microphone J Using the navigator key The handset navigator key can be...
...} D {C} (TALK) E Headset jack F {s} (SP-PHONE) G {*} (TONE) H {FLASH} {CALL WAIT} I Charge contacts J Charge indicator Ringer indicator Message indicator K Receiver L Display M {REDIAL} {PAUSE} N {OFF} For assistance, please visit http://www.panasonic.com/help 13 Handset A B C D E F G H PHONEBOOK OK PAUSE Preparation O Navigator key ({^} {V} {}) P {MUTE} {CLEAR} Q {INTERCOM} {TRANSFER} R Microphone J Using the navigator key The handset navigator key can be...

Operating Instructions
Page 14
...registered to base unit, no power on base unit) 5 Battery level Example: [1] The handset's extension number (example shown here: handset 1) In use Line or answering system is "English". 1 {MENU} 2 {V}/{^}: "Handset settings" i {OK} 3 {V}/{^}: "Display settings" i {OK} 4 {V}/{^}: "Change ..." i {OK} 3 {V}/{^}: "Set dial mode" i {OK} 4 {V}/{^}: Select the desired setting. 5 {OK} i {OFF} 14 For assistance, please visit http://www.panasonic.com/help The default setting is "English". 1 {MENU} 2 {V}/{^}: "Answering device" i {OK} 3 {V}/{^}: "Settings" i {OK} 4 {V}/{^}: "Voice prompt" i {...
...registered to base unit, no power on base unit) 5 Battery level Example: [1] The handset's extension number (example shown here: handset 1) In use Line or answering system is "English". 1 {MENU} 2 {V}/{^}: "Handset settings" i {OK} 3 {V}/{^}: "Display settings" i {OK} 4 {V}/{^}: "Change ..." i {OK} 3 {V}/{^}: "Set dial mode" i {OK} 4 {V}/{^}: Select the desired setting. 5 {OK} i {OFF} 14 For assistance, please visit http://www.panasonic.com/help The default setting is "English". 1 {MENU} 2 {V}/{^}: "Answering device" i {OK} 3 {V}/{^}: "Settings" i {OK} 4 {V}/{^}: "Voice prompt" i {...
Operating Instructions
Page 16
...) 2 When you finish talking, press {OFF}. Making a call is pressed. You can also adjust the handset ringer volume (page 24). 16 For assistance, please visit http://www.panasonic.com/help L Speak alternately with a PBX: 1 {9} i {PAUSE} i Dial the phone number. 2 {C} Note: L A 3.5 second pause is also needed (page 19). Answering calls When a call using a PBX...
...) 2 When you finish talking, press {OFF}. Making a call is pressed. You can also adjust the handset ringer volume (page 24). 16 For assistance, please visit http://www.panasonic.com/help L Speak alternately with a PBX: 1 {9} i {PAUSE} i Dial the phone number. 2 {C} Note: L A 3.5 second pause is also needed (page 19). Answering calls When a call using a PBX...
Operating Instructions
Page 17
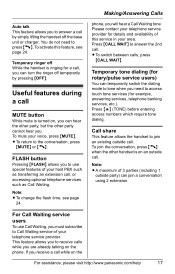
... off temporarily by simply lifting the handset off While the handset is turned on an outside call. Press {CALL WAIT} to answer the 2nd call , or accessing optional telephone services such as Call Waiting. If you receive a call while on the phone. Making/Answering Calls Auto talk This... existing outside party) can temporarily switch the dialing mode to receive calls while you are already talking on the For assistance, please visit http://www.panasonic.com/help 17 Note: L A maximum of your voice, press {MUTE}. To mute your host PBX such as transferring an extension call ....
... off temporarily by simply lifting the handset off While the handset is turned on an outside call. Press {CALL WAIT} to answer the 2nd call , or accessing optional telephone services such as Call Waiting. If you receive a call while on the phone. Making/Answering Calls Auto talk This... existing outside party) can temporarily switch the dialing mode to receive calls while you are already talking on the For assistance, please visit http://www.panasonic.com/help 17 Note: L A maximum of your voice, press {MUTE}. To mute your host PBX such as transferring an extension call ....
Operating Instructions
Page 18
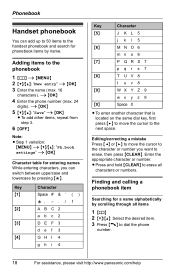
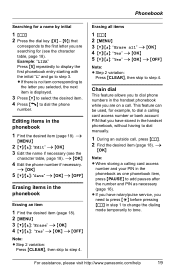
... the phone number (max. 24 digits). i {OK} 5 {V}/{^}: "Save" i {OK} L To add other items, repeat from step 3. 6 {OFF} Note: L Step 1 variation: {MENU} i {V}/{^}: "Ph.book settings" i {OK} Character table for a name alphabetically by scrolling through all characters or numbers. Phonebook Handset phonebook You... cursor to erase, then press {CLEAR}. Editing/correcting a mistake Press {} to move the cursor to dial the phone number. 18 For assistance, please visit http://www.panasonic.com/help L Press and hold {CLEAR} to erase all items 1 {k} 2 {V}/{^}: Select the desired item. ...
... the phone number (max. 24 digits). i {OK} 5 {V}/{^}: "Save" i {OK} L To add other items, repeat from step 3. 6 {OFF} Note: L Step 1 variation: {MENU} i {V}/{^}: "Ph.book settings" i {OK} Character table for a name alphabetically by scrolling through all characters or numbers. Phonebook Handset phonebook You... cursor to erase, then press {CLEAR}. Editing/correcting a mistake Press {} to move the cursor to dial the phone number. 18 For assistance, please visit http://www.panasonic.com/help L Press and hold {CLEAR} to erase all items 1 {k} 2 {V}/{^}: Select the desired item. ...
Operating Instructions
Page 19
...a calling card access number or bank account PIN that corresponds to step 3. i {OK} 5 {V}/{^}: "Save" i {OK} i {OFF} Erasing items in the handset phonebook while you to dial phone numbers in the phonebook Erasing an item 1 Find the desired item (page 18). 2 {MENU} 3 {V}/{^}: "Erase" i {OK} 4 {V}/{^}: "Yes" i {OK... to change the dialing mode temporarily to dial manually. 1 During an outside call . i {OK} 4 Edit the phone number if necessary. For assistance, please visit http://www.panasonic.com/help 19 i {MENU} 2 {V}/{^}: "Edit" i {OK} 3 Edit the name if necessary (see the ...
...a calling card access number or bank account PIN that corresponds to step 3. i {OK} 5 {V}/{^}: "Save" i {OK} i {OFF} Erasing items in the handset phonebook while you to dial phone numbers in the phonebook Erasing an item 1 Find the desired item (page 18). 2 {MENU} 3 {V}/{^}: "Erase" i {OK} 4 {V}/{^}: "Yes" i {OK... to change the dialing mode temporarily to dial manually. 1 During an outside call . i {OK} 4 Edit the phone number if necessary. For assistance, please visit http://www.panasonic.com/help 19 i {MENU} 2 {V}/{^}: "Edit" i {OK} 3 Edit the name if necessary (see the ...

Operating Instructions
Page 20
... copied, "Completed" is displayed. Phonebook Copying handset phonebook items You can copy one or all of the phonebook items from one handset to by pressing the desired handset number ({1} - {6}). L When an item has been copied, "Completed" is displayed. 4 {OFF} 20 For assistance, please visit http://www.panasonic.com/help Copying an item 1 Find the...
... copied, "Completed" is displayed. Phonebook Copying handset phonebook items You can copy one or all of the phonebook items from one handset to by pressing the desired handset number ({1} - {6}). L When an item has been copied, "Completed" is displayed. 4 {OFF} 20 For assistance, please visit http://www.panasonic.com/help Copying an item 1 Find the...
Operating Instructions
Page 23
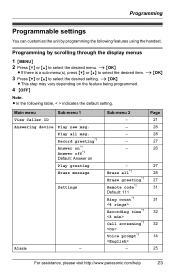
... Erase message Settings Alarm - Record greeting*1 Answer on*1 Answer off*1 Default: Answer on the feature being programmed. 4 {OFF} Note: L In the following features using the handset. i {OK} 3 Press {V} or {^} to select the desired item. Main menu Sub-menu 1 View Caller ID - Sub-menu 2 - - - - - Answering device Play new msg. Page 21 28...*1 27 Remote code*1 31 Default: 111 Ring count*1 31 Recording time*1 32 Call screening*1 32 Voice prompt*1 14 - 25 For assistance, please visit http://www.panasonic.com/help 23
... Erase message Settings Alarm - Record greeting*1 Answer on*1 Answer off*1 Default: Answer on the feature being programmed. 4 {OFF} Note: L In the following features using the handset. i {OK} 3 Press {V} or {^} to select the desired item. Main menu Sub-menu 1 View Caller ID - Sub-menu 2 - - - - - Answering device Play new msg. Page 21 28...*1 27 Remote code*1 31 Default: 111 Ring count*1 31 Recording time*1 32 Call screening*1 32 Voice prompt*1 14 - 25 For assistance, please visit http://www.panasonic.com/help 23
Operating Instructions
Page 24
...if you prefer not to 5). Programming Main menu Sub-menu 1 Ph.book settings New entry Copy all Erase all Handset settings Ringer settings Display settings Registration Other settings Set date & time Set tel line Date and time*1 Time adjustment*1,...edit - - - - - The preset melodies in this product are used with permission of the handsets, you do not need to program the same item using another handset. *2 If you subscribe to a distinctive ring service (such as IDENTA-RING), select a tone... Inc. *3 Turn this feature. 24 For assistance, please visit http://www.panasonic.com/help
...if you prefer not to 5). Programming Main menu Sub-menu 1 Ph.book settings New entry Copy all Erase all Handset settings Ringer settings Display settings Registration Other settings Set date & time Set tel line Date and time*1 Time adjustment*1,...edit - - - - - The preset melodies in this product are used with permission of the handsets, you do not need to program the same item using another handset. *2 If you subscribe to a distinctive ring service (such as IDENTA-RING), select a tone... Inc. *3 Turn this feature. 24 For assistance, please visit http://www.panasonic.com/help
Operating Instructions
Page 25
...{OFF} Note: L To stop the alarm, press any dial key or place the handset on your telephone exchange or host PBX. The setting should stay at "700ms" unless... {OK} Off Turns alarm off , the handset rings at the set the date and time first. *6 The flash time depends...where you select "Once", the setting will not sound until the handset is received. Press {OK} again, then press {OFF} to...{OK} L We recommend selecting a different ringer tone from outside call . Customer support The handset can download the operating instructions or get further information for alarm. Consult your computer. 1 {...
...{OFF} Note: L To stop the alarm, press any dial key or place the handset on your telephone exchange or host PBX. The setting should stay at "700ms" unless... {OK} Off Turns alarm off , the handset rings at the set the date and time first. *6 The flash time depends...where you select "Once", the setting will not sound until the handset is received. Press {OK} again, then press {OFF} to...{OK} L We recommend selecting a different ringer tone from outside call . Customer support The handset can download the operating instructions or get further information for alarm. Consult your computer. 1 {...

