

KXT7667 User Guide
Page 6
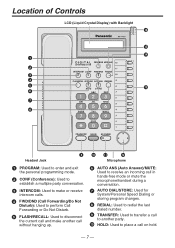
Location of Controls LCD (Liquid Crystal Display) with Backlight 16 15 14 1 2 3 4 5 13 6 7 8 9 Headset Jack 1 PROGRAM: Used to enter and exit the personal programming mode. 2 CONF (Conference): Used to establish a multiple party conversation. 3 INTERCOM: Used to make or receive ...
Location of Controls LCD (Liquid Crystal Display) with Backlight 16 15 14 1 2 3 4 5 13 6 7 8 9 Headset Jack 1 PROGRAM: Used to enter and exit the personal programming mode. 2 CONF (Conference): Used to establish a multiple party conversation. 3 INTERCOM: Used to make or receive ...

KXT7667 User Guide
Page 7
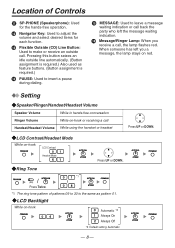
... *2 1 Always On 2 Always Off *2 Default setting: Automatic - 7 - LCD Backlight While on -hook or receiving a call Handset/Headset Volume While using the handset or headset Press UP or DOWN. Pressing this button seizes an idle outside call. Location of patterns 09 to leave a message waiting indication or.... 15 MESSAGE: Used to 30 is the same as feature buttons. (Button assignment is required.) Also used as pattern 01. LCD Contrast/Headset Mode While on red. When someone has left the message waiting indication. 16 Message/Ringer Lamp: When you a message, the lamp stays ...
... *2 1 Always On 2 Always Off *2 Default setting: Automatic - 7 - LCD Backlight While on -hook or receiving a call Handset/Headset Volume While using the handset or headset Press UP or DOWN. Pressing this button seizes an idle outside call. Location of patterns 09 to leave a message waiting indication or.... 15 MESSAGE: Used to 30 is the same as feature buttons. (Button assignment is required.) Also used as pattern 01. LCD Contrast/Headset Mode While on red. When someone has left the message waiting indication. 16 Message/Ringer Lamp: When you a message, the lamp stays ...
Quick Reference Guide
Page 7
Location of Controls LCD (Liquid Crystal Display) with Backlight 16 15 14 1 2 3 4 5 13 6 7 8 9 Headset Jack 1 PROGRAM: Used to enter and exit the personal programming mode. 2 CONF (Conference): Used to establish a multiple party conversation. 3 INTERCOM: Used to make or receive ...
Location of Controls LCD (Liquid Crystal Display) with Backlight 16 15 14 1 2 3 4 5 13 6 7 8 9 Headset Jack 1 PROGRAM: Used to enter and exit the personal programming mode. 2 CONF (Conference): Used to establish a multiple party conversation. 3 INTERCOM: Used to make or receive ...
Quick Reference Guide
Page 8
...items for each function. 13 Flexible Outside (CO) Line Button: Used to leave a message waiting indication or call Handset/Headset Volume While using the handset or headset Press UP or DOWN. LCD Backlight While on -hook or receiving a call back the party who left you receive ...a call . Setting Speaker/Ringer/Handset/Headset Volume Speaker Volume While in hands-free conversation Ringer Volume While on -hook 04 0 Automatic *2 1 Always On 2 Always Off *2 Default setting:...
...items for each function. 13 Flexible Outside (CO) Line Button: Used to leave a message waiting indication or call Handset/Headset Volume While using the handset or headset Press UP or DOWN. LCD Backlight While on -hook or receiving a call back the party who left you receive ...a call . Setting Speaker/Ringer/Handset/Headset Volume Speaker Volume While in hands-free conversation Ringer Volume While on -hook 04 0 Automatic *2 1 Always On 2 Always Off *2 Default setting:...

Quick Reference Guide
Page 10
Wall Mounting Headset (not included) Recommendable: KX-TCA86, KX-TCA91, KX-TCA92 Not compatible: KX-T7090 1 Pull down during a conversation, hook it locks, 3 Mount the unit on the wall. Connection The telephone line cord (included) To the main unit ( TO MAIN UNIT ) /PABX < Back view > Headset CAUTION Ensure the cord is inserted in ) 2 Remove the attached stand. 2 1 To temporarily place the handset down the handset hook until it over the top edge of the phone as shown. - 10 - so the tab holds the handset. 83 mm (3-1/4 in the groove to prevent damage to the connector.
Wall Mounting Headset (not included) Recommendable: KX-TCA86, KX-TCA91, KX-TCA92 Not compatible: KX-T7090 1 Pull down during a conversation, hook it locks, 3 Mount the unit on the wall. Connection The telephone line cord (included) To the main unit ( TO MAIN UNIT ) /PABX < Back view > Headset CAUTION Ensure the cord is inserted in ) 2 Remove the attached stand. 2 1 To temporarily place the handset down the handset hook until it over the top edge of the phone as shown. - 10 - so the tab holds the handset. 83 mm (3-1/4 in the groove to prevent damage to the connector.


