Operating Instructions
Page 1
Operating Instructions coi. MODEL No. Le rogamos leer antes de utilizer. Instrucciones de operacion INTERCOM Installation Procedure Connection Preparation Basic Operation Manual outward dialing and receiving Switching to hands-free or handset Mute operation Automatic dialing Station Programming Detailed Operation Indicators light's Hold Intercom Paging Conference Storing number during a conversation Memory transfer Pause usage Other features Information Tarjeta de referencia rapida Procedimiento de Instalaci0n, Conexi6n Troubleshooting guide, others Connection to the Telephone Line ...
Operating Instructions coi. MODEL No. Le rogamos leer antes de utilizer. Instrucciones de operacion INTERCOM Installation Procedure Connection Preparation Basic Operation Manual outward dialing and receiving Switching to hands-free or handset Mute operation Automatic dialing Station Programming Detailed Operation Indicators light's Hold Intercom Paging Conference Storing number during a conversation Memory transfer Pause usage Other features Information Tarjeta de referencia rapida Procedimiento de Instalaci0n, Conexi6n Troubleshooting guide, others Connection to the Telephone Line ...
Operating Instructions
Page 2
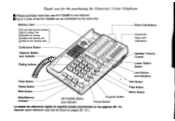
Conference Button Intercom Button and Indicator O O 'O ,OO /4Z) O 'O cz).'" :50 Direct Call Buttons Extension Keys and Indicators Speaker Volume Control Dialing buttons > ..! / Flash Button Redial Button Mute Button Mute/Memory Indicator SP-PHONE Button and Indicator Program Button Pause Button La tarjeta de referencia rapida en espaliol puede encontrarse en las paginas 28-31. (Spanish quick reference card can be connected on the same line. • Please purchase more than one KX-T3250B to use the reverse side for storing numbers into...
Conference Button Intercom Button and Indicator O O 'O ,OO /4Z) O 'O cz).'" :50 Direct Call Buttons Extension Keys and Indicators Speaker Volume Control Dialing buttons > ..! / Flash Button Redial Button Mute Button Mute/Memory Indicator SP-PHONE Button and Indicator Program Button Pause Button La tarjeta de referencia rapida en espaliol puede encontrarse en las paginas 28-31. (Spanish quick reference card can be connected on the same line. • Please purchase more than one KX-T3250B to use the reverse side for storing numbers into...
Operating Instructions
Page 3
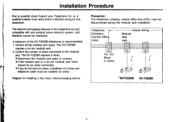
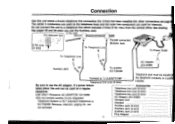
... jack. The intercom and paging features in Home '"KX-1 -3250B KX-T3250B - 2 - Confirm all the modular jack types. Telephone Company Central Office Lines House Wiring Modular Wall Jack Tel. The KX-T32506 requires a six pin modular jack. 2. Confirm the number of five KX-T3250B telephones is a six pin modular jack there should be six wires connected. • If you do not have six wires, installation of a three pair telephone...
... jack. The intercom and paging features in Home '"KX-1 -3250B KX-T3250B - 2 - Confirm all the modular jack types. Telephone Company Central Office Lines House Wiring Modular Wall Jack Tel. The KX-T32506 requires a six pin modular jack. 2. Confirm the number of five KX-T3250B telephones is a six pin modular jack there should be six wires connected. • If you do not have six wires, installation of a three pair telephone...
Operating Instructions
Page 4
... Auxiliary Jack. 2-Tel Line For Intercom line 7-1 2-Tel Line (4 wire) t To Telephone Line Parallel connected Modular Jack To Power Outlet To Telephone Line t 0 AC Adaptor or Auxiliary Jack 4 To another 2-Line Integrated Telephone System or SLT (standard telephone) to AC Adaptor (KX-A09B) Handset cord Handset 1 1 1 KX-T3250B. Because, intercom, paging etc. are used as a regular Telephone line cord (6-wire) telephone. See drawing. See pages 38 and 39 when you use the AC adaptor. nos.) from the central office. Connection Use this unit where a 6-wire telephone line...
... Auxiliary Jack. 2-Tel Line For Intercom line 7-1 2-Tel Line (4 wire) t To Telephone Line Parallel connected Modular Jack To Power Outlet To Telephone Line t 0 AC Adaptor or Auxiliary Jack 4 To another 2-Line Integrated Telephone System or SLT (standard telephone) to AC Adaptor (KX-A09B) Handset cord Handset 1 1 1 KX-T3250B. Because, intercom, paging etc. are used as a regular Telephone line cord (6-wire) telephone. See drawing. See pages 38 and 39 when you use the AC adaptor. nos.) from the central office. Connection Use this unit where a 6-wire telephone line...
Operating Instructions
Page 7
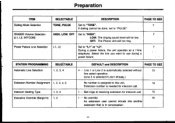
ITEM Dialing Mode Selection RINGER Volume Selection (L1, L2, INT'COM) Power Failure Line Selection SELECTABLE DESCRIPTION PAGE TO SEE TONE, PULSE Set to "TONE". 7 If dialing cannot be low. Select the line you want to "PULSE". HIGH, LOW, OFF Set to this unit, 14 Extension number is needed for intercom call. 1 • •• Bell rings at receiving extension for intercom call. 15 1 .• • No override. 16 An extension user cannot intrude into...
ITEM Dialing Mode Selection RINGER Volume Selection (L1, L2, INT'COM) Power Failure Line Selection SELECTABLE DESCRIPTION PAGE TO SEE TONE, PULSE Set to "TONE". 7 If dialing cannot be low. Select the line you want to "PULSE". HIGH, LOW, OFF Set to this unit, 14 Extension number is needed for intercom call. 1 • •• Bell rings at receiving extension for intercom call. 15 1 .• • No override. 16 An extension user cannot intrude into...
Operating Instructions
Page 9
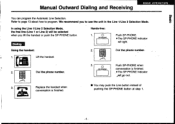
... SP-PHONE. •The SP-PHONE indicator will be selected when you to program. EIBEI ODD 000 CIE1 Dial the phone number. 2. OBEI CIE10 EIOCI CIE3 Dial the phone number. 3. Manual Outward Dialing and Receiving BASIC OPERATION You can program the Automatic Line Selection. 0 Refer to page 13 about how to use the unit in the Line 1/Line 2 Selection Mode. Lift the handset. 2. In using the Line 1/Line 2 Selection Mode, the free line (Line 1 or Line 2) will light. Using the handset: 1.
... SP-PHONE. •The SP-PHONE indicator will be selected when you to program. EIBEI ODD 000 CIE1 Dial the phone number. 2. OBEI CIE10 EIOCI CIE3 Dial the phone number. 3. Manual Outward Dialing and Receiving BASIC OPERATION You can program the Automatic Line Selection. 0 Refer to page 13 about how to use the unit in the Line 1/Line 2 Selection Mode. Lift the handset. 2. In using the Line 1/Line 2 Selection Mode, the free line (Line 1 or Line 2) will light. Using the handset: 1.
Operating Instructions
Page 10
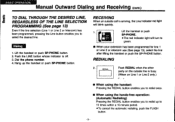
... the handset or push SP-PHONE button. RECEIVING When an outside call is off. 3. Dial the phone number. 4. Push the LINE button whose indicator is arriving, the Line Indicator red light will turn to select the desired line. BASIC OPERATION Manual Outward Dialing and Receiving (cont.) TO DIAL THROUGH THE DESIRED LINE, REGARDLESS OF THE LINE SELECTION PROGRAMMING (See page 13) Even if the line selection (Line 1 or Line 2 or Intercom) has been programmed, pressing the Line button...
... the handset or push SP-PHONE button. RECEIVING When an outside call is off. 3. Dial the phone number. 4. Push the LINE button whose indicator is arriving, the Line Indicator red light will turn to select the desired line. BASIC OPERATION Manual Outward Dialing and Receiving (cont.) TO DIAL THROUGH THE DESIRED LINE, REGARDLESS OF THE LINE SELECTION PROGRAMMING (See page 13) Even if the line selection (Line 1 or Line 2 or Intercom) has been programmed, pressing the Line button...
Operating Instructions
Page 11
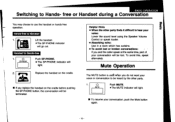
... voice: Lower the sound level using the Speaker Volume Control or speak louder. • Absorbing echo: Use in a room which has curtains. • To avoid lost . Mute Operation The MUTE button is used when you and the caller speak at the same time, part of your voice or conversation to be terminated. Hands-free to Hands-free 1. Helpful Hints • When the other party. 1. 0 MUTE Push MUTE. •The MUTE...
... voice: Lower the sound level using the Speaker Volume Control or speak louder. • Absorbing echo: Use in a room which has curtains. • To avoid lost . Mute Operation The MUTE button is used when you and the caller speak at the same time, part of your voice or conversation to be terminated. Hands-free to Hands-free 1. Helpful Hints • When the other party. 1. 0 MUTE Push MUTE. •The MUTE...
Operating Instructions
Page 12
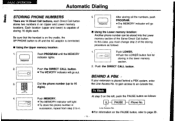
... line. Push the DIRECT CALL button. • The MEMORY indicator will light. •To store the phone number in succession, repeat from step 2 to 16 digits). 5. BASIC OPERATION Automatic Dialing tcoo STORING PHONE NUMBERS CO There are 14 Direct Call buttons, each . Push MEMORY. Each location (upper and lower) is placed behind a PBX system, enter the Line Access No. PROGRAM Push PROGRAM until the MEMORY indicator lights. 2. BEHIND A PBX If your extension is capable of the Same Direct Call button. to gain access...
... line. Push the DIRECT CALL button. • The MEMORY indicator will light. •To store the phone number in succession, repeat from step 2 to 16 digits). 5. BASIC OPERATION Automatic Dialing tcoo STORING PHONE NUMBERS CO There are 14 Direct Call buttons, each . Push MEMORY. Each location (upper and lower) is placed behind a PBX system, enter the Line Access No. PROGRAM Push PROGRAM until the MEMORY indicator lights. 2. BEHIND A PBX If your extension is capable of the Same Direct Call button. to gain access...
Operating Instructions
Page 13
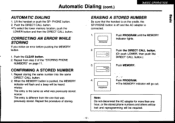
... MEMORY indicator will flash and a beep will go out. Note: Do not disconnect the AC adaptor for more than one that the handset is different from step 2 of storing. ERASING A STORED NUMBER Be sure that was previously stored. *once: The entry is on page 11. Push the CLEAR button. 2. Automatic Dialing (cont.) AUTOMATIC DIALING 1. PHONE button. 2. PROGRAM Push PROGRAM. •The MEMORY indicator will be required. -12- CONFIRMING A STORED NUMBER...
... MEMORY indicator will flash and a beep will go out. Note: Do not disconnect the AC adaptor for more than one that the handset is different from step 2 of storing. ERASING A STORED NUMBER Be sure that was previously stored. *once: The entry is on page 11. Push the CLEAR button. 2. Automatic Dialing (cont.) AUTOMATIC DIALING 1. PHONE button. 2. PROGRAM Push PROGRAM. •The MEMORY indicator will be required. -12- CONFIRMING A STORED NUMBER...
Operating Instructions
Page 14
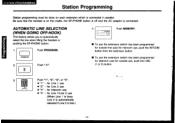
Push MEMORY. 0 MEMORY 1. PROGRAM 2. AUTOMATIC LINE SELECTION (WHEN GOING OFF-HOOK) This feature allows you to automatically select the line when lifting the handset or pushing the SP-PHONE button. 4. Push "1", "2", "3", or "4". • "1" for Line 1 use • "2" for Line 2 use • "3" for Intercom use • "4" for Line 1/Line 2 use (When Line 1 is busy, Line 2 is automatically selected if Line 2 is free.) Push PROGRAM. Be sure that the handset is on each extension which is connected in parallel...
Push MEMORY. 0 MEMORY 1. PROGRAM 2. AUTOMATIC LINE SELECTION (WHEN GOING OFF-HOOK) This feature allows you to automatically select the line when lifting the handset or pushing the SP-PHONE button. 4. Push "1", "2", "3", or "4". • "1" for Line 1 use • "2" for Line 2 use • "3" for Intercom use • "4" for Line 1/Line 2 use (When Line 1 is busy, Line 2 is automatically selected if Line 2 is free.) Push PROGRAM. Be sure that the handset is on each extension which is connected in parallel...
Operating Instructions
Page 15
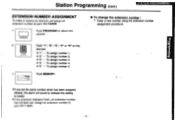
... Programming (cont.) EXTENSION NUMBER ASSIGNMENT To make or receive an intercom call assign an extension number at each KX-T3250B. 1. DBE MOO 1:1E -] Push "1", "2", "3", "4" or "5" on the dial pad. •"1" ••• To assign number 1. •"2" ••• To assign number 2. •"3" ••• To assign number 3. • "4" ••• To assign number 4. •"5" ••• To assign number 5. 1. PROGRAM Push PROGRAM for about one second. 2. STATION PROGRAMMING Assign an extension number...
... Programming (cont.) EXTENSION NUMBER ASSIGNMENT To make or receive an intercom call assign an extension number at each KX-T3250B. 1. DBE MOO 1:1E -] Push "1", "2", "3", "4" or "5" on the dial pad. •"1" ••• To assign number 1. •"2" ••• To assign number 2. •"3" ••• To assign number 3. • "4" ••• To assign number 4. •"5" ••• To assign number 5. 1. PROGRAM Push PROGRAM for about one second. 2. STATION PROGRAMMING Assign an extension number...
Operating Instructions
Page 18
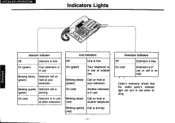
... line Blinking slowly Call on hold at (red) another telephone Blinking quickly Call is arriving (red) Extension Indicators Off Extension is on hold Caller's extension shows that the called party's indicator light will turn to red when dialing. - 17 - DETAILED OPERATION Indicators Lights • • Intercom Indicator Off Intercom is free On (green) Your extension is in use Blinking slowly (green) Intercom call on hold at your extension Blinking quickly Intercom call is (green) arriving On (red) Intercom is in use at other extension Line Indicators Off Line...
... line Blinking slowly Call on hold at (red) another telephone Blinking quickly Call is arriving (red) Extension Indicators Off Extension is on hold Caller's extension shows that the called party's indicator light will turn to red when dialing. - 17 - DETAILED OPERATION Indicators Lights • • Intercom Indicator Off Intercom is free On (green) Your extension is in use Blinking slowly (green) Intercom call on hold at your extension Blinking quickly Intercom call is (green) arriving On (red) Intercom is in use at other extension Line Indicators Off Line...

Operating Instructions
Page 20
... CALL ON HOLD Example: Call on hold Call in progress New call Line 1 Line 2 Example: The first call is on hold The second call , replace the handset on Line 2. • The new call is finished on the cradle. 2. Push LINE 1 and talk. HOLD Push HOLD. • Line 1 is still on hold . 2. '0 LINE 2 0rD 3. DETAILED OPERATION Hold (Cont.) These operation are explained using an example. C= HOLD Push HOLD. • Line 2 is now on hold. • Line 1 is now on hold . 1. In case of the intercom line...
... CALL ON HOLD Example: Call on hold Call in progress New call Line 1 Line 2 Example: The first call is on hold The second call , replace the handset on Line 2. • The new call is finished on the cradle. 2. Push LINE 1 and talk. HOLD Push HOLD. • Line 1 is still on hold . 2. '0 LINE 2 0rD 3. DETAILED OPERATION Hold (Cont.) These operation are explained using an example. C= HOLD Push HOLD. • Line 2 is now on hold. • Line 1 is now on hold . 1. In case of the intercom line...
Operating Instructions
Page 21
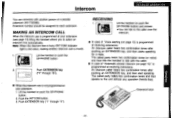
Note: When the intercom line is busy (INT'COM Indicator light is red color), making another person at your extension (see page 13) lifting the handset allows you to each extension. Extension number should be assigned to select an intercom line automatically. Lift the handset or push the SP-PHONE button. 2. MAKING AN INTERCOM CALL When the intercom use is invalid. 1. DETAILED OPERATION Intercom You can converse with another intercom call is programmed at a parallel extension (KX-T3250B). Push EXTENSION key ("1" through "5").
Note: When the intercom line is busy (INT'COM Indicator light is red color), making another person at your extension (see page 13) lifting the handset allows you to each extension. Extension number should be assigned to select an intercom line automatically. Lift the handset or push the SP-PHONE button. 2. MAKING AN INTERCOM CALL When the intercom use is invalid. 1. DETAILED OPERATION Intercom You can converse with another intercom call is programmed at a parallel extension (KX-T3250B). Push EXTENSION key ("1" through "5").
Operating Instructions
Page 22
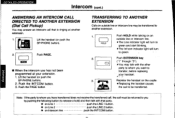
... push the SP-PHONE button). 2. Push the INT'COM button. 3. HOLD 2. 3. Push PAGE. • When the intercom use has not been programmed at another extension. 1. Push the PAGE button TRANSFERRING TO ANOTHER EXTENSION Calls on the cradle. • Replacing the handset causes the call must be transferred. Replate the handset on outside line or intercom line. •The Line indicator light will turn to green and start blinking. • The Int`com indicator light will turn to transfer, before replacing your extension. 1.
... push the SP-PHONE button). 2. Push the INT'COM button. 3. HOLD 2. 3. Push PAGE. • When the intercom use has not been programmed at another extension. 1. Push the PAGE button TRANSFERRING TO ANOTHER EXTENSION Calls on the cradle. • Replacing the handset causes the call must be transferred. Replate the handset on outside line or intercom line. •The Line indicator light will turn to green and start blinking. • The Int`com indicator light will turn to transfer, before replacing your extension. 1.

Operating Instructions
Page 25
To Dial Lift the handset (or push SP-PHONE). 1. Push MEMORY. 0 MEMORY • The MEMORY indicator will go out. PROGRAM Push PROGRAM during a conversation. Note: If you store a new phone number into memory using the "Memo Dial" feature, the previously stored "Memo Dial" number will be stored into the MEMO button. So you by pushing the MEMO button. CD fv O. Storing Number during a Conversation (Memo Dial) While engaged in conversation, another telephone number can dial the number by the other...
To Dial Lift the handset (or push SP-PHONE). 1. Push MEMORY. 0 MEMORY • The MEMORY indicator will go out. PROGRAM Push PROGRAM during a conversation. Note: If you store a new phone number into memory using the "Memo Dial" feature, the previously stored "Memo Dial" number will be stored into the MEMO button. So you by pushing the MEMO button. CD fv O. Storing Number during a Conversation (Memo Dial) While engaged in conversation, another telephone number can dial the number by the other...
Operating Instructions
Page 26
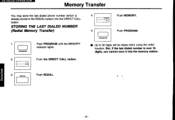
Push the DIRECT CALL button. Push PROGRAM. MEM0OR Y 5. But, if the last dialed number is already stored in the REDIAL button) into the memory station. - 25 - Push REDIAL. 4. REDIAL Push PROGRAM until the MEMORY indicator lights. PROGRAM 2. 0 -o Cs 3. DETAILED OPERATION Memory Transfer You may store the last dialed phone number (which is over 16 digits, you cannot save it into the DIRECT CALL button. STORING THE LAST DIALED NUMBER (Redial Memory Transfer) 1. Push MEMORY. PROGRAM • Up to 30 digits will be dialed when using the redial function.
Push the DIRECT CALL button. Push PROGRAM. MEM0OR Y 5. But, if the last dialed number is already stored in the REDIAL button) into the memory station. - 25 - Push REDIAL. 4. REDIAL Push PROGRAM until the MEMORY indicator lights. PROGRAM 2. 0 -o Cs 3. DETAILED OPERATION Memory Transfer You may store the last dialed phone number (which is over 16 digits, you cannot save it into the DIRECT CALL button. STORING THE LAST DIALED NUMBER (Redial Memory Transfer) 1. Push MEMORY. PROGRAM • Up to 30 digits will be dialed when using the redial function.
Operating Instructions
Page 27
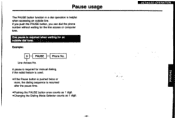
... a dial operation is resumed after the pause time. • Pushing the PAUSE button once counts as 1 digit. *Changing the Dialing Mode Selector counts as 1 digit. - 26 - A pause is required for manual dialing, if the redial feature is used. • If the Pause button is pushed twice or more, the dialing sequence is helpful when accessing an outside line. If you push the PAUSE button, you can dial the phone number without waiting for an tone...
... a dial operation is resumed after the pause time. • Pushing the PAUSE button once counts as 1 digit. *Changing the Dialing Mode Selector counts as 1 digit. - 26 - A pause is required for manual dialing, if the redial feature is used. • If the Pause button is pushed twice or more, the dialing sequence is helpful when accessing an outside line. If you push the PAUSE button, you can dial the phone number without waiting for an tone...
Operating Instructions
Page 28
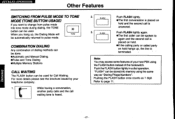
... pulse mode. Push FLASH lightly again. •The first caller can be stored into tone mode during dialing, the TONE button can be used for Call Waiting. DETAILED OPERATION Other Features SWITCHING FROMPULSEMODE TO TONE MODE (TONE BUTTON USAGE) If you hang up , the line is terminated•. For more details please see the brochure issued by your host PBX using the same way as 1 digit. Push the FLASH button lightly in a dial operation. Refer to change from pulse mode into memory using the FLASH button...
... pulse mode. Push FLASH lightly again. •The first caller can be stored into tone mode during dialing, the TONE button can be used for Call Waiting. DETAILED OPERATION Other Features SWITCHING FROMPULSEMODE TO TONE MODE (TONE BUTTON USAGE) If you hang up , the line is terminated•. For more details please see the brochure issued by your host PBX using the same way as 1 digit. Push the FLASH button lightly in a dial operation. Refer to change from pulse mode into memory using the FLASH button...


