Fax
Page 4
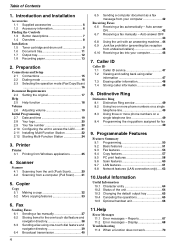
... 29 4.2 Scanning from Windows applications 25 4. Auto answer ON 42 6.7 Receiving a fax manually - Programmable Features Features Summary 9.1 Programming 50 9.2 Basic features 51 9.3 Fax features 54 ...57 9.5 PC print features 58 9.6 Scan features 60 9.7 LAN features 61 9.8 Network features (LAN connection only)......63 10.Useful Information Useful Information 10.1 Character entry 64...a fax automatically - Display 68 Troubleshooting 11.3 When a function does not work 70 Printer Printer 3.1 Printing from a computer (Pull Scan)........ 31 5. Reports 67 11.2 Error messages ...
... 29 4.2 Scanning from Windows applications 25 4. Auto answer ON 42 6.7 Receiving a fax manually - Programmable Features Features Summary 9.1 Programming 50 9.2 Basic features 51 9.3 Fax features 54 ...57 9.5 PC print features 58 9.6 Scan features 60 9.7 LAN features 61 9.8 Network features (LAN connection only)......63 10.Useful Information Useful Information 10.1 Character entry 64...a fax automatically - Display 68 Troubleshooting 11.3 When a function does not work 70 Printer Printer 3.1 Printing from a computer (Pull Scan)........ 31 5. Reports 67 11.2 Error messages ...
Fax
Page 7
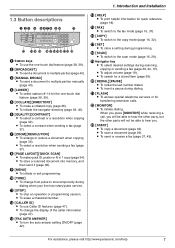
... 8-14 for transferring extension calls. J {TONE} L To change the display of the caller information (page 47). O {FAX} L To switch to multiple parties manually (page 40). U {FLASH} L To access special telephone services or for the one -touch dial feature (page 38, 39). When you press {MONITOR} while ... hear the other party, but the other party will not be able to the copy mode (page 16, 32). For assistance, please visit http://www.panasonic.com/help 7 1. E {COLLATE}{DIRECTORY} L To make quick ID, poster or N in 1 copy (page 34). L To select a contrast when sending a fax (page...
... 8-14 for transferring extension calls. J {TONE} L To change the display of the caller information (page 47). O {FAX} L To switch to multiple parties manually (page 40). U {FLASH} L To access special telephone services or for the one -touch dial feature (page 38, 39). When you press {MONITOR} while ... hear the other party, but the other party will not be able to the copy mode (page 16, 32). For assistance, please visit http://www.panasonic.com/help 7 1. E {COLLATE}{DIRECTORY} L To make quick ID, poster or N in 1 copy (page 34). L To select a contrast when sending a fax (page...

Fax
Page 8
... exit CD E GHIJ F A Recording paper guides B Handset unit (Optional) connection jack C Speaker D USB interface connector E LAN interface connector F LED G External telephone jack H Telephone line jack I Manual input tray J Power inlet Removing the shipping tape Remove the shipping tape (1) and pad (2). 1 2 1 Note: L Shipping tape positions are subject to change without notice. 8 For...
... exit CD E GHIJ F A Recording paper guides B Handset unit (Optional) connection jack C Speaker D USB interface connector E LAN interface connector F LED G External telephone jack H Telephone line jack I Manual input tray J Power inlet Removing the shipping tape Remove the shipping tape (1) and pad (2). 1 2 1 Note: L Shipping tape positions are subject to change without notice. 8 For...
Fax
Page 10
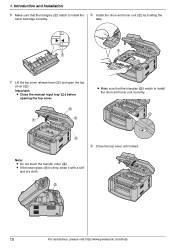
... the manual input tray (3) before opening the top cover. 2 1 4 L Make sure that the triangles (1) match to install the drum and toner unit correctly. 2 3 9 Close the top cover until locked. L If the lower glass (5) is dirty, clean it with a soft and dry cloth. 5 10 For assistance, please visit http://www.panasonic.com/help...
... the manual input tray (3) before opening the top cover. 2 1 4 L Make sure that the triangles (1) match to install the drum and toner unit correctly. 2 3 9 Close the top cover until locked. L If the lower glass (5) is dirty, clean it with a soft and dry cloth. 5 10 For assistance, please visit http://www.panasonic.com/help...
Fax
Page 21
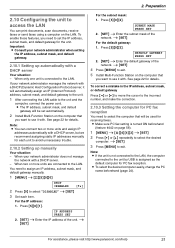
...network administrator manages the network with a DHCP server, but we recommend assigning static IP addresses manually...PC fax reception. Important: L Consult your network administrator does not manage the network with a DHCP server Your situation: - ...network administrator when setting the IP address, subnet mask, and default gateway. 2.10.1 Setting up manually Your situation: - IP ADDRESS PRESS SET 2. {SET} i Enter the IP address of the network... need to assign an IP address, subnet mask, and default gateway manually. 1 {MENU} i {#}{5}{0}{0} DHCP =ENABLED [V^] 2 Press {0} to use ...
...network administrator manages the network with a DHCP server, but we recommend assigning static IP addresses manually...PC fax reception. Important: L Consult your network administrator does not manage the network with a DHCP server Your situation: - ...network administrator when setting the IP address, subnet mask, and default gateway. 2.10.1 Setting up manually Your situation: - IP ADDRESS PRESS SET 2. {SET} i Enter the IP address of the network... need to assign an IP address, subnet mask, and default gateway manually. 1 {MENU} i {#}{5}{0}{0} DHCP =ENABLED [V^] 2 Press {0} to use ...
Fax
Page 25
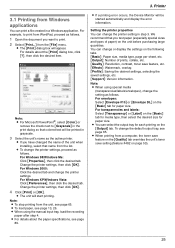
...list. Setting the printer properties You can change the printer setting in the print dialog so that name from the unit, see page 13, 26. You can change or display the settings on the unit before purchasing large quantities. Note: L When using the manual input tray, load... next to [Grayscale] in step 3. L If a printing error occurs, the Device Monitor will appear. L When printing from WordPad, proceed as the active printer. Change the printer settings, then click [OK]. 4 Click [Print] or [OK]. To change the setting as follows. 3. L To load paper, see page 65. L...
...list. Setting the printer properties You can change the printer setting in the print dialog so that name from the unit, see page 13, 26. You can change or display the settings on the unit before purchasing large quantities. Note: L When using the manual input tray, load... next to [Grayscale] in step 3. L If a printing error occurs, the Device Monitor will appear. L When printing from WordPad, proceed as the active printer. Change the printer settings, then click [OK]. 4 Click [Print] or [OK]. To change the setting as follows. 3. L To load paper, see page 65. L...

Fax
Page 26
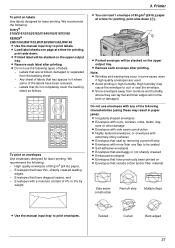
... the upper output tray. L Adjust the width of the guides (2) to print on . L Remove each transparency after you must change the paper source in step 2. 3. Printer 3.1.1 Using the manual input tray You can print not only on plain paper but also on a flat surface to cool and to page 89 for... laser printing. The manual input tray is used only for printing with the computer. 1 Pull open the manual input tray (1), and then raise the extender (2) gently until the unit grasps the paper and a single ...
... the upper output tray. L Adjust the width of the guides (2) to print on . L Remove each transparency after you must change the paper source in step 2. 3. Printer 3.1.1 Using the manual input tray You can print not only on plain paper but also on a flat surface to cool and to page 89 for... laser printing. The manual input tray is used only for printing with the computer. 1 Pull open the manual input tray (1), and then raise the extender (2) gently until the unit grasps the paper and a single ...
Fax
Page 27
3. Printer To print on the upper output tray. L Remove each envelope after printing. Envelopes with any of 4% to 6% by removing a peel-off strip Multiple flaps L Use the manual input tray to be sealed L Self-adhesive envelopes L Envelopes that have been removed. - Labels ... paper at a time for printing, print-side down (1). 1 L Printed envelope will be stacked on labels Use labels designed for laser printing. ears or other damage L Envelopes with side seam construction L Highly textured envelopes, or envelopes with extremely shiny surfaces L Envelopes ...
3. Printer To print on the upper output tray. L Remove each envelope after printing. Envelopes with any of 4% to 6% by removing a peel-off strip Multiple flaps L Use the manual input tray to be sealed L Self-adhesive envelopes L Envelopes that have been removed. - Labels ... paper at a time for printing, print-side down (1). 1 L Printed envelope will be stacked on labels Use labels designed for laser printing. ears or other damage L Envelopes with side seam construction L Highly textured envelopes, or envelopes with extremely shiny surfaces L Envelopes ...
Fax
Page 37
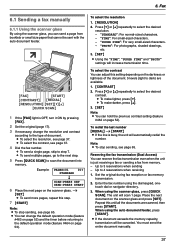
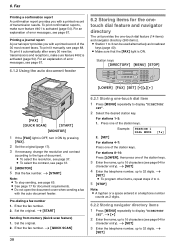
... fax number using the scanner glass, press {QUICK SCAN}. The unit will increase transmission time. You must send the entire document manually. 37 L You can reserve the fax transmission even when the unit is busy, the unit will be sent with the auto document...: L To stop sending, see page 65. "FINE": For small-sized characters. - "STANDARD": For normal-sized characters. - Fax 6SeFnadxing Faxes 6.1 Sending a fax manually 6.1.1 Using the scanner glass By using the auto document feeder, press {START}. "PHOTO": For photographs, shaded drawings, etc. 3. {SET} L Using the "FINE",...
... fax number using the scanner glass, press {QUICK SCAN}. The unit will increase transmission time. You must send the entire document manually. 37 L You can reserve the fax transmission even when the unit is busy, the unit will be sent with the auto document...: L To stop sending, see page 65. "FINE": For small-sized characters. - "STANDARD": For normal-sized characters. - Fax 6SeFnadxing Faxes 6.1 Sending a fax manually 6.1.1 Using the scanner glass By using the auto document feeder, press {START}. "PHOTO": For photographs, shaded drawings, etc. 3. {SET} L Using the "FINE",...
Fax
Page 38
...) 1. Enter the fax number. To print it automatically after every 30 new fax transmissions and receptions, make sure feature #401 is ON. To print it manually, see page 67. Station keys {DIRECTORY} {MENU} {STOP} {LOWER} {FAX} {SET} {V}{^}{>} {FAX} {QUICK SCAN} {START} {MONITOR} 1 If the {FAX} light is activated (page 54). L See...
...) 1. Enter the fax number. To print it automatically after every 30 new fax transmissions and receptions, make sure feature #401 is ON. To print it manually, see page 67. Station keys {DIRECTORY} {MENU} {STOP} {LOWER} {FAX} {SET} {V}{^}{>} {FAX} {QUICK SCAN} {START} {MONITOR} 1 If the {FAX} light is activated (page 54). L See...

Fax
Page 40
... programmed items will be canceled. i {SET} Using the dial keypad: Enter the fax number. L The broadcast function utilizes stations 1-3. For MANUAL BROADCAST (using one-touch dial or navigator directory. 4 {START} 40 6.4 Broadcast transmission By storing one -touch dial function will remain in ...brackets indicates the number of registered items. L To program other items, repeat this step (up to select "MANUAL BROAD". 3 {SET} 4 Program items. Using stations 1-7: Press the desired station key. i {SET} L The number in the broadcast memory, ...
... programmed items will be canceled. i {SET} Using the dial keypad: Enter the fax number. L The broadcast function utilizes stations 1-3. For MANUAL BROADCAST (using one-touch dial or navigator directory. 4 {START} 40 6.4 Broadcast transmission By storing one -touch dial function will remain in ...brackets indicates the number of registered items. L To program other items, repeat this step (up to select "MANUAL BROAD". 3 {SET} 4 Program items. Using stations 1-7: Press the desired station key. i {SET} L The number in the broadcast memory, ...

Fax
Page 41
... necessary, change to the desired resolution (page 37) and the desired contrast (page 37). 3. If necessary, change to erase. Press {BROADCAST} (1-2) or {MANUAL BROAD}. Place the next page. Note: L To stop sending, see page 65. i {MENU} i {*} 3 Press {V} or {^} repeatedly to display the... {STOP}. 4 {SET} i {SET} i {STOP} 6.4.4 Sending the same document to display the desired broadcast memory ("", "" or ""). Press {BROADCAST} (1-2) or {MANUAL BROAD}. To send the same document using the auto document feeder 1. i {SET} L To send more pages, repeat this step (up to 20 items). 4 {STOP}...
... necessary, change to the desired resolution (page 37) and the desired contrast (page 37). 3. If necessary, change to erase. Press {BROADCAST} (1-2) or {MANUAL BROAD}. Place the next page. Note: L To stop sending, see page 65. i {MENU} i {*} 3 Press {V} or {^} repeatedly to display the... {STOP}. 4 {SET} i {SET} i {STOP} 6.4.4 Sending the same document to display the desired broadcast memory ("", "" or ""). Press {BROADCAST} (1-2) or {MANUAL BROAD}. To send the same document using the auto document feeder 1. i {SET} L To send more pages, repeat this step (up to 20 items). 4 {STOP}...

Fax
Page 43
... calling tone (slow beep) is ON. 43 Note: L To stop receiving, see page 65. {START} Note: L If you can then send a fax. Fax 6.7 Receiving a fax manually - The default setting is heard, or - L The {FAX AUTO ANSWER} indicator turns OFF. a fax calling tone (slow beep) is heard, press {START}. 3. Note: L To stop...
... calling tone (slow beep) is ON. 43 Note: L To stop receiving, see page 65. {START} Note: L If you can then send a fax. Fax 6.7 Receiving a fax manually - The default setting is heard, or - L The {FAX AUTO ANSWER} indicator turns OFF. a fax calling tone (slow beep) is heard, press {START}. 3. Note: L To stop...
Fax
Page 45
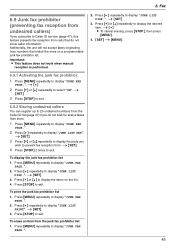
... PROH.". 2. i {SET} 3. Press {MENU} repeatedly to display "JUNK LIST DISP.". Press {V} or {^} repeatedly to display "JUNK FAX PROH.". Important: L This feature does not work when manual reception is performed. 6.9.1 Activating the junk fax prohibitor 1 Press {MENU} repeatedly to display the desired item. Press {STOP} to prevent fax reception from calls that...
... PROH.". 2. i {SET} 3. Press {MENU} repeatedly to display "JUNK LIST DISP.". Press {V} or {^} repeatedly to display "JUNK FAX PROH.". Important: L This feature does not work when manual reception is performed. 6.9.1 Activating the junk fax prohibitor 1 Press {MENU} repeatedly to display the desired item. Press {STOP} to prevent fax reception from calls that...
Fax
Page 47
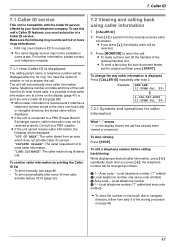
... properly. Local telephone number ("1" added) B Local telephone number only (area code omitted) C Area code - Make sure the following will be changed as follows: A 1 - To print manually, see page 88. - L To send a fax using caller information 1 {CALLER ID} 2 Press {V} to answer the call ) from an area which does not provide Caller ID...
... properly. Local telephone number ("1" added) B Local telephone number only (area code omitted) C Area code - Make sure the following will be changed as follows: A 1 - To print manually, see page 88. - L To send a fax using caller information 1 {CALLER ID} 2 Press {V} to answer the call ) from an area which does not provide Caller ID...
Fax
Page 52
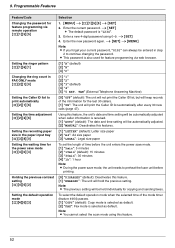
... ID list automatically after every 30 new calls (page 47). 9. i {SET} i {MENU} Note: L If you forget your current password, "0101" can always be automatically adjusted. {2} "MANUAL": Deactivates this features. {1} "LETTER" (default): Letter size paper {2} "A4": A4 size paper {3} "LEGAL": Legal size paper To set the length of the mode timer (feature...
... ID list automatically after every 30 new calls (page 47). 9. i {SET} i {MENU} Note: L If you forget your current password, "0101" can always be automatically adjusted. {2} "MANUAL": Deactivates this features. {1} "LETTER" (default): Letter size paper {2} "A4": A4 size paper {3} "LEGAL": Legal size paper To set the length of the mode timer (feature...

Fax
Page 58
.... 58 Enter the number of copies in PCL {#}{7}{6}{2} You can select the output tray that will be used in PCL printing. {1} "#1" (default): Paper input tray {2} "#2": Manual input tray Setting the output tray in PCL printing. Setting the font number in PCL {#}{7}{6}{9} To set the font number to be used in PCL...
.... 58 Enter the number of copies in PCL {#}{7}{6}{2} You can select the output tray that will be used in PCL printing. {1} "#1" (default): Paper input tray {2} "#2": Manual input tray Setting the output tray in PCL printing. Setting the font number in PCL {#}{7}{6}{9} To set the font number to be used in PCL...
Fax
Page 67
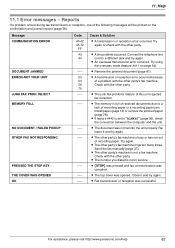
... or reception error occurred. L An overseas transmission error occurred. L The top cover was canceled. Reinsert it and try again. For assistance, please visit http://www.panasonic.com/help 67 Check with the other party's fax machine rings too many times. 11. REJECT MEMORY FULL NO DOCUMENT / FAILED PICKUP OTHER FAX NOT...-72 FF 43 44 ----53 54 59 70 --------- --------- L The memory is full of received documents due to a different jack and try again. Send the fax manually (page 37). L {STOP} was pressed and fax communication was opened.
... or reception error occurred. L An overseas transmission error occurred. L The top cover was canceled. Reinsert it and try again. For assistance, please visit http://www.panasonic.com/help 67 Check with the other party's fax machine rings too many times. 11. REJECT MEMORY FULL NO DOCUMENT / FAILED PICKUP OTHER FAX NOT...-72 FF 43 44 ----53 54 59 70 --------- --------- L The memory is full of received documents due to a different jack and try again. Send the fax manually (page 37). L {STOP} was pressed and fax communication was opened.
Fax
Page 68
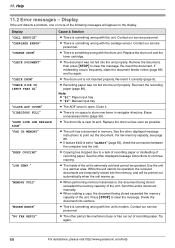
... personnel. Contact our service personnel. Re-insert it . Close it correctly (page 9). Send the entire document manually. Divide the document into the memory, and will appear on the display. 11. Re-insert the document. Note: L "#1": Paper ...input tray L "#2": Manual input tray L The ADF cover is near its end. L There is no space to store new items in memory....paper. Contact our service personnel. Try again. 68 For assistance, please visit http://www.panasonic.com/help
... personnel. Contact our service personnel. Re-insert it . Close it correctly (page 9). Send the entire document manually. Divide the document into the memory, and will appear on the display. 11. Re-insert the document. Note: L "#1": Paper ...input tray L "#2": Manual input tray L The ADF cover is near its end. L There is no space to store new items in memory....paper. Contact our service personnel. Try again. 68 For assistance, please visit http://www.panasonic.com/help
Fax
Page 69
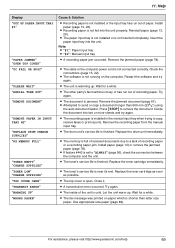
... & Solution L Recording paper is busy or has run out of recording paper or a recording paper jam. Try again. Remove the recording paper from the manual input tray. L The toner's service life is open. L The top cover is near its end. L The paper input tray is not installed or is... try again. Install paper (page 13) or remove the jammed paper (page 78). Remove the jammed document (page 81). For assistance, please visit http://www.panasonic.com/help 69 L Attempted to remove the document. Press {STOP} to send or copy a document longer than letter size paper. 11. L If feature ...
... & Solution L Recording paper is busy or has run out of recording paper or a recording paper jam. Try again. Remove the recording paper from the manual input tray. L The toner's service life is open. L The top cover is near its end. L The paper input tray is not installed or is... try again. Install paper (page 13) or remove the jammed paper (page 78). Remove the jammed document (page 81). For assistance, please visit http://www.panasonic.com/help 69 L Attempted to remove the document. Press {STOP} to send or copy a document longer than letter size paper. 11. L If feature ...


