
Operating Instructions
Page 3
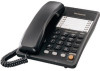
... Controls Settings Installing the Batteries Connecting the Handset/Telephone Line Cord Connecting a Communication Device Programming Summary Dialing Mode Ringer Volume Wall Mounting Basic Operation Making Calls Answering Calls Advanced Operation Speed Dialer Storing Phone Numbers Dialing a Stored Number One-Touch Dialer Storing Phone Numbers Dialing a Stored Number Special Features For Call Waiting Service...
... Controls Settings Installing the Batteries Connecting the Handset/Telephone Line Cord Connecting a Communication Device Programming Summary Dialing Mode Ringer Volume Wall Mounting Basic Operation Making Calls Answering Calls Advanced Operation Speed Dialer Storing Phone Numbers Dialing a Stored Number One-Touch Dialer Storing Phone Numbers Dialing a Stored Number Special Features For Call Waiting Service...

Operating Instructions
Page 6
... not in use before using the DATA jack: After connecting the handset and telephone line cord (p. 5), connect the communication device telephone line cord to the telephone line, you can connect it through this unit using this unit (making calls, storing phone numbers in memory etc.) or the communication device may not operate properly. 6
... not in use before using the DATA jack: After connecting the handset and telephone line cord (p. 5), connect the communication device telephone line cord to the telephone line, you can connect it through this unit using this unit (making calls, storing phone numbers in memory etc.) or the communication device may not operate properly. 6

Operating Instructions
Page 9
i rA TJ 0 O o c)c C Q Connect the telephone line cord. 0 Mount the unit, and slide down the handset hook until it locks, so the tab holds the handset. 2 Tuck the telephone line cord inside the wall mounting adaptor, and push it as shown here. To temporarily set the handset down during a conversation, place it in the direction of the arrow. •"up" should be mounted on a wall phone plate. 1 Pull down . Wall Phone Plate 0 0 0 For assistance, please call: 1-800-211-PANA(7262)j 9 Wall Mounting The unit can be facing upward.
i rA TJ 0 O o c)c C Q Connect the telephone line cord. 0 Mount the unit, and slide down the handset hook until it locks, so the tab holds the handset. 2 Tuck the telephone line cord inside the wall mounting adaptor, and push it as shown here. To temporarily set the handset down during a conversation, place it in the direction of the arrow. •"up" should be mounted on a wall phone plate. 1 Pull down . Wall Phone Plate 0 0 0 For assistance, please call: 1-800-211-PANA(7262)j 9 Wall Mounting The unit can be facing upward.
Operating Instructions
Page 30
...the equipment into an outlet on a circuit different from the telephone line and connect a known working phone. If the known working phone operates properly, have your telephone company. 30 Note: This equipment has been tested and found to ...comply with the limits for help. • A FCC compliant telephone cord and modular plug is encouraged to...and Other Information This device complies with Part 15 of the authorized Panasonic Factory Service Centers.
...the equipment into an outlet on a circuit different from the telephone line and connect a known working phone. If the known working phone operates properly, have your telephone company. 30 Note: This equipment has been tested and found to ...comply with the limits for help. • A FCC compliant telephone cord and modular plug is encouraged to...and Other Information This device complies with Part 15 of the authorized Panasonic Factory Service Centers.


