
Installation Manual
Page 1
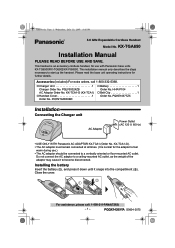
...) - 1 - KX-TGA650 Installation Manual PLEASE READ BEFORE USE AND SAVE. HHR-P104 A Belt Clip 1 Order No. KX-TCA1-G). • The AC adaptor must remain connected at all times. (It is an accessory cordless handset, for further details. Please read the base unit operating instructions for use .) • The AC adaptor should be connected to a vertically oriented or floor-mounted AC outlet. TGA650.fm Page 1 Wednesday, July 13, 2005 3:16 PM 5.8 GHz Expandable Cordless Handset Model...
...) - 1 - KX-TGA650 Installation Manual PLEASE READ BEFORE USE AND SAVE. HHR-P104 A Belt Clip 1 Order No. KX-TCA1-G). • The AC adaptor must remain connected at all times. (It is an accessory cordless handset, for further details. Please read the base unit operating instructions for use .) • The AC adaptor should be connected to a vertically oriented or floor-mounted AC outlet. TGA650.fm Page 1 Wednesday, July 13, 2005 3:16 PM 5.8 GHz Expandable Cordless Handset Model...
Installation Manual
Page 2
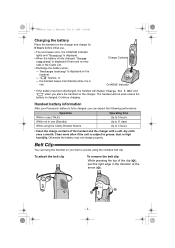
... clip (1), pull the right edge in the direction of the handset and the charger with a soft, dry cloth once a month. Charge Contacts CHARGE Indicator • If the battery has been discharged, the handset will not work unless the battery is fully charged, you place the handset on the charger. The handset will display "Charge for 6 hours before initial use. • The unit beeps once, the CHARGE indicator lights and "Charging" is displayed. • When the battery...
... clip (1), pull the right edge in the direction of the handset and the charger with a soft, dry cloth once a month. Charge Contacts CHARGE Indicator • If the battery has been discharged, the handset will not work unless the battery is fully charged, you place the handset on the charger. The handset will display "Charge for 6 hours before initial use. • The unit beeps once, the CHARGE indicator lights and "Charging" is displayed. • When the battery...
Installation Manual
Page 3
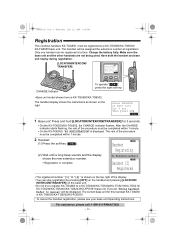
... OKL BACK OK CHARGE Indicator To operate " O K ", press the right soft key. • Base unit model shown here is displayed. To cancel the handset registration, please see your base unit Operating Instructions. TGA650.fm Page 3 Wednesday, July 13, 2005 3:16 PM Registration This cordless handset, KX-TGA650, must be completed within 1 minute. 2 Handset: (1) Press the soft key ( O K ). (2) Wait until a long beep sounds and the display shows the new extension number. • Registration is complete. After the CHARGE indicator starts flashing, the rest...
... OKL BACK OK CHARGE Indicator To operate " O K ", press the right soft key. • Base unit model shown here is displayed. To cancel the handset registration, please see your base unit Operating Instructions. TGA650.fm Page 3 Wednesday, July 13, 2005 3:16 PM Registration This cordless handset, KX-TGA650, must be completed within 1 minute. 2 Handset: (1) Press the soft key ( O K ). (2) Wait until a long beep sounds and the display shows the new extension number. • Registration is complete. After the CHARGE indicator starts flashing, the rest...

Installation Manual
Page 4
..., call the accessories telephone number on page 1. Connecting an optional headset Open the headset jack cover, and insert the headset plug into the headset jack as the display language. Model shown here is KX-TCA88. Please use only a Panasonic KX-TCA60, KX-TCA86, KX-TCA88, KX-TCA88HA, KX-TCA91, KX-TCA92 or KX-TCA98 headset. Install screws using the wall template (see below . Mount the charger (A). Headset Jack • Headset sold separately. Press [MENU] N [d] or [B] to select "Initial setting" N Soft key ( SELECT...
..., call the accessories telephone number on page 1. Connecting an optional headset Open the headset jack cover, and insert the headset plug into the headset jack as the display language. Model shown here is KX-TCA88. Please use only a Panasonic KX-TCA60, KX-TCA86, KX-TCA88, KX-TCA88HA, KX-TCA91, KX-TCA92 or KX-TCA98 headset. Install screws using the wall template (see below . Mount the charger (A). Headset Jack • Headset sold separately. Press [MENU] N [d] or [B] to select "Initial setting" N Soft key ( SELECT...
Installation Manual
Page 5
... outlet on the line and briefly explain to radio communications. This equipment generates, uses, and can be carried and operated with the instructions, may not be ensured when using this device must be heard in a particular installation. Move away from external RF (radio frequency) energy. This equipment is connected. - If noise occurs, use an optional headset accessory or the speakerphone option (if...
... outlet on the line and briefly explain to radio communications. This equipment generates, uses, and can be carried and operated with the instructions, may not be ensured when using this device must be heard in a particular installation. Move away from external RF (radio frequency) energy. This equipment is connected. - If noise occurs, use an optional headset accessory or the speakerphone option (if...
Installation Manual
Page 6
... in a fire. All Rights Reserved. Check with the instructions and limitations specified in this battery. Released electrolyte is used as rings, bracelets, and keys. Charge the battery(ies) provided with the setup or operation, please call 1-800-8-BATTERY for information on the bottom of the unit) Name and address of purchase (found on how to recycle this manual. San Gabriel Industrial Park, Ave. 65...
... in a fire. All Rights Reserved. Check with the instructions and limitations specified in this battery. Released electrolyte is used as rings, bracelets, and keys. Charge the battery(ies) provided with the setup or operation, please call 1-800-8-BATTERY for information on the bottom of the unit) Name and address of purchase (found on how to recycle this manual. San Gabriel Industrial Park, Ave. 65...


