
2.4 Ghz Cordles Phon
Page 2
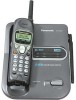
... ID and Call Waiting Service and Voice Mail Service, where available, are new messages left in the voice mail box at phone company. KX-TCA1-G (KX-TCA1) 4-Wire Telephone Line Cord with Transparent Plugs (p. 13) Order No. registered mark. AC Adaptor (p. 11) Order ...is on page 65 before use. PQPP511SVC (P-P511) Handset Cover (p. 14, 59) Order No. PQJA10075Z one one 2 Attach your new Panasonic cordless telephone. Energy Star: As an ENERGY STAR® Partner, Panasonic has determined that this phone will flash when there are telephone company services...
... ID and Call Waiting Service and Voice Mail Service, where available, are new messages left in the voice mail box at phone company. KX-TCA1-G (KX-TCA1) 4-Wire Telephone Line Cord with Transparent Plugs (p. 13) Order No. registered mark. AC Adaptor (p. 11) Order ...is on page 65 before use. PQPP511SVC (P-P511) Handset Cover (p. 14, 59) Order No. PQJA10075Z one one 2 Attach your new Panasonic cordless telephone. Energy Star: As an ENERGY STAR® Partner, Panasonic has determined that this phone will flash when there are telephone company services...
2.4 Ghz Cordles Phon
Page 3
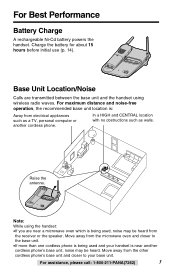
...;If you are transmitted between the base unit and the handset using wireless radio waves. Move away from the receiver or the speaker. For Best Performance Battery Charge A rechargeable Ni-Cd battery powers the handset. Base Unit Location/Noise Calls are near another cordless phone. Raise the antenna. Charge the battery for about 15...
...;If you are transmitted between the base unit and the handset using wireless radio waves. Move away from the receiver or the speaker. For Best Performance Battery Charge A rechargeable Ni-Cd battery powers the handset. Base Unit Location/Noise Calls are near another cordless phone. Raise the antenna. Charge the battery for about 15...

2.4 Ghz Cordles Phon
Page 4
...Preparation Location of Controls 6 Display 8 Settings 11 Connecting the AC Adaptor 11 Connecting the Telephone Line Cord 12 Installing the Battery in the Handset 14 Battery Charge 14 Dialing Mode 16 Line Mode 17 Programmable Functions 18 Auto Talk Feature 19 Ringer Volume 20 Ringer Tone 21 LCD ...Caller ID Service 28 Using the Caller List 29 Viewing the Caller List 29 Calling Back from the Caller List 31 Editing the Caller's Phone Number 32 The Caller ID Number Auto Edit Feature 33 Storing Caller List Information in the Directory 34 Erasing Caller List Information 35 Advanced...
...Preparation Location of Controls 6 Display 8 Settings 11 Connecting the AC Adaptor 11 Connecting the Telephone Line Cord 12 Installing the Battery in the Handset 14 Battery Charge 14 Dialing Mode 16 Line Mode 17 Programmable Functions 18 Auto Talk Feature 19 Ringer Volume 20 Ringer Tone 21 LCD ...Caller ID Service 28 Using the Caller List 29 Viewing the Caller List 29 Calling Back from the Caller List 31 Editing the Caller's Phone Number 32 The Caller ID Number Auto Edit Feature 33 Storing Caller List Information in the Directory 34 Erasing Caller List Information 35 Advanced...
2.4 Ghz Cordles Phon
Page 5
... Useful Information Using the Other Line During a Conversation 48 Conference Call 49 Special Features 50 Automatic Security Code Setting 50 Handset Locator 50 Muting Your Conversation 51 Temporary Tone Dialing (For Rotary or Pulse Service Users 51 How to Use the PAUSE...Selection 54 Incoming Call Tone 55 Useful Information Wall Mounting 56 Belt Clip 58 Optional Headset 58 Battery Replacement 59 Adding Another Phone 60 Troubleshooting 61 Important Safety Instructions 65 FCC and Other Information 67 Specifications 70 Index 70 For assistance, please call...
... Useful Information Using the Other Line During a Conversation 48 Conference Call 49 Special Features 50 Automatic Security Code Setting 50 Handset Locator 50 Muting Your Conversation 51 Temporary Tone Dialing (For Rotary or Pulse Service Users 51 How to Use the PAUSE...Selection 54 Incoming Call Tone 55 Useful Information Wall Mounting 56 Belt Clip 58 Optional Headset 58 Battery Replacement 59 Adding Another Phone 60 Troubleshooting 61 Important Safety Instructions 65 FCC and Other Information 67 Specifications 70 Index 70 For assistance, please call...
2.4 Ghz Cordles Phon
Page 7
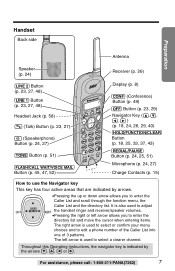
... arrow is indicated by arrows. •Pressing the up or down arrow allows you to edit a phone number of the Caller List into one of 3 patterns. The left arrow allows you to select a clearer channel. Handset Back side Preparation Antenna Speaker (p. 24) Receiver (p. 26) (LINE!2) Button (p. 23, 27, 48) (LINE!1) Button (p. 23...
... arrow is indicated by arrows. •Pressing the up or down arrow allows you to edit a phone number of the Caller List into one of 3 patterns. The left arrow allows you to select a clearer channel. Handset Back side Preparation Antenna Speaker (p. 24) Receiver (p. 26) (LINE!2) Button (p. 23, 27, 48) (LINE!1) Button (p. 23...

2.4 Ghz Cordles Phon
Page 8
...(p. 29). Line 1 received message) (p. 44). The called line after completing operations such as talk, viewing the Caller List or programming. Received callsG (Handset off the base unit) The display shows that you have received new calls (p. 29). To check the new calls, press Ö or Ñ. 12...message(s) is received, the display shows the caller's name, number and the called line status indication flashes. 8 Received calls (Handset on the base unit) The display shows that you instructions and information on the base unit to the directory list, press á (Directory ...
...(p. 29). Line 1 received message) (p. 44). The called line after completing operations such as talk, viewing the Caller List or programming. Received callsG (Handset off the base unit) The display shows that you have received new calls (p. 29). To check the new calls, press Ö or Ñ. 12...message(s) is received, the display shows the caller's name, number and the called line status indication flashes. 8 Received calls (Handset on the base unit) The display shows that you instructions and information on the base unit to the directory list, press á (Directory ...

2.4 Ghz Cordles Phon
Page 9
...the call (ex. 1 hour, 6 minutes and 35 seconds). An outside call is also displayed (p. 15). To release the hold by the handset user (p. 25). The handset has lost communication with the base unit. SMITH,JACK 1-222-333-4444 1 11:20A JAN10 ✕3 This is flashing. The display ...please call (ex. Place the handset on hold , press the line button whose status indication is a name from the directory. Jan. 10, 11:20 AM), and - During a conversation, the display shows the length of times called (ex. 3 times). The stored name and phone number are displayed. The called ...
...the call (ex. 1 hour, 6 minutes and 35 seconds). An outside call is also displayed (p. 15). To release the hold by the handset user (p. 25). The handset has lost communication with the base unit. SMITH,JACK 1-222-333-4444 1 11:20A JAN10 ✕3 This is flashing. The display ...please call (ex. Place the handset on hold , press the line button whose status indication is a name from the directory. Jan. 10, 11:20 AM), and - During a conversation, the display shows the length of times called (ex. 3 times). The stored name and phone number are displayed. The called ...
2.4 Ghz Cordles Phon
Page 10
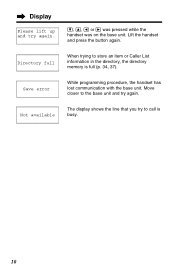
Save error While programming procedure, the handset has lost communication with the base unit. Lift the handset and press the button again. Move closer to store an item or Caller List information in the directory, the directory memory is busy. 10 Directory full When trying to the base unit and try again. Not available The display shows the line that you try again. Ö, Ñ, Ü or á was pressed while the handset was on the base unit. Display Please lift up and try to call is full (p. 34, 37).
Save error While programming procedure, the handset has lost communication with the base unit. Lift the handset and press the button again. Move closer to store an item or Caller List information in the directory, the directory memory is busy. 10 Directory full When trying to the base unit and try again. Not available The display shows the line that you try again. Ö, Ñ, Ü or á was pressed while the handset was on the base unit. Display Please lift up and try to call is full (p. 34, 37).
2.4 Ghz Cordles Phon
Page 14
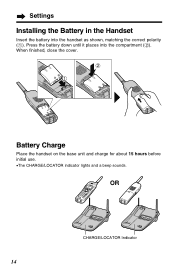
Settings Installing the Battery in the Handset Insert the battery into the compartment ($). OR CHARGE/LOCATOR Indicator 14 Press the battery down until it places into the handset as shown, matching the correct polarity (#). When finished, close the cover. 2 1 Battery Charge Place the handset on the base unit and charge for about 15 hours before initial use. •The CHARGE/LOCATOR indicator lights and a beep sounds.
Settings Installing the Battery in the Handset Insert the battery into the compartment ($). OR CHARGE/LOCATOR Indicator 14 Press the battery down until it places into the handset as shown, matching the correct polarity (#). When finished, close the cover. 2 1 Battery Charge Place the handset on the base unit and charge for about 15 hours before initial use. •The CHARGE/LOCATOR indicator lights and a beep sounds.

2.4 Ghz Cordles Phon
Page 15
... battery strength is fully charged, you DO NOT recharge the handset battery for more often if the unit is subject to place the handset on the display, or -the handset beeps intermittently while it is in the chart below. Battery information After your Panasonic battery is fully charged (p. 14): Operation Operating time While in...
... battery strength is fully charged, you DO NOT recharge the handset battery for more often if the unit is subject to place the handset on the display, or -the handset beeps intermittently while it is in the chart below. Battery information After your Panasonic battery is fully charged (p. 14): Operation Operating time While in...

2.4 Ghz Cordles Phon
Page 16
Settings Dialing Mode If you have touch tone service, set to "Pulse". If rotary or pulse service is used and the handset is displayed. 6 Select "Pulse" or "Tone" by pressing Ö or Ñ. Make sure the unit is not being used , set to "Tone". HSave directory Ringer ... setting is lifted off the base unit. 1 Press (HOLD/FUNCTION/CLEAR). HSet flash time Save VM acces# 4 Scroll to "Program" by pressing (OFF). 16 Your phone comes from the factory set to "Tone". Ringer tone HProgram 3 Press á.
Settings Dialing Mode If you have touch tone service, set to "Pulse". If rotary or pulse service is used and the handset is displayed. 6 Select "Pulse" or "Tone" by pressing Ö or Ñ. Make sure the unit is not being used , set to "Tone". HSave directory Ringer ... setting is lifted off the base unit. 1 Press (HOLD/FUNCTION/CLEAR). HSet flash time Save VM acces# 4 Scroll to "Program" by pressing (OFF). 16 Your phone comes from the factory set to "Tone". Ringer tone HProgram 3 Press á.

2.4 Ghz Cordles Phon
Page 17
...;A beep sounds. •To program the other line, start again from the factory set to "B". Make sure the unit is not being used and the handset is connected to a low voltage system such as a PBX, set to select the line. •The line's current setting will be displayed. Your... phone comes from step 4. •To exit the programming mode, press (OFF). HSet flash time Save VM acces# 4 Scroll to "Program" by pressing Ö or Ñ. ...
...;A beep sounds. •To program the other line, start again from the factory set to "B". Make sure the unit is not being used and the handset is connected to a low voltage system such as a PBX, set to select the line. •The line's current setting will be displayed. Your... phone comes from step 4. •To exit the programming mode, press (OFF). HSet flash time Save VM acces# 4 Scroll to "Program" by pressing Ö or Ñ. ...
2.4 Ghz Cordles Phon
Page 18
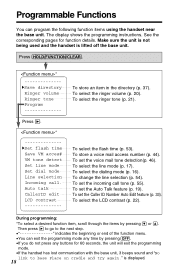
Make sure the unit is not being used and the handset is lifted off the base unit. Press (HOLD/FUNCTION/CLEAR). Programmable Functions You can program the following function items using the handset near the base unit. The display shows the programming instructions. See the corresponding pages for function details.
Make sure the unit is not being used and the handset is lifted off the base unit. Press (HOLD/FUNCTION/CLEAR). Programmable Functions You can program the following function items using the handset near the base unit. The display shows the programming instructions. See the corresponding pages for function details.

2.4 Ghz Cordles Phon
Page 19
Your phone comes from the factory set to answer a call by pressing (OFF). •In order to view Caller ID information after you lift up the handset to OFF. Make sure the unit is not being used and the handset is displayed. 6 Select "On" or "Off" by pressing Ö or Ñ. HAuto ... you to answer a call , leave the Auto Talk feature OFF. Auto talk :On •You can exit the programming mode any time by lifting the handset off the base unit. 1 Press (HOLD/FUNCTION/CLEAR). 2 Scroll to "Program" by pressing Ö or Ñ. 3 Press á. 4 Scroll to "Auto talk" by ...
Your phone comes from the factory set to answer a call by pressing (OFF). •In order to view Caller ID information after you lift up the handset to OFF. Make sure the unit is not being used and the handset is displayed. 6 Select "On" or "Off" by pressing Ö or Ñ. HAuto ... you to answer a call , leave the Auto Talk feature OFF. Auto talk :On •You can exit the programming mode any time by lifting the handset off the base unit. 1 Press (HOLD/FUNCTION/CLEAR). 2 Scroll to "Program" by pressing Ö or Ñ. 3 Press á. 4 Scroll to "Auto talk" by ...

2.4 Ghz Cordles Phon
Page 20
... the line. Ringer volume G=Line1 F=Line2 4 Press Ö (Line1) or Ñ (Line2) to HIGH, LOW or OFF. Your phone comes from the factory set to OFF, the handset will return to "Ringer volume" by pressing Ö or Ñ. •Each time you press Ö or Ñ, the volume ... Ö or Ñ. Reprogram if necessary. 20 Make sure the unit is not being used and the handset is lifted off L1 GF H=Save •You can select the handset ringer volume for the line(s). Save directory HRinger volume Ringer tone 3 Press á. Programmable Functions Ringer Volume ...
... the line. Ringer volume G=Line1 F=Line2 4 Press Ö (Line1) or Ñ (Line2) to HIGH, LOW or OFF. Your phone comes from the factory set to OFF, the handset will return to "Ringer volume" by pressing Ö or Ñ. •Each time you press Ö or Ñ, the volume ... Ö or Ñ. Reprogram if necessary. 20 Make sure the unit is not being used and the handset is lifted off L1 GF H=Save •You can select the handset ringer volume for the line(s). Save directory HRinger volume Ringer tone 3 Press á. Programmable Functions Ringer Volume ...

2.4 Ghz Cordles Phon
Page 21
...(p. 20). Make sure the unit is preset to "2". Ringer volume HRinger tone Program 3 Press á. For assistance, please call is being used and the handset is preset to "1". Ringer tone Line1:3 GF H=Save 6 Press á (Save key). •A beep sounds. •To program the other line, start...pressing dialing buttons (1) to (6). •If you press Ö or Ñ, the ringer tone will change and ring. •You can select the handset ringer tone out of 6 patterns for each line. Ringer tone Line1:1 GF H=Save 5 Select the desired ringer tone by pressing Ö or Ñ....
...(p. 20). Make sure the unit is preset to "2". Ringer volume HRinger tone Program 3 Press á. For assistance, please call is being used and the handset is preset to "1". Ringer tone Line1:3 GF H=Save 6 Press á (Save key). •A beep sounds. •To program the other line, start...pressing dialing buttons (1) to (6). •If you press Ö or Ñ, the ringer tone will change and ring. •You can select the handset ringer tone out of 6 patterns for each line. Ringer tone Line1:1 GF H=Save 5 Select the desired ringer tone by pressing Ö or Ñ....

2.4 Ghz Cordles Phon
Page 22
...HLCD contrast LCD contrast Low High GF H=Save LCD contrast Low ❚ High •You can program the handset LCD contrast (5 levels). To make the handset display clearer, set to "Program" by pressing Ö or Ñ. •Each time you press &#...214; or Ñ, the LCD contrast will change. 7 Press á (Save key). •A beep sounds. •To exit the programming mode, press (OFF). Ringer tone HProgram 3 Press á. 4 Scroll to high level. Your phone...
...HLCD contrast LCD contrast Low High GF H=Save LCD contrast Low ❚ High •You can program the handset LCD contrast (5 levels). To make the handset display clearer, set to "Program" by pressing Ö or Ñ. •Each time you press &#...214; or Ñ, the LCD contrast will change. 7 Press á (Save key). •A beep sounds. •To exit the programming mode, press (OFF). Ringer tone HProgram 3 Press á. 4 Scroll to high level. Your phone...

2.4 Ghz Cordles Phon
Page 23
... is automatically selected and the line status indication is displayed. •To change the line selection, see page 54. [L1] Talk H=Mute Line1 2 Dial a phone number. •The dialed number is displayed. •In step 1, you may select a line manually by pressing the line button instead of the call : 1-... please call and the battery strength. [L1] H=Mute 1112222 [L1] H=Mute Talk Line1 00-00-10 3 To hang up, press (OFF) or place the handset on cradle and try again." is displayed. •After a few seconds, the display will show the length of . Off 00-01-18 •If the...
... is automatically selected and the line status indication is displayed. •To change the line selection, see page 54. [L1] Talk H=Mute Line1 2 Dial a phone number. •The dialed number is displayed. •In step 1, you may select a line manually by pressing the line button instead of the call : 1-... please call and the battery strength. [L1] H=Mute 1112222 [L1] H=Mute Talk Line1 00-00-10 3 To hang up, press (OFF) or place the handset on cradle and try again." is displayed. •After a few seconds, the display will show the length of . Off 00-01-18 •If the...
2.4 Ghz Cordles Phon
Page 24
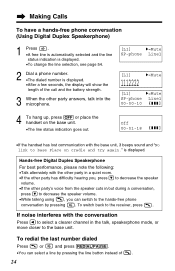
... volume. •If the other party answers, talk into the microphone. [L1] H=Mute SP-phone Line1 [L1] H=Mute 1112222 [L1] H=Mute SP-phone Line1 00-00-10 4 To hang up, press (OFF) or place the handset on cradle and try again." To switch back to the hands-free... press . is displayed. •After a few seconds, the display will show the length of . 24 Making Calls To have a hands-free phone conversation (Using Digital Duplex Speakerphone) 1 Press . •A free line is automatically selected and the line status indication is displayed. •To change the line selection,...
... volume. •If the other party answers, talk into the microphone. [L1] H=Mute SP-phone Line1 [L1] H=Mute 1112222 [L1] H=Mute SP-phone Line1 00-00-10 4 To hang up, press (OFF) or place the handset on cradle and try again." To switch back to the hands-free... press . is displayed. •After a few seconds, the display will show the length of . 24 Making Calls To have a hands-free phone conversation (Using Digital Duplex Speakerphone) 1 Press . •A free line is automatically selected and the line status indication is displayed. •To change the line selection,...
2.4 Ghz Cordles Phon
Page 25
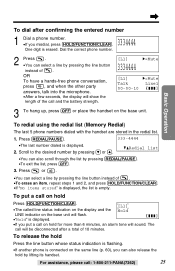
... (REDIAL/PAUSE). •To exit the list, press (OFF). 3. To redial using the redial list (Memory Redial) The last 5 phone numbers dialed with the handset are stored in the redial list. 1. Scroll to the desired number by pressing the line button instead of . •To erase an ..."No items stored" is displayed, the list is connected on the base unit. One digit is displayed. 2. Press or . •You can also scroll through the list by pressing the line button instead of . Dial the correct phone number. 2 Press . •You can select a line by pressing Ö or ...
... (REDIAL/PAUSE). •To exit the list, press (OFF). 3. To redial using the redial list (Memory Redial) The last 5 phone numbers dialed with the handset are stored in the redial list. 1. Scroll to the desired number by pressing the line button instead of . •To erase an ..."No items stored" is displayed, the list is connected on the base unit. One digit is displayed. 2. Press or . •You can also scroll through the list by pressing the line button instead of . Dial the correct phone number. 2 Press . •You can select a line by pressing Ö or ...

