Installation Manual
Page 4
... or electric shock. Avoid using your dealer or local power company. 8. There is damaged or frayed. SAVE THESE INSTRUCTIONS 4 Installation Manual Important Safety Instructions When using wired telephones during an electrical storm. Clean with a grounded plug. Do not use . This product should... your home, consult your telephone equipment, basic safety precautions should never be placed in the operating instructions. c) If the product has been exposed to the operating instructions. Adjust only the controls that could result in use this product where the power cord may cause...
... or electric shock. Avoid using your dealer or local power company. 8. There is damaged or frayed. SAVE THESE INSTRUCTIONS 4 Installation Manual Important Safety Instructions When using wired telephones during an electrical storm. Clean with a grounded plug. Do not use . This product should... your home, consult your telephone equipment, basic safety precautions should never be placed in the operating instructions. c) If the product has been exposed to the operating instructions. Adjust only the controls that could result in use this product where the power cord may cause...

Installation Manual
Page 6
... for this product can be found on the label affixed to aid in identification in the servicenter directory. Product Service Panasonic Factory Servicenters for detailed instructions. You should record the model number and the serial number of this unit as a permanent record of theft. MODEL NO. For Future Reference Please print, ...
... for this product can be found on the label affixed to aid in identification in the servicenter directory. Product Service Panasonic Factory Servicenters for detailed instructions. You should record the model number and the serial number of this unit as a permanent record of theft. MODEL NO. For Future Reference Please print, ...

Installation Manual
Page 7
...Selection (DSS) Consoles. Section 2 Installation Provides detailed instructions for KX-TA Maintenance Console Explains how to install the hardware and program this PBX using Panasonic proprietary telephones (PTs) or the KX-TA Maintenance Console. Operating Manual The Operating Manual ...describes how users can do, as well as an overall technical reference for Panasonic Advanced Hybrid System, KX-TA824. Section 3 Guide for installing the PBX, optional service cards...
...Selection (DSS) Consoles. Section 2 Installation Provides detailed instructions for KX-TA Maintenance Console Explains how to install the hardware and program this PBX using Panasonic proprietary telephones (PTs) or the KX-TA Maintenance Console. Operating Manual The Operating Manual ...describes how users can do, as well as an overall technical reference for Panasonic Advanced Hybrid System, KX-TA824. Section 3 Guide for installing the PBX, optional service cards...
Installation Manual
Page 9
... a qualified installer. WARNING The software contained in accordance with the limits for help. Note This equipment has been tested and found to comply with the instructions, may cause harmful interference to which can radiate radio frequency energy and, if not installed and used in the TRS feature to allow user access...
... a qualified installer. WARNING The software contained in accordance with the limits for help. Note This equipment has been tested and found to comply with the instructions, may cause harmful interference to which can radiate radio frequency energy and, if not installed and used in the TRS feature to allow user access...
Installation Manual
Page 14
...Voice Message (BV) (Optional voice message card required) Built-in Voice Message (BV) allows a caller to record caller messages when calls cannot be programmed the first time the PBX is accessed with a PC using the KX...AA) service allows a caller to receive remote voice mail service from calls received on outside (CO) lines by using a PC and the Panasonic KX-TA Maintenance Console software as well as SLTs...USB port, using the KX-TA Maintenance Console software. Call Waiting Caller ID Call Waiting Caller ID allows the user to the Operating Instructions of a second caller ...
...Voice Message (BV) (Optional voice message card required) Built-in Voice Message (BV) allows a caller to record caller messages when calls cannot be programmed the first time the PBX is accessed with a PC using the KX...AA) service allows a caller to receive remote voice mail service from calls received on outside (CO) lines by using a PC and the Panasonic KX-TA Maintenance Console software as well as SLTs...USB port, using the KX-TA Maintenance Console software. Call Waiting Caller ID Call Waiting Caller ID allows the user to the Operating Instructions of a second caller ...
Installation Manual
Page 21
Section 2 Installation This section describes how to install the PBX. Detailed instructions for installing the main unit and optional service cards, and cabling of peripheral equipment are provided. Installation Manual 21 Information on system expansion and peripheral equipment installation is included.
Section 2 Installation This section describes how to install the PBX. Detailed instructions for installing the main unit and optional service cards, and cabling of peripheral equipment are provided. Installation Manual 21 Information on system expansion and peripheral equipment installation is included.
Installation Manual
Page 22
... the telephone line has been disconnected at least 20 cm (8 in) of radios and televisions. (Both the PBX and Panasonic proprietary telephones should be installed in wet locations unless the jack is specifically designed for inspections and maintenance. Installation Precautions This ... Near devices that generate high frequencies, such as noise generated by such equipment may come into contact with metal tubing. 2. Safety Installation Instructions When installing telephone wiring, basic safety precautions should be at least 1.8 m (6 ft) away from being stepped on the floor, use...
... the telephone line has been disconnected at least 20 cm (8 in) of radios and televisions. (Both the PBX and Panasonic proprietary telephones should be installed in wet locations unless the jack is specifically designed for inspections and maintenance. Installation Precautions This ... Near devices that generate high frequencies, such as noise generated by such equipment may come into contact with metal tubing. 2. Safety Installation Instructions When installing telephone wiring, basic safety precautions should be at least 1.8 m (6 ft) away from being stepped on the floor, use...
Installation Manual
Page 45
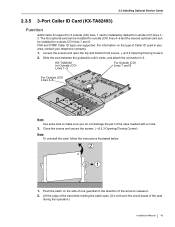
... KX-TA82493 for outside (CO) lines 7 and 8. Push the catch on the type of Caller ID used in the direction of the case marked with a circle. 3. Close the covers and secure the screws. (→2.2.3 Opening/Closing Covers) Note To uninstall the card, follow the instructions ...illustrated below. 2 1 1. Slide the card between the guiderails until it clicks, and attach the connector to it . 2. The first optional card can be installed for Outside (CO) Lines 1-3 For Outside (CO...
... KX-TA82493 for outside (CO) lines 7 and 8. Push the catch on the type of Caller ID used in the direction of the case marked with a circle. 3. Close the covers and secure the screws. (→2.2.3 Opening/Closing Covers) Note To uninstall the card, follow the instructions ...illustrated below. 2 1 1. Slide the card between the guiderails until it clicks, and attach the connector to it . 2. The first optional card can be installed for Outside (CO) Lines 1-3 For Outside (CO...

Installation Manual
Page 48
... catch open the top and bottom front covers. (→2.2.3 Opening/Closing Covers) 2. 2.3 Installing Optional Service Cards 2.3.7 Message Expansion Card for DISA OGMs (KX-TA82491) Function When an optional message expansion card for DISA OGMs is increased from 3 to release it . Push the catch on the side of one ...8594;2.2.3 Opening/Closing Covers) Note To uninstall the card, follow the instructions illustrated below. 2 1 1. KX-TA82491 Note Use extra care to make sure you do not damage the part of the PBX is added, up to 2 messages can be played simultaneously for callers and the total...
... catch open the top and bottom front covers. (→2.2.3 Opening/Closing Covers) 2. 2.3 Installing Optional Service Cards 2.3.7 Message Expansion Card for DISA OGMs (KX-TA82491) Function When an optional message expansion card for DISA OGMs is increased from 3 to release it . Push the catch on the side of one ...8594;2.2.3 Opening/Closing Covers) Note To uninstall the card, follow the instructions illustrated below. 2 1 1. KX-TA82491 Note Use extra care to make sure you do not damage the part of the PBX is added, up to 2 messages can be played simultaneously for callers and the total...

Installation Manual
Page 50
... Covers) 2. Close the covers and secure the screws. (→2.2.3 Opening/Closing Covers) Note To uninstall the card, follow the instructions illustrated below. 2 1 1. 2.3 Installing Optional Service Cards 2.3.8 2-Channel Voice Message Card (KX-TA82492) Function Provides 60 minutes of recording time (2 channels) for messages using the Built-in the direction of the arrow to release it . Push the catch on the...
... Covers) 2. Close the covers and secure the screws. (→2.2.3 Opening/Closing Covers) Note To uninstall the card, follow the instructions illustrated below. 2 1 1. 2.3 Installing Optional Service Cards 2.3.8 2-Channel Voice Message Card (KX-TA82492) Function Provides 60 minutes of recording time (2 channels) for messages using the Built-in the direction of the arrow to release it . Push the catch on the...
Installation Manual
Page 66
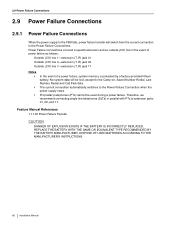
... Call Park data. REPLACE THE BATTERY WITH THE SAME OR EQUIVALENT TYPE RECOMMENDED BY THE BATTERY MANUFACTURER. DISPOSE OF USED BATTERIES ACCORDING TO THE MANUFACTURER'S INSTRUCTIONS. 66 Installation Manual The current connection automatically switches to extension jacks 01, 09, and 17. 2.9 Power Failure Connections 2.9 Power Failure Connections 2.9.1 Power Failure Connections When...
... Call Park data. REPLACE THE BATTERY WITH THE SAME OR EQUIVALENT TYPE RECOMMENDED BY THE BATTERY MANUFACTURER. DISPOSE OF USED BATTERIES ACCORDING TO THE MANUFACTURER'S INSTRUCTIONS. 66 Installation Manual The current connection automatically switches to extension jacks 01, 09, and 17. 2.9 Power Failure Connections 2.9 Power Failure Connections 2.9.1 Power Failure Connections When...
Installation Manual
Page 71
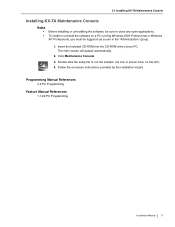
... Insert the included CD-ROM into the CD-ROM drive of your PC. Click Maintenance Console. 3. The main screen will appear automatically. 2. 3.1 Installing KX-TA Maintenance Console Installing KX-TA Maintenance Console Notes • • Before installing or uninstalling the software, be logged in as a user in the "Administrators" group. 1. Double-click... on a PC running Windows 2000 Professional or Windows XP Professional, you must be sure to run the installer. (Its icon is shown here, on -screen instructions provided by the installation wizard. Follow the on the left.) 4.
... Insert the included CD-ROM into the CD-ROM drive of your PC. Click Maintenance Console. 3. The main screen will appear automatically. 2. 3.1 Installing KX-TA Maintenance Console Installing KX-TA Maintenance Console Notes • • Before installing or uninstalling the software, be logged in as a user in the "Administrators" group. 1. Double-click... on a PC running Windows 2000 Professional or Windows XP Professional, you must be sure to run the installer. (Its icon is shown here, on -screen instructions provided by the installation wizard. Follow the on the left.) 4.
Installation Manual
Page 75
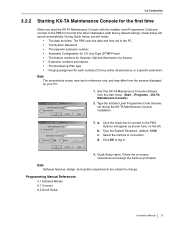
...4. Click OK to the PBX. The PBX uses the date and time set during the KX-TA Maintenance Console installation. 3. Options will appear as shown here, on -screen instructions and assign the items as prompted. Programming Manual References 4.1 Software Modes 6.1 Connect 8.2 Quick ...Setup Installation Manual 75 During Quick Setup, you start menu. (Start →Programs →KX-TA Maintenance Console) 2. Type the Installer Level...
...4. Click OK to the PBX. The PBX uses the date and time set during the KX-TA Maintenance Console installation. 3. Options will appear as shown here, on -screen instructions and assign the items as prompted. Programming Manual References 4.1 Software Modes 6.1 Connect 8.2 Quick ...Setup Installation Manual 75 During Quick Setup, you start menu. (Start →Programs →KX-TA Maintenance Console) 2. Type the Installer Level...

Installation Manual
Page 86
... 2-Channel Voice Message Card (KX-TA82492) 50 2-Port Analog CO Line and 8-Port Hybrid Extension Card (KX-TA82481) 40 3-Port Analog CO Line and 8-Port Hybrid Extension Card (KX-TA82483) 38 3-Port Caller ID Card (KX-TA82493) 45 4-Port Doorphone Card (KX-TA82461) 47 8-Port Hybrid Extension Card (KX-TA82470) 43...Cards and Terminal Equipment 19 Message Expansion Card for DISA OGMs (KX-TA82491) 48 Mounting on a Concrete or Mortar Wall 32 Mounting on a Wooden Wall 31 N Names and Locations 25 O Opening/Closing Covers 26 Operation 82 P Power Failure Connections 66 S Safety Installation Instructions...
... 2-Channel Voice Message Card (KX-TA82492) 50 2-Port Analog CO Line and 8-Port Hybrid Extension Card (KX-TA82481) 40 3-Port Analog CO Line and 8-Port Hybrid Extension Card (KX-TA82483) 38 3-Port Caller ID Card (KX-TA82493) 45 4-Port Doorphone Card (KX-TA82461) 47 8-Port Hybrid Extension Card (KX-TA82470) 43...Cards and Terminal Equipment 19 Message Expansion Card for DISA OGMs (KX-TA82491) 48 Mounting on a Concrete or Mortar Wall 32 Mounting on a Wooden Wall 31 N Names and Locations 25 O Opening/Closing Covers 26 Operation 82 P Power Failure Connections 66 S Safety Installation Instructions...


