
KXTA308 User Guide
Page 2
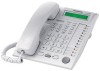
Service Unit KX-TA308 Telephones Optional Equipment KX-TA30820 KX-TA30830 KX-TA30850 KX-T7885 KX-TD7895 KX-T30865 Description Advanced Hybrid System (Main Unit) Proprietary Telephone Proprietary Telephone with Backlit Display Proprietary Telephone Wireless Proprietary Telephone Wireless Proprietary Telephone Doorphone The KX-TA308XX series telephones are available only for purchasing this Panasonic Telephone System. For your future reference SERIAL NO. (found on the side of the unit) DATE OF PURCHASE...
Service Unit KX-TA308 Telephones Optional Equipment KX-TA30820 KX-TA30830 KX-TA30850 KX-T7885 KX-TD7895 KX-T30865 Description Advanced Hybrid System (Main Unit) Proprietary Telephone Proprietary Telephone with Backlit Display Proprietary Telephone Wireless Proprietary Telephone Wireless Proprietary Telephone Doorphone The KX-TA308XX series telephones are available only for purchasing this Panasonic Telephone System. For your future reference SERIAL NO. (found on the side of the unit) DATE OF PURCHASE...
KXTA308 User Guide
Page 3
...to direct sunlight. • Never attempt to insert wires, pins, etc., into the telephone line. Consult a certified Panasonic dealer for this unit. • Do not use . KX-J07W/B KX-J15W/B KX-J25W/B W: White B : Black Illustration Description Dimensions Handset cord 213.36 cm {7 feet... symptom, to the outside of this product are NOT equipped to clean the cabinet. Product service Panasonic Factory Servicenters for detailed instructions. Plug the telephone directly into the vents or holes of the carton. Accessory Order Information • Replacement parts and...
...to direct sunlight. • Never attempt to insert wires, pins, etc., into the telephone line. Consult a certified Panasonic dealer for this unit. • Do not use . KX-J07W/B KX-J15W/B KX-J25W/B W: White B : Black Illustration Description Dimensions Handset cord 213.36 cm {7 feet... symptom, to the outside of this product are NOT equipped to clean the cabinet. Product service Panasonic Factory Servicenters for detailed instructions. Plug the telephone directly into the vents or holes of the carton. Accessory Order Information • Replacement parts and...
KXTA308 User Guide
Page 7
... 2 Station Programming (Personal Programming) .... 2-1 2.1 Station Programming Instructions 2-2 2.2 Station Programming (Personal Programming 2-6 Call Waiting Tone Type...Line Assignment - Table of Contents Section 1 PT Overview 1-1 1.1 Configuration 1-2 Location of Controls 1-3 Connection...1-5 Feature Buttons ...1-6 Fixed Buttons ...1-6 Flexible Buttons ...1-9 Line Access Buttons 1-11 Group-CO (G-CO) Button 1-11 Other-CO (O-CO) Button 1-12 Single-CO (S-CO) Button 1-12 Initial Settings ...1-13 Display Contrast Adjustment (KX-TA30830 only 1-13 BACKLIGHT Adjustment (KX-TA30830...
... 2 Station Programming (Personal Programming) .... 2-1 2.1 Station Programming Instructions 2-2 2.2 Station Programming (Personal Programming 2-6 Call Waiting Tone Type...Line Assignment - Table of Contents Section 1 PT Overview 1-1 1.1 Configuration 1-2 Location of Controls 1-3 Connection...1-5 Feature Buttons ...1-6 Fixed Buttons ...1-6 Flexible Buttons ...1-9 Line Access Buttons 1-11 Group-CO (G-CO) Button 1-11 Other-CO (O-CO) Button 1-12 Single-CO (S-CO) Button 1-12 Initial Settings ...1-13 Display Contrast Adjustment (KX-TA30830 only 1-13 BACKLIGHT Adjustment (KX-TA30830...
KXTA308 User Guide
Page 28
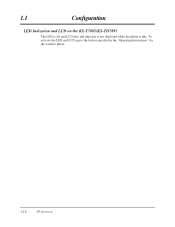
1.1 Configuration LED Indication and LCD on the KX-T7885/KX-TD7895 The LED is off and LCD date and time line is not displayed while the phone is idle. To activate the LED and LCD, press the button specified in the "Operating Instructions" for the wireless phone. 1-16 PT Overview
1.1 Configuration LED Indication and LCD on the KX-T7885/KX-TD7895 The LED is off and LCD date and time line is not displayed while the phone is idle. To activate the LED and LCD, press the button specified in the "Operating Instructions" for the wireless phone. 1-16 PT Overview

KXTA308 User Guide
Page 29
Section 2 Station Programming (Personal Programming) Contents 2.1 Station Programming Instructions 2-2 2.2 Station Programming (Personal Programming 2-6
Section 2 Station Programming (Personal Programming) Contents 2.1 Station Programming Instructions 2-2 2.2 Station Programming (Personal Programming 2-6
KXTA308 User Guide
Page 30
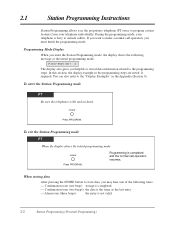
.... Programming is completed and the normal call operation, you enter the Station Programming mode, the display shows the following tones. - 2.1 Station Programming Instructions Station Programming allows you, the proprietary telephone (PT) user, to program certain features from your telephone is busy to outside callers. Confirmation tone (two beeps): the data is completed...
.... Programming is completed and the normal call operation, you enter the Station Programming mode, the display shows the following tones. - 2.1 Station Programming Instructions Station Programming allows you, the proprietary telephone (PT) user, to program certain features from your telephone is busy to outside callers. Confirmation tone (two beeps): the data is completed...
KXTA308 User Guide
Page 31
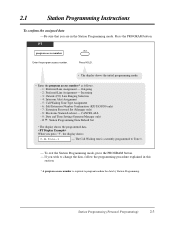
.... Incoming - 3: Outside (CO) Line Ringing Selection - 4: Intercom Alert Assignment - 5: Call Waiting Tone Type Assignment - 6: Self-Extension Number Confirmation (KX-TA30830 only) - 7: Extension Password Set (Manager only) - 8: Electronic Station Lockout - If you wish to change the data, follow the programming procedure explained in the Station Programming mode. 2.1 Station Programming Instructions To confi...
.... Incoming - 3: Outside (CO) Line Ringing Selection - 4: Intercom Alert Assignment - 5: Call Waiting Tone Type Assignment - 6: Self-Extension Number Confirmation (KX-TA30830 only) - 7: Extension Password Set (Manager only) - 8: Electronic Station Lockout - If you wish to change the data, follow the programming procedure explained in the Station Programming mode. 2.1 Station Programming Instructions To confi...
KXTA308 User Guide
Page 32
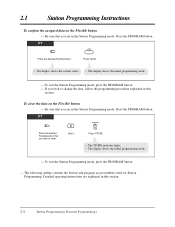
... in the Station Programming mode. Dial 2. 2.1 Station Programming Instructions To confirm the assigned data on the Flexible button - Press HOLD. • The display shows the current status. • The display shows the initial programming mode. - PT AUTO DIAL Press ...access numbers used for Station Programming. Detailed operating instructions are in this section. To exit the Station Programming mode, press the PROGRAM button. - STORE Press STORE. • The STORE indicator lights. • The display shows the initial programming mode. - Press the...
... in the Station Programming mode. Dial 2. 2.1 Station Programming Instructions To confirm the assigned data on the Flexible button - Press HOLD. • The display shows the current status. • The display shows the initial programming mode. - PT AUTO DIAL Press ...access numbers used for Station Programming. Detailed operating instructions are in this section. To exit the Station Programming mode, press the PROGRAM button. - STORE Press STORE. • The STORE indicator lights. • The display shows the initial programming mode. - Press the...
KXTA308 User Guide
Page 33
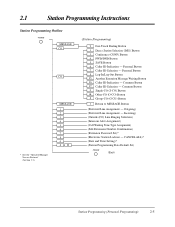
...Extension Password Set)* (Electronic Station Lockout - Personal Button 7 Caller ID Selection - Common Button 0 Single-CO (S-CO) Button Other-CO (O-CO) Button # Group-CO (G-CO) Button 3 Return to MESSAGE Button (Preferred Line Assignment - CANCEL ALL)* (Date and Time Setting)* (Station Programming Data Default Set) PROGRAM (Exit... Button 8 Log-In/Log-Out Button 95 Another Extension Message Waiting Button 96 Caller ID Indication - 2.1 Station Programming Instructions Station Programming Outline PROGRAM MESSAGE CO CO * See the "Operator/Manager Service Features" (Section 3.3).
...Extension Password Set)* (Electronic Station Lockout - Personal Button 7 Caller ID Selection - Common Button 0 Single-CO (S-CO) Button Other-CO (O-CO) Button # Group-CO (G-CO) Button 3 Return to MESSAGE Button (Preferred Line Assignment - CANCEL ALL)* (Date and Time Setting)* (Station Programming Data Default Set) PROGRAM (Exit... Button 8 Log-In/Log-Out Button 95 Another Extension Message Waiting Button 96 Caller ID Indication - 2.1 Station Programming Instructions Station Programming Outline PROGRAM MESSAGE CO CO * See the "Operator/Manager Service Features" (Section 3.3).


