

Operating Instructions
Page 1
Panasonic Operating Instructions Electronic Typewriter Model No. KX-R530 Before operating this unit, please read these instructions completely.
Panasonic Operating Instructions Electronic Typewriter Model No. KX-R530 Before operating this unit, please read these instructions completely.

Operating Instructions
Page 2
... record of your purchase of the Panasonic Electronic Typewriter KX-R530. MODEL NO. For your convenience, note this number below, and retain this book along with the unit •Ribbon Cassette (installed on the carriage 1 *0perating Instruction Manual •Correction Tape (installed on the carriage 1 •Hard Cover • Daisywheel [KX-R101(Installed on the label at the right side of purchase, to change without notice. 2 NAME OF DEALER...
... record of your purchase of the Panasonic Electronic Typewriter KX-R530. MODEL NO. For your convenience, note this number below, and retain this book along with the unit •Ribbon Cassette (installed on the carriage 1 *0perating Instruction Manual •Correction Tape (installed on the carriage 1 •Hard Cover • Daisywheel [KX-R101(Installed on the label at the right side of purchase, to change without notice. 2 NAME OF DEALER...

Operating Instructions
Page 3
... the carriage stopper and the ribbon cassette stopper. *Do not place your typewriter where it is turned OFF, open the paper support and the top cover then remove the ribbon cassette stopper installed on the ribbon cassette and the carriage stopper installed on the carriage shaft. (Be sure to read this section before operating this unit.) To use the unit, first remove...
... the carriage stopper and the ribbon cassette stopper. *Do not place your typewriter where it is turned OFF, open the paper support and the top cover then remove the ribbon cassette stopper installed on the ribbon cassette and the carriage stopper installed on the carriage shaft. (Be sure to read this section before operating this unit.) To use the unit, first remove...

Operating Instructions
Page 4
... to a Computer Chapter,6 APPENDIX 6-1 LIST OF CODE KEY FUNCTIONS 6-2 LIST OF DISPLAY MESSAGES 43-44 45 6-3 OTHERS A. Troubleshooting B. Main Parts 6 B. Procedure for the typewriter are composed of an Entire Text Chapter 5 PRINTER 5-1 USE AS A PRINTER (with KX-R60) 41-43 A. Margin Formats C. Bold Print H. To Print a Text from Memory D. CONTENTS The Operating Instructions for Typing B. Chapter 1 BEFORE USING THE TYPEWRITER 1-1 NAMES AND OPERATION OF THE KX-R530 PARTS 6-8 A. Mode Status Indicators and Guidances...
... to a Computer Chapter,6 APPENDIX 6-1 LIST OF CODE KEY FUNCTIONS 6-2 LIST OF DISPLAY MESSAGES 43-44 45 6-3 OTHERS A. Troubleshooting B. Main Parts 6 B. Procedure for the typewriter are composed of an Entire Text Chapter 5 PRINTER 5-1 USE AS A PRINTER (with KX-R60) 41-43 A. Margin Formats C. Bold Print H. To Print a Text from Memory D. CONTENTS The Operating Instructions for Typing B. Chapter 1 BEFORE USING THE TYPEWRITER 1-1 NAMES AND OPERATION OF THE KX-R530 PARTS 6-8 A. Mode Status Indicators and Guidances...

Operating Instructions
Page 6
... Release Lever This lever is used to manually feed the paper up or down . Paper Bail Lever Pulling this unit as a printer by connecting the optional Interface Adaptor KX-R60 to make paper insertion easy. 1 -1 NAMES AND OPERATION OF THE KX-R530 PARTS Paper Support Carriage• The ribbon cassette, correction tape and daisywheel are installed on the display to correct, delete, or edit it before printing...
... Release Lever This lever is used to manually feed the paper up or down . Paper Bail Lever Pulling this unit as a printer by connecting the optional Interface Adaptor KX-R60 to make paper insertion easy. 1 -1 NAMES AND OPERATION OF THE KX-R530 PARTS Paper Support Carriage• The ribbon cassette, correction tape and daisywheel are installed on the display to correct, delete, or edit it before printing...

Operating Instructions
Page 8
I `0 ( LI- 5, 'I . .. • • ".53 • $t o E LOCK AI S a FT C TAFEFI CODE LOG .. . _ - - -- PanaCinie Etactromc Typewriter II 30 INCE .101 LW, SD Re rk L5F RE TAB :A I , DpE•AAFCKC
I `0 ( LI- 5, 'I . .. • • ".53 • $t o E LOCK AI S a FT C TAFEFI CODE LOG .. . _ - - -- PanaCinie Etactromc Typewriter II 30 INCE .101 LW, SD Re rk L5F RE TAB :A I , DpE•AAFCKC
Operating Instructions
Page 9
...will not be used to remove. clockwise until the ribbon slack is now ready for about 5 years. 1-3 CHANGING THE RIBBON CASSETTE After turning the POWER switch off, open the paper support and remove the front plate. Press the CODE+K keys to the left margin which was previously set to "ON...listed on both sides and lift up the front portion (where the ribbon is exposed) to retain these functions can be using the unit for several days, unplug the power cord after the POWER switch is turned off: •Stored Text •Margins •Typing Impression •Tabs •Mode Settings...
...will not be used to remove. clockwise until the ribbon slack is now ready for about 5 years. 1-3 CHANGING THE RIBBON CASSETTE After turning the POWER switch off, open the paper support and remove the front plate. Press the CODE+K keys to the left margin which was previously set to "ON...listed on both sides and lift up the front portion (where the ribbon is exposed) to retain these functions can be using the unit for several days, unplug the power cord after the POWER switch is turned off: •Stored Text •Margins •Typing Impression •Tabs •Mode Settings...
Operating Instructions
Page 10
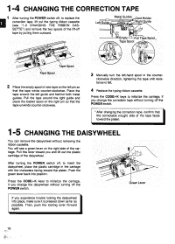
..., to replace the correction tape, lift out the typing ribbon cassette (see a green lever on the right pin so that the correctable (rough) side of the carriage. Press the CODE+K keys to insert the daisywheel, place the plastic cartridge in the counter- Push the green lever back into place, make sure it is felt. 4 Replace the typing ribbon cassette. Green Lever If you change the...
..., to replace the correction tape, lift out the typing ribbon cassette (see a green lever on the right pin so that the correctable (rough) side of the carriage. Press the CODE+K keys to insert the daisywheel, place the plastic cartridge in the counter- Push the green lever back into place, make sure it is felt. 4 Replace the typing ribbon cassette. Green Lever If you change the...

Operating Instructions
Page 12
... character can set when the unit was last used. You can be printed immediately. Selecting Pitch (10.12.15) Every time you can be edited (inserted, deleted, corrected) on the display at the right margin and returning the carriage automatically. Selecting typing mode (TPW • L/L • JST) Every time you want to the last word within the...
... character can set when the unit was last used. You can be printed immediately. Selecting Pitch (10.12.15) Every time you can be edited (inserted, deleted, corrected) on the display at the right margin and returning the carriage automatically. Selecting typing mode (TPW • L/L • JST) Every time you want to the last word within the...
Operating Instructions
Page 14
... cord to print them. If you want to change a TAB stop, press the TAB key to move the carriage to the tab position to change this margin format, simply do the exercises to the fundamental operations of the Panasonic KX-R530. To set . Read the following characters. 2-2 USING THE TYPEWRITER This section introduces you to familiarize yourself with each operation. Remove the ribbon cassette stopper...
... cord to print them. If you want to change a TAB stop, press the TAB key to move the carriage to the tab position to change this margin format, simply do the exercises to the fundamental operations of the Panasonic KX-R530. To set . Read the following characters. 2-2 USING THE TYPEWRITER This section introduces you to familiarize yourself with each operation. Remove the ribbon cassette stopper...

Operating Instructions
Page 15
... the MAR REL key to set the right margin. Press the CODE+1 keys to by -pass a previously set margin. The display will hear the buzzer which indicates that the maximum number of TAB stops is preprogrammed in the machine at 8 spaces from the right margin. SET" for one second. Example: Set the margins and tabs as follows: • Set the left margin on the...
... the MAR REL key to set the right margin. Press the CODE+1 keys to by -pass a previously set margin. The display will hear the buzzer which indicates that the maximum number of TAB stops is preprogrammed in the machine at 8 spaces from the right margin. SET" for one second. Example: Set the margins and tabs as follows: • Set the left margin on the...

Operating Instructions
Page 17
...left margin to allow you to move the paper 1/2 line toward the top of the page. You will show the symbol la". 2 EJ Press the CODE+INDEX keys to position the carriage on the current line: Press the CANCEL (0) key ...CODE+INDEX keys and type "th". These keys are used for the typing of superscripts (e.g. 103) and subscripts (e.g. To type a subscript, reverse the keystroke order. The display will also use them during correction. Press the INDEX key to enter the manual correction mode. To erase the last printed character on the line with one simple operation. 1 2 Type the correct...
...left margin to allow you to move the paper 1/2 line toward the top of the page. You will show the symbol la". 2 EJ Press the CODE+INDEX keys to position the carriage on the current line: Press the CANCEL (0) key ...CODE+INDEX keys and type "th". These keys are used for the typing of superscripts (e.g. 103) and subscripts (e.g. To type a subscript, reverse the keystroke order. The display will also use them during correction. Press the INDEX key to enter the manual correction mode. To erase the last printed character on the line with one simple operation. 1 2 Type the correct...

Operating Instructions
Page 18
... on the paper. 6 CODE Press the CODE+TEXT keys. 7 QUICK ERASE Press the CANCEL (a) or QUICK ERASE key to delete the entered characters. 8 Type the correct character. •Repeat steps 2-8 for each error to be used to be made. 3 CODE P 1 60 Press the CODE+TEXT keys. This will disappear from the display. 1Disabling Print When Making Manual Corrections The CODE+TEXT keys may be corrected. 9 II Press...
... on the paper. 6 CODE Press the CODE+TEXT keys. 7 QUICK ERASE Press the CANCEL (a) or QUICK ERASE key to delete the entered characters. 8 Type the correct character. •Repeat steps 2-8 for each error to be used to be made. 3 CODE P 1 60 Press the CODE+TEXT keys. This will disappear from the display. 1Disabling Print When Making Manual Corrections The CODE+TEXT keys may be corrected. 9 II Press...

Operating Instructions
Page 20
... display at a time. •If you type the characters, they will be printed in the middle of and the symbol is displayed behind the information to stop deleting information in bold face. Electronic Typewriter Press the CODE+U keys to be underlined. "Q" •When the "UL" or "JST" typing mode is selected, the symbol is displayed "D" in front of the...
... display at a time. •If you type the characters, they will be printed in the middle of and the symbol is displayed behind the information to stop deleting information in bold face. Electronic Typewriter Press the CODE+U keys to be underlined. "Q" •When the "UL" or "JST" typing mode is selected, the symbol is displayed "D" in front of the...

Operating Instructions
Page 21
... symbol "►" is displayed in front of your information. 3 ODE Press the CODE+W keys. Tab 123.64 12.10 Right Margin Tab 3 347.91 13.06 7654.23 .24 21 The unit will show "00". 4 45 2 Enter the numbers and decimal point. Electronic Typewriter Press the CODE+W keys to the correct starting position in steps 1 and 2, press the CANCEL (G) key. Word by word...
... symbol "►" is displayed in front of your information. 3 ODE Press the CODE+W keys. Tab 123.64 12.10 Right Margin Tab 3 347.91 13.06 7654.23 .24 21 The unit will show "00". 4 45 2 Enter the numbers and decimal point. Electronic Typewriter Press the CODE+W keys to the correct starting position in steps 1 and 2, press the CANCEL (G) key. Word by word...
Operating Instructions
Page 31
..., press the CODE+B keys for BOLD or CODE+U or CODE+W keys for UNDERLINE. •To search for particular characters. When the entered word is not included in the search command. TEXT Press the BACKSPACE key or the CODE+BACKSPACE keys move to the desired position, and press the CANCEL (0) key to be corrected directly within the text, press the CODE+N keys. 31 or...
..., press the CODE+B keys for BOLD or CODE+U or CODE+W keys for UNDERLINE. •To search for particular characters. When the entered word is not included in the search command. TEXT Press the BACKSPACE key or the CODE+BACKSPACE keys move to the desired position, and press the CANCEL (0) key to be corrected directly within the text, press the CODE+N keys. 31 or...

Operating Instructions
Page 40
... CODE+F keys. If no misspelled words are also treated as a word. For example, "Great!!" For example, "now's" and "at the beginning of a sentence, it starts with a capital letter, such as America, both "America" and "AMERICA" will be judged correct, however "america" will be judged incorrect. Accu-Spell checks spelling according to the following rules. •Numbers and symbols...
... CODE+F keys. If no misspelled words are also treated as a word. For example, "Great!!" For example, "now's" and "at the beginning of a sentence, it starts with a capital letter, such as America, both "America" and "AMERICA" will be judged correct, however "america" will be judged incorrect. Accu-Spell checks spelling according to the following rules. •Numbers and symbols...

Operating Instructions
Page 42
... printer also has a character set ". The characters that you can print English sentences and, of course, numerals. Unfortunately, these character sets do match so that don't match are usually the foreign character accents and other special symbols. HT A LF 8 Xh x 9 y J z 9 E e U A B ESC K SP k SP U u SP L SP SP 0 A a N CR M SP m SP E a SP N A n 0 ( P=Space) O 0 6 6 sFor the five types of letters, numbers, and symbols...
... printer also has a character set ". The characters that you can print English sentences and, of course, numerals. Unfortunately, these character sets do match so that don't match are usually the foreign character accents and other special symbols. HT A LF 8 Xh x 9 y J z 9 E e U A B ESC K SP k SP U u SP L SP SP 0 A a N CR M SP m SP E a SP N A n 0 ( P=Space) O 0 6 6 sFor the five types of letters, numbers, and symbols...
Operating Instructions
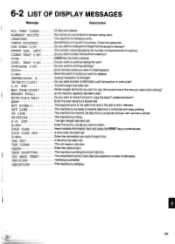
Page 45
... code has been set . or print a list? The machine is not ready to enter more than the maximum number of text. CHG FORM Y/N? ##### CHR. L.M. Do you want to replace. The unit clears a tab stop. OFF LINE ON LINE PRINTING R.M. Enter the word or words you want to change the margin format stored in memory. The machine is changed. Typing impression is changing words. The right margin...
... code has been set . or print a list? The machine is not ready to enter more than the maximum number of text. CHG FORM Y/N? ##### CHR. L.M. Do you want to replace. The unit clears a tab stop. OFF LINE ON LINE PRINTING R.M. Enter the word or words you want to change the margin format stored in memory. The machine is changed. Typing impression is changing words. The right margin...
Operating Instructions
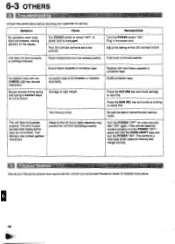
Page 46
... typewriter for service. Adjust the setting of ribbon cassette or correction tape. Buzzer sounds during typing and typing is not installed, or installed incorrectly. Press the MAR REL key and continue printing on the display. If the unit still does not function properly turn the POWER "OFF", press and hold the CODE+SHIFT keys and turn the POWER "ON". Symptom Cause Remedy/check No operation; Install correction tape. The error...
... typewriter for service. Adjust the setting of ribbon cassette or correction tape. Buzzer sounds during typing and typing is not installed, or installed incorrectly. Press the MAR REL key and continue printing on the display. If the unit still does not function properly turn the POWER "OFF", press and hold the CODE+SHIFT keys and turn the POWER "ON". Symptom Cause Remedy/check No operation; Install correction tape. The error...


