User Guide
Page 1
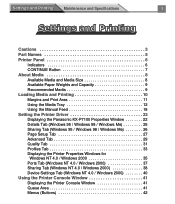
... 9 Loading Media and Printing 10 Margins and Print Area 11 Using the Media Tray 12 Using the Manual Feed 18 Setting the Printer Driver 22 Displaying the Panasonic KX-P7100 Properties Window 22 Details Tab (Windows 95 / Windows 98 / Windows Me 25 Sharing Tab (Windows 95 / Windows 98 / ...Windows Me 26 Page Setup Tab 27 Advanced Tab 29 Quality Tab 31 Profiles Tab 33 Displaying the Printer Properties Windows for Windows NT 4.0 / ...
... 9 Loading Media and Printing 10 Margins and Print Area 11 Using the Media Tray 12 Using the Manual Feed 18 Setting the Printer Driver 22 Displaying the Panasonic KX-P7100 Properties Window 22 Details Tab (Windows 95 / Windows 98 / Windows Me 25 Sharing Tab (Windows 95 / Windows 98 / ...Windows Me 26 Page Setup Tab 27 Advanced Tab 29 Quality Tab 31 Profiles Tab 33 Displaying the Printer Properties Windows for Windows NT 4.0 / ...

User Guide
Page 2
... Specifications 2 Using the Special Print Features 45 Duplex Printing 45 Overlay Printing - Watermark 47 Printer Status Display 53 Printer Status Display Icon on the Task Bar 53 Function of the Status Display 54 Recovery Information 55 Setting the Printer Status Display 56 Index 57 • Microsoft, Windows and Windows NT are either registered...
... Specifications 2 Using the Special Print Features 45 Duplex Printing 45 Overlay Printing - Watermark 47 Printer Status Display 53 Printer Status Display Icon on the Task Bar 53 Function of the Status Display 54 Recovery Information 55 Setting the Printer Status Display 56 Index 57 • Microsoft, Windows and Windows NT are either registered...

User Guide
Page 3
it may be wrapped around the fuser roller and cause damage. • Any toner other than genuine Panasonic toner; it may damage the printer. Settings and Printing Maintenance and Specifications Cautions 3 Cautions To avoid machine malfunction, do not use the equipment under the following conditions: • Direct exposure to ... feed. (Insert a media one by one.) Ink jet media Not genuine toner • Media for ink jet (paper, transparency, etc.) or transparency for color laser printer;
it may be wrapped around the fuser roller and cause damage. • Any toner other than genuine Panasonic toner; it may damage the printer. Settings and Printing Maintenance and Specifications Cautions 3 Cautions To avoid machine malfunction, do not use the equipment under the following conditions: • Direct exposure to ... feed. (Insert a media one by one.) Ink jet media Not genuine toner • Media for ink jet (paper, transparency, etc.) or transparency for color laser printer;

User Guide
Page 4
...error. s Ventilation Space The ventilation space is needed more than 20 mm (0.8″) between the printer and a wall. s Using the USB interface Please note that if more than one KX-P7100 printers are connected in radio interference with data. s Power Source Do not use a line conditioner, transient... suppressor or surge protector as the printer's bare metal frame prior to any of those printers will perform print out job. Settings...
...error. s Ventilation Space The ventilation space is needed more than 20 mm (0.8″) between the printer and a wall. s Using the USB interface Please note that if more than one KX-P7100 printers are connected in radio interference with data. s Power Source Do not use a line conditioner, transient... suppressor or surge protector as the printer's bare metal frame prior to any of those printers will perform print out job. Settings...

User Guide
Page 5
... and Specifications 5 Part Names Paper support (see pages 16, 18) Output tray Manual feed (see pages 8 , 18) Media tray (see pages 8, 12) Rear Side View Printer panel (see page 6) Paper level indicator (see page 14) Parallel interface connector (see page 49 in "Maintenance and Specifications") USB interface connector (see...
... and Specifications 5 Part Names Paper support (see pages 16, 18) Output tray Manual feed (see pages 8 , 18) Media tray (see pages 8, 12) Rear Side View Printer panel (see page 6) Paper level indicator (see page 14) Parallel interface connector (see page 49 in "Maintenance and Specifications") USB interface connector (see...

User Guide
Page 6
... turned off and back on your printer. Settings and Printing Maintenance and Specifications Printer Panel Indicators READY ERROR TONER/ DRUM UNIT CONTINUE CONTINUE button 6 Printer Panel Indicators Three indicators show the following printer's status. Toner cartridge: KX-PDP7 (For U.S.A) : Indicator is not installed in the sleep mode. D1 Printer is lit. Printer recoverable errors (media jam, media...
... turned off and back on your printer. Settings and Printing Maintenance and Specifications Printer Panel Indicators READY ERROR TONER/ DRUM UNIT CONTINUE CONTINUE button 6 Printer Panel Indicators Three indicators show the following printer's status. Toner cartridge: KX-PDP7 (For U.S.A) : Indicator is not installed in the sleep mode. D1 Printer is lit. Printer recoverable errors (media jam, media...

User Guide
Page 7
TONER/ READY ERROR DRUM UNIT Printer Status Printer wakes up from the error status after paper empty or paper feed error is restored. : Indicator is lit. : Indicator is blinking fast (with an interval of 1 second). : Indicator is turned off. Printer recovers from the sleep mode (power save mode). Settings and Printing Maintenance and Specifications CONTINUE Button 7 Printer Panel The printer executes the following action depending on the printer status by pressing this button.
TONER/ READY ERROR DRUM UNIT Printer Status Printer wakes up from the error status after paper empty or paper feed error is restored. : Indicator is lit. : Indicator is blinking fast (with an interval of 1 second). : Indicator is turned off. Printer recovers from the sleep mode (power save mode). Settings and Printing Maintenance and Specifications CONTINUE Button 7 Printer Panel The printer executes the following action depending on the printer status by pressing this button.

User Guide
Page 8
... specification, refer to "Media" on a custom size paper, print it using the application software that time set to letter or A4 for the printer's media size setting. At that page size can be used for available media. Settings and Printing Maintenance and Specifications About Media 8 About Media See the...
... specification, refer to "Media" on a custom size paper, print it using the application software that time set to letter or A4 for the printer's media size setting. At that page size can be used for available media. Settings and Printing Maintenance and Specifications About Media 8 About Media See the...

User Guide
Page 10
... Media and Printing See the Setup Guide for the following instructions. • Installing the Toner Cartridge and Drum Unit • Connecting Cables • Intalling the Printer Software The media is printed out on a thick paper [106-165 g/m2 (29-44 lbs.)] or label. However, it is needed to remove every time... the media is printed out to use manual feed when printing a document on the output tray (top of the printer). For available media, see "About Media" on page 8.
... Media and Printing See the Setup Guide for the following instructions. • Installing the Toner Cartridge and Drum Unit • Connecting Cables • Intalling the Printer Software The media is printed out on a thick paper [106-165 g/m2 (29-44 lbs.)] or label. However, it is needed to remove every time... the media is printed out to use manual feed when printing a document on the output tray (top of the printer). For available media, see "About Media" on page 8.

User Guide
Page 12
Settings and Printing Maintenance and Specifications 12 Loading Media and Printing Using the Media Tray 1 Pull the media tray out of the printer. 2 Pinch the media guides and slide them to the approximate width ( # ) and length ( $ ) of the media. $ #
Settings and Printing Maintenance and Specifications 12 Loading Media and Printing Using the Media Tray 1 Pull the media tray out of the printer. 2 Pinch the media guides and slide them to the approximate width ( # ) and length ( $ ) of the media. $ #

User Guide
Page 13
Settings and Printing Maintenance and Specifications 13 Loading Media and Printing NOTE • When loading the legal paper, slide the length guide unit ( $ ) to extend while pressing the stopper ( # ). $ # • If the media guide is in place. Push down the metal plate until it clicks, locking it back. Media guide • If the metal plate is removed, put it in the up position by accident, the media tray cannot be inserted into the printer.
Settings and Printing Maintenance and Specifications 13 Loading Media and Printing NOTE • When loading the legal paper, slide the length guide unit ( $ ) to extend while pressing the stopper ( # ). $ # • If the media guide is in place. Push down the metal plate until it clicks, locking it back. Media guide • If the metal plate is removed, put it in the up position by accident, the media tray cannot be inserted into the printer.

User Guide
Page 14
... fingerprints on the media, which can result in a smudged print. • Reusing media (used paper or jammed paper) that has been fed through the printer once can reduce the life of the consumables and paper path components. 4 Place the media with the print side down The height of paper should...
... fingerprints on the media, which can result in a smudged print. • Reusing media (used paper or jammed paper) that has been fed through the printer once can reduce the life of the consumables and paper path components. 4 Place the media with the print side down The height of paper should...
User Guide
Page 16
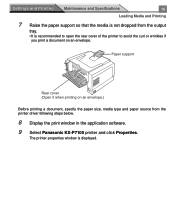
... paper support so that the media is not dropped from the printer driver following steps below. 8 Display the print window in the application software. 9 Select Panasonic KX-P7100 printer and click Properties. The printer properties window is recommended to open the rear cover of the printer to avoid the curl or wrinkles if you print a document on...
... paper support so that the media is not dropped from the printer driver following steps below. 8 Display the print window in the application software. 9 Select Panasonic KX-P7100 printer and click Properties. The printer properties window is recommended to open the rear cover of the printer to avoid the curl or wrinkles if you print a document on...

User Guide
Page 17
Settings and Printing Maintenance and Specifications 17 Loading Media and Printing 10 Select the Media Tray (%) from Paper Source and specify the paper size (#) and media type ($). • You cannot select Thick Paper or Label when selecting the Media Tray for Paper Source. • For the detailed information to setup the printer driver, see "Setting the Printer Driver" on page 22. # $ % 11 Click OK and print a document. • If you opened the rear cover at step 7, be sure to remove the media every time the media is printed out to avoid the warp or media jam.
Settings and Printing Maintenance and Specifications 17 Loading Media and Printing 10 Select the Media Tray (%) from Paper Source and specify the paper size (#) and media type ($). • You cannot select Thick Paper or Label when selecting the Media Tray for Paper Source. • For the detailed information to setup the printer driver, see "Setting the Printer Driver" on page 22. # $ % 11 Click OK and print a document. • If you opened the rear cover at step 7, be sure to remove the media every time the media is printed out to avoid the warp or media jam.

User Guide
Page 18
... media that the media is not dropped from 76.2 mm x 127 mm to 216 mm x 356 mm (3″ x 5″ to the approximate width of the printer to avoid the curl or wrinkles if you print a document on a thick paper or envelope.) 2 Separate the media guides to 8.5″ x 14″).
... media that the media is not dropped from 76.2 mm x 127 mm to 216 mm x 356 mm (3″ x 5″ to the approximate width of the printer to avoid the curl or wrinkles if you print a document on a thick paper or envelope.) 2 Separate the media guides to 8.5″ x 14″).
User Guide
Page 20
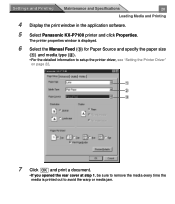
.... 6 Select the Manual Feed (%) for Paper Source and specify the paper size (#) and media type ($). • For the detailed information to setup the printer driver, see "Setting the Printer Driver" on page 22. # $ % 7 Click OK and print a document. • If you opened the rear cover at step 1, be sure to remove the... the warp or media jam. Settings and Printing Maintenance and Specifications 20 Loading Media and Printing 4 Display the print window in the application software. 5 Select Panasonic KX-P7100 printer and click Properties.
.... 6 Select the Manual Feed (%) for Paper Source and specify the paper size (#) and media type ($). • For the detailed information to setup the printer driver, see "Setting the Printer Driver" on page 22. # $ % 7 Click OK and print a document. • If you opened the rear cover at step 1, be sure to remove the... the warp or media jam. Settings and Printing Maintenance and Specifications 20 Loading Media and Printing 4 Display the print window in the application software. 5 Select Panasonic KX-P7100 printer and click Properties.

User Guide
Page 22
...is retained even if Windows is shutdown and restarted. 1 Click Start , move the pointer to set the printer by using the Panasonic KX-P7100 Properties window. A Setting the Printer from an application (see page 24). Document Default... (Windows NT® 4.0*5 ) - Properties (Windows ...2000*6 ). Settings and Printing Maintenance and Specifications 22 Setting the Printer Driver Setting the Printer Driver Displaying the Panasonic KX-P7100 Properties Window It is possible to Settings, then click Printers. The Printers window is displayed. *1 Microsoft® Windows® operating system ...
...is retained even if Windows is shutdown and restarted. 1 Click Start , move the pointer to set the printer by using the Panasonic KX-P7100 Properties window. A Setting the Printer from an application (see page 24). Document Default... (Windows NT® 4.0*5 ) - Properties (Windows ...2000*6 ). Settings and Printing Maintenance and Specifications 22 Setting the Printer Driver Setting the Printer Driver Displaying the Panasonic KX-P7100 Properties Window It is possible to Settings, then click Printers. The Printers window is displayed. *1 Microsoft® Windows® operating system ...

User Guide
Page 23
... NT 4.0 / Windows 2000. • For Windows NT 4.0 / Windows 2000, it enables you to view the features. Settings and Printing Maintenance and Specifications 23 Setting the Printer Driver 4 Click a tab to set another items by selecting Properties of the File menu (see page 35).
... NT 4.0 / Windows 2000. • For Windows NT 4.0 / Windows 2000, it enables you to view the features. Settings and Printing Maintenance and Specifications 23 Setting the Printer Driver 4 Click a tab to set another items by selecting Properties of the File menu (see page 35).
User Guide
Page 24
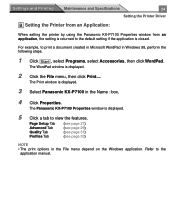
... and Specifications 24 Setting the Printer Driver B Setting the Printer from an Application: When setting the printer by using the Panasonic KX-P7100 Properties window from an application, the setting is returned to view the features. The WordPad window is displayed. 3 Select Panasonic KX-P7100 in the File menu depend on the Windows application. The Panasonic KX-P7100 Properties window is displayed...
... and Specifications 24 Setting the Printer Driver B Setting the Printer from an Application: When setting the printer by using the Panasonic KX-P7100 Properties window from an application, the setting is returned to view the features. The WordPad window is displayed. 3 Select Panasonic KX-P7100 in the File menu depend on the Windows application. The Panasonic KX-P7100 Properties window is displayed...

User Guide
Page 25
Parallel interface: KXPGDI (WinStyler GDI Port) USB interface: KXPUSB (WinStyler USB Port) For the functions of other buttons, refer to the Help menu in Windows 95, Windows 98 and Windows Me. # # Print to the following port Enables to select the port where the parallel interface cable or USB cable is available only in Windows. Settings and Printing Maintenance and Specifications 25 Setting the Printer Driver Details Tab (Windows 95 / Windows 98 / Windows Me) NOTE • This option is connected.
Parallel interface: KXPGDI (WinStyler GDI Port) USB interface: KXPUSB (WinStyler USB Port) For the functions of other buttons, refer to the Help menu in Windows 95, Windows 98 and Windows Me. # # Print to the following port Enables to select the port where the parallel interface cable or USB cable is available only in Windows. Settings and Printing Maintenance and Specifications 25 Setting the Printer Driver Details Tab (Windows 95 / Windows 98 / Windows Me) NOTE • This option is connected.