User Guide
Page 1
... Media 9 Loading Media and Printing 10 Margins and Print Area 11 Using the Media Tray 12 Using the Manual Feed 18 Setting the Printer Driver 22 Displaying the Panasonic KX-P7100 Properties Window 22 Details Tab (Windows 95 / Windows 98 / Windows Me 25 Sharing Tab (Windows 95 / Windows 98 / Windows Me 26 Page Setup...
... Media 9 Loading Media and Printing 10 Margins and Print Area 11 Using the Media Tray 12 Using the Manual Feed 18 Setting the Printer Driver 22 Displaying the Panasonic KX-P7100 Properties Window 22 Details Tab (Windows 95 / Windows 98 / Windows Me 25 Sharing Tab (Windows 95 / Windows 98 / Windows Me 26 Page Setup...
User Guide
Page 16
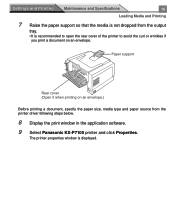
.... Settings and Printing Maintenance and Specifications 16 Loading Media and Printing 7 Raise the paper support so that the media is not dropped from the printer driver following steps below. 8 Display the print window in the application software. 9 Select Panasonic KX-P7100 printer and click Properties.
.... Settings and Printing Maintenance and Specifications 16 Loading Media and Printing 7 Raise the paper support so that the media is not dropped from the printer driver following steps below. 8 Display the print window in the application software. 9 Select Panasonic KX-P7100 printer and click Properties.

User Guide
Page 17
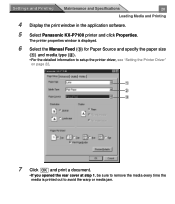
Settings and Printing Maintenance and Specifications 17 Loading Media and Printing 10 Select the Media Tray (%) from Paper Source and specify the paper size (#) and media type ($). • You cannot select Thick Paper or Label when selecting the Media Tray for Paper Source. • For the detailed information to setup the printer driver, see "Setting the Printer Driver" on page 22. # $ % 11 Click OK and print a document. • If you opened the rear cover at step 7, be sure to remove the media every time the media is printed out to avoid the warp or media jam.
Settings and Printing Maintenance and Specifications 17 Loading Media and Printing 10 Select the Media Tray (%) from Paper Source and specify the paper size (#) and media type ($). • You cannot select Thick Paper or Label when selecting the Media Tray for Paper Source. • For the detailed information to setup the printer driver, see "Setting the Printer Driver" on page 22. # $ % 11 Click OK and print a document. • If you opened the rear cover at step 7, be sure to remove the media every time the media is printed out to avoid the warp or media jam.
User Guide
Page 20
... the Manual Feed (%) for Paper Source and specify the paper size (#) and media type ($). • For the detailed information to setup the printer driver, see "Setting the Printer Driver" on page 22. # $ % 7 Click OK and print a document. • If you opened the rear cover at step 1, be sure to remove the media... the warp or media jam. Settings and Printing Maintenance and Specifications 20 Loading Media and Printing 4 Display the print window in the application software. 5 Select Panasonic KX-P7100 printer and click Properties.
... the Manual Feed (%) for Paper Source and specify the paper size (#) and media type ($). • For the detailed information to setup the printer driver, see "Setting the Printer Driver" on page 22. # $ % 7 Click OK and print a document. • If you opened the rear cover at step 1, be sure to remove the media... the warp or media jam. Settings and Printing Maintenance and Specifications 20 Loading Media and Printing 4 Display the print window in the application software. 5 Select Panasonic KX-P7100 printer and click Properties.

User Guide
Page 22
... the following menu depending on the oper- Settings and Printing Maintenance and Specifications 22 Setting the Printer Driver Setting the Printer Driver Displaying the Panasonic KX-P7100 Properties Window It is possible to set the printer by using the Panasonic KX-P7100 Properties window. Properties (Windows 95*2 / Windows 98*3 / Windows Me*4) - Document Default... (Windows NT® 4.0*5 ) - The Printers...
... the following menu depending on the oper- Settings and Printing Maintenance and Specifications 22 Setting the Printer Driver Setting the Printer Driver Displaying the Panasonic KX-P7100 Properties Window It is possible to set the printer by using the Panasonic KX-P7100 Properties window. Properties (Windows 95*2 / Windows 98*3 / Windows Me*4) - Document Default... (Windows NT® 4.0*5 ) - The Printers...

User Guide
Page 23
Settings and Printing Maintenance and Specifications 23 Setting the Printer Driver 4 Click a tab to set another items by selecting Properties of the File menu (see page 33) [For Windows 95, Windows 98, Windows Me] [For Windows ...
Settings and Printing Maintenance and Specifications 23 Setting the Printer Driver 4 Click a tab to set another items by selecting Properties of the File menu (see page 33) [For Windows 95, Windows 98, Windows Me] [For Windows ...
User Guide
Page 24
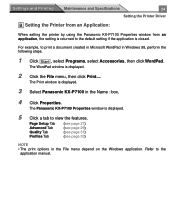
... is displayed. 5 Click a tab to view the features. Settings and Printing Maintenance and Specifications 24 Setting the Printer Driver B Setting the Printer from an Application: When setting the printer by using the Panasonic KX-P7100 Properties window from an application, the setting is returned to the default setting if the application is displayed. 3 Select...
... is displayed. 5 Click a tab to view the features. Settings and Printing Maintenance and Specifications 24 Setting the Printer Driver B Setting the Printer from an Application: When setting the printer by using the Panasonic KX-P7100 Properties window from an application, the setting is returned to the default setting if the application is displayed. 3 Select...

User Guide
Page 25
Parallel interface: KXPGDI (WinStyler GDI Port) USB interface: KXPUSB (WinStyler USB Port) For the functions of other buttons, refer to the Help menu in Windows 95, Windows 98 and Windows Me. # # Print to the following port Enables to select the port where the parallel interface cable or USB cable is connected. Settings and Printing Maintenance and Specifications 25 Setting the Printer Driver Details Tab (Windows 95 / Windows 98 / Windows Me) NOTE • This option is available only in Windows.
Parallel interface: KXPGDI (WinStyler GDI Port) USB interface: KXPUSB (WinStyler USB Port) For the functions of other buttons, refer to the Help menu in Windows 95, Windows 98 and Windows Me. # # Print to the following port Enables to select the port where the parallel interface cable or USB cable is connected. Settings and Printing Maintenance and Specifications 25 Setting the Printer Driver Details Tab (Windows 95 / Windows 98 / Windows Me) NOTE • This option is available only in Windows.

User Guide
Page 26
For the detailed information, refer to print the printer driver must be loaded. When shared, for other PCs to the Help menu in Windows. Settings and Printing Maintenance and Specifications 26 Setting the Printer Driver Sharing Tab (Windows 95 / Windows 98 / Windows Me) # # Shared As Enables you to share the printer over the network.
For the detailed information, refer to print the printer driver must be loaded. When shared, for other PCs to the Help menu in Windows. Settings and Printing Maintenance and Specifications 26 Setting the Printer Driver Sharing Tab (Windows 95 / Windows 98 / Windows Me) # # Shared As Enables you to share the printer over the network.

User Guide
Page 27
The print speed will be selected. $ Media Type Enables to select a different paper size. Settings and Printing Page Setup Tab Maintenance and Specifications 27 Setting the Printer Driver # $ % & ' ( ) # Paper Size Enables to select the type of media loaded in the Paper Source. Letter, A4, Legal, Executive, B5, A5, A6, Envelope #10, Envelope #9, Monarch, International DL or International C5 can be slow depending on the media type. When the Label or Thick Paper is selected, the Manual Feed is selected in the media tray or manual feed.
The print speed will be selected. $ Media Type Enables to select a different paper size. Settings and Printing Page Setup Tab Maintenance and Specifications 27 Setting the Printer Driver # $ % & ' ( ) # Paper Size Enables to select the type of media loaded in the Paper Source. Letter, A4, Legal, Executive, B5, A5, A6, Envelope #10, Envelope #9, Monarch, International DL or International C5 can be slow depending on the media type. When the Label or Thick Paper is selected, the Manual Feed is selected in the media tray or manual feed.

User Guide
Page 28
... page 45. The page border will be set to print on both sides of paper. Settings and Printing Maintenance and Specifications 28 Setting the Printer Driver % Paper Source Enables to the default settings. Portrait Landscape A A ' Duplex Selects either Flip on long edge or Flip on short edge when you want to...
... page 45. The page border will be set to print on both sides of paper. Settings and Printing Maintenance and Specifications 28 Setting the Printer Driver % Paper Source Enables to the default settings. Portrait Landscape A A ' Duplex Selects either Flip on long edge or Flip on short edge when you want to...

User Guide
Page 29
Settings and Printing Advanced Tab Maintenance and Specifications 29 Setting the Printer Driver Overlay feature enables you wish to overlay on page 47). # $ % & ) ' ( # Make Overlay / Cover / Trailer Page File Enables you to save a GDI file for graphics and/or characters that you to overlay an overlay file (images or characters) over a document (see "Overlay Printing - Watermark" on / before/after a document.
Settings and Printing Advanced Tab Maintenance and Specifications 29 Setting the Printer Driver Overlay feature enables you wish to overlay on page 47). # $ % & ) ' ( # Make Overlay / Cover / Trailer Page File Enables you to save a GDI file for graphics and/or characters that you to overlay an overlay file (images or characters) over a document (see "Overlay Printing - Watermark" on / before/after a document.

User Guide
Page 30
However, it is recommended to set the number of copies can also be determined using one method, either from this driver or from an application software to avoid having a printing problem. ( Scaling Reduces or enlarges a document to be printed. NOTE • The number of... 25% and 400%. ) Restore Defaults Resets the Advanced tab's settings to the default settings. Settings and Printing Maintenance and Specifications 30 Setting the Printer Driver $ Print With Overlay Enables you to select a GDI file that you wish to overlay on a document when it is printed. The following ...
However, it is recommended to set the number of copies can also be determined using one method, either from this driver or from an application software to avoid having a printing problem. ( Scaling Reduces or enlarges a document to be printed. NOTE • The number of... 25% and 400%. ) Restore Defaults Resets the Advanced tab's settings to the default settings. Settings and Printing Maintenance and Specifications 30 Setting the Printer Driver $ Print With Overlay Enables you to select a GDI file that you wish to overlay on a document when it is printed. The following ...

User Guide
Page 31
Smooth is low contrast and Sharp is high contrast. A lighter setting (increasing value) provides a lighter image and a darker setting (decreasing value) provides a darker image. $ Contrast Control Adjusts the range between the darkest and the lightest shades in the image. Settings and Printing Quality Tab Maintenance and Specifications 31 Setting the Printer Driver # $ % & # Brightness Control Changes the brightness of an image.
Smooth is low contrast and Sharp is high contrast. A lighter setting (increasing value) provides a lighter image and a darker setting (decreasing value) provides a darker image. $ Contrast Control Adjusts the range between the darkest and the lightest shades in the image. Settings and Printing Quality Tab Maintenance and Specifications 31 Setting the Printer Driver # $ % & # Brightness Control Changes the brightness of an image.

User Guide
Page 32
... of toner used to print. Black areas and text are printed in black and white. Settings and Printing Maintenance and Specifications 32 Setting the Printer Driver % Print Mode Select the appropriate print mode for the type of document to make the setting(s) effective. Graphic: Documents are printed in the Preview box...
... of toner used to print. Black areas and text are printed in black and white. Settings and Printing Maintenance and Specifications 32 Setting the Printer Driver % Print Mode Select the appropriate print mode for the type of document to make the setting(s) effective. Graphic: Documents are printed in the Preview box...

User Guide
Page 33
Settings and Printing Profiles Tab Maintenance and Specifications 33 Setting the Printer Driver You can save the settings of the driver (for example, printing on a label or envelope etc.) using the Profile tab and retrieve it when necessary. # $ % & ' ( # Profiles Name Displays the registered profile names. Profile (DEFAULT) is registered by default and cannot be changed or deleted.
Settings and Printing Profiles Tab Maintenance and Specifications 33 Setting the Printer Driver You can save the settings of the driver (for example, printing on a label or envelope etc.) using the Profile tab and retrieve it when necessary. # $ % & ' ( # Profiles Name Displays the registered profile names. Profile (DEFAULT) is registered by default and cannot be changed or deleted.

User Guide
Page 34
... the program version and copyright information. ClickOYKes . % Delete Enables to overwrite the profile. Settings and Printing Maintenance and Specifications 34 Setting the Printer Driver $ Save as ... . 4 Enter a profile name and comment. • If you enter the same profile name that existed in the Profi... comment you entered when registered a new profile. Enables to register a new profile or renew the saved profile. 1 Change the driver settings. 2 Click the Profiles tab. 3 Click Save as ...
... the program version and copyright information. ClickOYKes . % Delete Enables to overwrite the profile. Settings and Printing Maintenance and Specifications 34 Setting the Printer Driver $ Save as ... . 4 Enter a profile name and comment. • If you enter the same profile name that existed in the Profi... comment you entered when registered a new profile. Enables to register a new profile or renew the saved profile. 1 Change the driver settings. 2 Click the Profiles tab. 3 Click Save as ...
User Guide
Page 35
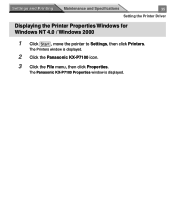
Settings and Printing Maintenance and Specifications 35 Setting the Printer Driver Displaying the Printer Properties Windows for Windows NT 4.0 / Windows 2000 1 Click Start , move the pointer to Settings, then click Printers. The Panasonic KX-P7100 Properties window is displayed. 2 Click the Panasonic KX-P7100 icon. 3 Click the File menu, then click Properties. The Printers window is displayed.
Settings and Printing Maintenance and Specifications 35 Setting the Printer Driver Displaying the Printer Properties Windows for Windows NT 4.0 / Windows 2000 1 Click Start , move the pointer to Settings, then click Printers. The Panasonic KX-P7100 Properties window is displayed. 2 Click the Panasonic KX-P7100 icon. 3 Click the File menu, then click Properties. The Printers window is displayed.

User Guide
Page 36
NOTE • The separator page (#) cannot be printed from General tab (Windows NT 4.0) or Advanced tab (Windows 2000). Ports tab (see page 37) Sharing tab (see page 38) Device Settings tab (see page 40) # (tab in Windows NT 4.0) •Tabs are different in Windows 2000. Settings and Printing Maintenance and Specifications 36 Setting the Printer Driver 4 Click a tab to view the features.
NOTE • The separator page (#) cannot be printed from General tab (Windows NT 4.0) or Advanced tab (Windows 2000). Ports tab (see page 37) Sharing tab (see page 38) Device Settings tab (see page 40) # (tab in Windows NT 4.0) •Tabs are different in Windows 2000. Settings and Printing Maintenance and Specifications 36 Setting the Printer Driver 4 Click a tab to view the features.

User Guide
Page 37
Parallel interface: KXP1, KXP2, KXP3 USB interface: KXPUSB (only Windows 2000) Settings and Printing Maintenance and Specifications 37 Setting the Printer Driver Ports Tab (Windows NT 4.0 / Windows 2000) # (tab in Windows NT 4.0) # Checked port Documents will be printed to the checked port.
Parallel interface: KXP1, KXP2, KXP3 USB interface: KXPUSB (only Windows 2000) Settings and Printing Maintenance and Specifications 37 Setting the Printer Driver Ports Tab (Windows NT 4.0 / Windows 2000) # (tab in Windows NT 4.0) # Checked port Documents will be printed to the checked port.