Operating Instructions
Page 2
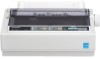
This printer has been factory set to operate with the most cases, there will be no need to change the factory settings. Feature Highlights Power consumption: Printer Emulation: Font: Printing speed: Paper Feeding: Tear Off: Paper Parking: Interface: Ready 3W Epson® LQ-300 without removing/wasting fanfold paper USB 2.0, parallel, serial About the documentation The printer's documentation consists of the unit. Operating Instructions (this manual) The Operating Instructions explain part names, installation, operations, maintenance and specifications of 2 manuals. For ...
This printer has been factory set to operate with the most cases, there will be no need to change the factory settings. Feature Highlights Power consumption: Printer Emulation: Font: Printing speed: Paper Feeding: Tear Off: Paper Parking: Interface: Ready 3W Epson® LQ-300 without removing/wasting fanfold paper USB 2.0, parallel, serial About the documentation The printer's documentation consists of the unit. Operating Instructions (this manual) The Operating Instructions explain part names, installation, operations, maintenance and specifications of 2 manuals. For ...
Operating Instructions
Page 4
... must use the recommended shielded interfacing cable when connecting to a host computer. Also, any interference received, including interference that may also call the end user technical support telephone number which is no guarantee that to which the receiver is subject to the following two conditions: (1) This device may not cause harmful interference, and (2) this manual and tried the troubleshooting...
... must use the recommended shielded interfacing cable when connecting to a host computer. Also, any interference received, including interference that may also call the end user technical support telephone number which is no guarantee that to which the receiver is subject to the following two conditions: (1) This device may not cause harmful interference, and (2) this manual and tried the troubleshooting...
Operating Instructions
Page 5
... Software 27 Using the Control Panel 28 Using the Control Panel 28 Selecting a Character Font 28 Selecting a Character Pitch 28 High Speed Mode ...29 Line Feed/Form Feed (LF/FF Switch 29 Tear Off (TEAR OFF Switch 29 Top of Form Function (TOF SET 30 Paper Parking (LOAD/PARK Switch 31 Paper Out Detector ...32 Initial Setup Mode ...33 Control Panel ...34 Serial Interface Setup Mode 36 Resetting All Current Settings to the Factory Settings 37 Printing Out the Current Settings 37 Maintenance & Troubleshooting 38 Periodic Maintenance ...38 Troubleshooting ...39 Operating Instructions...
... Software 27 Using the Control Panel 28 Using the Control Panel 28 Selecting a Character Font 28 Selecting a Character Pitch 28 High Speed Mode ...29 Line Feed/Form Feed (LF/FF Switch 29 Tear Off (TEAR OFF Switch 29 Top of Form Function (TOF SET 30 Paper Parking (LOAD/PARK Switch 31 Paper Out Detector ...32 Initial Setup Mode ...33 Control Panel ...34 Serial Interface Setup Mode 36 Resetting All Current Settings to the Factory Settings 37 Printing Out the Current Settings 37 Maintenance & Troubleshooting 38 Periodic Maintenance ...38 Troubleshooting ...39 Operating Instructions...
Operating Instructions
Page 10
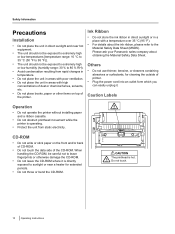
...;F)]. • The unit should not be careful not to the Material Safety Data Sheet (MSDS). Caution Labels Operation • Do not operate the printer without installing paper and a ribbon cassette. • Do not obstruct printhead movement while the printer is hot. Do not touch. 10 Operating Instructions Safety Information Precautions Installation • Do not place the unit in direct sunlight and near a heater...
...;F)]. • The unit should not be careful not to the Material Safety Data Sheet (MSDS). Caution Labels Operation • Do not operate the printer without installing paper and a ribbon cassette. • Do not obstruct printhead movement while the printer is hot. Do not touch. 10 Operating Instructions Safety Information Precautions Installation • Do not place the unit in direct sunlight and near a heater...
Operating Instructions
Page 15
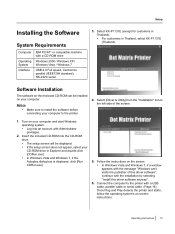
Select [Driver & Utility] from the "Installation" list on the left side of this driver software", continue with the installation by selecting "Install this driver software anyway". 6. Insert the included CD-ROM into an account with a USB cable, parallel cable or serial cable. (Page 16) Once Plug and Play detects the printer and starts, follow the operating system's on the enclosed CD-ROM can 't verify the publisher of the screen. 1. Select KX-P1131E (except for customers in...
Select [Driver & Utility] from the "Installation" list on the left side of this driver software", continue with the installation by selecting "Install this driver software anyway". 6. Insert the included CD-ROM into an account with a USB cable, parallel cable or serial cable. (Page 16) Once Plug and Play detects the printer and starts, follow the operating system's on the enclosed CD-ROM can 't verify the publisher of the screen. 1. Select KX-P1131E (except for customers in...
Operating Instructions
Page 23
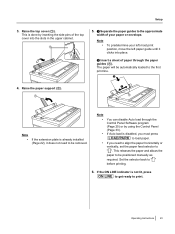
... ON LINE indicator is done by using the Control Panel (Page 33). B 4. If you must press LOAD/PARK to load paper. B Insert a sheet of paper through the Control Panel Software program (Page 25) or by inserting the side pins of your left most print position, move the left paper guide until it does not need to align the paper horizontally or vertically, set the paper feed selector to the approximate width of the top cover into...
... ON LINE indicator is done by using the Control Panel (Page 33). B 4. If you must press LOAD/PARK to load paper. B Insert a sheet of paper through the Control Panel Software program (Page 25) or by inserting the side pins of your left most print position, move the left paper guide until it does not need to align the paper horizontally or vertically, set the paper feed selector to the approximate width of the top cover into...
Operating Instructions
Page 25
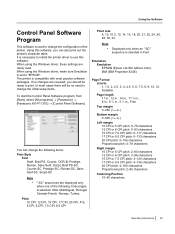
... the Control Panel Software program, from [Start], select [All programs] ® [Panasonic] ® [Panasonic KX-P1131E] ® [Control Panel Software]. In most popular software packages. When using the Windows driver, these settings are required, you can change the configuration of the following Code pages is selected: USA, Multilingual, Portugal, Canada-French, Norway, Turkey. Emulation Emulation EPSON (Epson LQ-300 without color) IBM (IBM Proprinter X24E) Page Format Line/in. 1, 1.5, 2, 2.5, 3, 4, 4.5, 5, 6, 7.5, 8, 9, 10, 12, Scalable Page length 11...
... the Control Panel Software program, from [Start], select [All programs] ® [Panasonic] ® [Panasonic KX-P1131E] ® [Control Panel Software]. In most popular software packages. When using the Windows driver, these settings are required, you can change the configuration of the following Code pages is selected: USA, Multilingual, Portugal, Canada-French, Norway, Turkey. Emulation Emulation EPSON (Epson LQ-300 without color) IBM (IBM Proprinter X24E) Page Format Line/in. 1, 1.5, 2, 2.5, 3, 4, 4.5, 5, 6, 7.5, 8, 9, 10, 12, Scalable Page length 11...
Operating Instructions
Page 26
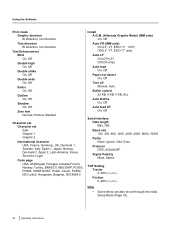
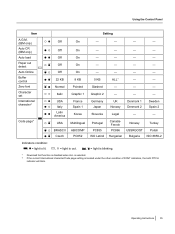
..., Bulgaria, ISO 8859-2 Install A.G.M. (Alternate Graphic Mode) (IBM only) On, Off Auto CR (IBM only) On (LF, VT, ESC+"J" +CR) Off (LF, VT, ESC+"J" only) Auto LF On (CR+LF) Off (CR only) Auto load On, Off Paper out detect On, Off Tear off Manual, Auto Buffer control 22 KB, 8 KB, 0 KB, ALL Auto Online On, Off Auto feed XT On, Off Serial Interface Data length 8Bit, 7Bit Baud rate...
..., Bulgaria, ISO 8859-2 Install A.G.M. (Alternate Graphic Mode) (IBM only) On, Off Auto CR (IBM only) On (LF, VT, ESC+"J" +CR) Off (LF, VT, ESC+"J" only) Auto LF On (CR+LF) Off (CR only) Auto load On, Off Paper out detect On, Off Tear off Manual, Auto Buffer control 22 KB, 8 KB, 0 KB, ALL Auto Online On, Off Auto feed XT On, Off Serial Interface Data length 8Bit, 7Bit Baud rate...
Operating Instructions
Page 27
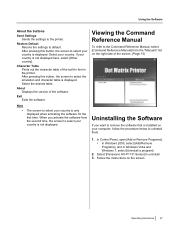
.... Select [Panasonic KX-P1131 Series] to the printer. After pressing this button, the screen to select your country is not displayed here, select [Other country]. After pressing this button, the screen to select the emulation and character table is displayed. Using the Software About the buttons Send Settings Sends the settings to uninstall. 3. Exit Exits the software. Viewing the Command Reference Manual To refer to the Command Reference Manual, select [Command Reference Manual] from the "Manuals" list on...
.... Select [Panasonic KX-P1131 Series] to the printer. After pressing this button, the screen to select your country is not displayed here, select [Other country]. After pressing this button, the screen to select the emulation and character table is displayed. Using the Software About the buttons Send Settings Sends the settings to uninstall. 3. Exit Exits the software. Viewing the Command Reference Manual To refer to the Command Reference Manual, select [Command Reference Manual] from the "Manuals" list on...
Operating Instructions
Page 29
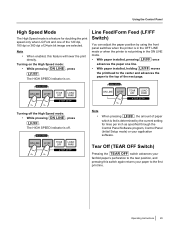
...-pin bit image are selected. Operating Instructions 29 Note • When pressing LF/FF , the amount of paper which is fed is on the High Speed mode: • While pressing ON LINE , press LF/FF . Line Feed/Form Feed (LF/FF Switch) You can adjust the paper position by the current setting for doubling the print speed only when LQ Font and one line. • With paper installed, holding LF/FF moves the printhead...
...-pin bit image are selected. Operating Instructions 29 Note • When pressing LF/FF , the amount of paper which is fed is on the High Speed mode: • While pressing ON LINE , press LF/FF . Line Feed/Form Feed (LF/FF Switch) You can adjust the paper position by the current setting for doubling the print speed only when LQ Font and one line. • With paper installed, holding LF/FF moves the printhead...
Operating Instructions
Page 30
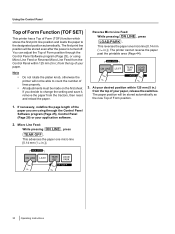
... application software. 2. Reverse Micro Line Feed: While pressing ON LINE , press LOAD/PARK . The first print line position will be able to change the setting and save it, remove the paper from the tractors, then reset and reload the paper. If necessary, redefine the page length of the paper you decide to count the number of your paper, release the switches. You can adjust the Top of your paper. Using the Control Panel Top of Form Function (TOF SET) This printer...
... application software. 2. Reverse Micro Line Feed: While pressing ON LINE , press LOAD/PARK . The first print line position will be able to change the setting and save it, remove the paper from the tractors, then reset and reload the paper. If necessary, redefine the page length of the paper you decide to count the number of your paper, release the switches. You can adjust the Top of your paper. Using the Control Panel Top of Form Function (TOF SET) This printer...
Operating Instructions
Page 31
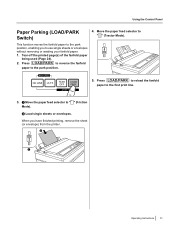
... fanfold paper to the park position. 4. When you to use single sheets or envelopes without removing or wasting your fanfold paper. 1. B A Operating Instructions 31 Move the paper feed selector to " " (Friction Mode). Tear off the printed page(s) of the fanfold paper being used (Page 24). 2. A Move the paper feed selector to " " (Tractor Mode). 5. Using the Control Panel Paper Parking (LOAD/PARK Switch) This function moves the fanfold paper to the park position, enabling you have finished printing, remove the sheet (or...
... fanfold paper to the park position. 4. When you to use single sheets or envelopes without removing or wasting your fanfold paper. 1. B A Operating Instructions 31 Move the paper feed selector to " " (Friction Mode). Tear off the printed page(s) of the fanfold paper being used (Page 24). 2. A Move the paper feed selector to " " (Tractor Mode). 5. Using the Control Panel Paper Parking (LOAD/PARK Switch) This function moves the fanfold paper to the park position, enabling you have finished printing, remove the sheet (or...
Operating Instructions
Page 33
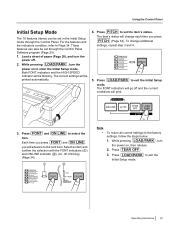
... will change additional settings, repeat step 3 and 4. 5. Load a sheet of paper (Page 20), and turn the power on, then release. 2. Both FONT indicators and the HIGH SPEED indicator will print. 3. Each time you press FONT and ON LINE , you press PITCH (Page 34). While pressing LOAD/PARK , turn the power off and the current conditions will be blinking. The item's status will advance to enter the Initial Setup mode. Press FONT...
... will change additional settings, repeat step 3 and 4. 5. Load a sheet of paper (Page 20), and turn the power on, then release. 2. Both FONT indicators and the HIGH SPEED indicator will print. 3. Each time you press FONT and ON LINE , you press PITCH (Page 34). While pressing LOAD/PARK , turn the power off and the current conditions will be blinking. The item's status will advance to enter the Initial Setup mode. Press FONT...
Operating Instructions
Page 35
... PITCH indicator will blink. Off On - - - - 22 KB 8 KB 0 KB ALL*1 - - Off On - - - - Italic Graphic 1 Graphic 2 - - - Operating Instructions 35 USA Italy Latin America USA BRASCII Czech France Spain 1 Korea Multilingual ABICOMP PC852 Germany Japan UK Norway Denmark 1 Denmark 2 Sweden Spain 2 Slovenia Legal - - Off On - - - - Using the Control Panel Item A.G.M. (IBM only) Auto CR (IBM only) Auto load Paper out detect Auto Online Buffer control Zero font Character set...
... PITCH indicator will blink. Off On - - - - 22 KB 8 KB 0 KB ALL*1 - - Off On - - - - Italic Graphic 1 Graphic 2 - - - Operating Instructions 35 USA Italy Latin America USA BRASCII Czech France Spain 1 Korea Multilingual ABICOMP PC852 Germany Japan UK Norway Denmark 1 Denmark 2 Sweden Spain 2 Slovenia Legal - - Off On - - - - Using the Control Panel Item A.G.M. (IBM only) Auto CR (IBM only) Auto load Paper out detect Auto Online Buffer control Zero font Character set...
Operating Instructions
Page 36
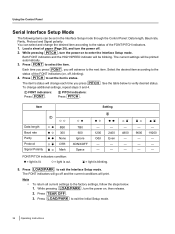
Using the Control Panel Serial Interface Setup Mode The following items can select and change the desired item according to the status of the FONT/PITCH indicators. 1. You can be set the item's status. The current settings will advance to exit the Interface Setup mode. Note • To return all current settings to exit the Initial Setup mode. - 9600 - - - - 19200 - - - 36 Operating Instructions While pressing LOAD/PARK , turn the power off. 2. Press TEAR OFF . 3. To change each time you...
Using the Control Panel Serial Interface Setup Mode The following items can select and change the desired item according to the status of the FONT/PITCH indicators. 1. You can be set the item's status. The current settings will advance to exit the Interface Setup mode. Note • To return all current settings to exit the Initial Setup mode. - 9600 - - - - 19200 - - - 36 Operating Instructions While pressing LOAD/PARK , turn the power off. 2. Press TEAR OFF . 3. To change each time you...
Operating Instructions
Page 38
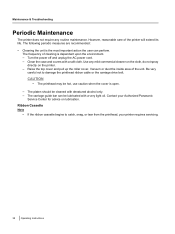
... can perform. Contact your printer requires servicing. 38 Operating Instructions e - Raise the top cover and pull up the roller cover. The platen should be hot, use caution when the cover is dependent upon the environment. o t Ribbon Cassette i Note n g • If the ribbon cassette begins to damage the printhead ribbon cable or the carriage drive belt. However, reasonable care of the unit. Use any routine maintenance. Be very o careful...
... can perform. Contact your printer requires servicing. 38 Operating Instructions e - Raise the top cover and pull up the roller cover. The platen should be hot, use caution when the cover is dependent upon the environment. o t Ribbon Cassette i Note n g • If the ribbon cassette begins to damage the printhead ribbon cable or the carriage drive belt. However, reasonable care of the unit. Use any routine maintenance. Be very o careful...
Operating Instructions
Page 39
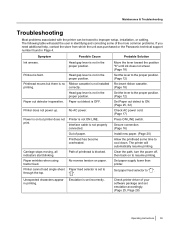
... your software package and set emulation accordingly. (Page 25, Page 28) Operating Instructions 39 Printer cannot load single sheet through the top. Set paper feed selector to ON. (Page 25, 32) Check AC power cord. (Page 17) Press ON LINE switch. in the proper position. Check printer driver of paper. Printout is set to improper setup, installation, or cabling. Paper out detector inoperative. Head gap lever is not in printing. Unexpected characters appear Emulation is faint. Head gap lever is no printing. Power is...
... your software package and set emulation accordingly. (Page 25, Page 28) Operating Instructions 39 Printer cannot load single sheet through the top. Set paper feed selector to ON. (Page 25, 32) Check AC power cord. (Page 17) Press ON LINE switch. in the proper position. Check printer driver of paper. Printout is set to improper setup, installation, or cabling. Paper out detector inoperative. Head gap lever is not in printing. Unexpected characters appear Emulation is faint. Head gap lever is no printing. Power is...
Operating Instructions
Page 40
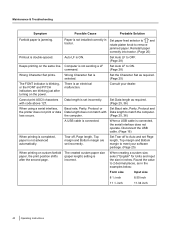
... power. When using a serial interface, the printer does not print or data loss occurs. Paper is not installed correctly in the examples below: Form size Input size 8 1/2 inch 8.50 inch 11 1/3 inch 11.34 inch 40 Operating Instructions Baud rate, Parity, Protocol or Data length does not match with code above 127. Tear off to Auto and set Page length, Top margin and Bottom margin to 2 decimal places, as in tractor. Round the value to meet your dealer. A USB cable...
... power. When using a serial interface, the printer does not print or data loss occurs. Paper is not installed correctly in the examples below: Form size Input size 8 1/2 inch 8.50 inch 11 1/3 inch 11.34 inch 40 Operating Instructions Baud rate, Parity, Protocol or Data length does not match with code above 127. Tear off to Auto and set Page length, Top margin and Bottom margin to 2 decimal places, as in tractor. Round the value to meet your dealer. A USB cable...
Operating Instructions
Page 47
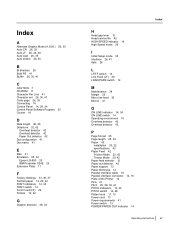
... Proprinter X24E 25 Extension Plate 11 F Factory Settings 33, 36, 37 Fanfold paper 12, 20, 42 FONT indicators 14, 34 FONT switch 14 Form Feed (FF) 29 Friction 12, 22 G Graphic direction 26, 34 Index H Head gap lever 12 Head service life 42 HIGH SPEED indicator 14 High Speed mode 29 I Initial Setup mode 33 Interface 26, 41 Italic 26 L LF/FF switch 14 Line Feed (LF) 29 LOAD/PARK switch 14 M Maintenance 38 Margin 25 Micro line feed...
... Proprinter X24E 25 Extension Plate 11 F Factory Settings 33, 36, 37 Fanfold paper 12, 20, 42 FONT indicators 14, 34 FONT switch 14 Form Feed (FF) 29 Friction 12, 22 G Graphic direction 26, 34 Index H Head gap lever 12 Head service life 42 HIGH SPEED indicator 14 High Speed mode 29 I Initial Setup mode 33 Interface 26, 41 Italic 26 L LF/FF switch 14 Line Feed (LF) 29 LOAD/PARK switch 14 M Maintenance 38 Margin 25 Micro line feed...
Operating Instructions
Page 48
... Printer driver 16 Printing Area 44 Printing direction 41 Printing Speed 2, 41 Proportional Spacing (P.S) 34 R Reverse micro line feed 30 Ribbon cassette 11, 18, 38 S Self Test 24 Serial interface 26 Serial interface cable 16 Serial interface connector 12, 16 Serial Interface Setup mode 36 Single sheet 22, 43, 45 Smoked plastic cover 12 Specifications 41, 43 T Tear off 26, 29, 34 TEAR OFF switch 14 Text direction 26 TOF Setting 26 Top cover 12 Top of Form (TOF) set 30 Tractor clamping levers 20 Tractors 13 Troubleshooting...
... Printer driver 16 Printing Area 44 Printing direction 41 Printing Speed 2, 41 Proportional Spacing (P.S) 34 R Reverse micro line feed 30 Ribbon cassette 11, 18, 38 S Self Test 24 Serial interface 26 Serial interface cable 16 Serial interface connector 12, 16 Serial Interface Setup mode 36 Single sheet 22, 43, 45 Smoked plastic cover 12 Specifications 41, 43 T Tear off 26, 29, 34 TEAR OFF switch 14 Text direction 26 TOF Setting 26 Top cover 12 Top of Form (TOF) set 30 Tractor clamping levers 20 Tractors 13 Troubleshooting...


