
Operating Instructions
Page 1
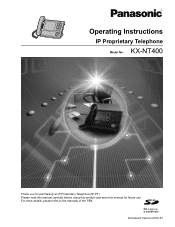
For more details, please refer to the manuals of the PBX. SD Logo is a trademark. Document Version 2010-01 IP Proprietary Telephone Model No. KX-NT400 Thank you for future use. Please read this manual carefully before using this product and save this manual for purchasing an IP Proprietary Telephone (IP-PT).
For more details, please refer to the manuals of the PBX. SD Logo is a trademark. Document Version 2010-01 IP Proprietary Telephone Model No. KX-NT400 Thank you for future use. Please read this manual carefully before using this product and save this manual for purchasing an IP Proprietary Telephone (IP-PT).
Operating Instructions
Page 9
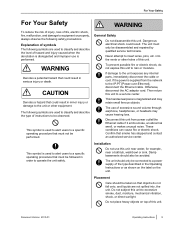
.... CAUTION Denotes a hazard that smoke has stopped and contact an authorized service center. General Safety Do not disassemble this unit from the network to the IP-PT [Power-over-Ethernet], disconnect the Ethernet cable. Damp basements should be disassembled and repaired by qualified service technicians. Do not subject this unit. If...
.... CAUTION Denotes a hazard that smoke has stopped and contact an authorized service center. General Safety Do not disassemble this unit from the network to the IP-PT [Power-over-Ethernet], disconnect the Ethernet cable. Damp basements should be disassembled and repaired by qualified service technicians. Do not subject this unit. If...
Operating Instructions
Page 10
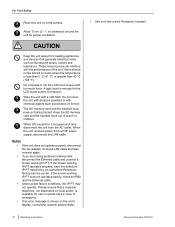
...check the PBX and the Ethernet cable. • Under power failure conditions, the IP-PT may not operate. If the known working IP-PT operates properly, have the defective IP-PT repaired by an authorized Panasonic factory service center. For Your Safety Place this unit on local power, is available ...emergency. • If an error message is shown on the unit's display, consult the network administrator. • Use only the correct Panasonic handset. 10 Operating Instructions Document Version 2010-01 It also should not be placed in rooms where the temperature is enough for the LCD ...
...check the PBX and the Ethernet cable. • Under power failure conditions, the IP-PT may not operate. If the known working IP-PT operates properly, have the defective IP-PT repaired by an authorized Panasonic factory service center. For Your Safety Place this unit on local power, is available ...emergency. • If an error message is shown on the unit's display, consult the network administrator. • Use only the correct Panasonic handset. 10 Operating Instructions Document Version 2010-01 It also should not be placed in rooms where the temperature is enough for the LCD ...

Operating Instructions
Page 11
... the unit to a secure network. • To prevent unauthorized access, only connect the unit to a network that is sent from the KX-NT400 to do so. Contacts' names, phone numbers, and IP addresses - For Bluetooth® Headset Users Medical: Consult the manufacturer of any regulations posted in case the machine malfunctions and data...
... the unit to a secure network. • To prevent unauthorized access, only connect the unit to a network that is sent from the KX-NT400 to do so. Contacts' names, phone numbers, and IP addresses - For Bluetooth® Headset Users Medical: Consult the manufacturer of any regulations posted in case the machine malfunctions and data...

Operating Instructions
Page 15
... Contacts ...109 User Options ...113 Password Settings ...113 Display Settings ...113 Dial Number Settings 114 Language Settings ...115 Directory List Select Settings 115 IP Camera Settings ...116 IP Camera Selection Buttons Settings 117 Portal Settings ...117 Presence Settings ...118 Administrator Options 121 LDAP Server Settings 121 Dial Modification Settings 122 PT Programming...
... Contacts ...109 User Options ...113 Password Settings ...113 Display Settings ...113 Dial Number Settings 114 Language Settings ...115 Directory List Select Settings 115 IP Camera Settings ...116 IP Camera Selection Buttons Settings 117 Portal Settings ...117 Presence Settings ...118 Administrator Options 121 LDAP Server Settings 121 Dial Modification Settings 122 PT Programming...

Operating Instructions
Page 16
... 147 Connections ...147 Wall Mounting ...150 Bluetooth Headset Connections 153 Installation ...153 Bluetooth Headset Operation 155 Setting Up the KX-NT400 157 Accessing the Start-up Settings 157 Language Settings ...159 IP Address Settings ...159 IP Port Settings ...160 Quality of Service (QoS) Settings 161 Maintenance ...162 Firmware Version Update 163 Setting Initialize ...165...
... 147 Connections ...147 Wall Mounting ...150 Bluetooth Headset Connections 153 Installation ...153 Bluetooth Headset Operation 155 Setting Up the KX-NT400 157 Accessing the Start-up Settings 157 Language Settings ...159 IP Address Settings ...159 IP Port Settings ...160 Quality of Service (QoS) Settings 161 Maintenance ...162 Firmware Version Update 163 Setting Initialize ...165...
Operating Instructions
Page 37
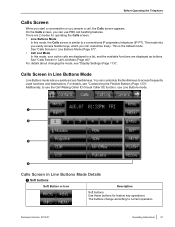
There are displayed as buttons. For details about changing the mode, see "Customizing the Flexible Buttons (Page 133)". Additionally, to a conventional IP proprietary telephone (IP-PT). Before Operating the Telephone Calls Screen When you start a conversation or you answer a call handling features. This is similar to use the Call Waiting ...
There are displayed as buttons. For details about changing the mode, see "Customizing the Flexible Buttons (Page 133)". Additionally, to a conventional IP proprietary telephone (IP-PT). Before Operating the Telephone Calls Screen When you start a conversation or you answer a call handling features. This is similar to use the Call Waiting ...
Operating Instructions
Page 50
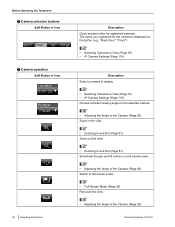
... 2010-01 The name you registered for the camera is displayed on the button (e.g., "Back Door", "Front"). • Selecting Cameras to View (Page 81) • IP Camera Settings (Page 116) Description Select a camera to display. • Selecting Cameras to View (Page 81) •...
... 2010-01 The name you registered for the camera is displayed on the button (e.g., "Back Door", "Front"). • Selecting Cameras to View (Page 81) • IP Camera Settings (Page 116) Description Select a camera to display. • Selecting Cameras to View (Page 81) •...
Operating Instructions
Page 81
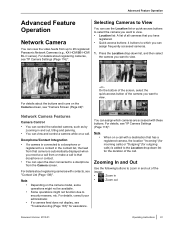
... when you want to view. Note • • • Depending on the Camera screen, see "IP Camera Settings (Page 116)". For details about the buttons and icons on the camera model, some operations might not... frequently accessed cameras. 1. For details about registering cameras with these buttons. If a camera feed does not display, see "IP Camera Settings (Page 116)". Note • When on a call to that you have registered. • Quick-access buttons...to select the camera you want to 20 registered Panasonic Network Cameras (e.g., KX-HCM/BB-HCM/ BL-C series).
... when you want to view. Note • • • Depending on the Camera screen, see "IP Camera Settings (Page 116)". For details about the buttons and icons on the camera model, some operations might not... frequently accessed cameras. 1. For details about registering cameras with these buttons. If a camera feed does not display, see "IP Camera Settings (Page 116)". Note • When on a call to that you have registered. • Quick-access buttons...to select the camera you want to 20 registered Panasonic Network Cameras (e.g., KX-HCM/BB-HCM/ BL-C series).
Operating Instructions
Page 110
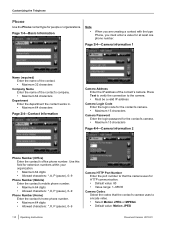
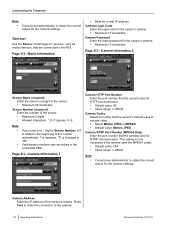
... value: 80 • Value range: 1-65535 Camera Codec Select the codec that the contact's camera uses to the camera. • Must be a valid IP address Camera Login Code Enter the login code for the contact's camera. • Maximum 15 characters Camera Password Enter the login password for the contact...8226; Maximum 64 characters Department Enter the department the contact works in. • Maximum 64 characters Page 2/4-Contact Information Camera Address Enter the IP address of the contact's camera. Customizing the Telephone Phone Use the Phone contact type for at least one phone number.
... value: 80 • Value range: 1-65535 Camera Codec Select the codec that the contact's camera uses to the camera. • Must be a valid IP address Camera Login Code Enter the login code for the contact's camera. • Maximum 15 characters Camera Password Enter the login password for the contact...8226; Maximum 64 characters Department Enter the department the contact works in. • Maximum 64 characters Page 2/4-Contact Information Camera Address Enter the IP address of the contact's camera. Customizing the Telephone Phone Use the Phone contact type for at least one phone number.
Operating Instructions
Page 111
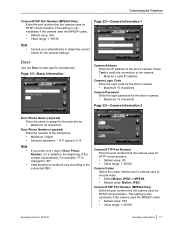
... 2/3-Camera Information 1 Door Use the Door contact type for the camera settings. Press Test to verify the connection to the camera. • Must be a valid IP address Camera Login Code Enter the login code for the door's camera. • Maximum 15 characters Camera Password Enter the login password for the door... RTSP Port Number (MPEG4 Only) Enter the port number that the door's camera uses to the connected PBX. Page 1/3-Basic Information Camera Address Enter the IP address of the number automatically.
... 2/3-Camera Information 1 Door Use the Door contact type for the camera settings. Press Test to verify the connection to the camera. • Must be a valid IP address Camera Login Code Enter the login code for the door's camera. • Maximum 15 characters Camera Password Enter the login password for the door... RTSP Port Number (MPEG4 Only) Enter the port number that the door's camera uses to the connected PBX. Page 1/3-Basic Information Camera Address Enter the IP address of the number automatically.
Operating Instructions
Page 112
...1-65535 Note • Consult your administrator to obtain the correct values for RTSP communication. Page 1/3-Basic Information • Must be a valid IP address Camera Login Code Enter the login code for the sensor's camera. • Maximum 15 characters Camera Password Enter the login password for the... the connected PBX. Valid sensor numbers vary according to the camera. 112 Operating Instructions Document Version 2010-01 Camera Address Enter the IP address of the number automatically. For example, "5" is changed to the PBX. Sensor Use the Sensor contact type for sensors, ...
...1-65535 Note • Consult your administrator to obtain the correct values for RTSP communication. Page 1/3-Basic Information • Must be a valid IP address Camera Login Code Enter the login code for the sensor's camera. • Maximum 15 characters Camera Password Enter the login password for the... the connected PBX. Valid sensor numbers vary according to the camera. 112 Operating Instructions Document Version 2010-01 Camera Address Enter the IP address of the number automatically. For example, "5" is changed to the PBX. Sensor Use the Sensor contact type for sensors, ...
Operating Instructions
Page 114
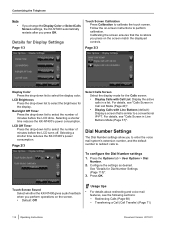
...redirect calls to select the display color. Press the Options tab > User Options > Dial Number. 2. Selecting a shorter time reduces the KX-NT400's power consumption. For details, see "Calls Screen in a list. See "Details for Display Settings Page 1/3 Touch Screen Calibration Press ... to a conventional IP-PT. To configure the Dial Number settings 1. Details for Dial Number Settings (Page 115)". 3. Calibrating the screen ensures that is similar to select the number of minutes before the LCD dims. Selecting a shorter time reduces the KX-NT400's power consumption. ...
...redirect calls to select the display color. Press the Options tab > User Options > Dial Number. 2. Selecting a shorter time reduces the KX-NT400's power consumption. For details, see "Calls Screen in a list. See "Details for Display Settings Page 1/3 Touch Screen Calibration Press ... to a conventional IP-PT. To configure the Dial Number settings 1. Details for Dial Number Settings (Page 115)". 3. Calibrating the screen ensures that is similar to select the number of minutes before the LCD dims. Selecting a shorter time reduces the KX-NT400's power consumption. ...
Operating Instructions
Page 116
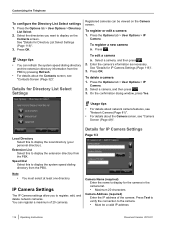
...by pressing Refresh. • For details about the Camera screen, see "Contacts Screen (Page 32)". You can be a valid IP address 116 Operating Instructions Document Version 2010-01 Customizing the Telephone To configure the Directory List Select settings 1. Usage tips • ... Directory List Select Settings Registered cameras can register a maximum of the camera. To edit a camera a. Press the Options tab > User Options > IP Camera. 2. Usage tips • For details about network camera features, see "Network Camera (Page 81)". • For details about the Contacts ...
...by pressing Refresh. • For details about the Camera screen, see "Contacts Screen (Page 32)". You can be a valid IP address 116 Operating Instructions Document Version 2010-01 Customizing the Telephone To configure the Directory List Select settings 1. Usage tips • ... Directory List Select Settings Registered cameras can register a maximum of the camera. To edit a camera a. Press the Options tab > User Options > IP Camera. 2. Usage tips • For details about network camera features, see "Network Camera (Page 81)". • For details about the Contacts ...
Operating Instructions
Page 117
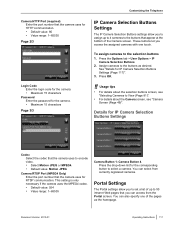
... 3. Document Version 2010-01 Operating Instructions 117 Press the Options tab > User Options > IP Camera Selection Buttons. 2. Assign cameras to the buttons as the homepage. Details for IP Camera Selection Buttons Settings Codec Select the codec that the camera uses to 50 intranet Web ...pages that the camera uses for the camera. • Maximum 15 characters Page 3/3 Customizing the Telephone IP Camera Selection Buttons Settings The IP Camera Selection Buttons settings allow you access the assigned cameras with one of the Camera screen. Portal Settings The ...
... 3. Document Version 2010-01 Operating Instructions 117 Press the Options tab > User Options > IP Camera Selection Buttons. 2. Assign cameras to the buttons as the homepage. Details for IP Camera Selection Buttons Settings Codec Select the codec that the camera uses to 50 intranet Web ...pages that the camera uses for the camera. • Maximum 15 characters Page 3/3 Customizing the Telephone IP Camera Selection Buttons Settings The IP Camera Selection Buttons settings allow you access the assigned cameras with one of the Camera screen. Portal Settings The ...
Operating Instructions
Page 118
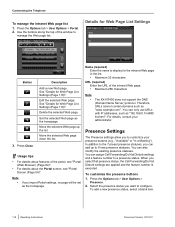
...the intranet Web page. • Maximum 256 characters Note • The KX-NT400 does not support the DNS (Domain Name Server) protocol. Delete the ... Page List Settings Button 3. Presence Settings The Presence settings allow you can only use URLs with IP addresses, such as "www.example.com". Set the selected Web page as the homepage. To...your presence buttons (e.g., "Available" or "In a Meeting"). Therefore, URLs cannot contain domains such as "192.168.0.1/nt400/ list.html". Press the Options tab > User Options > Portal. 2. You can also modify the existing presence ...
...the intranet Web page. • Maximum 256 characters Note • The KX-NT400 does not support the DNS (Domain Name Server) protocol. Delete the ... Page List Settings Button 3. Presence Settings The Presence settings allow you can only use URLs with IP addresses, such as "www.example.com". Set the selected Web page as the homepage. To...your presence buttons (e.g., "Available" or "In a Meeting"). Therefore, URLs cannot contain domains such as "192.168.0.1/nt400/ list.html". Press the Options tab > User Options > Portal. 2. You can also modify the existing presence ...
Operating Instructions
Page 121
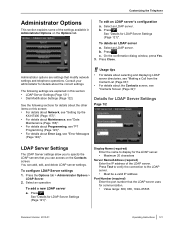
...Server. 2. Select an LDAP server. b. See "Details for the LDAP server. • Maximum 20 characters Server Name/Address (required) Enter the IP address of the settings available in this section: • LDAP Server Settings (Page 121) • Dial Modification Settings (Page 122) See the ... Must be a valid IP address Port Number (required) Enter the port number that modify network settings and telephone operations. Press . The following sections for details about the other items on this screen: • For details about Network, see "Setting Up the KX-NT400 (Page 157)". •...
...Server. 2. Select an LDAP server. b. See "Details for the LDAP server. • Maximum 20 characters Server Name/Address (required) Enter the IP address of the settings available in this section: • LDAP Server Settings (Page 121) • Dial Modification Settings (Page 122) See the ... Must be a valid IP address Port Number (required) Enter the port number that modify network settings and telephone operations. Press . The following sections for details about the other items on this screen: • For details about Network, see "Setting Up the KX-NT400 (Page 157)". •...
Operating Instructions
Page 125
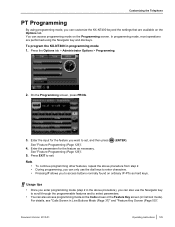
... the dial keys to enter characters. Usage tips • Once you enter programming mode (step 2 in Call List mode). To program the KX-NT400 in Line Buttons Mode (Page 37)" and "Feature Key Screen (Page 55)". Press EXIT to set, and then press See "Feature Programming... (Page 126)". 4. You can access programming mode on ordinary IP-PTs as necessary. Press the Options tab > Administrator Options > Programming. 2. During programming, you can customize the KX-NT400 beyond the settings that are performed using programming mode, you can only use the ...
... the dial keys to enter characters. Usage tips • Once you enter programming mode (step 2 in Call List mode). To program the KX-NT400 in Line Buttons Mode (Page 37)" and "Feature Key Screen (Page 55)". Press EXIT to set, and then press See "Feature Programming... (Page 126)". 4. You can access programming mode on ordinary IP-PTs as necessary. Press the Options tab > Administrator Options > Programming. 2. During programming, you can customize the KX-NT400 beyond the settings that are performed using programming mode, you can only use the ...
Operating Instructions
Page 157
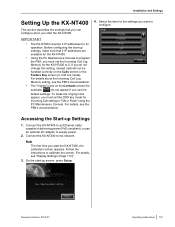
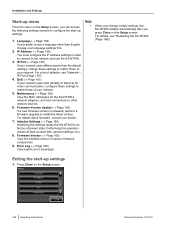
...start -up Settings 1. Select the item for the settings you do not appear if you start the KX-NT400, the calibration screen appears. If you want to configure. Connect the KX-NT400 to an Ethernet cable capable of delivering power (PoE compliant), or use the default settings. Follow ...the instructions to the network. Installation and Settings Setting Up the KX-NT400 This section describes the settings that 2 IP addresses are available for the KX-NT400. • Using the PC Maintenance Console to program the PBX, you must set the DSS key mode...
...start -up Settings 1. Select the item for the settings you do not appear if you start the KX-NT400, the calibration screen appears. If you want to configure. Connect the KX-NT400 to an Ethernet cable capable of delivering power (PoE compliant), or use the default settings. Follow ...the instructions to the network. Installation and Settings Setting Up the KX-NT400 This section describes the settings that 2 IP addresses are available for the KX-NT400. • Using the PC Maintenance Console to program the PBX, you must set the DSS key mode...
Operating Instructions
Page 158
... and use a language other network devices. 6. IP Port (® Page 160) If your language settings first. 2. IP Port (Page 176)". 4. For a list of various firmware components. 9. Language (® Page 159) If your prefer to match those of your network uses QoS (Quality of Service) for the KX-NT400's network adaptors, and test connections to...
... and use a language other network devices. 6. IP Port (® Page 160) If your language settings first. 2. IP Port (Page 176)". 4. For a list of various firmware components. 9. Language (® Page 159) If your prefer to match those of your network uses QoS (Quality of Service) for the KX-NT400's network adaptors, and test connections to...


