
Quick Reference Guide
Page 2
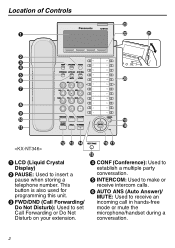
D CONF (Conference): Used to set Call Forwarding or Do Not Disturb on your extension. C FWD/DND (Call Forwarding/ Do Not Disturb): Used to establish a multiple party conversation. E INTERCOM: Used to ...
D CONF (Conference): Used to set Call Forwarding or Do Not Disturb on your extension. C FWD/DND (Call Forwarding/ Do Not Disturb): Used to establish a multiple party conversation. E INTERCOM: Used to ...

Quick Reference Guide
Page 4
While on -hook PAUSE PAUSE Ring Tone PAUSE (CO) OR INTERCOM Press 2 times. While on -hook PAUSE LCD Backlight OR AUTO DIAL STORE PAUSE OR AUTO DIAL STORE Automatic Always ON Always OFF OR AUTO DIAL PAUSE STORE * If you hear your own voice through the handset or headset, decrease the volume. 4 Settings Settings Speaker volume While in a hands-free conversation Handset/Headset While using the handset or volume* headset Ringer volume LCD Contrast (for the main display) While on-hook or receiving a call Press Up to increase or Down to decrease the volume.
While on -hook PAUSE PAUSE Ring Tone PAUSE (CO) OR INTERCOM Press 2 times. While on -hook PAUSE LCD Backlight OR AUTO DIAL STORE PAUSE OR AUTO DIAL STORE Automatic Always ON Always OFF OR AUTO DIAL PAUSE STORE * If you hear your own voice through the handset or headset, decrease the volume. 4 Settings Settings Speaker volume While in a hands-free conversation Handset/Headset While using the handset or volume* headset Ringer volume LCD Contrast (for the main display) While on-hook or receiving a call Press Up to increase or Down to decrease the volume.
Quick Reference Guide
Page 7
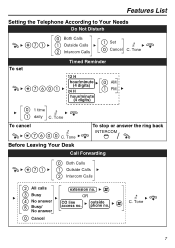
C. Tone To stop or answer the ring back / INTERCOM Before Leaving Your Desk Call Forwarding Both Calls Outside Calls Intercom Calls All calls Busy No answer Busy/ No answer Cancel extension no . Tone To cancel C. phone no . OR CO line outside access no. Tone To set Timed Reminder 12 H hour/minute AM (4 digits) 24 H PM hour/minute (4 digits) 1 time daily C. Tone 7 Features List Setting the Telephone According to Your Needs Do Not Disturb Both Calls Outside Calls Intercom Calls Set Cancel C.
C. Tone To stop or answer the ring back / INTERCOM Before Leaving Your Desk Call Forwarding Both Calls Outside Calls Intercom Calls All calls Busy No answer Busy/ No answer Cancel extension no . Tone To cancel C. phone no . OR CO line outside access no. Tone To set Timed Reminder 12 H hour/minute AM (4 digits) 24 H PM hour/minute (4 digits) 1 time daily C. Tone 7 Features List Setting the Telephone According to Your Needs Do Not Disturb Both Calls Outside Calls Intercom Calls Set Cancel C.

Quick Reference Guide
Page 8
...to Message mailbox no. From your own extension VPS extension no . Other Features End Call KX-TVP series Listen to a message From your own extension Mailbox Password* From someone else's extension VPS extension no . KX-TVM series Listen to Message Mailbox Password* * If you have no . Deliver Message Mailbox...'s extension mailbox no password, you can skip the last step. Enter the desired mailbox number Leave a message To send the message immediately (KX-TVM series) (KX-TVP series) To set the delivery time Follow the guidance 8 Mailbox Password* * If you have no .
...to Message mailbox no. From your own extension VPS extension no . Other Features End Call KX-TVP series Listen to a message From your own extension Mailbox Password* From someone else's extension VPS extension no . KX-TVM series Listen to Message Mailbox Password* * If you have no . Deliver Message Mailbox...'s extension mailbox no password, you can skip the last step. Enter the desired mailbox number Leave a message To send the message immediately (KX-TVM series) (KX-TVP series) To set the delivery time Follow the guidance 8 Mailbox Password* * If you have no .
Quick Reference Guide
Page 12
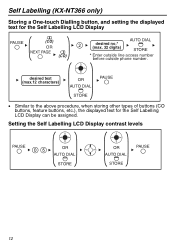
... Labelling LCD Display contrast levels PAUSE OR AUTO DIAL STORE OR AUTO DIAL STORE PAUSE 12 Self Labelling (KX-NT366 only) Storing a One-touch Dialling button, and setting the displayed text for the Self Labelling LCD Display can be assigned. desired text (max.12 characters) OR AUTO DIAL PAUSE STORE • Similar...
... Labelling LCD Display contrast levels PAUSE OR AUTO DIAL STORE OR AUTO DIAL STORE PAUSE 12 Self Labelling (KX-NT366 only) Storing a One-touch Dialling button, and setting the displayed text for the Self Labelling LCD Display can be assigned. desired text (max.12 characters) OR AUTO DIAL PAUSE STORE • Similar...
Quick Reference Guide
Page 13
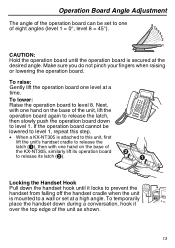
... it locks to prevent the handset from falling off the handset cradle when the unit is attached to this step. • When a KX-NT305 is mounted to a wall or set to one hand on the base of the unit, lift the operation board again to release the latch, then slowly push the... 1, repeat this unit, first lift the unit's handset cradle to release the latch (A), then with one level at a time. If the operation board cannot be set at the desired angle. To raise: Gently lift the operation board one hand on the base of the...
... it locks to prevent the handset from falling off the handset cradle when the unit is attached to this step. • When a KX-NT305 is mounted to a wall or set to one hand on the base of the unit, lift the operation board again to release the latch, then slowly push the... 1, repeat this unit, first lift the unit's handset cradle to release the latch (A), then with one level at a time. If the operation board cannot be set at the desired angle. To raise: Gently lift the operation board one hand on the base of the...
Quick Reference Guide
Page 15
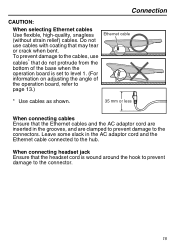
... when the operation board is wound around the hook to prevent damage to the hub. When connecting headset jack Ensure that the headset cord is set to level 1. (For information on adjusting the angle of the operation board, refer to page 13.) Ethernet cable * Use cables as shown. 35 mm or...
... when the operation board is wound around the hook to prevent damage to the hub. When connecting headset jack Ensure that the headset cord is set to level 1. (For information on adjusting the angle of the operation board, refer to page 13.) Ethernet cable * Use cables as shown. 35 mm or...
Quick Reference Guide
Page 18
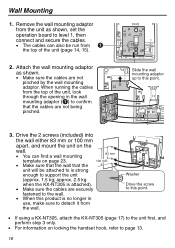
...(approx. 1.5 kg; Slide the wall mounting adaptor up to this point. • If using a KX-NT305, attach the KX-NT305 (page 17) to the unit first, and perform step 3 only. • For information on ...locking the handset hook, refer to page 13. 18 approx. 2.5 kg when the KX-NT305 is attached). • Make sure the cables are not being pinched. Drive the 2 screws (included) ...from the top of the unit (page 14, 15). 2. Attach the wall mounting adaptor as shown, set the operation board to level 1, then connect and secure the cables. • The cables can find a...
...(approx. 1.5 kg; Slide the wall mounting adaptor up to this point. • If using a KX-NT305, attach the KX-NT305 (page 17) to the unit first, and perform step 3 only. • For information on ...locking the handset hook, refer to page 13. 18 approx. 2.5 kg when the KX-NT305 is attached). • Make sure the cables are not being pinched. Drive the 2 screws (included) ...from the top of the unit (page 14, 15). 2. Attach the wall mounting adaptor as shown, set the operation board to level 1, then connect and secure the cables. • The cables can find a...
Quick Reference Guide
Page 21
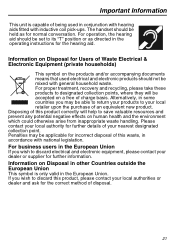
... symbol is capable of being used electrical and electronic products should not be mixed with general household waste. For operation, the hearing aid should be set to discard electrical and electronic equipment, please contact your nearest designated collection point. For business users in the European Union If you wish to your...
... symbol is capable of being used electrical and electronic products should not be mixed with general household waste. For operation, the hearing aid should be set to discard electrical and electronic equipment, please contact your nearest designated collection point. For business users in the European Union If you wish to your...


