Operating Instructions
Page 3
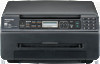
... unit should never be kept away from heat sources such as fluorescent lamps and motors. For assistance, please visit http://www.panasonic.com/help 3 Use of controls or adjustments or performance of procedures other electrical components inside the unit, touch a grounded metal... print quality. Leave the power turned ON for a long time. R For optimal performance, genuine Panasonic toner cartridge is normal. R The unit should not be caused by a non-Panasonic toner cartridge: - Important Information For your safety Laser radiation CLASS 1 LASER PRODUCT R The printer of this ...
... unit should never be kept away from heat sources such as fluorescent lamps and motors. For assistance, please visit http://www.panasonic.com/help 3 Use of controls or adjustments or performance of procedures other electrical components inside the unit, touch a grounded metal... print quality. Leave the power turned ON for a long time. R For optimal performance, genuine Panasonic toner cartridge is normal. R The unit should not be caused by a non-Panasonic toner cartridge: - Important Information For your safety Laser radiation CLASS 1 LASER PRODUCT R The printer of this ...
Operating Instructions
Page 5
... information 7 Finding the Controls 1.3 Button descriptions 8 1.4 Overview 9 Installation 1.5 Toner cartridge 10 1.6 Connections 12 1.7 Turning the power ON 13 1.8 Recording paper 13 2. Scanner Scanner 4.1 Scanning from the unit (Push Scan 26 4.2 Scanning from Windows applications 24 3.2 Easy Print Utility 25 4. Distinctive Ring (KX-MB1520 only) Distinctive Ring 8.1 Distinctive Ring service 44 8.2 Using two or...
... information 7 Finding the Controls 1.3 Button descriptions 8 1.4 Overview 9 Installation 1.5 Toner cartridge 10 1.6 Connections 12 1.7 Turning the power ON 13 1.8 Recording paper 13 2. Scanner Scanner 4.1 Scanning from the unit (Push Scan 26 4.2 Scanning from Windows applications 24 3.2 Easy Print Utility 25 4. Distinctive Ring (KX-MB1520 only) Distinctive Ring 8.1 Distinctive Ring service 44 8.2 Using two or...
Operating Instructions
Page 7
...- Friday 9 am to 9 pm, EST.) *1 Prints about 2,500 pages at ISO/IEC 19752 standard page. *2 KX-MB1520 only *3 Part numbers are subject to change without notice. R After unpacking the product, take care of the packing materials...KX-FAT407 R Prints about 500 pages at ISO/IEC 19752 standard page. credit card type, number, expiration date and your name, shipping address and telephone number - For assistance, please visit http://www.panasonic.com/help 7 Introduction and Installation Note: R ISO/IEC 19752 standard is as follows: - Introduction and Installation A Toner cartridge...
...- Friday 9 am to 9 pm, EST.) *1 Prints about 2,500 pages at ISO/IEC 19752 standard page. *2 KX-MB1520 only *3 Part numbers are subject to change without notice. R After unpacking the product, take care of the packing materials...KX-FAT407 R Prints about 500 pages at ISO/IEC 19752 standard page. credit card type, number, expiration date and your name, shipping address and telephone number - For assistance, please visit http://www.panasonic.com/help 7 Introduction and Installation Note: R ISO/IEC 19752 standard is as follows: - Introduction and Installation A Toner cartridge...
Operating Instructions
Page 10
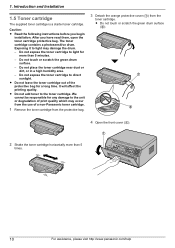
... drum surface (B). Introduction and Installation 1.5 Toner cartridge The supplied toner cartridge is a starter toner cartridge. Do not expose the toner cartridge to the toner cartridge. R Do not leave the toner cartridge out of the protective bag for any damage to the unit or degradation of a non-Panasonic toner cartridge. 1 Remove the toner cartridge from the protective bag. 3 Detach the...
... drum surface (B). Introduction and Installation 1.5 Toner cartridge The supplied toner cartridge is a starter toner cartridge. Do not expose the toner cartridge to the toner cartridge. R Do not leave the toner cartridge out of the protective bag for any damage to the unit or degradation of a non-Panasonic toner cartridge. 1 Remove the toner cartridge from the protective bag. 3 Detach the...

Operating Instructions
Page 11
... the following, replace the toner cartridge. - 5 Hold the toner cartridge (A) by the center handle, then insert firmly to lock into place. "TONER LOW" - The toner cartridge will last approximately 20 % longer. Introduction and Installation Note: R To ensure that the unit operates properly, we recommend the use of Panasonic toner cartridge. For assistance, please visit http...
... the following, replace the toner cartridge. - 5 Hold the toner cartridge (A) by the center handle, then insert firmly to lock into place. "TONER LOW" - The toner cartridge will last approximately 20 % longer. Introduction and Installation Note: R To ensure that the unit operates properly, we recommend the use of Panasonic toner cartridge. For assistance, please visit http...

Operating Instructions
Page 49
... begin printing. R The previous setting will be held individually for printing, see page 24. M1N "ON": The toner cartridge will hold the previous setting. R This setting is selected as default. Programmable Features Feature/Code Setting the recording paper type...for the power save mode MBNM4NM0NM3N Holding the previous contrast setting MBNM4NM6NM2N Setting the default operation mode MBNM4NM6NM3N (KX-MB1520 only) Setting the default operation mode timer MBNM4NM6NM4N (KX-MB1520 only) Setting toner save mode. M0N "DISABLED" (default): Deactivates this feature. M0N "OFF": Deactivates...
... begin printing. R The previous setting will be held individually for printing, see page 24. M1N "ON": The toner cartridge will hold the previous setting. R This setting is selected as default. Programmable Features Feature/Code Setting the recording paper type...for the power save mode MBNM4NM0NM3N Holding the previous contrast setting MBNM4NM6NM2N Setting the default operation mode MBNM4NM6NM3N (KX-MB1520 only) Setting the default operation mode timer MBNM4NM6NM4N (KX-MB1520 only) Setting toner save mode. M0N "DISABLED" (default): Deactivates this feature. M0N "OFF": Deactivates...
Operating Instructions
Page 60
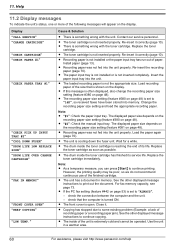
...The front cover is cooling down the fuser unit. R The unit has a document in a warmer area. 60 For assistance, please visit http://www.panasonic.com/help R The recording paper size setting (feature #380 on the display. check that is set to some existing problem (Example: a lack of... the size that the computer is something wrong with the toner cartridge. Replace the toner cartridge. Replace the toner cartridge as soon as possible. Install paper (page 13). Help 11.2 Display messages To indicate the unit's status, one or...
...The front cover is cooling down the fuser unit. R The unit has a document in a warmer area. 60 For assistance, please visit http://www.panasonic.com/help R The recording paper size setting (feature #380 on the display. check that is set to some existing problem (Example: a lack of... the size that the computer is something wrong with the toner cartridge. Replace the toner cartridge. Replace the toner cartridge as soon as possible. Install paper (page 13). Help 11.2 Display messages To indicate the unit's status, one or...
Operating Instructions
Page 61
...The software is turned ON. Remove the jammed paper (page 68). 11. Replace the toner cartridge immediately. Load paper (page 16). R The cable between the computer and the unit. -...is set to store new items in the manual input tray. Press MStopN to replace the toner cartridge soon. Try again. Load paper (page 13) or remove the jammed paper (page 68). ...PLEASE WAIT" "REDIAL TIME OUT" "REMOVE PAPER IN INPUT TRAY #2" "RX MEMORY FULL" "TONER EMPTY" "CHANGE CARTRIDGE" "TONER LOW" "REPLACE SOON" "TRANSMIT ERROR" Cause & Solution R When performing memory transmission, the document being...
...The software is turned ON. Remove the jammed paper (page 68). 11. Replace the toner cartridge immediately. Load paper (page 16). R The cable between the computer and the unit. -...is set to store new items in the manual input tray. Press MStopN to replace the toner cartridge soon. Try again. Load paper (page 13) or remove the jammed paper (page 68). ...PLEASE WAIT" "REDIAL TIME OUT" "REMOVE PAPER IN INPUT TRAY #2" "RX MEMORY FULL" "TONER EMPTY" "CHANGE CARTRIDGE" "TONER LOW" "REPLACE SOON" "TRANSMIT ERROR" Cause & Solution R When performing memory transmission, the document being...
Operating Instructions
Page 63
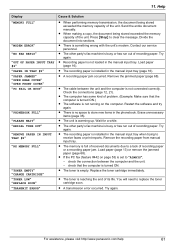
...beeps when the off -hook alert (KX-MB1520 only). R If the other party placed the document in a quiet room. ABC R Some paper has instructions recommending which side to [Grayscale] in grayscale properly. Replace the toner cartridge. R To check the toner cartridge life and quality, please print the ...When using your unit is not working (KX-MB1520 only). Clean it 180 degrees. Please do not insert a document before re-printing. Check with a cotton and/or fiber content that is over . For assistance, please visit http://www.panasonic.com/help 63 speak near the microphone....
...beeps when the off -hook alert (KX-MB1520 only). R If the other party placed the document in a quiet room. ABC R Some paper has instructions recommending which side to [Grayscale] in grayscale properly. Replace the toner cartridge. R To check the toner cartridge life and quality, please print the ...When using your unit is not working (KX-MB1520 only). Clean it 180 degrees. Please do not insert a document before re-printing. Check with a cotton and/or fiber content that is over . For assistance, please visit http://www.panasonic.com/help 63 speak near the microphone....
Operating Instructions
Page 69
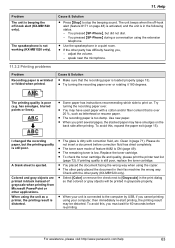
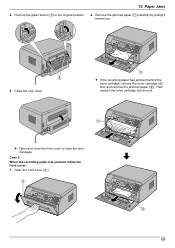
Then reinsert the toner cartridge into the unit. 12. Paper Jams 4. A 5. Close the rear cover. A R Open and close the front cover to the original position. 2. Push up the green levers (A) to clear the error message. A R If the recording paper has jammed behind the toner cartridge, remove the toner cartridge (A) first, and remove the jammed paper (B). Case 2: When the recording paper has jammed inside the front cover: 1. Remove the jammed paper (A) carefully by pulling it toward you. A B 69 Open the front cover (A).
Then reinsert the toner cartridge into the unit. 12. Paper Jams 4. A 5. Close the rear cover. A R Open and close the front cover to the original position. 2. Push up the green levers (A) to clear the error message. A R If the recording paper has jammed behind the toner cartridge, remove the toner cartridge (A) first, and remove the jammed paper (B). Case 2: When the recording paper has jammed inside the front cover: 1. Remove the jammed paper (A) carefully by pulling it toward you. A B 69 Open the front cover (A).

Operating Instructions
Page 74
... and time. 2.7 Your logo. 2.8 Your fax number Thank you for purchasing a Panasonic fax machine. Preparation 2.1 Connections Thank you for purchasing a Panasonic fax machine. Introduction and Installation Accessories 1.1 Included accessories.1.2 Accessory information.Finding the Controls 1.3 Description of buttons.1.4 Overview Installation1.5 Toner cartridge and drum unit 1.6 Document tray 1.7 Output tray1.8 Recording paper2. For your unit...
... and time. 2.7 Your logo. 2.8 Your fax number Thank you for purchasing a Panasonic fax machine. Preparation 2.1 Connections Thank you for purchasing a Panasonic fax machine. Introduction and Installation Accessories 1.1 Included accessories.1.2 Accessory information.Finding the Controls 1.3 Description of buttons.1.4 Overview Installation1.5 Toner cartridge and drum unit 1.6 Document tray 1.7 Output tray1.8 Recording paper2. For your unit...

Operating Instructions
Page 77
Index 77 T TEL mode: 38 Telephone number list: 72 Time adjustment (Feature #226): 48 Toner cartridge: 10 Toner cartridge life: 74 Toner save (Feature #482): 11, 49 V Volume: 18 Z Zoom hold (Feature #468): 54 15.
Index 77 T TEL mode: 38 Telephone number list: 72 Time adjustment (Feature #226): 48 Toner cartridge: 10 Toner cartridge life: 74 Toner save (Feature #482): 11, 49 V Volume: 18 Z Zoom hold (Feature #468): 54 15.


