
User Manual
Page 1
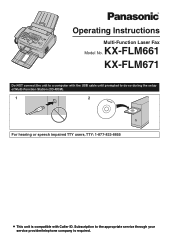
Subscription to do so during the setup of Multi-Function Station (CD-ROM). 1 2 For hearing or speech impaired TTY users, TTY: 1-877-833-8855 L This unit is required. KX-FLM661 KX-FLM671 Do NOT connect the unit to a computer with the USB cable until prompted to the appropriate service through your service provider/telephone company is compatible with Caller ID. Operating Instructions Multi-Function Laser Fax Model No.
Subscription to do so during the setup of Multi-Function Station (CD-ROM). 1 2 For hearing or speech impaired TTY users, TTY: 1-877-833-8855 L This unit is required. KX-FLM661 KX-FLM671 Do NOT connect the unit to a computer with the USB cable until prompted to the appropriate service through your service provider/telephone company is compatible with Caller ID. Operating Instructions Multi-Function Laser Fax Model No.
User Manual
Page 2
...of , transfer or return the product. For U.S.A. Thank you for more information. only: Please visit www.panasonic.com/environmental for purchasing a Panasonic fax machine. L Screen shots reprinted with permission from the memory before you dispose of Avery Dennison Corporation. L Avery...countries. Notice for internal use an eraser on a KX-FLM661. Note: L Most illustrations shown in these operating instructions are either registered trademarks or trademarks of Microsoft Corporation in part, is copyrighted by Panasonic System Networks Co., Ltd., and may smear. Trademarks...
...of , transfer or return the product. For U.S.A. Thank you for more information. only: Please visit www.panasonic.com/environmental for purchasing a Panasonic fax machine. L Screen shots reprinted with permission from the memory before you dispose of Avery Dennison Corporation. L Avery...countries. Notice for internal use an eraser on a KX-FLM661. Note: L Most illustrations shown in these operating instructions are either registered trademarks or trademarks of Microsoft Corporation in part, is copyrighted by Panasonic System Networks Co., Ltd., and may smear. Trademarks...
User Manual
Page 5
... 10.1 Programming 49 10.2 Basic features 50 10.3 Fax features 53 10.4 Copy features 56 10.5 PC print features 56 10.6 Scan features 57 10.7 LAN features (KX-FLM671 only 58 10.8 Network features (KX-FLM671, LAN connection only 60 11.Useful Information Useful ...Information 11.1 Character entry 61 11.2 Status of Contents 1. Auto answer ON 41 7.6 Receiving a fax manually - Printer Printer 3.1 Printing from a computer ...
... 10.1 Programming 49 10.2 Basic features 50 10.3 Fax features 53 10.4 Copy features 56 10.5 PC print features 56 10.6 Scan features 57 10.7 LAN features (KX-FLM671 only 58 10.8 Network features (KX-FLM671, LAN connection only 60 11.Useful Information Useful ...Information 11.1 Character entry 61 11.2 Status of Contents 1. Auto answer ON 41 7.6 Receiving a fax manually - Printer Printer 3.1 Printing from a computer ...
User Manual
Page 8
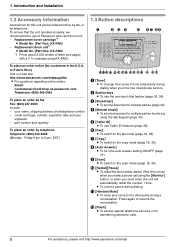
... No. (Part No.): KX-FA83 - G {Copy} L To switch to the fax mode (page 18, 38). H {Auto Answer} L To turn the auto answer setting ON/OFF (page 41). J {Redial}{Pause} L To redial the last number dialed. Replacement drum unit*1 L Model No. (Part No.): KX-FA84 *1 Prints about 2,500 sheets of Panasonic toner and drum unit...
... No. (Part No.): KX-FA83 - G {Copy} L To switch to the fax mode (page 18, 38). H {Auto Answer} L To turn the auto answer setting ON/OFF (page 41). J {Redial}{Pause} L To redial the last number dialed. Replacement drum unit*1 L Model No. (Part No.): KX-FA84 *1 Prints about 2,500 sheets of Panasonic toner and drum unit...
User Manual
Page 9
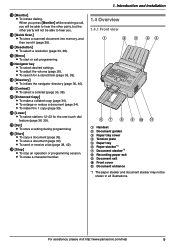
... be shown in 1 copy (page 35). U {Lower} L To select stations 12-22 for a stored item (page 36, 39). L To send or receive a fax (page 38, 42). 1. O {Resolution} L To select a resolution (page 33, 38). L To search for the one-touch dial feature (page 36, 39)....Navigator key L To select desired settings. L To adjust the volume (page 20). L To enlarge or reduce a document (page 34). For assistance, please visit http://www.panasonic.com/help 9 R {Directory} L To initiate the navigator directory (page 36, 40). L To make a collated copy (page 34). V {Set} L To store a...
... be shown in 1 copy (page 35). U {Lower} L To select stations 12-22 for a stored item (page 36, 39). L To send or receive a fax (page 38, 42). 1. O {Resolution} L To select a resolution (page 33, 38). L To search for the one-touch dial feature (page 36, 39)....Navigator key L To select desired settings. L To adjust the volume (page 20). L To enlarge or reduce a document (page 34). For assistance, please visit http://www.panasonic.com/help 9 R {Directory} L To initiate the navigator directory (page 36, 40). L To make a collated copy (page 34). V {Set} L To store a...
User Manual
Page 17
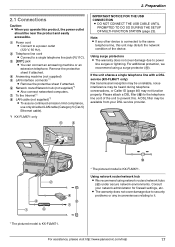
... to power line surges or lightning. If the unit shares a single telephone line with a DSL service (KX-FLM671 only) Fax transmission/reception may be unreliable, noise interference may not function properly. Preparation 2CFoPonrrenapesacstriaiostntioasnacned, pSleeatuspe visit http://www.panasonic.com/help 17 Note: L If any inconveniences relating to the same telephone line, this . A DSL...
... to power line surges or lightning. If the unit shares a single telephone line with a DSL service (KX-FLM671 only) Fax transmission/reception may be unreliable, noise interference may not function properly. Preparation 2CFoPonrrenapesacstriaiostntioasnacned, pSleeatuspe visit http://www.panasonic.com/help 17 Note: L If any inconveniences relating to the same telephone line, this . A DSL...
User Manual
Page 18
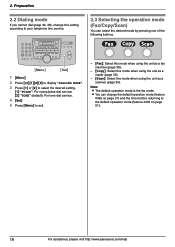
... For tone dial service. 4 {Set} 5 Press {Menu} to the default operation mode (feature #464 on page 51). 18 For assistance, please visit http://www.panasonic.com/help Preparation 2.2 Dialing mode If you cannot dial (page 36, 38), change the default operation mode (feature #463 on page 51) and the timer... before returning to exit. - {Fax}: Select this mode when using the unit as a fax machine (page 38). - {Copy}: Select this mode when using the unit as a copier (page 33). - {Scan}: Select this ...
... For tone dial service. 4 {Set} 5 Press {Menu} to the default operation mode (feature #464 on page 51). 18 For assistance, please visit http://www.panasonic.com/help Preparation 2.2 Dialing mode If you cannot dial (page 36, 38), change the default operation mode (feature #463 on page 51) and the timer... before returning to exit. - {Fax}: Select this mode when using the unit as a fax machine (page 38). - {Copy}: Select this mode when using the unit as a copier (page 33). - {Scan}: Select this ...

User Manual
Page 20
...- Handset receiver volume While using the monitor, press {V} or {^}. 20 For assistance, please visit http://www.panasonic.com/help Monitor volume While using the handset, press {V} or {^}. "Q and A" - If the {Fax} light is idle, press {V} or {^}. Confirm that there are no documents in the document entrance. L...volume can be adjusted if there are no documents in the entrance. L To turn it ON by pressing {Fax}. {Fax} {V}{^} {Set} {Menu} {} {Set} 1 Press {Menu} repeatedly to display "HELP". 2 Press {} repeatedly to display "RINGER OFF= OK?". "FEATURE ...
...- Handset receiver volume While using the monitor, press {V} or {^}. 20 For assistance, please visit http://www.panasonic.com/help Monitor volume While using the handset, press {V} or {^}. "Q and A" - If the {Fax} light is idle, press {V} or {^}. Confirm that there are no documents in the document entrance. L...volume can be adjusted if there are no documents in the entrance. L To turn it ON by pressing {Fax}. {Fax} {V}{^} {Set} {Menu} {} {Set} 1 Press {Menu} repeatedly to display "HELP". 2 Press {} repeatedly to display "RINGER OFF= OK?". "FEATURE ...

User Manual
Page 21
...received caller information. L To erase all characters, press and hold {Stop}. For assistance, please visit http://www.panasonic.com/help 21 Initial Programming 2.7 Date and time {Fax} 2. Preparation 2.8 Your logo You can program your unit's date and time setting on the top of each... {Menu} {} {Stop} {Set} 1 {Menu} i {#}{1}{0}{2} i {Set} LOGO=| 2 Enter your unit's date and time setting. Note: L The other party's fax machine will not adjust the clock. M:|08/D:10/Y:10 TIME: 10:15AM 2. Press {*} repeatedly to select "PM". 3 {Set} 4 Press {Menu} to the incorrect ...
...received caller information. L To erase all characters, press and hold {Stop}. For assistance, please visit http://www.panasonic.com/help 21 Initial Programming 2.7 Date and time {Fax} 2. Preparation 2.8 Your logo You can program your unit's date and time setting on the top of each... {Menu} {} {Stop} {Set} 1 {Menu} i {#}{1}{0}{2} i {Set} LOGO=| 2 Enter your unit's date and time setting. Note: L The other party's fax machine will not adjust the clock. M:|08/D:10/Y:10 TIME: 10:15AM 2. Press {*} repeatedly to select "PM". 3 {Set} 4 Press {Menu} to the incorrect ...
User Manual
Page 22
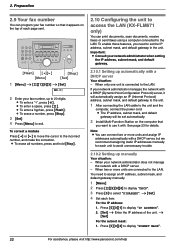
... {*}. L To erase all numbers, press and hold {Stop}. 2.10 Configuring the unit to access the LAN (KX-FLM671 only) You can print documents, scan documents, receive faxes or send faxes using a computer connected to the LAN. Important: L Consult your network administrator manages the network with a DHCP (Dynamic...SUBNET MASK". 22 For assistance, please visit http://www.panasonic.com/help i {Set} 4 Set each unit to the incorrect number, and make the correction. 2. When your fax number, up to 20 digits. Preparation 2.9 Your fax number You can connect two or more units are ...
... {*}. L To erase all numbers, press and hold {Stop}. 2.10 Configuring the unit to access the LAN (KX-FLM671 only) You can print documents, scan documents, receive faxes or send faxes using a computer connected to the LAN. Important: L Consult your network administrator manages the network with a DHCP (Dynamic...SUBNET MASK". 22 For assistance, please visit http://www.panasonic.com/help i {Set} 4 Set each unit to the incorrect number, and make the correction. 2. When your fax number, up to 20 digits. Preparation 2.9 Your fax number You can connect two or more units are ...

User Manual
Page 23
...drive with at least 150 MB of available space USB interface LAN interface (10Base-T/100Base-TX) (KX-FLM671 only) Other: Internet Explorer® 5.0 or later Warning: L To assure continued emission limit ...{V} or {^} repeatedly to the unit by USB is assigned as the default computer for details. Sending, receiving fax documents using your computer - L To protect the unit, use only shielded USB cable in directories using your ... Station 2.11.1 Required computer environment Panasonic Multi-Function Station software enables the unit to exit. For assistance, please visit http://www...
...drive with at least 150 MB of available space USB interface LAN interface (10Base-T/100Base-TX) (KX-FLM671 only) Other: Internet Explorer® 5.0 or later Warning: L To assure continued emission limit ...{V} or {^} repeatedly to the unit by USB is assigned as the default computer for details. Sending, receiving fax documents using your computer - L To protect the unit, use only shielded USB cable in directories using your ... Station 2.11.1 Required computer environment Panasonic Multi-Function Station software enables the unit to exit. For assistance, please visit http://www...
User Manual
Page 25
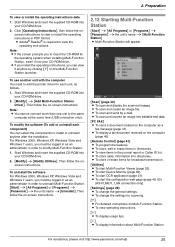
... Start Windows and insert the supplied CD-ROM into editable text data. [PC FAX] L To send a document created on -screen instructions. 2.12 Starting Multi-Function Station [Start] i [All Programs] or [Programs] i [Panasonic] i the unit's name i [Multi-Function Station] L Multi-Function Station ...will appear. To use another unit with the computer You need to insert the CD-ROM for broadcast transmission. [Utilities] L To start the configuration web page (page 49, 62) (KX-FLM671, LAN connection ...
... Start Windows and insert the supplied CD-ROM into editable text data. [PC FAX] L To send a document created on -screen instructions. 2.12 Starting Multi-Function Station [Start] i [All Programs] or [Programs] i [Panasonic] i the unit's name i [Multi-Function Station] L Multi-Function Station ...will appear. To use another unit with the computer You need to insert the CD-ROM for broadcast transmission. [Utilities] L To start the configuration web page (page 49, 62) (KX-FLM671, LAN connection ...

User Manual
Page 33
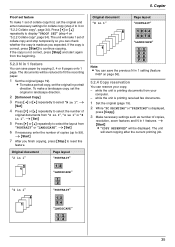
... unit will start copying. 6 After you finish copying, press {Stop} to the default operation mode (feature #464 on page 56). i {Set} Note: L You can receive faxes automatically even when in step 3 and 4. L To select the resolution, see page 62. L You can change the resolution and contrast according to dark) are available...
... unit will start copying. 6 After you finish copying, press {Stop} to the default operation mode (feature #464 on page 56). i {Set} Note: L You can receive faxes automatically even when in step 3 and 4. L To select the resolution, see page 62. L You can change the resolution and contrast according to dark) are available...
User Manual
Page 35
... the unit is not correct, press {Stop} and start copying after the current printing job. i {Start} 7 After you expected. while the unit is printing received fax documents. 1 Set the original (page 19). 2 While "PC PRINTING" or "PRINTING" is displayed, press {Copy}. 3 Make necessary settings such as you finish copying, press {Stop...
... the unit is not correct, press {Stop} and start copying after the current printing job. i {Start} 7 After you expected. while the unit is printing received fax documents. 1 Set the original (page 19). 2 While "PC PRINTING" or "PRINTING" is displayed, press {Copy}. 3 Make necessary settings such as you finish copying, press {Stop...

User Manual
Page 36
.... 6.1.3 Editing a stored item 1 {Directory} 2 Press {V} or {^} repeatedly to 32 digits. L Make sure that the {Fax} light is ON. L Confirm that the {Fax} light is ON. 6.2.1 Using one of the station keys. 3 Enter the name, up to display "DIRECTORY SET". 2 Select... the telephone number, up to display "DIRECTORY SET". L The unit will start dialing automatically. 6.2.2 Using the navigator directory 1 Press {Directory}. Station keys {Fax} {Menu} {Lower} {Stop} {V}{^}{>}{Directory} {Set} 6.1.1 Storing one -touch dial feature and navigator directory (page 36). For stations 12-22: Press...
.... 6.1.3 Editing a stored item 1 {Directory} 2 Press {V} or {^} repeatedly to 32 digits. L Make sure that the {Fax} light is ON. L Confirm that the {Fax} light is ON. 6.2.1 Using one of the station keys. 3 Enter the name, up to display "DIRECTORY SET". 2 Select... the telephone number, up to display "DIRECTORY SET". L The unit will start dialing automatically. 6.2.2 Using the navigator directory 1 Press {Directory}. Station keys {Fax} {Menu} {Lower} {Stop} {V}{^}{>}{Directory} {Set} 6.1.1 Storing one -touch dial feature and navigator directory (page 36). For stations 12-22: Press...
User Manual
Page 38
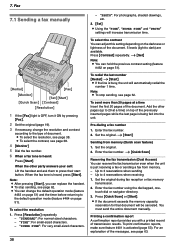
...unit will be canceled. 7. To redial the last number {Redial} i {Start} L If the line is OFF, turn it ON by pressing {Fax}. 2 Set the original (page 19). 3 If necessary, change the default operation mode (feature #463 on page 51). L If the document exceeds... feature #401 is heard, press {Start}. Add the other party answers your call: Lift the handset and ask them to 3 reservations when sending - Fax 7SeFnadxing Faxes 7.1 Sending a fax manually - "PHOTO": For photographs, shaded drawings, etc. 2. {Set} L Using the "FINE", "SUPER FINE" and "PHOTO" settings will increase ...
...unit will be canceled. 7. To redial the last number {Redial} i {Start} L If the line is OFF, turn it ON by pressing {Fax}. 2 Set the original (page 19). 3 If necessary, change the default operation mode (feature #463 on page 51). L If the document exceeds... feature #401 is heard, press {Start}. Add the other party answers your call: Lift the handset and ask them to 3 reservations when sending - Fax 7SeFnadxing Faxes 7.1 Sending a fax manually - "PHOTO": For photographs, shaded drawings, etc. 2. {Set} L Using the "FINE", "SUPER FINE" and "PHOTO" settings will increase ...
User Manual
Page 39
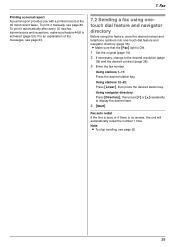
... {V} or {^} repeatedly to the desired resolution (page 38) and the desired contrast (page 38). 3 Enter the fax number. 7. For an explanation of the 30 most recent faxes. L Make sure that the {Fax} light is ON. 1 Set the original (page 19). 2 If necessary, change to display the desired item. ...and navigator directory Before using this feature, store the desired names and telephone numbers into one-touch dial feature and navigator directory (page 36). Fax Printing a journal report A journal report provides you with a printed record of the messages, see page 62. 39 Using stations 12-22...
... {V} or {^} repeatedly to the desired resolution (page 38) and the desired contrast (page 38). 3 Enter the fax number. 7. For an explanation of the 30 most recent faxes. L Make sure that the {Fax} light is ON. 1 Set the original (page 19). 2 If necessary, change to display the desired item. ...and navigator directory Before using this feature, store the desired names and telephone numbers into one-touch dial feature and navigator directory (page 36). Fax Printing a journal report A journal report provides you with a printed record of the messages, see page 62. 39 Using stations 12-22...
User Manual
Page 40
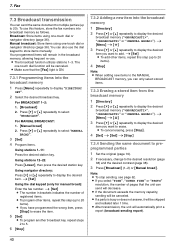
... be canceled. For BROADCAST 1-2: 1. {Broadcast} 2. i {Set} Using the dial keypad (only for manual broad): Enter the fax number. i {Set} L To add other items, repeat this feature, store the fax numbers into the broadcast memory 1 {Directory} 2 Press {V} or {^} repeatedly to select "MANUAL BROAD". 3 {Set} 4 Program...memory, allowing frequent re-use. L Make sure that the unit can send will remain in brackets indicates the number of pages that the {Fax} light is busy or does not answer, it will automatically print a report (broadcast sending report). 40 L If you select "FINE", ...
... be canceled. For BROADCAST 1-2: 1. {Broadcast} 2. i {Set} Using the dial keypad (only for manual broad): Enter the fax number. i {Set} L To add other items, repeat this feature, store the fax numbers into the broadcast memory 1 {Directory} 2 Press {V} or {^} repeatedly to select "MANUAL BROAD". 3 {Set} 4 Program...memory, allowing frequent re-use. L Make sure that the unit can send will remain in brackets indicates the number of pages that the {Fax} light is busy or does not answer, it will automatically print a report (broadcast sending report). 40 L If you select "FINE", ...

User Manual
Page 41
.... Note: L To stop the operation, click [Cancel]. 6 [Send] L The document will appear. If you want to display "FAX ONLY MODE". L The [Send a Fax] dialog box will be changed (feature #210 on page 51). L To stop sending, see the help file by selecting [p] from... your computer You can be sent through the unit from Multi-Function Station. Receiving Faxes 7.5 Receiving a fax automatically - M6XX 5 Enter the fax number using Multi-Function Station. L Click [Select...] to a Distinctive Ring service See page 48. 41 L For details, ...
.... Note: L To stop the operation, click [Cancel]. 6 [Send] L The document will appear. If you want to display "FAX ONLY MODE". L The [Send a Fax] dialog box will be changed (feature #210 on page 51). L To stop sending, see the help file by selecting [p] from... your computer You can be sent through the unit from Multi-Function Station. Receiving Faxes 7.5 Receiving a fax automatically - M6XX 5 Enter the fax number using Multi-Function Station. L Click [Select...] to a Distinctive Ring service See page 48. 41 L For details, ...
User Manual
Page 42
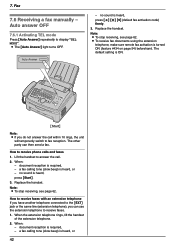
... (extension telephone), you do not answer the call . 2. The default setting is heard, press {Start}. 3. Fax 7.6 Receiving a fax manually - no sound is ON. {Start} Note: L If you can then send a fax. How to answer the call within 10 rings, the unit will temporarily switch to... fax reception. a fax calling tone (slow beep) is heard, press {*} {#} {9} (default fax activation code) firmly. 3. When: - L The {Auto Answer} light turns OFF...
... (extension telephone), you do not answer the call . 2. The default setting is heard, press {Start}. 3. Fax 7.6 Receiving a fax manually - no sound is ON. {Start} Note: L If you can then send a fax. How to answer the call within 10 rings, the unit will temporarily switch to... fax reception. a fax calling tone (slow beep) is heard, press {*} {#} {9} (default fax activation code) firmly. 3. When: - L The {Auto Answer} light turns OFF...


