Operating Instructions
Page 1
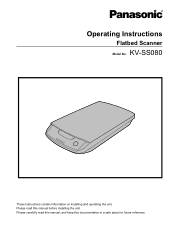
Please read this manual, and keep this manual before installing the unit. Please carefully read this documentation in a safe place for future reference. KV-SS080 These instructions contain information on installing and operating the unit. Operating Instructions Flatbed Scanner Model No.
Please read this manual, and keep this manual before installing the unit. Please carefully read this documentation in a safe place for future reference. KV-SS080 These instructions contain information on installing and operating the unit. Operating Instructions Flatbed Scanner Model No.
Operating Instructions
Page 2
...) The Operating Instructions explain the installation method and procedures, the part names, operations, features and maintenance of the PIE (Panasonic Image Enhancement Technology) features using the ISIS and TWAIN drivers. • RTIV Reference Manual Explains the features and settings for... User Utility.) • The electronic documentation is located on the included CD-ROM. This unit is used . *1 Except for purchasing a Panasonic Flatbed Scanner. To use the User Utility, which is a proprietary scanner*1 option. Abbreviations • Windows® refers to the Microsoft®...
...) The Operating Instructions explain the installation method and procedures, the part names, operations, features and maintenance of the PIE (Panasonic Image Enhancement Technology) features using the ISIS and TWAIN drivers. • RTIV Reference Manual Explains the features and settings for... User Utility.) • The electronic documentation is located on the included CD-ROM. This unit is used . *1 Except for purchasing a Panasonic Flatbed Scanner. To use the User Utility, which is a proprietary scanner*1 option. Abbreviations • Windows® refers to the Microsoft®...

Operating Instructions
Page 5
... Your Computer 18 Uninstalling Manuals ...18 Operation 19 Turning on the Unit Power 19 Scanning Documents ...20 Changing the Scan Background Color 22 Reversing the flatbed sheet 22 Care and Maintenance 25 Cleaning the Unit ...25 Appendix 27 Troubleshooting ...27 Repacking Instructions 28 Specifications ...30 Index...31 Operating Instructions 5
... Your Computer 18 Uninstalling Manuals ...18 Operation 19 Turning on the Unit Power 19 Scanning Documents ...20 Changing the Scan Background Color 22 Reversing the flatbed sheet 22 Care and Maintenance 25 Cleaning the Unit ...25 Appendix 27 Troubleshooting ...27 Repacking Instructions 28 Specifications ...30 Index...31 Operating Instructions 5

Operating Instructions
Page 9
... near apparatus which is marked with the letter L or coloured RED. Others • Make sure to a warm place. Failing to do so can damage the flatbed glass. • Do not use thinner, benzine, or cleaners containing abrasives or surfactants, for extended periods. • Do not throw or bend the CD-ROM...
... near apparatus which is marked with the letter L or coloured RED. Others • Make sure to a warm place. Failing to do so can damage the flatbed glass. • Do not use thinner, benzine, or cleaners containing abrasives or surfactants, for extended periods. • Do not throw or bend the CD-ROM...
Operating Instructions
Page 11
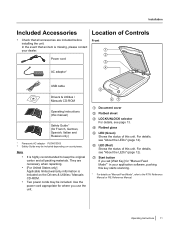
...your application software, pushing this manual) Safety Guide*2 (for "Manual Feed Mode"*1 in your dealer. For details, see "About the LEDs" (page 12). D Flatbed glass E LED (Green) Shows the status of Controls Front 1 2 3 4 USB cable Drivers & Utilities / Manuals CD-ROM Operating Instructions (this key starts...unit. Use the power cord appropriate for where you set [Wait Key] for French, German, Spanish, Italian and Russian only) *1 Panasonic AC adaptor PJSWC0003 *2 Safety Guide may be included depending on "Manual Feed Mode", refer to the RTIV Reference Manual or PIE Reference ...
...your application software, pushing this manual) Safety Guide*2 (for "Manual Feed Mode"*1 in your dealer. For details, see "About the LEDs" (page 12). D Flatbed glass E LED (Green) Shows the status of Controls Front 1 2 3 4 USB cable Drivers & Utilities / Manuals CD-ROM Operating Instructions (this key starts...unit. Use the power cord appropriate for where you set [Wait Key] for French, German, Spanish, Italian and Russian only) *1 Panasonic AC adaptor PJSWC0003 *2 Safety Guide may be included depending on "Manual Feed Mode", refer to the RTIV Reference Manual or PIE Reference ...

Operating Instructions
Page 14
Installation 3. Notice • Use only the power cord, the AC adaptor, and the USB cable that are provided with the unit. • Confirm that the scanner for connecting this unit is connected to the computer. • Do not connect more than 1 flatbed scanner to the unit. Install software (page 15). 14 Operating Instructions Connect the power cord, AC adaptor, and the USB cable to the same computer. (Doing so can cause erroneous behavior on the computer.) 4 3 5 21 A Power cord B AC adaptor C USB cable D To the scanner for connecting this unit E To the AC outlet 4.
Installation 3. Notice • Use only the power cord, the AC adaptor, and the USB cable that are provided with the unit. • Confirm that the scanner for connecting this unit is connected to the computer. • Do not connect more than 1 flatbed scanner to the unit. Install software (page 15). 14 Operating Instructions Connect the power cord, AC adaptor, and the USB cable to the same computer. (Doing so can cause erroneous behavior on the computer.) 4 3 5 21 A Power cord B AC adaptor C USB cable D To the scanner for connecting this unit E To the AC outlet 4.

Operating Instructions
Page 20
Failing to remove paper clips and staples from documents before placing it on the flatbed glass, it will not be scanned correctly. 20 Operating Instructions Operation Scanning Documents Notice • Make sure to do so can damage the flatbed glass. • If the document is set crooked on the flatbed glass. 1. Open the document cover (A). 1 2. Place the document face down, and align the edge of the document (A) with the standard mark (B) in the upper right of the flatbed glass. 12 Notice • If the document is folded or creased, smooth it out before scanning.
Failing to remove paper clips and staples from documents before placing it on the flatbed glass, it will not be scanned correctly. 20 Operating Instructions Operation Scanning Documents Notice • Make sure to do so can damage the flatbed glass. • If the document is set crooked on the flatbed glass. 1. Open the document cover (A). 1 2. Place the document face down, and align the edge of the document (A) with the standard mark (B) in the upper right of the flatbed glass. 12 Notice • If the document is folded or creased, smooth it out before scanning.

Operating Instructions
Page 21
... close the document cover before starting a scan. • Do not close the document cover quickly or let it slam down. Also, do not touch the flatbed glass will not be scanned properly. • Do not move the document and prevent proper scanning.) • After scanning, open the document cover and remove...
... close the document cover before starting a scan. • Do not close the document cover quickly or let it slam down. Also, do not touch the flatbed glass will not be scanned properly. • Do not move the document and prevent proper scanning.) • After scanning, open the document cover and remove...

Operating Instructions
Page 22
...• Plastic films, etc. Lift the document cover (A) directly upwards, and remove it. 1 2. The default setting is black. Reversing the flatbed sheet 1. Turn the document cover over, and then push the center of the rear edge (A) of the document cover. 22 Operating Instructions Operation ...Changing the Scan Background Color By reversing the flatbed sheet on the unit, you with your finger. 1 4 5 2 3 Notice • Confirm that the ears (B, C) of the flatbed sheet are clear of the tabs (D, E) of the flatbed sheet towards you can change the scanning background color ...
...• Plastic films, etc. Lift the document cover (A) directly upwards, and remove it. 1 2. The default setting is black. Reversing the flatbed sheet 1. Turn the document cover over, and then push the center of the rear edge (A) of the document cover. 22 Operating Instructions Operation ...Changing the Scan Background Color By reversing the flatbed sheet on the unit, you with your finger. 1 4 5 2 3 Notice • Confirm that the ears (B, C) of the flatbed sheet are clear of the tabs (D, E) of the flatbed sheet towards you can change the scanning background color ...

Operating Instructions
Page 23
Reverse the flatbed sheet, and then place the tips of the ears of the flatbed sheet (A, B) so that they fit under the tabs of the flatbed sheet (A) and pull it towards you (B). Slightly lift the front side of the document cover (C, D). 3 4 1 2 Operating Instructions 23 Operation 2 1 4. 3.
Reverse the flatbed sheet, and then place the tips of the ears of the flatbed sheet (A, B) so that they fit under the tabs of the flatbed sheet (A) and pull it towards you (B). Slightly lift the front side of the document cover (C, D). 3 4 1 2 Operating Instructions 23 Operation 2 1 4. 3.

Operating Instructions
Page 24
Replace the document cover. • Push the hinges of the flatbed sheet are under the tabs of the document cover (C, D). 3 4 1 2 Notice • Confirm that the ears of the document cover (A) into the hinge mounting holes (B). 1 2 24 Operating Instructions Operation 5. Push the flatbed sheet towards the rear while making sure that the ears of the flatbed sheet (A, B) are fastened to all 4 tabs. 6.
Replace the document cover. • Push the hinges of the flatbed sheet are under the tabs of the document cover (C, D). 3 4 1 2 Notice • Confirm that the ears of the document cover (A) into the hinge mounting holes (B). 1 2 24 Operating Instructions Operation 5. Push the flatbed sheet towards the rear while making sure that the ears of the flatbed sheet (A, B) are fastened to all 4 tabs. 6.
Operating Instructions
Page 25
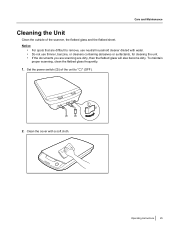
Set the power switch (A) of the scanner, the flatbed glass and the flatbed sheet. n • If the documents you are scanning are difficult to " " (OFF). Care and Maintenance C a r e Cleaning the Unit a n ... remove, use thinner, benzine, or cleaners containing abrasives or surfactants, for cleaning the unit. To maintain t proper scanning, clean the flatbed glass frequently. d Notice M a • For spots that are dirty, then the flatbed glass will also become dirty. a n c e 1 2. e n 1. Clean the cover with water. Operating Instructions 25 i ...
Set the power switch (A) of the scanner, the flatbed glass and the flatbed sheet. n • If the documents you are scanning are difficult to " " (OFF). Care and Maintenance C a r e Cleaning the Unit a n ... remove, use thinner, benzine, or cleaners containing abrasives or surfactants, for cleaning the unit. To maintain t proper scanning, clean the flatbed glass frequently. d Notice M a • For spots that are dirty, then the flatbed glass will also become dirty. a n c e 1 2. e n 1. Clean the cover with water. Operating Instructions 25 i ...

Operating Instructions
Page 26
Open the document cover (A). 1 4. Care and Maintenance 3. Gently wipe the flatbed glass (A) and flatbed sheet (B) with a soft, moist cloth. 2 1 26 Operating Instructions
Open the document cover (A). 1 4. Care and Maintenance 3. Gently wipe the flatbed glass (A) and flatbed sheet (B) with a soft, moist cloth. 2 1 26 Operating Instructions
Operating Instructions
Page 27
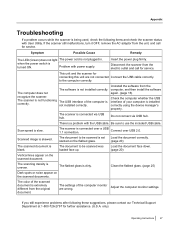
...service. The document to use the included USB cable. The scanner is connected over USB 2.0. Scanned image is uneven. Clean the flatbed glass. (page 25) Dark spots or noise appear on the scanned document. Adjust the computer monitor settings. Check the computer ...and then install the software The computer does not again. (page 16) recognize the scanner. Be sure to be scanned is set slanted on the flatbed glass. The scanning density is skewed. Appendix A p p e Troubleshooting n d If a problem occurs while the scanner is being used, check...
...service. The document to use the included USB cable. The scanner is connected over USB 2.0. Scanned image is uneven. Clean the flatbed glass. (page 25) Dark spots or noise appear on the scanned document. Adjust the computer monitor settings. Check the computer ...and then install the software The computer does not again. (page 16) recognize the scanner. Be sure to be scanned is set slanted on the flatbed glass. The scanning density is skewed. Appendix A p p e Troubleshooting n d If a problem occurs while the scanner is being used, check...

Operating Instructions
Page 31
... Scanning paper size 30 Drivers 15 Drivers & Utilities / Manuals CD-ROM 11, 29 E Electronic Documentation Uninstalling 18 Viewing Electronic Documentation 17 External dimensions 30 F Flatbed glass 11 Flatbed sheet 11, 22 H Hard Disk 15 I Image control 30 Interface 15 L LED (Green) 11, 12 LED (Red) 11, 12 LOCK/UNLOCK selector 11, 13...
... Scanning paper size 30 Drivers 15 Drivers & Utilities / Manuals CD-ROM 11, 29 E Electronic Documentation Uninstalling 18 Viewing Electronic Documentation 17 External dimensions 30 F Flatbed glass 11 Flatbed sheet 11, 22 H Hard Disk 15 I Image control 30 Interface 15 L LED (Green) 11, 12 LED (Red) 11, 12 LOCK/UNLOCK selector 11, 13...
