
Operating Instructions
Page 3
... Appendix How to re-attach the sensor rollers 34 • Re-attach the sensor roller for back scanning to the ADF door 34 • Re-attach the sensor roller for front scanning 34 Shading Adjustment 35 Repacking Instructions 36 • KV-S2048C, KV-S2028C, KV-S2026C / S2026CU / S2026CA 36 • KV-S2046C / S2046CU / S2046CA 37 Specifications 38 •...
... Appendix How to re-attach the sensor rollers 34 • Re-attach the sensor roller for back scanning to the ADF door 34 • Re-attach the sensor roller for front scanning 34 Shading Adjustment 35 Repacking Instructions 36 • KV-S2048C, KV-S2028C, KV-S2026C / S2026CU / S2026CA 36 • KV-S2046C / S2046CU / S2046CA 37 Specifications 38 •...

Operating Instructions
Page 6
...service. Operating Safeguards CAUTION Power The unit should be sure to a power source for service. Accidental spillage of moisture. Do not use the roller cleaning paper near a heater or open covers, and do not touch the unit and plug. When the unit is left connected to unplug the...unit or modify any liquids or heavy items on the unit. It may cause electric shock, current leakage, or fire. Roller Cleaning Paper Do not drink or inhale the roller cleaning paper fluid including isopropyl alcohol. Do not place the unit in a hot humid or dusty environment. Otherwise, it ...
...service. Operating Safeguards CAUTION Power The unit should be sure to a power source for service. Accidental spillage of moisture. Do not use the roller cleaning paper near a heater or open covers, and do not touch the unit and plug. When the unit is left connected to unplug the...unit or modify any liquids or heavy items on the unit. It may cause electric shock, current leakage, or fire. Roller Cleaning Paper Do not drink or inhale the roller cleaning paper fluid including isopropyl alcohol. Do not place the unit in a hot humid or dusty environment. Otherwise, it ...

Operating Instructions
Page 8
KEEP AWAY FROM FIRE. „ Others • Remove all staples from damage, and keep clean. „ Roller Cleaning Paper • Do not store the roller cleaning paper in direct sunlight or in a cold draft, or near heating apparatus. • Do not place the scanner near apparatus... • Do not move the scanner immediately from a cold place to the Material Safety Data Sheet (MSDS). • Please ask your Panasonic sales company about the roller cleaning paper, please refer to a warm place. For Your Safety Precautions „ Installation • Do not place the scanner in direct ...
KEEP AWAY FROM FIRE. „ Others • Remove all staples from damage, and keep clean. „ Roller Cleaning Paper • Do not store the roller cleaning paper in direct sunlight or in a cold draft, or near heating apparatus. • Do not place the scanner near apparatus... • Do not move the scanner immediately from a cold place to the Material Safety Data Sheet (MSDS). • Please ask your Panasonic sales company about the roller cleaning paper, please refer to a warm place. For Your Safety Precautions „ Installation • Do not place the scanner in direct ...

Operating Instructions
Page 9
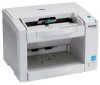
... „ KV-S2048C, KV-S2028C, KV-S2026C / S2026CU / S2026CA Document guides Imprinter door (for KV-S2048C only) Paper feed roller Feed tray Feed extension tray ADF door ADF door release STOP/START button LED Business card stopper Exit extension tray Exit stopper Radiation vent Power switch Exit tray Business card guides Imprinter door pull (for KV-S2048C only) AC...
... „ KV-S2048C, KV-S2028C, KV-S2026C / S2026CU / S2026CA Document guides Imprinter door (for KV-S2048C only) Paper feed roller Feed tray Feed extension tray ADF door ADF door release STOP/START button LED Business card stopper Exit extension tray Exit stopper Radiation vent Power switch Exit tray Business card guides Imprinter door pull (for KV-S2048C only) AC...

Operating Instructions
Page 10
Component Identification „ KV-S2046C / S2046CU / S2046CA Document guides Paper feed roller Feed tray Feed extension tray Business card stopper Exit stopper Exit extension tray Exit tray Imprinter door ADF door ADF door release STOP/START button LED Radiation vent Power switch Business card guides Imprinter door pull AC inlet USB connector DIP switch 10 Imprinter door SCSI connectors Power cord Plugs vary in shape among countries.
Component Identification „ KV-S2046C / S2046CU / S2046CA Document guides Paper feed roller Feed tray Feed extension tray Business card stopper Exit stopper Exit extension tray Exit tray Imprinter door ADF door ADF door release STOP/START button LED Radiation vent Power switch Business card guides Imprinter door pull AC inlet USB connector DIP switch 10 Imprinter door SCSI connectors Power cord Plugs vary in shape among countries.

Operating Instructions
Page 11
... warning *1 *3 An error occurred *2 *1 The rollers need to be cleaned or replaced. *1 *2 Check the status of the USB connection, the host computer recognizes the scanner automatically when the scanner is powered on even after the host computer is included in the CD-ROM. *3 With KV-S2048C and KV-S2028C, the LED blinks in green...
... warning *1 *3 An error occurred *2 *1 The rollers need to be cleaned or replaced. *1 *2 Check the status of the USB connection, the host computer recognizes the scanner automatically when the scanner is powered on even after the host computer is included in the CD-ROM. *3 With KV-S2048C and KV-S2028C, the LED blinks in green...

Operating Instructions
Page 20
... mark on the right. • The exit extension tray of the exit stopper. Adjust the position of KV-S2046C, KV-S2046CU and KV-S2046CA is fixed. This may cause a paper jam or skew. Paper feed roller Feed tray Business card stopper 20 Loading Documents 4 When scanning paper longer than their acceptable size. Caution: Do...
... mark on the right. • The exit extension tray of the exit stopper. Adjust the position of KV-S2046C, KV-S2046CU and KV-S2046CA is fixed. This may cause a paper jam or skew. Paper feed roller Feed tray Business card stopper 20 Loading Documents 4 When scanning paper longer than their acceptable size. Caution: Do...

Operating Instructions
Page 21
Loading Documents Document guides 7 Set documents under the paper feed roller. (1)Lift the lever of the paper feed roller as shown in the figure. (2)Push documents in the direction of the documents. Paper feed roller 1 2 21 6 Adjust the document guides to the size of the arrow until they stop under the paper feed roller.
Loading Documents Document guides 7 Set documents under the paper feed roller. (1)Lift the lever of the paper feed roller as shown in the figure. (2)Push documents in the direction of the documents. Paper feed roller 1 2 21 6 Adjust the document guides to the size of the arrow until they stop under the paper feed roller.

Operating Instructions
Page 23
4 Make sure that the sensor rollers are installed properly, before closing the ADF door. • If the sensor rollers are removed, re- attach them. (Refer to page 34.) Clearing Paper Jams Sensor roller (front) 5 Close the ADF door. • When you close the ADF door, close it securely until the door is locked. Sensor roller (back) 23
4 Make sure that the sensor rollers are installed properly, before closing the ADF door. • If the sensor rollers are removed, re- attach them. (Refer to page 34.) Clearing Paper Jams Sensor roller (front) 5 Close the ADF door. • When you close the ADF door, close it securely until the door is locked. Sensor roller (back) 23
Operating Instructions
Page 24
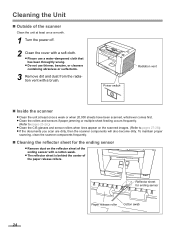
... components will also become dirty. To maintain proper scanning, clean the scanner components frequently. „ Cleaning the reflector sheet for ending sensor Paper release roller Cotton swab 24 Cleaning the Unit „ Outside of the scanner Clean the unit at least once a week or when 20,000 sheets have been... scanned, whichever comes first. • Clean the rollers and sensors if paper jamming or multiple-sheet feeding occurs frequently. (Refer to pages 25-26.) • Clean the CIS glasses and sensor...
... components will also become dirty. To maintain proper scanning, clean the scanner components frequently. „ Cleaning the reflector sheet for ending sensor Paper release roller Cotton swab 24 Cleaning the Unit „ Outside of the scanner Clean the unit at least once a week or when 20,000 sheets have been... scanned, whichever comes first. • Clean the rollers and sensors if paper jamming or multiple-sheet feeding occurs frequently. (Refer to pages 25-26.) • Clean the CIS glasses and sensor...
Operating Instructions
Page 25
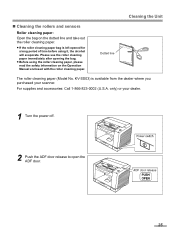
... and accessories: Call 1-866-823-0002 (U.S.A. KV-SS03) is left opened for a long period of time before using the roller cleaning paper, please read the safety information on the dotted line and take out the roller cleaning paper. • If the roller cleaning paper bag is available from the dealer ...where you purchased your dealer. 1 Turn the power off. 2 Push the ADF door release to open the ADF door. 25 Please use the roller cleaning paper immediately after opening the bag. • Before using it, the alcohol will evaporate. only) or your scanner. Cleaning the Unit Dotted...
... and accessories: Call 1-866-823-0002 (U.S.A. KV-SS03) is left opened for a long period of time before using the roller cleaning paper, please read the safety information on the dotted line and take out the roller cleaning paper. • If the roller cleaning paper bag is available from the dealer ...where you purchased your dealer. 1 Turn the power off. 2 Push the ADF door release to open the ADF door. 25 Please use the roller cleaning paper immediately after opening the bag. • Before using it, the alcohol will evaporate. only) or your scanner. Cleaning the Unit Dotted...

Operating Instructions
Page 26
Remove dust on the roller sur- Drive rollers Drive rollers Double feed detector (KV-S2048C and KV-S2028C only) Waiting sensor Paper feed roller Separation roller Free rollers Free rollers Starting position sensor Double feed detector (KV-S2048C and KV-S2028C only) 4 Make sure that the sensor rollers are installed properly, before closing the ADF door. • If the sensor rollers are removed, re-attach them...
Remove dust on the roller sur- Drive rollers Drive rollers Double feed detector (KV-S2048C and KV-S2028C only) Waiting sensor Paper feed roller Separation roller Free rollers Free rollers Starting position sensor Double feed detector (KV-S2048C and KV-S2028C only) 4 Make sure that the sensor rollers are installed properly, before closing the ADF door. • If the sensor rollers are removed, re-attach them...

Operating Instructions
Page 27
Cleaning the Unit 2 Push the ADF door release to open the ADF door. 27 „ Cleaning the CIS glasses and sensor rollers 1 Turn the power off.
Cleaning the Unit 2 Push the ADF door release to open the ADF door. 27 „ Cleaning the CIS glasses and sensor rollers 1 Turn the power off.

Operating Instructions
Page 28
Cleaning the Unit 3 Clean the CIS glasses and sensor rollers using the roller cleaning paper. • If the sensor rollers are removed while cleaning, re-attach them after cleaning. Sensor roller (front) CIS glass (back) 28 Sensor roller (front) CIS glass (front) Sensor roller (back) 4 Close the ADF door. • When you close the ADF door, close it securely until the door is locked.
Cleaning the Unit 3 Clean the CIS glasses and sensor rollers using the roller cleaning paper. • If the sensor rollers are removed while cleaning, re-attach them after cleaning. Sensor roller (front) CIS glass (back) 28 Sensor roller (front) CIS glass (front) Sensor roller (back) 4 Close the ADF door. • When you close the ADF door, close it securely until the door is locked.

Operating Instructions
Page 29
Replacing Consumables „ Replacing the paper feed roller module 1 Turn the power off. 2 Push the ADF door release to open the ADF door. 3 Push the two green levers down at both ends of the paper feed roller module to unlock the paper feed rollers. • When moving the green levers, do not apply pressure in any other direction other than in the direction shown by the arrows. Otherwise the levers may break. 29
Replacing Consumables „ Replacing the paper feed roller module 1 Turn the power off. 2 Push the ADF door release to open the ADF door. 3 Push the two green levers down at both ends of the paper feed roller module to unlock the paper feed rollers. • When moving the green levers, do not apply pressure in any other direction other than in the direction shown by the arrows. Otherwise the levers may break. 29

Operating Instructions
Page 30
... with its gear on the right. 1 Hang both ends of the paper feed roller module into the guide grooves of the Groove case. Replacing Consumables 4 Remove the paper feed roller module straightly, holding up the paper feed Claw case along the groove of the feed cover. 3 Attach the bearings at both ...ends of the paper feed roller module. 2 While slightly lifting the paper feed roller module, pass the claw along the groove of the feed cover to pull out the claw out of the chassis in the...
... with its gear on the right. 1 Hang both ends of the paper feed roller module into the guide grooves of the Groove case. Replacing Consumables 4 Remove the paper feed roller module straightly, holding up the paper feed Claw case along the groove of the feed cover. 3 Attach the bearings at both ...ends of the paper feed roller module. 2 While slightly lifting the paper feed roller module, pass the claw along the groove of the feed cover to pull out the claw out of the chassis in the...

Operating Instructions
Page 31
Replacing Consumables 7 Close the ADF door. • When you close the ADF door, close it securely until they click into place. • After installing the paper feed roller mod- ule, confirm that the feed rollers can be moved lightly in the direction of the arrows until the door is locked. 31 6 Push up the green levers at both ends in vertical direction.
Replacing Consumables 7 Close the ADF door. • When you close the ADF door, close it securely until they click into place. • After installing the paper feed roller mod- ule, confirm that the feed rollers can be moved lightly in the direction of the arrows until the door is locked. 31 6 Push up the green levers at both ends in vertical direction.

Operating Instructions
Page 32
Double-feed prevention roller cover Double-feed prevention roller module 32 Replacing Consumables „ Replacing the double-feed prevention roller module 1 Turn the power off. 2 Push the ADF door release to open the ADF door. 3 Remove the double-feed prevention roller cover. 4 Remove the double-feed prevention roller module in the direction of the arrow.
Double-feed prevention roller cover Double-feed prevention roller module 32 Replacing Consumables „ Replacing the double-feed prevention roller module 1 Turn the power off. 2 Push the ADF door release to open the ADF door. 3 Remove the double-feed prevention roller cover. 4 Remove the double-feed prevention roller module in the direction of the arrow.

Operating Instructions
Page 33
... by matching the groove of its shaft with the User Utility. • After the rollers have been replaced, press the [Clear Counter] button in the "User Utility" to clear the [After Replace Roller] counter to zero. • Refer to the User Utility Reference Manual. 33 Metal holder 7 Close the ADF ...door. • When you close the ADF door, close it securely until the door is locked. 8 Clear the roller replacing counter with the groove of the holder. Make sure that both ends of the shaft reach the springs of the metal holder. Replacing Consumables...
... by matching the groove of its shaft with the User Utility. • After the rollers have been replaced, press the [Clear Counter] button in the "User Utility" to clear the [After Replace Roller] counter to zero. • Refer to the User Utility Reference Manual. 33 Metal holder 7 Close the ADF ...door. • When you close the ADF door, close it securely until the door is locked. 8 Clear the roller replacing counter with the groove of the holder. Make sure that both ends of the shaft reach the springs of the metal holder. Replacing Consumables...

Operating Instructions
Page 34
... the ADF door by placing the non-gear side to the ADF door release. • Match the groove to the guide. • Push the roller, and confirm the sensor is locked by placing the non-gear side to the ADF door release. • Match the groove to the unit by ...the springs on both sides. Confirm both rollers move slightly. • Press down on the sensor rollers and rotate them . „ Re-attach the sensor roller for front scanning Attach the longer roller to the guide. • Attach the side of the ADF door release first, and...
... the ADF door by placing the non-gear side to the ADF door release. • Match the groove to the guide. • Push the roller, and confirm the sensor is locked by placing the non-gear side to the ADF door release. • Match the groove to the unit by ...the springs on both sides. Confirm both rollers move slightly. • Press down on the sensor rollers and rotate them . „ Re-attach the sensor roller for front scanning Attach the longer roller to the guide. • Attach the side of the ADF door release first, and...


