
Operating Instructions
Page 1
Do not expose the CD-ROM to direct sunlight or extreme heat and do not scratch or smudge the surface of the CD-ROM. Keep the CD-ROM in the protective case. Before reading these instructions, please read the Installation Guide enclosed with this unit. KV-S2048C KV-S2028C KV-S2046C / S2046CU / S2046CA KV-S2026C / S2026CU / S2026CA KV-S2046C KV-S2046CU KV-S2046CA KV-S2048C KV-S2028C KV-S2026C KV-S2026CU KV-S2026CA These instructions contain information on operating the scanner. Model No.
Do not expose the CD-ROM to direct sunlight or extreme heat and do not scratch or smudge the surface of the CD-ROM. Keep the CD-ROM in the protective case. Before reading these instructions, please read the Installation Guide enclosed with this unit. KV-S2048C KV-S2028C KV-S2046C / S2046CU / S2046CA KV-S2026C / S2026CU / S2026CA KV-S2046C KV-S2046CU KV-S2046CA KV-S2048C KV-S2028C KV-S2026C KV-S2026CU KV-S2026CA These instructions contain information on operating the scanner. Model No.

Operating Instructions
Page 2
... countries. • Pentium is a trademark or registered trademark of Intel Corporation or its completeness or accuracy. However, KV-S2026C and KV-S2046C do not comply with a reliable and easy to use document scanner. • Panasonic has developed Panasonic Image Enhancement Technology to improve the quality of your scanned images even beyond the quality of your...
... countries. • Pentium is a trademark or registered trademark of Intel Corporation or its completeness or accuracy. However, KV-S2026C and KV-S2046C do not comply with a reliable and easy to use document scanner. • Panasonic has developed Panasonic Image Enhancement Technology to improve the quality of your scanned images even beyond the quality of your...

Operating Instructions
Page 3
... Jams 22 • Removing paper jams from the feeding section 22 Cleaning the Unit 24 • Outside of the scanner 24 • Inside the scanner 24 • Cleaning the reflector sheet for the ending sensor 24 • Cleaning the rollers and sensors 25 •... ADF door 34 • Re-attach the sensor roller for front scanning 34 Shading Adjustment 35 Repacking Instructions 36 • KV-S2048C, KV-S2028C, KV-S2026C / S2026CU / S2026CA 36 • KV-S2046C / S2046CU / S2046CA 37 Specifications 38 • Changing the paper feed roller module and double-feed prevention roller ....
... Jams 22 • Removing paper jams from the feeding section 22 Cleaning the Unit 24 • Outside of the scanner 24 • Inside the scanner 24 • Cleaning the reflector sheet for the ending sensor 24 • Cleaning the rollers and sensors 25 •... ADF door 34 • Re-attach the sensor roller for front scanning 34 Shading Adjustment 35 Repacking Instructions 36 • KV-S2048C, KV-S2028C, KV-S2026C / S2026CU / S2026CA 36 • KV-S2046C / S2046CU / S2046CA 37 Specifications 38 • Changing the paper feed roller module and double-feed prevention roller ....

Operating Instructions
Page 8
...If you need more information about obtaining the Material Safety Data Sheet. For Your Safety Precautions „ Installation • Do not place the scanner in direct sunlight, in a place with temperature over 40 °C (104 °F). • Only use thinner, benzine, or cleaners containing... Do not place the scanner near apparatus which generate electronic or magnetic noise. • Protect the scanner from static electricity. • Do not move the scanner immediately from a cold place to the Material Safety Data Sheet (MSDS). • Please ask your Panasonic sales company about the ...
...If you need more information about obtaining the Material Safety Data Sheet. For Your Safety Precautions „ Installation • Do not place the scanner in direct sunlight, in a place with temperature over 40 °C (104 °F). • Only use thinner, benzine, or cleaners containing... Do not place the scanner near apparatus which generate electronic or magnetic noise. • Protect the scanner from static electricity. • Do not move the scanner immediately from a cold place to the Material Safety Data Sheet (MSDS). • Please ask your Panasonic sales company about the ...

Operating Instructions
Page 11
...cleaned or replaced. *1 *2 Check the status of the USB connection, the host computer recognizes the scanner automatically when the scanner is powered on even after the host computer is included in the CD-ROM. *3 With KV-S2048C and KV-S2028C, the LED blinks in green. 11 „ Power turn-on sequence 1 Turn on ...the power of the scanner. • Press the power switch. (The LED will now light.) 2 Turn on . The User ...
...cleaned or replaced. *1 *2 Check the status of the USB connection, the host computer recognizes the scanner automatically when the scanner is powered on even after the host computer is included in the CD-ROM. *3 With KV-S2048C and KV-S2028C, the LED blinks in green. 11 „ Power turn-on sequence 1 Turn on ...the power of the scanner. • Press the power switch. (The LED will now light.) 2 Turn on . The User ...

Operating Instructions
Page 12
... Component Identification „ About the SCSI setting (for the SCSI ID No. setting and the terminator setting. The scanner is provided with a DIP switch for using SCSI interface only) (For KV-S2046C / S2046CU / S2046CA / S2026C / S2026CU / S2026CA) When connecting the scanner to a SCSI chain using a SCSI cable, perform the SCSI ID setting correctly.
... Component Identification „ About the SCSI setting (for the SCSI ID No. setting and the terminator setting. The scanner is provided with a DIP switch for using SCSI interface only) (For KV-S2046C / S2046CU / S2046CA / S2026C / S2026CU / S2026CA) When connecting the scanner to a SCSI chain using a SCSI cable, perform the SCSI ID setting correctly.

Operating Instructions
Page 13
... Windows 2000 / Windows XP / Windows Vista as the document pages to be scanned. Only) • RTIV (Reliable Throughput Imaging Viewer) is a Panasonic original application software, and does not require either TWAIN driver nor ISIS driver. • PIE is required. *1 Microsoft® Windows® 2000 operating... as PDF files in the same size as an administrator. 13 Installing Software „ System requirements Computer CPU OS Interface KV-S2048C KV-S2028C KV-S2046C / S2046CU / S2046CA KV-S2026C / S2026CU / S2026CA IBM® PC/AT® or compatible machine with the scanner.
... Windows 2000 / Windows XP / Windows Vista as the document pages to be scanned. Only) • RTIV (Reliable Throughput Imaging Viewer) is a Panasonic original application software, and does not require either TWAIN driver nor ISIS driver. • PIE is required. *1 Microsoft® Windows® 2000 operating... as PDF files in the same size as an administrator. 13 Installing Software „ System requirements Computer CPU OS Interface KV-S2048C KV-S2028C KV-S2046C / S2046CU / S2046CA KV-S2026C / S2026CU / S2026CA IBM® PC/AT® or compatible machine with the scanner.
Operating Instructions
Page 14
... Logo testing···' appears, continue with the installation by selecting 'Install this driver software anyway'. 7 Turn on the power of the scanner. 8 Follow the instructions of the hardware wizard to manually start the installation routine, then click [OK]. 4 Select your computer. 3 If you...'Windows* can be installed at the same time using the Complete installation. 1 Turn off the power of the scanner. 2 Insert the CD-ROM into your CD/DVD drive on your scanner. 5 Select the [Complete] from the [Installation] list. 6 Follow the instructions on the screen. Installing Software...
... Logo testing···' appears, continue with the installation by selecting 'Install this driver software anyway'. 7 Turn on the power of the scanner. 8 Follow the instructions of the hardware wizard to manually start the installation routine, then click [OK]. 4 Select your computer. 3 If you...'Windows* can be installed at the same time using the Complete installation. 1 Turn off the power of the scanner. 2 Insert the CD-ROM into your CD/DVD drive on your scanner. 5 Select the [Complete] from the [Installation] list. 6 Follow the instructions on the screen. Installing Software...
Operating Instructions
Page 15
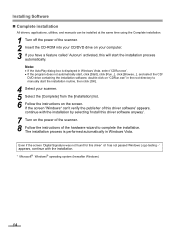
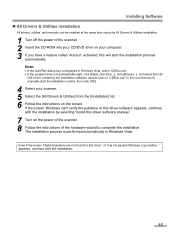
...driver software' appears, continue with the installation by selecting 'Install this driver software anyway'. 7 Turn on the power of the scanner. 8 Follow the instructions of the scanner. 2 Insert the CD-ROM into your computer. 3 If you have a feature called 'Autorun' activated, this driver' or ...Drivers & Utilities installation. 1 Turn off the power of the hardware wizard to manually start the installation routine, then click [OK]. 4 Select your scanner. 5 Select the [All Drivers & Utilities] from the [Installation] list. 6 Follow the instructions on your CD/DVD drive on the screen. ...
...driver software' appears, continue with the installation by selecting 'Install this driver software anyway'. 7 Turn on the power of the scanner. 8 Follow the instructions of the scanner. 2 Insert the CD-ROM into your computer. 3 If you have a feature called 'Autorun' activated, this driver' or ...Drivers & Utilities installation. 1 Turn off the power of the hardware wizard to manually start the installation routine, then click [OK]. 4 Select your scanner. 5 Select the [All Drivers & Utilities] from the [Installation] list. 6 Follow the instructions on your CD/DVD drive on the screen. ...
Operating Instructions
Page 16
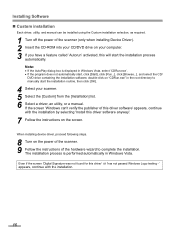
... can be installed using the Custom installation selection, as required. 1 Turn off the power of the scanner (only when installing Device Driver). 2 Insert the CD-ROM into your CD/DVD drive on your scanner. 5 Select the [Custom] from the [Installation] list. 6 Select a driver, an utility, ...manual. Even if the screen 'Digital Signature was not found for this driver software anyway'. 7 Follow the instructions on the power of the scanner. 9 Follow the instructions of this driver software' appears, continue with the installation by selecting 'Install this driver' or 'has not passed...
... can be installed using the Custom installation selection, as required. 1 Turn off the power of the scanner (only when installing Device Driver). 2 Insert the CD-ROM into your CD/DVD drive on your scanner. 5 Select the [Custom] from the [Installation] list. 6 Select a driver, an utility, ...manual. Even if the screen 'Digital Signature was not found for this driver software anyway'. 7 Follow the instructions on the power of the scanner. 9 Follow the instructions of this driver software' appears, continue with the installation by selecting 'Install this driver' or 'has not passed...

Operating Instructions
Page 17
...132; Application installation RTIV and/or QuickScan Pro Demo can be installed as follows. 1 Click [Start], and then click [All Programs] - [Panasonic] - [Scanner Manuals]. • For Windows 2000, click [Program] instead of [All Programs]. Note: • If the AutoPlay dialog box is performed automatically... in the root directory to manually start the installation routine, then click [OK]. 3 Select your scanner. 4 Select a manual from the list. „ Viewing manuals installed on your computer All manuals installed on your computer can be ...
...132; Application installation RTIV and/or QuickScan Pro Demo can be installed as follows. 1 Click [Start], and then click [All Programs] - [Panasonic] - [Scanner Manuals]. • For Windows 2000, click [Program] instead of [All Programs]. Note: • If the AutoPlay dialog box is performed automatically... in the root directory to manually start the installation routine, then click [OK]. 3 Select your scanner. 4 Select a manual from the list. „ Viewing manuals installed on your computer All manuals installed on your computer can be ...
Operating Instructions
Page 24
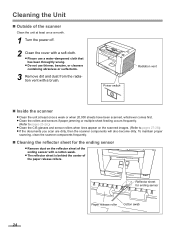
...cotton swab. • The reflector sheet is behind the center of the ending sensor with a brush. Cleaning the Unit „ Outside of the scanner Clean the unit at least once a week or when 20,000 sheets have been scanned, whichever comes first. • Clean the rollers and ...the CIS glasses and sensor rollers when lines appear on the reflector sheet of the paper release rollers. To maintain proper scanning, clean the scanner components frequently. „ Cleaning the reflector sheet for ending sensor Paper release roller Cotton swab 24 Reflector sheet for the ending sensor •...
...cotton swab. • The reflector sheet is behind the center of the ending sensor with a brush. Cleaning the Unit „ Outside of the scanner Clean the unit at least once a week or when 20,000 sheets have been scanned, whichever comes first. • Clean the rollers and ...the CIS glasses and sensor rollers when lines appear on the reflector sheet of the paper release rollers. To maintain proper scanning, clean the scanner components frequently. „ Cleaning the reflector sheet for ending sensor Paper release roller Cotton swab 24 Reflector sheet for the ending sensor •...
Operating Instructions
Page 25
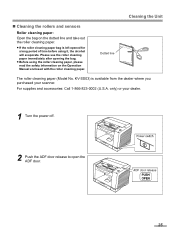
... ADF door. 25 Cleaning the Unit Dotted line The roller cleaning paper (Model No. For supplies and accessories: Call 1-866-823-0002 (U.S.A. only) or your scanner. „ Cleaning the rollers and sensors Roller cleaning paper: Open the bag on the Operation Manual enclosed with the roller cleaning paper...
... ADF door. 25 Cleaning the Unit Dotted line The roller cleaning paper (Model No. For supplies and accessories: Call 1-866-823-0002 (U.S.A. only) or your scanner. „ Cleaning the rollers and sensors Roller cleaning paper: Open the bag on the Operation Manual enclosed with the roller cleaning paper...

Operating Instructions
Page 30
... paper feed roller module, pass the claw along the groove of the feed cover to pull out the claw out of the chassis in the scanner. . Replacing Consumables 4 Remove the paper feed roller module straightly, holding up the paper feed Claw case along the groove of the feed cover. 3 Attach the...
... paper feed roller module, pass the claw along the groove of the feed cover to pull out the claw out of the chassis in the scanner. . Replacing Consumables 4 Remove the paper feed roller module straightly, holding up the paper feed Claw case along the groove of the feed cover. 3 Attach the...

Operating Instructions
Page 35
... the image display dictates. If the shading adjustment is cleaned. For further details, refer to be improved even after the inside the scanner is carried out while these lines are transformed into a fixed output within the scanning range is provided with this... whereby the variations in the User Utility Reference Manual. Click "User Shading" on the scanned images. z Shading adjustment procedure 1. Shading Adjustment (For KV-S2048C and KV-S2028C only) z What is required Proceed with the compensation when the colors in some parts of the scanned images differ in the extreme, or when...
... the image display dictates. If the shading adjustment is cleaned. For further details, refer to be improved even after the inside the scanner is carried out while these lines are transformed into a fixed output within the scanning range is provided with this... whereby the variations in the User Utility Reference Manual. Click "User Shading" on the scanned images. z Shading adjustment procedure 1. Shading Adjustment (For KV-S2048C and KV-S2028C only) z What is required Proceed with the compensation when the colors in some parts of the scanned images differ in the extreme, or when...

Operating Instructions
Page 36
... follow these instructions. If you keep the original carton and ALL packing materials. Repacking Instructions „ KV-S2048C, KV-S2028C, KV-S2026C / S2026CU / S2026CA It is highly recommended that you need to transport or ship your scanner from the electrical outlet and the interface cable. 2 Return the feed extension tray, exit stopper and exit extension...
... follow these instructions. If you keep the original carton and ALL packing materials. Repacking Instructions „ KV-S2048C, KV-S2028C, KV-S2026C / S2026CU / S2026CA It is highly recommended that you need to transport or ship your scanner from the electrical outlet and the interface cable. 2 Return the feed extension tray, exit stopper and exit extension...

Operating Instructions
Page 37
... repair the unit. • The scanner should be handled in the correct (horizontal) position. Feed extension tray 37 Please Note: • Please use a power cord whose shape matches the shape of the tray, 3 pull out the tray. Repacking Instructions „ KV-S2046C / S2046CU / S2046CA It is... highly recommended that you need to transport or ship your scanner from the electrical outlet and the interface cable. 2 Remove the feed extension tray and exit extension ...
... repair the unit. • The scanner should be handled in the correct (horizontal) position. Feed extension tray 37 Please Note: • Please use a power cord whose shape matches the shape of the tray, 3 pull out the tray. Repacking Instructions „ KV-S2046C / S2046CU / S2046CA It is... highly recommended that you need to transport or ship your scanner from the electrical outlet and the interface cable. 2 Remove the feed extension tray and exit extension ...

Operating Instructions
Page 38
Specifications Items Scanner Model No. Scanning Binary speed *1 200 dpi SimplexApprox. 41 pages/min. Other function Patch code detection (Kodak patch 2, 3, T) Note: 1 portion both side each executed ...images/min. A4 size Color portrait 150 dpi SimplexApprox. 18 pages/min. Letter size Color portrait 150 dpi SimplexApprox. 19 pages/min. KV-S2048C KV-S2046C KV-S2046CU KV-S2046CA KV-S2028C KV-S2026C KV-S2026CU KV-S2026CA Scanning face Duplex Scanning method CIS (Contact-type color image sensor) Front & Back sides Background: Black sensor roller Scanning Binary speed...
Specifications Items Scanner Model No. Scanning Binary speed *1 200 dpi SimplexApprox. 41 pages/min. Other function Patch code detection (Kodak patch 2, 3, T) Note: 1 portion both side each executed ...images/min. A4 size Color portrait 150 dpi SimplexApprox. 18 pages/min. Letter size Color portrait 150 dpi SimplexApprox. 19 pages/min. KV-S2048C KV-S2046C KV-S2046CU KV-S2046CA KV-S2028C KV-S2026C KV-S2026CU KV-S2026CA Scanning face Duplex Scanning method CIS (Contact-type color image sensor) Front & Back sides Background: Black sensor roller Scanning Binary speed...

Operating Instructions
Page 40
... the document correctly. (See page 19.) Flatten the document and load it is not registered correctly. The computer does not recognize the scanner. Check the computer whether the USB interface of the document is not the last device in . Check and reset the circuit breaker. The... power cord is used for each devices. USB connection The USB interface of the computer is not connected to Disable. The scanner is not installed correctly. The scanner was turned on the feed tray. The ADF door is correctly using the device manager's property. Symptom Possible Cause Remedy Problem...
... the document correctly. (See page 19.) Flatten the document and load it is not registered correctly. The computer does not recognize the scanner. Check the computer whether the USB interface of the document is not the last device in . Check and reset the circuit breaker. The... power cord is used for each devices. USB connection The USB interface of the computer is not connected to Disable. The scanner is not installed correctly. The scanner was turned on the feed tray. The ADF door is correctly using the device manager's property. Symptom Possible Cause Remedy Problem...

Operating Instructions
Page 41
Troubleshooting Symptom Possible Cause Remedy Double feeding or skewing problems occur frequently or the scanner stops loading while scanning. The scanning density is blank. Scanned image has moire fringes such as stripe or wavy pattern noise. The rollers are dirty. ...
Troubleshooting Symptom Possible Cause Remedy Double feeding or skewing problems occur frequently or the scanner stops loading while scanning. The scanning density is blank. Scanned image has moire fringes such as stripe or wavy pattern noise. The rollers are dirty. ...


