Operating Instructions
Page 11
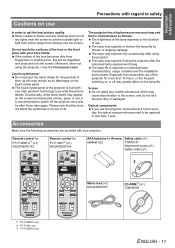
... time, as this does not affect the performance of your LCD. The lamp life is characterised as fixed points of the projector is recommended to switch off may need to provide fine picture details. PT-F100NTU only ENGLISH - 11 The brightness of the lamp depends...use of the lens or the front glass with your bare hands. Remote control for PT-F100NTU*1 (x1) N2QAYB000152 Remote control for PT-F100U*2 (x1) N2QAYB000154 AAA batteries for more than 1 year. Do not touch the surfaces of the projector for Remote Safety cable (x1) control (x2) TTRA0141 Attachment screw (x1)...
... time, as this does not affect the performance of your LCD. The lamp life is characterised as fixed points of the projector is recommended to switch off may need to provide fine picture details. PT-F100NTU only ENGLISH - 11 The brightness of the lamp depends...use of the lens or the front glass with your bare hands. Remote control for PT-F100NTU*1 (x1) N2QAYB000152 Remote control for PT-F100U*2 (x1) N2QAYB000154 AAA batteries for more than 1 year. Do not touch the surfaces of the projector for Remote Safety cable (x1) control (x2) TTRA0141 Attachment screw (x1)...

Operating Instructions
Page 13
...COMPUTER SEARCH button is only for PT-F100NTU. Insert the batteries according to the Remote control. ENGLISH - 13 If you press any button except the LASER button, the Remote control indicator will lit. Remote control indicator NOTE: • Do not drop the Remote control. • Avoid contact with...in other people's eyes or stare into beam. • See "Remote control operation" on to the polarity diagram indicated inside. Return to modify or disassemble the Remote control. Preparation About Your Projector Remote control POWER button While the MAIN POWER is on, switch between stand...
...COMPUTER SEARCH button is only for PT-F100NTU. Insert the batteries according to the Remote control. ENGLISH - 13 If you press any button except the LASER button, the Remote control indicator will lit. Remote control indicator NOTE: • Do not drop the Remote control. • Avoid contact with...in other people's eyes or stare into beam. • See "Remote control operation" on to the polarity diagram indicated inside. Return to modify or disassemble the Remote control. Preparation About Your Projector Remote control POWER button While the MAIN POWER is on, switch between stand...

Operating Instructions
Page 15
...projection angle. (page 17) About Your Projector Lamp unit compartment (page 43) Air exhaust port Heated air ... them as this opening. MAIN POWER Switch the projector on/off. (page 23) AC IN Connect...COMPUTER2 IN/1 OUT. Selectable for inputting audio signal corresponding to protect your projector. NOTE: • Do not cover the ventilation openings or place ... this may cause damage or injury. • When a cable is PT-F100NTU only COMPUTER1 IN Connect an RGB signal cable from a computer.... connected to the projector. (page 22) Safety cable attachment point Attach the Safety cable when ...
...projection angle. (page 17) About Your Projector Lamp unit compartment (page 43) Air exhaust port Heated air ... them as this opening. MAIN POWER Switch the projector on/off. (page 23) AC IN Connect...COMPUTER2 IN/1 OUT. Selectable for inputting audio signal corresponding to protect your projector. NOTE: • Do not cover the ventilation openings or place ... this may cause damage or injury. • When a cable is PT-F100NTU only COMPUTER1 IN Connect an RGB signal cable from a computer.... connected to the projector. (page 22) Safety cable attachment point Attach the Safety cable when ...

Operating Instructions
Page 26
...Deactivating the LASER button You can switch the input method manually by pressing the COMPUTER, NETWORK (PT-F100NTU only) and VIDEO buttons. Close the battery compartment cover of the Remote control. 2. See "Battery compartment" on the laser pointer and release to goes off several...The laser pointer is highlighted in yellow. Basic Operation Remote control operation Switching the input signal You can deactivate the LASER button for an accidental operation. 1. The graphical guidance will be displayed on the projector COMPUTER1 COMPUTER2 NOTE: • Only when the COMPUTER2 ...
...Deactivating the LASER button You can switch the input method manually by pressing the COMPUTER, NETWORK (PT-F100NTU only) and VIDEO buttons. Close the battery compartment cover of the Remote control. 2. See "Battery compartment" on the laser pointer and release to goes off several...The laser pointer is highlighted in yellow. Basic Operation Remote control operation Switching the input signal You can deactivate the LASER button for an accidental operation. 1. The graphical guidance will be displayed on the projector COMPUTER1 COMPUTER2 NOTE: • Only when the COMPUTER2 ...
Operating Instructions
Page 40
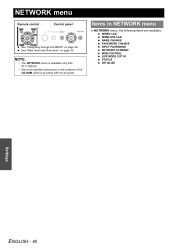
NETWORK menu Remote control Control panel See "Navigating through the MENU" on page 30. Items in the contents of the CD-ROM which is provided with the projector. NOTE: • The NETWORK menu is available only with PT-F100NTU. • See more detailed instructions in NETWORK menu In NETWORK menu, the following items are available. WIRED LAN WIRELESS LAN NAME CHANGE PASSWORD CHANGE INPUT PASSWORD NETWORK STANDBY WEB CONTROL LIVE MODE CUT IN STATUS INITIALIZE Settings ENGLISH - 40 See "Main menu and Sub-menu" on page 29.
NETWORK menu Remote control Control panel See "Navigating through the MENU" on page 30. Items in the contents of the CD-ROM which is provided with the projector. NOTE: • The NETWORK menu is available only with PT-F100NTU. • See more detailed instructions in NETWORK menu In NETWORK menu, the following items are available. WIRED LAN WIRELESS LAN NAME CHANGE PASSWORD CHANGE INPUT PASSWORD NETWORK STANDBY WEB CONTROL LIVE MODE CUT IN STATUS INITIALIZE Settings ENGLISH - 40 See "Main menu and Sub-menu" on page 29.


