Operating Instructions
Page 1
TQBJ 0208 Operating Instructions DLP® Based Projector Commercial Use PT-D10000U Models No. PT-DW10000U Read these instructions completely before operating this unit.
TQBJ 0208 Operating Instructions DLP® Based Projector Commercial Use PT-D10000U Models No. PT-DW10000U Read these instructions completely before operating this unit.

Operating Instructions
Page 2
Dear Panasonic Customer: This instruction booklet provides all the necessary operating information that you might require. Model number: PT-D10000U/PT-DW10000U Serial number: 2 - You should note it will help you to get the most performance out of your new product, and that you will be found on its back. We hope it in the space provided below and retain this booklet in case service is required. ENGLISH The serial number of your product may be pleased with your Panasonic DLP® based projector.
Dear Panasonic Customer: This instruction booklet provides all the necessary operating information that you might require. Model number: PT-D10000U/PT-DW10000U Serial number: 2 - You should note it will help you to get the most performance out of your new product, and that you will be found on its back. We hope it in the space provided below and retain this booklet in case service is required. ENGLISH The serial number of your product may be pleased with your Panasonic DLP® based projector.
Operating Instructions
Page 5
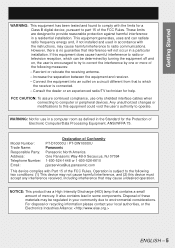
... the receiving antenna. - Model Number: Trade Name: Responsible Party: Address: Telephone Number: Email: Declaration of Conformity PT-D10000U / PT-DW10000U Panasonic Panasonic North America One Panasonic Way 4B-9 Secaucus, NJ 07094 1-800-524-1448 or 1-800-526-6610 pjscservice@us.panasonic.com This device complies with the limits for a Class B digital device, pursuant to part 15 of...
... the receiving antenna. - Model Number: Trade Name: Responsible Party: Address: Telephone Number: Email: Declaration of Conformity PT-D10000U / PT-DW10000U Panasonic Panasonic North America One Panasonic Way 4B-9 Secaucus, NJ 07094 1-800-524-1448 or 1-800-526-6610 pjscservice@us.panasonic.com This device complies with the limits for a Class B digital device, pursuant to part 15 of...
Operating Instructions
Page 20
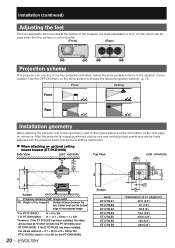
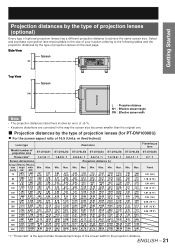
... The four adjustable feet mounted at H=SH/2 for both the PT-D10000U and PT-DW10000U. Select the most suitable scheme to SH for the PT-DW10000U. 20 - If the ET-D75LE6 has been installed, the values will be fixed at the bottom of the projector are level-adjustable (0 mm-15 mm) which can be used...-D75LE1 ET-D75LE2 ET-D75LE3 ET-D75LE4 ET-D75LE5 ET-D75LE6 ET-D75LE8 L1 254 (10˝) 175 (6.9˝) Dimension of the projected image * For PT-D10000U: H = 0 to SH For PT-DW10000U: H = -0.1 × SH to the figures below and the information on the next page for the...
... The four adjustable feet mounted at H=SH/2 for both the PT-D10000U and PT-DW10000U. Select the most suitable scheme to SH for the PT-DW10000U. 20 - If the ET-D75LE6 has been installed, the values will be fixed at the bottom of the projector are level-adjustable (0 mm-15 mm) which can be used...-D75LE1 ET-D75LE2 ET-D75LE3 ET-D75LE4 ET-D75LE5 ET-D75LE6 ET-D75LE8 L1 254 (10˝) 175 (6.9˝) Dimension of the projected image * For PT-D10000U: H = 0 to SH For PT-DW10000U: H = -0.1 × SH to the figures below and the information on the next page for the...
Operating Instructions
Page 21
... lens most suitable to the size of your location referring to the following tables and the projection distances by the type of projection lenses (for PT-DW10000U) ● For the screen aspect ratio of 16:9 (Units: m (feet/inches)) Lens type Zoom lens Fixed-focus lens Model number of optional projection lenses...
... lens most suitable to the size of your location referring to the following tables and the projection distances by the type of projection lenses (for PT-DW10000U) ● For the screen aspect ratio of 16:9 (Units: m (feet/inches)) Lens type Zoom lens Fixed-focus lens Model number of optional projection lenses...
Operating Instructions
Page 22
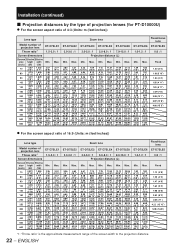
... Projection distance (L) Screen Effective Effective size height width Min. (inch) (SH) (SW) Max. Installation (continued) ■ Projection distances by the type of projection lenses (for PT-D10000U) ● For the screen aspect ratio of 4:3 (Units: m (feet/inches)) Lens type Zoom lens Fixed-focus lens Model number of projection lens Throw ratio*1 ET...
... Projection distance (L) Screen Effective Effective size height width Min. (inch) (SH) (SW) Max. Installation (continued) ■ Projection distances by the type of projection lenses (for PT-D10000U) ● For the screen aspect ratio of 4:3 (Units: m (feet/inches)) Lens type Zoom lens Fixed-focus lens Model number of projection lens Throw ratio*1 ET...
Operating Instructions
Page 23
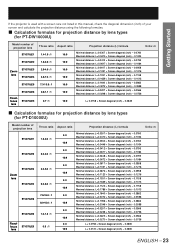
... If the projector is used with a screen size not listed in this manual, check the diagonal dimension (inch) of your screen and calculate the projection distance using the following formulas. ■ Calculation formulas for projection distance by lens types (for PT-DW10000U) Model...inch) - 0.0736 0.7 : 1 16:9 L= 0.0158 × Screen diagonal (inch) - 0.0835 ■ Calculation formulas for projection distance by lens types (for PT-D10000U) Model number of projection lens ET-D75LE1 ET-D75LE2 Zoom lens ET-D75LE3 ET-D75LE4 ET-D75LE8 ET-D75LE6 Fixedfocus lens ET-D75LE5 Throw ratio...
... If the projector is used with a screen size not listed in this manual, check the diagonal dimension (inch) of your screen and calculate the projection distance using the following formulas. ■ Calculation formulas for projection distance by lens types (for PT-DW10000U) Model...inch) - 0.0736 0.7 : 1 16:9 L= 0.0158 × Screen diagonal (inch) - 0.0835 ■ Calculation formulas for projection distance by lens types (for PT-D10000U) Model number of projection lens ET-D75LE1 ET-D75LE2 Zoom lens ET-D75LE3 ET-D75LE4 ET-D75LE8 ET-D75LE6 Fixedfocus lens ET-D75LE5 Throw ratio...
Operating Instructions
Page 27
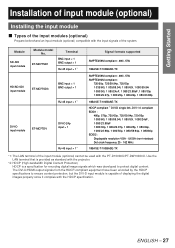
... of displaying the digital images properly since it complies with the PT-D10000U/PT-DW10000U. Getting Started Installation of input module (optional) Installing the input module ■ Types of the input modules (optional) Prepare beforehand an input module (optional) compatible with the projector. *2: HDCP (High-bandwidth Digital Content Protection) HDCP is a specification for encoding...
... of displaying the digital images properly since it complies with the PT-D10000U/PT-DW10000U. Getting Started Installation of input module (optional) Installing the input module ■ Types of the input modules (optional) Prepare beforehand an input module (optional) compatible with the projector. *2: HDCP (High-bandwidth Digital Content Protection) HDCP is a specification for encoding...
Operating Instructions
Page 30
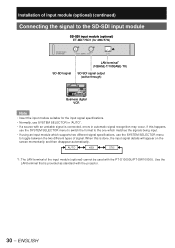
Use the LAN terminal that is provided as standard with the PT-D10000U/PT-DW10000U. ENGLISH If this is connected, errors in automatic signal recognition may occur. AUTO 480i 576i *1: The LAN terminal of the input module (optional) cannot be used with the projector. 30 - When this happens, use the SYSTEM SELECTOR menu to switch...
Use the LAN terminal that is provided as standard with the PT-D10000U/PT-DW10000U. ENGLISH If this is connected, errors in automatic signal recognition may occur. AUTO 480i 576i *1: The LAN terminal of the input module (optional) cannot be used with the projector. 30 - When this happens, use the SYSTEM SELECTOR menu to switch...
Operating Instructions
Page 31
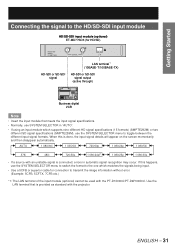
...or SD-SDI signal output (active through) Business digital VCR Note • Insert the input module that is provided as standard with the PT-D10000U/PT-DW10000U. Use the LAN terminal that meets the input signal specifications. • Normally, use the SYSTEM SELECTOR menu to transmit the image ...information without error. (Example: 5CFB, 5CFTX, 7CFB etc.) *1: The LAN terminal of the input module (optional) cannot be used with the projector. Getting Started Connecting the signal to the HD/SD-SDI input module HD/SD-SDI input module (optional) ET-MD77SD3 (for connection to toggle...
...or SD-SDI signal output (active through) Business digital VCR Note • Insert the input module that is provided as standard with the PT-D10000U/PT-DW10000U. Use the LAN terminal that meets the input signal specifications. • Normally, use the SYSTEM SELECTOR menu to transmit the image ...information without error. (Example: 5CFB, 5CFTX, 7CFB etc.) *1: The LAN terminal of the input module (optional) cannot be used with the projector. Getting Started Connecting the signal to the HD/SD-SDI input module HD/SD-SDI input module (optional) ET-MD77SD3 (for connection to toggle...
Operating Instructions
Page 32
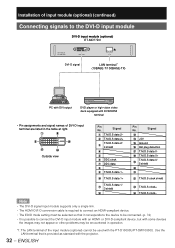
... DVI-D signal LAN terminal*1 (10BASE-T/100BASE-TX) PC with DVI output DVD player or high-vision video deck equipped with the PT-D10000U/PT-DW10000U. Use the LAN terminal that is required to connect an HDMI-compliant device. • The EDID mode setting must be ... with DVD/HDMI terminal • Pin assignments and signal names of input module (optional) (continued) Connecting signals to connect the DVI-D input module with the projector. 32 - T.M.D.S data 1+ / T.M.D.S data 1/ 3 shield 0 Pin No. Note • The DVI-D signal input module supports only a single link. •...
... DVI-D signal LAN terminal*1 (10BASE-T/100BASE-TX) PC with DVI output DVD player or high-vision video deck equipped with the PT-D10000U/PT-DW10000U. Use the LAN terminal that is required to connect an HDMI-compliant device. • The EDID mode setting must be ... with DVD/HDMI terminal • Pin assignments and signal names of input module (optional) (continued) Connecting signals to connect the DVI-D input module with the projector. 32 - T.M.D.S data 1+ / T.M.D.S data 1/ 3 shield 0 Pin No. Note • The DVI-D signal input module supports only a single link. •...
Operating Instructions
Page 38
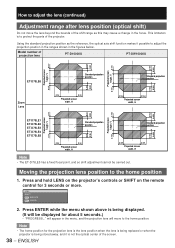
...;E X E C U T E ɹMEɹNUɹC A N C E L 2. ENGLISH Moving the projection lens position to protect the parts of projection lens PT-D10000U PT-DW10000U 0.15V 0.50V Projected screen 0.15V height, V 0.15V 0.12V 0.40V 0.12V height, V 0.12V Projected screen ET-D75LE6 Standard projection position Standard projection position 0.15V ... • The home position for the projection lens is the lens position when the lens is being replaced or when the projector is being displayed. (It will move the lens beyond the bounds of the shift range as the reference, the optical axis...
...;E X E C U T E ɹMEɹNUɹC A N C E L 2. ENGLISH Moving the projection lens position to protect the parts of projection lens PT-D10000U PT-DW10000U 0.15V 0.50V Projected screen 0.15V height, V 0.15V 0.12V 0.40V 0.12V height, V 0.12V Projected screen ET-D75LE6 Standard projection position Standard projection position 0.15V ... • The home position for the projection lens is the lens position when the lens is being replaced or when the projector is being displayed. (It will move the lens beyond the bounds of the shift range as the reference, the optical axis...
Operating Instructions
Page 45
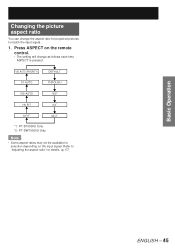
Refer to match the input signal. 1. VID AUTO (PRIORITY) S1 AUTO DEFAULT THROUGH VID AUTO 16:9*1 HV FIT 4:3*2 H FIT*2 S4:3*1 *1: PT-D10000U Only *2: PT-DW10000U Only Note • Some aspect ratios may not be available for details. (p. 57) ENGLISH - 45 Basic Operation Changing the picture aspect ratio You can change the aspect ratio for projected pictures to "Adjusting the aspect ratio" for selection depending on the remote control. • The setting will change as follows each time ASPECT is pressed. Press ASPECT on the input signal.
Refer to match the input signal. 1. VID AUTO (PRIORITY) S1 AUTO DEFAULT THROUGH VID AUTO 16:9*1 HV FIT 4:3*2 H FIT*2 S4:3*1 *1: PT-D10000U Only *2: PT-DW10000U Only Note • Some aspect ratios may not be available for details. (p. 57) ENGLISH - 45 Basic Operation Changing the picture aspect ratio You can change the aspect ratio for projected pictures to "Adjusting the aspect ratio" for selection depending on the remote control. • The setting will change as follows each time ASPECT is pressed. Press ASPECT on the input signal.
Operating Instructions
Page 47
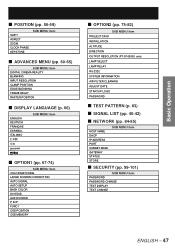
... SETUP BACK COLOR DVI EDID AUX DVI EDID P IN P FUNC1 OSD POSITION OSD MEMORY ■ OPTION2 (pp. 75-82) SUB MENU item PROJECTOR ID INSTALLATION ALTITUDE DIRECTION OUTPUT RESOLUTION (PT-D10000U only) LAMP SELECT LAMP RELAY RS-232C SYSTEM INFORMATION AIR FILTER CLEANING ADJUST DATE STARTUP LOGO PASSWORD ■ TEST PATTERN (p. 83) ■...
... SETUP BACK COLOR DVI EDID AUX DVI EDID P IN P FUNC1 OSD POSITION OSD MEMORY ■ OPTION2 (pp. 75-82) SUB MENU item PROJECTOR ID INSTALLATION ALTITUDE DIRECTION OUTPUT RESOLUTION (PT-D10000U only) LAMP SELECT LAMP RELAY RS-232C SYSTEM INFORMATION AIR FILTER CLEANING ADJUST DATE STARTUP LOGO PASSWORD ■ TEST PATTERN (p. 83) ■...
Operating Instructions
Page 57
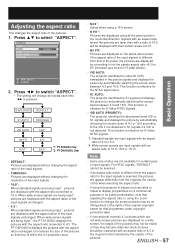
...is not detected. Press ▲▼ to the VID if it into the panels aspect ratio (4:3 for PT-D10000U and 16:9 for PT-DW10000U). • VID AUTO: The projector identifies the video ID (VID) embedded in the picture signals and displays the picture by automatically choosing the ... 16:9, 15:9 or 15:10. VID AUTO (PRIORITY) DEFAULT S1 AUTO THROUGH VID AUTO 16:9*1 HV FIT H FIT*2 4:3*2 S4:3*1 *1: PT-D10000U Only *2: PT-DW10000U Only • DEFAULT: Pictures are displayed without changing the aspect ratio of the input signals. • THROUGH: Pictures are displayed without changing...
...is not detected. Press ▲▼ to the VID if it into the panels aspect ratio (4:3 for PT-D10000U and 16:9 for PT-DW10000U). • VID AUTO: The projector identifies the video ID (VID) embedded in the picture signals and displays the picture by automatically choosing the ... 16:9, 15:9 or 15:10. VID AUTO (PRIORITY) DEFAULT S1 AUTO THROUGH VID AUTO 16:9*1 HV FIT H FIT*2 4:3*2 S4:3*1 *1: PT-D10000U Only *2: PT-DW10000U Only • DEFAULT: Pictures are displayed without changing the aspect ratio of the input signals. • THROUGH: Pictures are displayed without changing...
Operating Instructions
Page 61
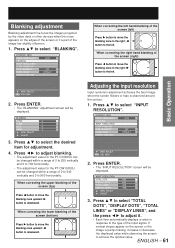
...TOTAL DOTS DISPLAY DOTS TOTAL LINES DISPLAY LINES MENU SELECT ADJUST 1344 1024 809 768 3. Press ▲▼ to select the desired item for the PT-DW10000U can be changed within a range of the screen (bottom) Press ► button to move the blanking zone to the right; ◄ button... to adjust blanking. • The adjustment value for the PT-D10000U can be displayed. If vertical stripes appear on the edges of the screen or if a part of the screen (left . Press ▲▼ to ...
...TOTAL DOTS DISPLAY DOTS TOTAL LINES DISPLAY LINES MENU SELECT ADJUST 1344 1024 809 768 3. Press ▲▼ to select the desired item for the PT-DW10000U can be changed within a range of the screen (bottom) Press ► button to move the blanking zone to the right; ◄ button... to adjust blanking. • The adjustment value for the PT-D10000U can be displayed. If vertical stripes appear on the edges of the screen or if a part of the screen (left . Press ▲▼ to ...
Operating Instructions
Page 65
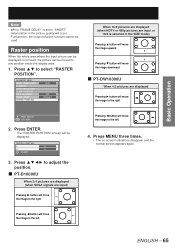
... When 4:3 pictures are displayed Pressing ► button will move the image to the right. Press to adjust the position. ■ PT-D10000U When 5:4 pictures are displayed (when SXGA signals are input or 16:9 is set to the left . ENGLISH - 65 Press ENTER. • The "RASTER POSITION" screen will be used , the picture can...
... When 4:3 pictures are displayed Pressing ► button will move the image to the right. Press to adjust the position. ■ PT-D10000U When 5:4 pictures are displayed (when SXGA signals are input or 16:9 is set to the left . ENGLISH - 65 Press ENTER. • The "RASTER POSITION" screen will be used , the picture can...
Operating Instructions
Page 77
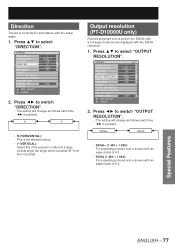
...is the standard setup. • V (VERTICAL): Select this if the projector is tilted at a large vertical angle (an angle which exceeds 30° from the horizontal). Output resolution (PT-D10000U only) Pictures projected onto a screen (for SXGA) with a 5:4 aspect ratio can be displayed with the setup angle.... 1. OPTION2 PROJECTOR ID INSTALLATION ALTITUDE DIRECTION OUTPUT RESOLUTION LAMP SELECT LAMP RELAY RS...
...is the standard setup. • V (VERTICAL): Select this if the projector is tilted at a large vertical angle (an angle which exceeds 30° from the horizontal). Output resolution (PT-D10000U only) Pictures projected onto a screen (for SXGA) with a 5:4 aspect ratio can be displayed with the setup angle.... 1. OPTION2 PROJECTOR ID INSTALLATION ALTITUDE DIRECTION OUTPUT RESOLUTION LAMP SELECT LAMP RELAY RS...
Operating Instructions
Page 116
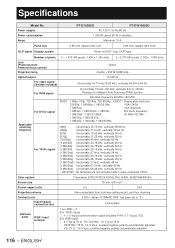
Power supply Power consumption Amps PT-D10000U PT-DW10000U AC 120 V, 50 Hz/60 Hz 1 500 W (about 25 W in standby) Maximum 15 A Panel size 0.95 inch (aspect ratio 4:3) 0.95 inch (aspect ratio 16:9) DLP® panel Display system Three-unit DLP® chip, DLP® type Number of pixels 3 × 1 470 000 pixels ...kHz/15.63 kHz, vertically 59.94 Hz/50 Hz For RGB signal Horizontally 15 kHz-100 kHz, vertically 24 Hz-120 Hz, Panasonic Intelligent Auto Scanning (PIAS) system Dot clock frequency 20 MHz-162 MHz For DVI-D signal Applicable scanning frequency For YPBPR signal EDID1 1...
Power supply Power consumption Amps PT-D10000U PT-DW10000U AC 120 V, 50 Hz/60 Hz 1 500 W (about 25 W in standby) Maximum 15 A Panel size 0.95 inch (aspect ratio 4:3) 0.95 inch (aspect ratio 16:9) DLP® panel Display system Three-unit DLP® chip, DLP® type Number of pixels 3 × 1 470 000 pixels ...kHz/15.63 kHz, vertically 59.94 Hz/50 Hz For RGB signal Horizontally 15 kHz-100 kHz, vertically 24 Hz-120 Hz, Panasonic Intelligent Auto Scanning (PIAS) system Dot clock frequency 20 MHz-162 MHz For DVI-D signal Applicable scanning frequency For YPBPR signal EDID1 1...
Operating Instructions
Page 117
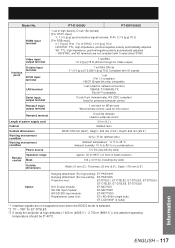
... the EDID2 mode is selected. *2 70˝ - 300˝ for ET-D75LE5 *3 If using the projector at high altitudes (1 400 m (4605.3´) - 2 700 m (8881.5´)), the ambient operating temperature should be 0°-40°C. RGB2 input terminal PT-D10000U PT-DW10000U 1 set of beam receiver) 134 g (0.31 lb) (including dry cells) Width: 51 mm...
... the EDID2 mode is selected. *2 70˝ - 300˝ for ET-D75LE5 *3 If using the projector at high altitudes (1 400 m (4605.3´) - 2 700 m (8881.5´)), the ambient operating temperature should be 0°-40°C. RGB2 input terminal PT-D10000U PT-DW10000U 1 set of beam receiver) 134 g (0.31 lb) (including dry cells) Width: 51 mm...


