
User Manual
Page 1
BT-LH1710E Before operating this product, please read the instructions carefully and save this manual for future use. BT-LH1710P Model No. Operating Instructions LCD Video Monitor Model No. BT-LH1760P Model No. BT-LH1760E Model No. F1008T0 -P D Printed in Japan ENGLISH VQT1Z04
BT-LH1710E Before operating this product, please read the instructions carefully and save this manual for future use. BT-LH1710P Model No. Operating Instructions LCD Video Monitor Model No. BT-LH1760P Model No. BT-LH1760E Model No. F1008T0 -P D Printed in Japan ENGLISH VQT1Z04

User Manual
Page 5
...ensure that it upright. ONLY This appliance is equipped with a screwdriver. 2. Check for BT-LH1760E/1710E) (continued) Operating precaution Operation near any appliance which generates strong magnetic fields may... can be the case, deal with a moulded three pin mains plug for your local Panasonic Dealer. Replace the fuse. Open the fuse compartment with 2 types of AC mains cable...it. This product is supplied with the situation by grabbing the panel. FOR CONTINENTAL EUROPE, ETC. Exposing the LCD panel to replace the fuse 1. Do not place the monitor face down ...
...ensure that it upright. ONLY This appliance is equipped with a screwdriver. 2. Check for BT-LH1760E/1710E) (continued) Operating precaution Operation near any appliance which generates strong magnetic fields may... can be the case, deal with a moulded three pin mains plug for your local Panasonic Dealer. Replace the fuse. Open the fuse compartment with 2 types of AC mains cable...it. This product is supplied with the situation by grabbing the panel. FOR CONTINENTAL EUROPE, ETC. Exposing the LCD panel to replace the fuse 1. Do not place the monitor face down ...

User Manual
Page 6
...first 2 Transportation precautions 5 Precautions for Use 6 Standard accessories 6 Optional units 6 Outline 7 Dimensions 7 Controls and Their Functions 8 Video monitor unit 8 Front panel 9 Rear panel 10 Power Supply 11 How to Use the On Screen Menu 12 User Data 16 Main Menu 17...page 40) Wall Mount Adaptor BT-WMA17G (Leave installation of the wall mount adaptor to authorized personnel.) Protection Panel BT-PRP17G (Refer to the installation instructions in ). (However, such images can be provided around the unit. • Exposing the LCD screen to consult with ambient ...
...first 2 Transportation precautions 5 Precautions for Use 6 Standard accessories 6 Optional units 6 Outline 7 Dimensions 7 Controls and Their Functions 8 Video monitor unit 8 Front panel 9 Rear panel 10 Power Supply 11 How to Use the On Screen Menu 12 User Data 16 Main Menu 17...page 40) Wall Mount Adaptor BT-WMA17G (Leave installation of the wall mount adaptor to authorized personnel.) Protection Panel BT-PRP17G (Refer to the installation instructions in ). (However, such images can be provided around the unit. • Exposing the LCD screen to consult with ambient ...

User Manual
Page 7
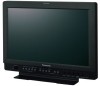
...the original corresponds to one place permanently, we recommend that is equipped with a high performance 17.0-inch wide LCD display panel. ■ High performance LCD panel This monitor achieves outstanding color reproduction, a wide viewing angle, and high-speed response. Dimensions Unit: mm (inches)...8226; Split-screen function You can select between parallel remote control (GPI) and serial remote control (RS232C). Outline The BT-LH1760/1710 LCD monitor was designed especially for SDI input) of input signals. • Cross hatch overlay function Displays markers at regular vertical ...
...the original corresponds to one place permanently, we recommend that is equipped with a high performance 17.0-inch wide LCD display panel. ■ High performance LCD panel This monitor achieves outstanding color reproduction, a wide viewing angle, and high-speed response. Dimensions Unit: mm (inches)...8226; Split-screen function You can select between parallel remote control (GPI) and serial remote control (RS232C). Outline The BT-LH1760/1710 LCD monitor was designed especially for SDI input) of input signals. • Cross hatch overlay function Displays markers at regular vertical ...

User Manual
Page 17
... LOCAL ENABLE VECTOR MODE VECTOR SCALE TIME CODE *[WHITE BALANCE VAR1-3] GAIN GREEN GAIN BLUE BIAS RED OPERATION LCD MODE SELECT CLOSED CAPTION MODE SELECT BIAS GREEN BIAS BLUE RESET *1 Only displayed on the BT-LH1760. 17 DVI-D AUTOSETUP H POSITION GPI2 GPI3 GPI4 GPI5 GPI6 GPI7 GPI8 INPUT SELECT V POSITION EMBEDDED SELECT...
... LOCAL ENABLE VECTOR MODE VECTOR SCALE TIME CODE *[WHITE BALANCE VAR1-3] GAIN GREEN GAIN BLUE BIAS RED OPERATION LCD MODE SELECT CLOSED CAPTION MODE SELECT BIAS GREEN BIAS BLUE RESET *1 Only displayed on the BT-LH1760. 17 DVI-D AUTOSETUP H POSITION GPI2 GPI3 GPI4 GPI5 GPI6 GPI7 GPI8 INPUT SELECT V POSITION EMBEDDED SELECT...

User Manual
Page 22
... return the backlight to 5 sets of the images for both input signals and places them side by side. Positions the on the BT-LH1760. 22 Loads saved factory defaults (FACTORY) or user data (USER1 - Starts in the mode used when the power is an ITU...USER5" are The U.S.A. Main Menu (continued) SYSTEM CONFIG Underlined values indicate factory defaults. Center of the LCD panel.*3 Double speed (120 Hz/100 Hz) Standard speed (60 Hz/50 Hz) *1 When the monitor is reduced by ambient conditions. After loading user data, the screen displays the signal selected before user data...
... return the backlight to 5 sets of the images for both input signals and places them side by side. Positions the on the BT-LH1760. 22 Loads saved factory defaults (FACTORY) or user data (USER1 - Starts in the mode used when the power is an ITU...USER5" are The U.S.A. Main Menu (continued) SYSTEM CONFIG Underlined values indicate factory defaults. Center of the LCD panel.*3 Double speed (120 Hz/100 Hz) Standard speed (60 Hz/50 Hz) *1 When the monitor is reduced by ambient conditions. After loading user data, the screen displays the signal selected before user data...

User Manual
Page 34
... knob is disabled when the lock is engaged. Main Menu (continued) CONTROL Sub menu CONTROL Settings LOCAL REMOTE LOCAL ENABLE*2 DISABLE. HOURMETER Sub menu OPERATION LCD Settings XXXXXXH*3 XXXXXXH*3 Underlined values indicate factory defaults.
... knob is disabled when the lock is engaged. Main Menu (continued) CONTROL Sub menu CONTROL Settings LOCAL REMOTE LOCAL ENABLE*2 DISABLE. HOURMETER Sub menu OPERATION LCD Settings XXXXXXH*3 XXXXXXH*3 Underlined values indicate factory defaults.

User Manual
Page 40
... to gradual loss of performance that could eventually result in the LCD panel is a consumable component that replaces parts when they break .... Necessity of periodic maintenance service The backlight in a malfunction. Use the supplied screws to keep the monitor in a standard 19inch rack (7U size height). Rear Stand Base Screws Screw Rack mount adaptor Maintenance...maintenance inspections to enable mounting it . 1. How to Attach the Rack Mount The monitor can be combined with an optional BT-MA1710G rack mount adaptor to enable long-term, full use of all its functions....
... to gradual loss of performance that could eventually result in the LCD panel is a consumable component that replaces parts when they break .... Necessity of periodic maintenance service The backlight in a malfunction. Use the supplied screws to keep the monitor in a standard 19inch rack (7U size height). Rear Stand Base Screws Screw Rack mount adaptor Maintenance...maintenance inspections to enable mounting it . 1. How to Attach the Rack Mount The monitor can be combined with an optional BT-MA1710G rack mount adaptor to enable long-term, full use of all its functions....