Installation Guide
Page 1
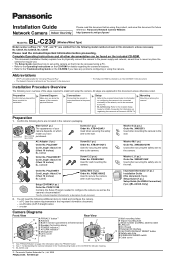
...Camera Indicators in the camera's packaging. PQME10080Z Used to as well how to mount or place the camera for indicator meaning. *3 BL-C230A only © Panasonic System Networks Co., Ltd. 2009 PNQX2272ZA KK1009CQ0 Washer S (2 pcs.) Order No. a router Camera Diagrams Front View Rear View... See "PRIVACY Button" on page 4 for securing the safety wire to the Troubleshooting Guide on the CD-ROM for installation. Washer M (1 pc.) Order No. BL-C230A, BL-C230CE, BL-C230E Please read this document for "Universal Plug and Play". • The Network Camera is referred to secure the ...
...Camera Indicators in the camera's packaging. PQME10080Z Used to as well how to mount or place the camera for indicator meaning. *3 BL-C230A only © Panasonic System Networks Co., Ltd. 2009 PNQX2272ZA KK1009CQ0 Washer S (2 pcs.) Order No. a router Camera Diagrams Front View Rear View... See "PRIVACY Button" on page 4 for securing the safety wire to the Troubleshooting Guide on the CD-ROM for installation. Washer M (1 pc.) Order No. BL-C230A, BL-C230CE, BL-C230E Please read this document for "Universal Plug and Play". • The Network Camera is referred to secure the ...
Installation Guide
Page 4
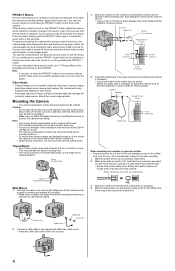
... thread of 6 mm (1/4 inch) or more information about privacy mode, see 7.6 Privacy Mode in the Operating Instructions on this document depict the BL-C230A. Once privacy mode is perpendicular to direct sunlight or halogen light may fall and be mounted depending on the front of the camera platform. Other... the floor. Drive the screws into a soft material. This may become detached, it is secure. • Leave 2 mm (1/16 inch) of the installation area must be at least 294 N (30 kgf) per screw. • The camera is activated. Remove the cable cover, secure the safety wire to...
... thread of 6 mm (1/4 inch) or more information about privacy mode, see 7.6 Privacy Mode in the Operating Instructions on this document depict the BL-C230A. Once privacy mode is perpendicular to direct sunlight or halogen light may fall and be mounted depending on the front of the camera platform. Other... the floor. Drive the screws into a soft material. This may become detached, it is secure. • Leave 2 mm (1/16 inch) of the installation area must be at least 294 N (30 kgf) per screw. • The camera is activated. Remove the cable cover, secure the safety wire to...


