
Operating Instructions
Page 55
Turning off the camera. - Saving the Date and Time page. - Restarting, updating firmware or resetting the camera to factory default. 4. Operating Instructions 55 The following operations also delete buffered images for all triggers. - Click [Delete Buffered Images]. 2.7 Deleting Buffered Images Note • • When restarting the camera (see Page 123), buffered images for all triggers are deleted.
Turning off the camera. - Saving the Date and Time page. - Restarting, updating firmware or resetting the camera to factory default. 4. Operating Instructions 55 The following operations also delete buffered images for all triggers. - Click [Delete Buffered Images]. 2.7 Deleting Buffered Images Note • • When restarting the camera (see Page 123), buffered images for all triggers are deleted.
Operating Instructions
Page 126
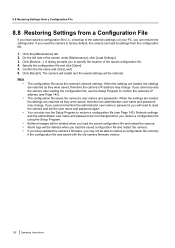
...name or password, you restore a configuration file using the Setup Program. Network settings and the administrator user name and password are not changed when you will be able to reset the camera and set the user name and password again. Alarm logs will need to...• • • • • The configuration file saves the camera's network settings. If you reset the camera to confirm the camera's IP address (see Page 143). You can also use the Setup Program to factory default, the camera can restore the settings later. Confirm the file name and click [Load]. 6. ...
...name or password, you restore a configuration file using the Setup Program. Network settings and the administrator user name and password are not changed when you will be able to reset the camera and set the user name and password again. Alarm logs will need to...• • • • • The configuration file saves the camera's network settings. If you reset the camera to confirm the camera's IP address (see Page 143). You can also use the Setup Program to factory default, the camera can restore the settings later. Confirm the file name and click [Load]. 6. ...

Operating Instructions
Page 127
... then turns off for a list of the screen under [Maintenance], click [Reset To Factory Default]. 3. All buffered images - When the camera is reset, the following information will be deleted: - All camera settings (including the user name, password, IP address, subnet mask etc.) The network connection mode changes to AM/PM mode. Change the setting if necessary...
... then turns off for a list of the screen under [Maintenance], click [Reset To Factory Default]. 3. All buffered images - When the camera is reset, the following information will be deleted: - All camera settings (including the user name, password, IP address, subnet mask etc.) The network connection mode changes to AM/PM mode. Change the setting if necessary...

Operating Instructions
Page 128
8.9 Resetting the Camera Resetting the camera using the FACTORY DEFAULT RESET button You can also reset all of the camera's settings to reset it. FACTORY DEFAULT RESET 128 Operating Instructions The camera must be turned on in order to their factory default settings by pressing the FACTORY DEFAULT RESET button for about one second with a pointed object.
8.9 Resetting the Camera Resetting the camera using the FACTORY DEFAULT RESET button You can also reset all of the camera's settings to reset it. FACTORY DEFAULT RESET 128 Operating Instructions The camera must be turned on in order to their factory default settings by pressing the FACTORY DEFAULT RESET button for about one second with a pointed object.
Operating Instructions
Page 143
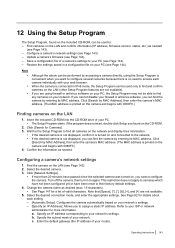
... accessing a camera directly, using firewall or antivirus software on your network's settings. - [Specify an IP Address]: Allows you cannot configure the camera. Click [Search for more than 20 minutes have been reset to their information. • If the desired camera is connected in...See Page 147 for a list of a camera's settings to access each setting. - [Automatic Setup]: Configures the camera automatically based on the network and display their factory default settings. 4. See Page 82 for the Setup Program to find and confirm cameras on your router). b. c. If you ...
... accessing a camera directly, using firewall or antivirus software on your network's settings. - [Specify an IP Address]: Allows you cannot configure the camera. Click [Search for more than 20 minutes have been reset to their information. • If the desired camera is connected in...See Page 147 for a list of a camera's settings to access each setting. - [Automatic Setup]: Configures the camera automatically based on the network and display their factory default settings. 4. See Page 82 for the Setup Program to find and confirm cameras on your router). b. c. If you ...
Installation Guide
Page 2
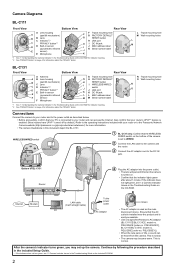
...Panasonic Network Camera website (http://panasonic.co.jp/pcc/products/en/netwkcam/) for information about the PRIVACY button. Continue by default.) Refer to the power outlet as the main disconnect device. L Tripod mounting hole M Wall mounting holes L M BL-C131 Front View Bottom View A Antenna A B Lens housing B (pan...mounting hole G H FACTORY DEFAULT H RESET button I I J MAC address label K Serial number label J K *1 See 1.1 Understanding the Camera Indicator in this document depict the BL-C131. If the indicator does not light green, see 1.2 Camera Indicator Issues in the...
...Panasonic Network Camera website (http://panasonic.co.jp/pcc/products/en/netwkcam/) for information about the PRIVACY button. Continue by default.) Refer to the power outlet as the main disconnect device. L Tripod mounting hole M Wall mounting holes L M BL-C131 Front View Bottom View A Antenna A B Lens housing B (pan...mounting hole G H FACTORY DEFAULT H RESET button I I J MAC address label K Serial number label J K *1 See 1.1 Understanding the Camera Indicator in this document depict the BL-C131. If the indicator does not light green, see 1.2 Camera Indicator Issues in the...
Setup Guide
Page 1
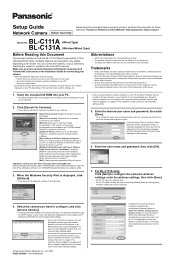
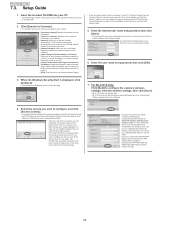
... with your wireless router, and to your camera. • Before following the instructions in part on the work of their factory default settings. © Panasonic System Networks Co., Ltd. 2006 PQQX15698XA KK1106MH2020 • Configure the camera for wireless access by checking the model no...on and connected to reset the camera and configure it on the CD-ROM. 2. Panasonic Network Camera Website: http://panasonic.net/pcc/ipcam/ BL-C111A Model No. (Wired Type) BL-C131A (Wireless/Wired Type) Before Reading this step. • BL-C131A users can distinguish cameras by model number, ...
... with your wireless router, and to your camera. • Before following the instructions in part on the work of their factory default settings. © Panasonic System Networks Co., Ltd. 2006 PQQX15698XA KK1106MH2020 • Configure the camera for wireless access by checking the model no...on and connected to reset the camera and configure it on the CD-ROM. 2. Panasonic Network Camera Website: http://panasonic.net/pcc/ipcam/ BL-C111A Model No. (Wired Type) BL-C131A (Wireless/Wired Type) Before Reading this step. • BL-C131A users can distinguish cameras by model number, ...

Service Manual
Page 2
...Replaced and a New MAC Address Label Is Used 37 8.13. How To Change MAC Address Label 38 8.16. Resetting the Camera Using the FACTORY DEFAULT RESET Button 50 12 Block Diagram 51 13 Schematic Diagram 52 13.1. Main Board (Component View 65 14.2. I /O Board...Lens Board (Bottom View 67 14.5. Replacement Parts List (BL-C111A 76 16.6. Setup Guide 22 8 Troubleshooting Guide 24 8.1. Camera Block Check 30 8.5. Cabinet and Electrical Parts Location(BLC111A 72 16.2. Battery Caution 3 1.2. Resetting the Camera 50 11.2. Sub Board (Component View 70 PAGE 14.8....
...Replaced and a New MAC Address Label Is Used 37 8.13. How To Change MAC Address Label 38 8.16. Resetting the Camera Using the FACTORY DEFAULT RESET Button 50 12 Block Diagram 51 13 Schematic Diagram 52 13.1. Main Board (Component View 65 14.2. I /O Board...Lens Board (Bottom View 67 14.5. Replacement Parts List (BL-C111A 76 16.6. Setup Guide 22 8 Troubleshooting Guide 24 8.1. Camera Block Check 30 8.5. Cabinet and Electrical Parts Location(BLC111A 72 16.2. Battery Caution 3 1.2. Resetting the Camera 50 11.2. Sub Board (Component View 70 PAGE 14.8....

Service Manual
Page 10
BL-C111A /BL-C131A 4 Technical Descriptions 4.1. Main Board 4.1.1. RESET IC (IC106) Reset ... emits about 150ms reset pulse after detecting 2.9V. Version up , it distributes the data to a factory-shipments state, when you push. GPI0 • Motor (PAN/TILT) Operation &#...8226; Clear Setting SW • Privacy Mode SW • I2C • LED • Pyroelectric Infrared Sensor 10 CPU Block CPU (IC101) Operating Power Supply: 3.3V (for I /F. Clear Setting Button (SW802) Outline of Operation: It is possible to bring back the setting value of a Network Camera...
BL-C111A /BL-C131A 4 Technical Descriptions 4.1. Main Board 4.1.1. RESET IC (IC106) Reset ... emits about 150ms reset pulse after detecting 2.9V. Version up , it distributes the data to a factory-shipments state, when you push. GPI0 • Motor (PAN/TILT) Operation &#...8226; Clear Setting SW • Privacy Mode SW • I2C • LED • Pyroelectric Infrared Sensor 10 CPU Block CPU (IC101) Operating Power Supply: 3.3V (for I /F. Clear Setting Button (SW802) Outline of Operation: It is possible to bring back the setting value of a Network Camera...
Service Manual
Page 22
... wireless settings, then click [Save]. • BL-C111A users can skip this program]: Displays the program's version information. • [Search for wireless access by MAC address (see "Camera Diagrams" on the CD-ROM; Insert the included CD-ROM into your network. • [Manual]: Allows you have a Panasonic BB-HGW700A Network Camera Control Unit, WEP settings will not...
... wireless settings, then click [Save]. • BL-C111A users can skip this program]: Displays the program's version information. • [Search for wireless access by MAC address (see "Camera Diagrams" on the CD-ROM; Insert the included CD-ROM into your network. • [Manual]: Allows you have a Panasonic BB-HGW700A Network Camera Control Unit, WEP settings will not...
Service Manual
Page 37
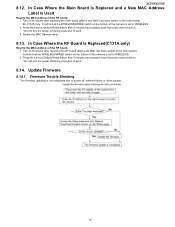
...C131A only) Rewrite the MAC Address of the RF board 1. BL-C111A/BL-C131A 8.12. Press the Factory Default Reset button after 5 minutes have passed since the power was turned on the bottom of work . 3. Update Firmware 8.14.1. BL-C131A only : Confirm that the WIRELESS/WIRED switch on . *...camera is set to the main board). Firmware Trouble Shouting The firmware updating is set to the main board). Confirm that the WIRELESS/WIRED switch on the power after replacing the RF board (after a new MAC has been written to WIRELESS. 2. Turn on . * Do not turn the power off , network...
...C131A only) Rewrite the MAC Address of the RF board 1. BL-C111A/BL-C131A 8.12. Press the Factory Default Reset button after 5 minutes have passed since the power was turned on the bottom of work . 3. Update Firmware 8.14.1. BL-C131A only : Confirm that the WIRELESS/WIRED switch on . *...camera is set to the main board). Firmware Trouble Shouting The firmware updating is set to the main board). Confirm that the WIRELESS/WIRED switch on the power after replacing the RF board (after a new MAC has been written to WIRELESS. 2. Turn on . * Do not turn the power off , network...
Service Manual
Page 50
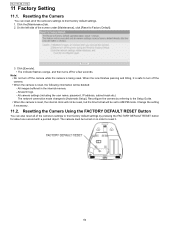
... internal memory - Resetting the Camera You can also reset all of the camera's settings to their factory default settings. 1. When the lens finishes panning and tilting, it . 50 Reconfigure the camera by pressing the FACTORY DEFAULT RESET button for a few seconds. BL-C111A /BL-C131A 11 Factory Setting 11.1. Resetting the Camera Using the FACTORY DEFAULT RESET Button You can reset all of the camera's settings to reset it is...
... internal memory - Resetting the Camera You can also reset all of the camera's settings to their factory default settings. 1. When the lens finishes panning and tilting, it . 50 Reconfigure the camera by pressing the FACTORY DEFAULT RESET button for a few seconds. BL-C111A /BL-C131A 11 Factory Setting 11.1. Resetting the Camera Using the FACTORY DEFAULT RESET Button You can reset all of the camera's settings to reset it is...
