
Operating Instructions
Page 25
...25 When [16 Screens] is determined on network conditions, PC performance, the number of people accessing the cameras, and the type of bandwidth are not ... other cameras. *3 If the camera does not support pan and tilt features, this camera using the HTTP protocol. This setting is selected as the number of the camera image to...cameras depend on the multi camera page are not available and their global IP addresses. Note • • • • • • If a camera configured for [Refresh Rate] and [Resolution] that camera. The default settings for the multi camera...
...25 When [16 Screens] is determined on network conditions, PC performance, the number of people accessing the cameras, and the type of bandwidth are not ... other cameras. *3 If the camera does not support pan and tilt features, this camera using the HTTP protocol. This setting is selected as the number of the camera image to...cameras depend on the multi camera page are not available and their global IP addresses. Note • • • • • • If a camera configured for [Refresh Rate] and [Resolution] that camera. The default settings for the multi camera...
Operating Instructions
Page 70
... registered with a Dynamic DNS service, configure the camera to the Viewnetcam.com website at http:// www.viewnetcam.com.) 3. If your router supports UPnP™, this can be turned off by default) or for use that is designed for information ...on setting port forwarding. 2. After you a dynamic global IP address, register with a Dynamic DNS service. We recommend using Viewnetcam.com, a Dynamic DNS service that service. 70 Operating Instructions Refer to the operating instructions included with Panasonic Network Cameras...
... registered with a Dynamic DNS service, configure the camera to the Viewnetcam.com website at http:// www.viewnetcam.com.) 3. If your router supports UPnP™, this can be turned off by default) or for use that is designed for information ...on setting port forwarding. 2. After you a dynamic global IP address, register with a Dynamic DNS service. We recommend using Viewnetcam.com, a Dynamic DNS service that service. 70 Operating Instructions Refer to the operating instructions included with Panasonic Network Cameras...

Operating Instructions
Page 83
...port numbers are connecting multiple cameras and plan on the CD-ROM. 2. We recommend using port 80. Under [Network Configuration from the Internet using port numbers in the 50000-50050 range. 3. Enter the IP address to be assigned to the camera. • The default port number is 80, ...however, note that some ISPs do not allow Internet access to the cameras, assign a different port...
...port numbers are connecting multiple cameras and plan on the CD-ROM. 2. We recommend using port 80. Under [Network Configuration from the Internet using port numbers in the 50000-50050 range. 3. Enter the IP address to be assigned to the camera. • The default port number is 80, ...however, note that some ISPs do not allow Internet access to the cameras, assign a different port...
Operating Instructions
Page 84
You can be selected. 9. Under [DNS], enter the IP addresses of your router or the default gateway IP address provided by your router's address is effective for both IPv4 and IPv6 connections. • BL-C131A only: If using the camera in wireless mode, [Auto Negotiation] must be confirmed on the...file sizes; For example, if your ISP or network administrator. 6. Under [Default Gateway], enter the IP address of the primary and secondary DNS servers provided by your router or PC. Click [Save]. 10. Note • • To access the camera again, use . • This setting is ...
You can be selected. 9. Under [DNS], enter the IP addresses of your router or the default gateway IP address provided by your router's address is effective for both IPv4 and IPv6 connections. • BL-C131A only: If using the camera in wireless mode, [Auto Negotiation] must be confirmed on the...file sizes; For example, if your ISP or network administrator. 6. Under [Default Gateway], enter the IP address of the primary and secondary DNS servers provided by your router or PC. Click [Save]. 10. Note • • To access the camera again, use . • This setting is ...
Operating Instructions
Page 86
... usually leave this setting at [Auto Negotiation]. • This setting is effective for both IPv4 and IPv6 connections. • BL-C131A only: If using the camera in wireless mode, [Auto Negotiation] must be confirmed on image quality, image brightness, etc. - 192 ´ 144:...find the camera's new IP address (see Page 119). 86 Operating Instructions Under [Default Gateway], enter the default gateway IP address if required by your ISP or network administrator. • This field can normally be left empty. 5. Under [Max. 5.1.1 Network (IPv4) Settings • If the camera is ...
... usually leave this setting at [Auto Negotiation]. • This setting is effective for both IPv4 and IPv6 connections. • BL-C131A only: If using the camera in wireless mode, [Auto Negotiation] must be confirmed on image quality, image brightness, etc. - 192 ´ 144:...find the camera's new IP address (see Page 119). 86 Operating Instructions Under [Default Gateway], enter the default gateway IP address if required by your ISP or network administrator. • This field can normally be left empty. 5. Under [Max. 5.1.1 Network (IPv4) Settings • If the camera is ...
Operating Instructions
Page 126
...left side of the camera's settings) on your PC, you reset the camera to factory default, the camera can restore the settings later. Click [Browse...]. Alarm logs will be able to restore a configuration file correctly if the configuration file was saved with the old camera firmware version. 126... restore a configuration file (see Page 143). Click [Restart]. You can also use the Setup Program to confirm the camera's IP address (see Page 143). Network settings and the administrator user name and password are not changed when you to specify the location of the saved configuration ...
...left side of the camera's settings) on your PC, you reset the camera to factory default, the camera can restore the settings later. Click [Browse...]. Alarm logs will be able to restore a configuration file correctly if the configuration file was saved with the old camera firmware version. 126... restore a configuration file (see Page 143). Click [Restart]. You can also use the Setup Program to confirm the camera's IP address (see Page 143). Network settings and the administrator user name and password are not changed when you to specify the location of the saved configuration ...

Operating Instructions
Page 127
..., IP address, subnet mask etc.) The network connection mode changes to the [Setup Guide]. Change the setting if necessary (see Page 95). Operating Instructions 127 Click the [Maintenance] tab. 2. When the camera is reset, the following information will be deleted: - When the lens finishes panning and tilting, it is safe to their factory default settings...
..., IP address, subnet mask etc.) The network connection mode changes to the [Setup Guide]. Change the setting if necessary (see Page 95). Operating Instructions 127 Click the [Maintenance] tab. 2. When the camera is reset, the following information will be deleted: - When the lens finishes panning and tilting, it is safe to their factory default settings...

Operating Instructions
Page 134
...allow the camera to the camera. • Ask your ISP or network administrator about which port numbers are estimated file sizes; When the [New settings are saved.] message is 80, however, note that these are available for both IPv4 and IPv6 connections. • BL-C131A only...over the Internet. 2. Ask your ISP or network administrator for both IPv4 and IPv6 connections. • Refer to the camera. • The default port number is displayed, click [Restart]. 134 Operating Instructions Under [Default Gateway], enter the IP address of the primary and secondary DNS servers ...
...allow the camera to the camera. • Ask your ISP or network administrator about which port numbers are estimated file sizes; When the [New settings are saved.] message is 80, however, note that these are available for both IPv4 and IPv6 connections. • BL-C131A only...over the Internet. 2. Ask your ISP or network administrator for both IPv4 and IPv6 connections. • Refer to the camera. • The default port number is displayed, click [Restart]. 134 Operating Instructions Under [Default Gateway], enter the IP address of the primary and secondary DNS servers ...

Operating Instructions
Page 140
... to the Camera If you are using previous versions of Windows XP using the following procedure. This feature is enabled for the camera by default. You can create a shortcut to use this feature. In order to the camera in your computer's [My Network Places] folder that will be automatically updated even if the camera's IP address changes...
... to the Camera If you are using previous versions of Windows XP using the following procedure. This feature is enabled for the camera by default. You can create a shortcut to use this feature. In order to the camera in your computer's [My Network Places] folder that will be automatically updated even if the camera's IP address changes...
Operating Instructions
Page 143
...the Setup Program may not be used only to your network. Change the camera name as needed (see Page 144). Enter the default gateway (the IP address of a camera's settings to find all cameras on the network and display their factory default settings. 4. Restore the settings saved in IPv6 mode..., the Setup Program can be able to find and confirm cameras on the LAN (other Setup...
...the Setup Program may not be used only to your network. Change the camera name as needed (see Page 144). Enter the default gateway (the IP address of a camera's settings to find all cameras on the network and display their factory default settings. 4. Restore the settings saved in IPv6 mode..., the Setup Program can be able to find and confirm cameras on the LAN (other Setup...
Operating Instructions
Page 144
... the IP address of your ISP or network administrator for more information. A dialog prompts you downloaded from the Panasonic Network Camera website and click [Open]. 5. Click [Save Settings to PC/Save Settings to update, then click [Execute]. • Only cameras which are compatible with the selected firmware file are not saved in a configuration file 1. Enter the default...
... the IP address of your ISP or network administrator for more information. A dialog prompts you downloaded from the Panasonic Network Camera website and click [Open]. 5. Click [Save Settings to PC/Save Settings to update, then click [Execute]. • Only cameras which are compatible with the selected firmware file are not saved in a configuration file 1. Enter the default...

Operating Instructions
Page 149
... (BL-C131A on- Communication Mode ly) Channel 802.11 b/g Auto SSID xxCONFIRM xxSpeed xxAuto Encryption No encryption UPnP™ Auto Port Forwarding Disable Display Shortcut Icon in My Net- 13.4 Default Setting List xxOLD SPxEx C 13.4 Default Setting List Basic Items Default Network Connection... No (Automatic Setup only) Network Configuration from Setup Enable Program (Static/DHCP only) Port No. 80 (Static/DHCP only) IP address (Static only) 192.168.0.253 Subnet Mask (Static only) 255.255.255.0 Host Name (DHCP only) (Blank) Default Gateway (Static/DHCP only) ...
... (BL-C131A on- Communication Mode ly) Channel 802.11 b/g Auto SSID xxCONFIRM xxSpeed xxAuto Encryption No encryption UPnP™ Auto Port Forwarding Disable Display Shortcut Icon in My Net- 13.4 Default Setting List xxOLD SPxEx C 13.4 Default Setting List Basic Items Default Network Connection... No (Automatic Setup only) Network Configuration from Setup Enable Program (Static/DHCP only) Port No. 80 (Static/DHCP only) IP address (Static only) 192.168.0.253 Subnet Mask (Static only) 255.255.255.0 Host Name (DHCP only) (Blank) Default Gateway (Static/DHCP only) ...

Operating Instructions
Page 151
... Transfer, No Memory - Disable - Single Camera Image Quality Standard - Display IP Address or Host Name Port No. Still Image Refresh Interval 30 s - Operating Instructions 151 Advanced Image Display Multi Camera Buffer/Transfer Operation Time Indicator Control Privacy Mode 13.4 Default Setting List Items Default Notes Single Camera Image Resolution 320 ´ 240 - Camera Name Checked - - - - Indicator Control...
... Transfer, No Memory - Disable - Single Camera Image Quality Standard - Display IP Address or Host Name Port No. Still Image Refresh Interval 30 s - Operating Instructions 151 Advanced Image Display Multi Camera Buffer/Transfer Operation Time Indicator Control Privacy Mode 13.4 Default Setting List Items Default Notes Single Camera Image Resolution 320 ´ 240 - Camera Name Checked - - - - Indicator Control...
Setup Guide
Page 1
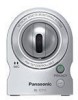
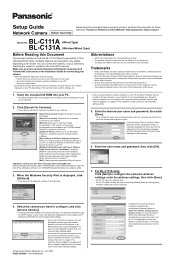
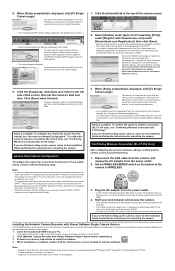
...default settings. © Panasonic System Networks Co., Ltd. 2006 PQQX15698XA KK1106MH2020 • Configure the camera for wireless access by entering its MAC address (see "Camera Diagrams" on page 2 in the Installation Guide to find your camera...3. For BL-C131A Only: Click [Next] to find your camera's MAC address label). 5. Panasonic Network Camera Website: http://panasonic.net/pcc/ipcam/ BL-C111A Model No. (Wired Type) BL-C131A (... future reference. Turn off the camera, then turn it again. of your router, click [Network Settings], then select [Specify an IP Address] or [DHCP] and ...
...default settings. © Panasonic System Networks Co., Ltd. 2006 PQQX15698XA KK1106MH2020 • Configure the camera for wireless access by entering its MAC address (see "Camera Diagrams" on page 2 in the Installation Guide to find your camera...3. For BL-C131A Only: Click [Next] to find your camera's MAC address label). 5. Panasonic Network Camera Website: http://panasonic.net/pcc/ipcam/ BL-C111A Model No. (Wired Type) BL-C131A (... future reference. Turn off the camera, then turn it again. of your router, click [Network Settings], then select [Specify an IP Address] or [DHCP] and ...
Setup Guide
Page 2
...camera's IP addresses for mounting the camera. Setup is the IP address you must have changed. If you select to WIRELESS. 3. If the program does not start the software. Note: • Network Camera Recorder with Viewer Software Single Camera Version is compatible with Panasonic Network Cameras, and is provided free of the camera...Save]. • When the dialog about the camera's port number changing is turned off by default on the Network Camera Setup Program window for general information, and refer to display camera images properly. The Viewnetcam.com website will ...
...camera's IP addresses for mounting the camera. Setup is the IP address you must have changed. If you select to WIRELESS. 3. If the program does not start the software. Note: • Network Camera Recorder with Viewer Software Single Camera Version is compatible with Panasonic Network Cameras, and is provided free of the camera...Save]. • When the dialog about the camera's port number changing is turned off by default on the Network Camera Setup Program window for general information, and refer to display camera images properly. The Viewnetcam.com website will ...
Service Manual
Page 22
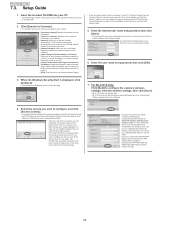
...and exits the Setup Program. • If you to view the included documentation. Select the camera you will not be able to your network. BL-C111A /BL-C131A 7.3. Click [Search for Cameras]. • The program searches for wireless access by selecting [Disable] and then clicking [Next... cameras which have not been configured yet or have a Panasonic BB-HGW700A Network Camera Control Unit, WEP settings will be entered manually. 22 PDF versions of the printed documentation are using the DHCP feature of your router, click [Network Settings], then select [Specify an IP ...
...and exits the Setup Program. • If you to view the included documentation. Select the camera you will not be able to your network. BL-C111A /BL-C131A 7.3. Click [Search for Cameras]. • The program searches for wireless access by selecting [Disable] and then clicking [Next... cameras which have not been configured yet or have a Panasonic BB-HGW700A Network Camera Control Unit, WEP settings will be entered manually. 22 PDF versions of the printed documentation are using the DHCP feature of your router, click [Network Settings], then select [Specify an IP ...

Service Manual
Page 23
... off by default on the CD-ROM. • You may have successfully set the camera's date and time. Disconnect the LAN cable from the camera, and unplug the AC adaptor from Internet Configuration". Start your camera over the ...IP address you select to register with Viewnetcam.com, click [Go to the operating instructions included with Panasonic Network Cameras, and is provided free of the screen, then set up the camera, return to your router must have a PPPoE or PPTP connection to the Installation Guide and follow the instructions for Access from the Internet. BL-C111A/BL...
... off by default on the CD-ROM. • You may have successfully set the camera's date and time. Disconnect the LAN cable from the camera, and unplug the AC adaptor from Internet Configuration". Start your camera over the ...IP address you select to register with Viewnetcam.com, click [Go to the operating instructions included with Panasonic Network Cameras, and is provided free of the screen, then set up the camera, return to your router must have a PPPoE or PPTP connection to the Installation Guide and follow the instructions for Access from the Internet. BL-C111A/BL...
Service Manual
Page 50
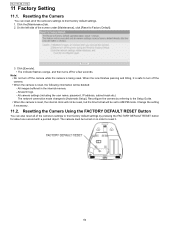
... [Automatic Setup]. All camera settings (including the user name, password, IP address, subnet mask etc.) The network connection mode changes to Factory Default]. 3. Note: • Do not turn off for about one second with a pointed object. The camera must be set to...camera by pressing the FACTORY DEFAULT RESET button for a few seconds. When the lens finishes panning and tilting, it . 50 BL-C111A /BL-C131A 11 Factory Setting 11.1. Resetting the Camera Using the FACTORY DEFAULT RESET Button You can reset all of the camera's settings to turn off the camera while the camera...
... [Automatic Setup]. All camera settings (including the user name, password, IP address, subnet mask etc.) The network connection mode changes to Factory Default]. 3. Note: • Do not turn off for about one second with a pointed object. The camera must be set to...camera by pressing the FACTORY DEFAULT RESET button for a few seconds. When the lens finishes panning and tilting, it . 50 BL-C111A /BL-C131A 11 Factory Setting 11.1. Resetting the Camera Using the FACTORY DEFAULT RESET Button You can reset all of the camera's settings to turn off the camera while the camera...
